Spring Security Hello World Java Config
Hello to all!
In this article we will try to write an application protected by Spring Security using Java Config (an approach based on the use of annotations and classes to set up the Spring context of the application) instead of XML.
')
It will be a very simple web application, Hello World based on Spring MVC and Spring Security. We will implement all settings using only Java classes, without a single line of configuration in XML.
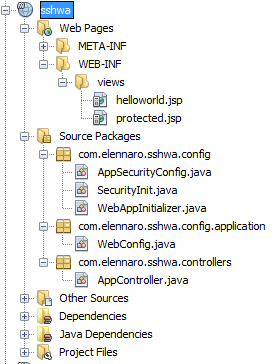
Let's start with a review of the project structure.
Next, we will look at configuring a Spring MVC controller.
Controller (
The controller will have one unprotected resource and two paths to resources, access to which is restricted by the administrator (admin) and super administrator (superadmin) roles. Here are the ways to these resources:
In each method, we create and return a Model (an instance of the
You need to tell the Spring framework where the presentation components are located, and how to display them. You also need to bind the security settings. All this can be done using the Java class annotated
WebConfig.java
Let's briefly review the code above:
Next, we will look directly at the security settings of Spring Security.
AppSecurityConfig.java
The most important role in the configuration is the class annotations:
The
In addition, here we register users with their roles, and then we specify the addresses of resources with limited access, the restrictions are specified by roles. User names and passwords, for simplicity, are listed directly in the code. Spring Security makes it easy to specify a different source for user data, such as a database. Note that the roles in the place where we assign them to the user are written without the
Now we have Security settings in AppSecurityConfig.java and MVC settings in WebConfig.java . You must make sure that the security settings are included in the main context of the application (in other words, I saw them and pulled in the Root Application Context). To do this, you can create a class that extends (inherits) AbstractAnnotationConfigDispatcherServletInitializer . We need to configure everything so that a specific URL pattern (the path to a specific resource) passes through a security level (it passes through a Spring Security filter check). The traditional approach involved setting up a servlet filter in which we would verify security credentials. With the advent of Setvlet 3.x, there is no longer any need to declare filters in web.xml, all customization can be done using Java classes. Just for this, we need
SecurityInit.java
For those familiar with the XML configuration, the above code is similar to the following:
We’ve finished setting up MVC and Spring Security. It remains to configure the Servlet Manager, which is responsible for initializing Spring MVC and mapping the URL of patterns. Again, we abandon the traditional configuration of the Servlet Manager via web.xml and use Java Classes.
WebAppInitializer.java
Here we set up the servlet mapping to “/” and therefore all requests will be intercepted by the Spring Servant Manager.
Note that our WebAppInitializer.java class inherits AbstractAnnotationConfigDispatcherservletinitializergetRootConfigClasses , replacing its
All ... It remains to register views and try to run the application.
helloworld.jsp
protected.jsp
Here it can be understood that the link to the logout URL is:
Spring Security will generate the login page itself.
Run the Application: http: // localhost: 8080 / sshwa / helloworld /
As we wanted, the / helloworld resource is unprotected
When we change the URL to http: // localhost: 8080 / sshwa / protected / Spring Security will redirect us to / login , with the default authentication form. If we enter the wrong username or password, error messages will be displayed, and Spring will redirect to the URL / login? Error.
For unauthorized users, Spring will first throw us into root ("/"), and the next time you try to access the resource with the wrong role, it will display a page with code 403 .
The full application code is available at:
github.com/elennaro/sshwa/tree/0.2-SNAPSHOT
I hope in the future I will have time to gradually develop this tutorial (in plans to transfer everything to Spring Boot, and when Spring Security 4.0 Release is released try to fasten the tests).
Based on material from the source: javahash.com/spring-security-hello-world-example . The code has been reworked, the text has been supplemented with seemingly useful comments.
This is my first material, I will try to take into account all the wishes and comments.
PS Thank you drno-reg , for finding an error during logout (the text and source codes were updated).
In this article we will try to write an application protected by Spring Security using Java Config (an approach based on the use of annotations and classes to set up the Spring context of the application) instead of XML.
Used Technologies
- Spring 4.0.5 Release
- Spring Boot 1.0.1
- Spring Security 3.2.3 Release
- Maven
- Tomcat 8
- Servlet Api 3.1
- Java 1.8
')
It will be a very simple web application, Hello World based on Spring MVC and Spring Security. We will implement all settings using only Java classes, without a single line of configuration in XML.
Let's start with a review of the project structure.
Project Structure
Maven dependencies (from pom.xml)
<dependencies> <dependency> <groupId>javax.servlet</groupId> <artifactId>javax.servlet-api</artifactId> <version>3.1.0</version> <scope>provided</scope> </dependency> <dependency> <groupId>javax.servlet.jsp</groupId> <artifactId>jsp-api</artifactId> <version>2.2</version> <scope>provided</scope> </dependency> <dependency> <groupId>org.springframework</groupId> <artifactId>spring-context</artifactId> <version>4.0.5.RELEASE</version> <type>jar</type> </dependency> <dependency> <groupId>org.springframework</groupId> <artifactId>spring-webmvc</artifactId> <version>4.0.5.RELEASE</version> <type>jar</type> </dependency> <!-- Add Spring Security --> <dependency> <groupId>org.springframework.security</groupId> <artifactId>spring-security-core</artifactId> <version>3.2.4.RELEASE</version> </dependency> <dependency> <groupId>org.springframework.security</groupId> <artifactId>spring-security-web</artifactId> <version>3.2.4.RELEASE</version> </dependency> <dependency> <groupId>org.springframework.security</groupId> <artifactId>spring-security-config</artifactId> <version>3.2.4.RELEASE</version> </dependency> <!-- Add Jstl Dependencies --> <dependency> <groupId>org.apache.taglibs</groupId> <artifactId>taglibs-standard-jstlel</artifactId> <version>1.2.1</version> </dependency> </dependencies> Next, we will look at configuring a Spring MVC controller.
Controller ( AppController.java )
package com.elennaro.sshwa.controllers; //Import section ommited... @Controller public class AppController { @RequestMapping(value = {"/", "/helloworld**"}, method = {RequestMethod.GET}) public ModelAndView welcomePage() { ModelAndView model = new ModelAndView(); model.addObject("title", "Spring Security Tutorial"); model.addObject("message", "Welcome Page !"); model.setViewName("helloworld"); return model; } @RequestMapping(value = "/protected**", method = RequestMethod.GET) public ModelAndView protectedPage() { ModelAndView model = new ModelAndView(); model.addObject("title", "Spring Security 3.2.4 Hello World Tutorial"); model.addObject("message", "This is protected page - Only for Admin Users!"); model.setViewName("protected"); return model; } @RequestMapping(value = "/confidential**", method = RequestMethod.GET) public ModelAndView adminPage() { ModelAndView model = new ModelAndView(); model.addObject("title", "Spring Security 3.2.4 Hello World Tutorial"); model.addObject("message", "This is confidential page - Need Super Admin Role!"); model.setViewName("protected"); return model; } } The controller will have one unprotected resource and two paths to resources, access to which is restricted by the administrator (admin) and super administrator (superadmin) roles. Here are the ways to these resources:
- / helloword will have public access, no security restrictions will be applied to it.
- / protected area with limited access, only users with the administrator role (admin) will have access to it.
- / confidential area with limited access, only users with the role of super administrator will have access to it.
In each method, we create and return a Model (an instance of the
ModelAndView class). The name of the view component is also specified in the model. To bind the names of the components of the view (with your permission, I will call the components of the view generically views, from the English View) to specific display files (in our case, the JSP files), you need to register the class with the WebConfig.java settings. The class description is presented below.Customize Spring MVC (WebConfig.java)
You need to tell the Spring framework where the presentation components are located, and how to display them. You also need to bind the security settings. All this can be done using the Java class annotated
@Configuration (in the future we will call such classes configuration).WebConfig.java
package com.elennaro.sshwa.config.application; //Import section ommited... @Configuration @EnableWebMvc @ComponentScan({ "com.elennaro.sshwa.config", "com.elennaro.sshwa.controllers" }) //@Import({ AppSecurityConfig.class }) public class WebConfig { @Bean public InternalResourceViewResolver viewResolver() { InternalResourceViewResolver viewResolver = new InternalResourceViewResolver(); viewResolver.setViewClass(JstlView.class); viewResolver.setPrefix("/WEB-INF/views/"); viewResolver.setSuffix(".jsp"); return viewResolver; } } Let's briefly review the code above:
- We declare the configuration class (using the
@Configurationannotation). - Using the
@ComponentScanannotation,@ComponentScanspecify the Spring framework that components should be searched inside thecom.elennaro.sshwa.configandcom.elennaro.sshwa.controllers. Here, experts advise: it is better to always indicate specific packages, and not all at once with the help of*. That is, we could specify all the packages:com.elennaro.sshwa.*And everything would work. But if we appeared elsewhere in the same@ComponentScanwe would at best re-scan all the packages twice, and at worst stumbled upon a couple of unpleasant errors ... - Specify that the views will be in the directory
/WEB-INF/views/ - We import the class with the security settings, the Spring Security configurator itself (using the
@Import({ AppSecurityConfig.class }))annotation@Import({ AppSecurityConfig.class })). This line is specially commented out in the code. I wanted to show that the class with security settings (AppSecurityConfig.java) checked (as you will see below) with the@Configurationannotation will be automatically found and connected to the framework Spring application, because the path to the package containing the AppSecurityConfig classAppSecurityConfigspecified in the@ComponentScanannotation. Thanks to this, Spring will find and connect the configuration class automatically. - Note that the
AppController.javacontroller itself will also fall under the component scan, since the path to the package containing it is specified in@ComponentScan({ "com.elennaro.sshwa.config", "com.elennaro.sshwa.controllers" })and annotation@Controlleris listed for this class.
Next, we will look directly at the security settings of Spring Security.
Security Settings (Spring Security - AppSecurityConfig.java, SecurityInit.java)
AppSecurityConfig.java
package com.elennaro.sshwa.config; //Import section ommited... @Configuration @EnableWebSecurity public class AppSecurityConfig extends WebSecurityConfigurerAdapter { @Autowired public void configureGlobal(AuthenticationManagerBuilder auth) throws Exception { auth.inMemoryAuthentication().withUser("user").password("user").roles("USER"); auth.inMemoryAuthentication().withUser("admin").password("admin").roles("ADMIN"); auth.inMemoryAuthentication().withUser("superadmin").password("superadmin").roles("SUPERADMIN"); } @Override protected void configure(HttpSecurity http) throws Exception { http.authorizeRequests() .antMatchers("/protected/**").access("hasRole('ROLE_ADMIN')") .antMatchers("/confidential/**").access("hasRole('ROLE_SUPERADMIN')") .and().formLogin().defaultSuccessUrl("/", false); } } The most important role in the configuration is the class annotations:
@Configuration@EnableWebSecurity.
The
@EnableWebSecurity in conjunction with the WebSecurityConfigurerAdapter class, is working on providing authentication. By default, HTTP authentication and web-based authentication are built into and active in Spring Security.In addition, here we register users with their roles, and then we specify the addresses of resources with limited access, the restrictions are specified by roles. User names and passwords, for simplicity, are listed directly in the code. Spring Security makes it easy to specify a different source for user data, such as a database. Note that the roles in the place where we assign them to the user are written without the
ROLE_ prefix, while specifying the access test expressions in the access method, in which we, using the spring expression language ( SPEL ) (in our case, checking the role of the user hasRole('ROLE_ ') ), we write the role with the prefix ROLE_ . Another little trick to authenticate: defaultSuccessUrl("/", false) , setting the second parameter ( alwaysUse ) to false tells Spring Security that if it is successful, you can redirect the user to the page from which he came to the authentication page.Now we have Security settings in AppSecurityConfig.java and MVC settings in WebConfig.java . You must make sure that the security settings are included in the main context of the application (in other words, I saw them and pulled in the Root Application Context). To do this, you can create a class that extends (inherits) AbstractAnnotationConfigDispatcherServletInitializer . We need to configure everything so that a specific URL pattern (the path to a specific resource) passes through a security level (it passes through a Spring Security filter check). The traditional approach involved setting up a servlet filter in which we would verify security credentials. With the advent of Setvlet 3.x, there is no longer any need to declare filters in web.xml, all customization can be done using Java classes. Just for this, we need
AbstractAnnotationConfigDispatcherServletInitializer .SecurityInit.java
package com.elennaro.sshwa.config; //Import section ommited... public class SecurityInit extends AbstractSecurityWebApplicationInitializer { } For those familiar with the XML configuration, the above code is similar to the following:
<filter> <filter-name>springSecurityFilterChain</filter-name> <filter-class> org.springframework.web.filter.DelegatingFilterProxy </filter-class> </filter> <filter-mapping> <filter-name>springSecurityFilterChain</filter-name> <url-pattern>/*</url-pattern> <dispatcher>ERROR</dispatcher> <dispatcher>REQUEST</dispatcher> </filter-mapping> We’ve finished setting up MVC and Spring Security. It remains to configure the Servlet Manager, which is responsible for initializing Spring MVC and mapping the URL of patterns. Again, we abandon the traditional configuration of the Servlet Manager via web.xml and use Java Classes.
Configuring the Servlet Manager (WebAppInitializer.java)
WebAppInitializer.java
package com.elennaro.sshwa.config; //Import section ommited... public class WebAppInitializer extends AbstractAnnotationConfigDispatcherServletInitializer{ @Override protected Class<?>[] getRootConfigClasses() { return new Class[] {WebConfig.class}; // We dont need any special servlet config yet. } @Override protected Class<?>[] getServletConfigClasses() { return null; } @Override protected String[] getServletMappings() { return new String[] {"/"}; } } Here we set up the servlet mapping to “/” and therefore all requests will be intercepted by the Spring Servant Manager.
Note that our WebAppInitializer.java class inherits AbstractAnnotationConfigDispatcherservletinitializergetRootConfigClasses , replacing its
getRootConfigClasses method so that we return the WebConfig.class application settings class.All ... It remains to register views and try to run the application.
Views (Views)
helloworld.jsp
<%@ page language="java" contentType="text/html; charset=UTF-8" pageEncoding="UTF-8"%> <html> <head> <base href="${pageContext.request.scheme}://${pageContext.request.serverName}:${pageContext.request.serverPort}${pageContext.request.contextPath}/" /> <meta http-equiv="Content-Type" content="text/html; charset=UTF-8"> <title>Hello World</title> </head> <body> <header> <h1>Title : ${title}</h1> </header> <section> <h1>Message : ${message}</h1> </section> <div>Get <a href="protected">protected</a> resource for admin.</div> <div>Get <a href="confidential">confidential</a> resource for superadmin.</div> <footer> <div>Updated by Alex Art from <a href="https://in2circle.com" target="_blank">in2circle.com</a></div> </footer> </body> </html> protected.jsp
<%@ page isELIgnored="false" %> <%@ page language="java" contentType="text/html; charset=UTF-8" pageEncoding="UTF-8"%> <%@ taglib prefix="c" uri="http://java.sun.com/jsp/jstl/core" %> <html> <head> <base href="${pageContext.request.scheme}://${pageContext.request.serverName}:${pageContext.request.serverPort}${pageContext.request.contextPath}/" /> <meta http-equiv="Content-Type" content="text/html; charset=UTF-8"> <title>Protected page</title> </head> <body> <h1>Title : ${title}</h1> <h1>Message : ${message}</h1> <c:if test="${pageContext.request.userPrincipal.name != null}"> <h2>Welcome : ${pageContext.request.userPrincipal.name} <%--@elvariable id="_csrf" type="org.springframework.web.bind.MissingServletRequestParameterException"--%> <c:url var="logoutUrl" value="/logout" /> <form action="${logoutUrl}" id="logout" method="post"> <input type="hidden" name="${_csrf.parameterName}" value="${_csrf.token}" /> <input type="submit" name="submit" value="Log Out"> </form> </c:if> </h2> <div>Get <a href="protected">protected</a> resource for admin.</div> <div>Get <a href="confidential">confidential</a> resource for superadmin.</div> <footer> <div>Updated by Alex Art from <a href="https://in2circle.com" target="_blank">in2circle.com</a></div> </footer> </body> </html> Here it can be understood that the link to the logout URL is:
logout and that by default the type of logout of the request must be POST and the request of logout must contain csrf token.Spring Security will generate the login page itself.
The finish.
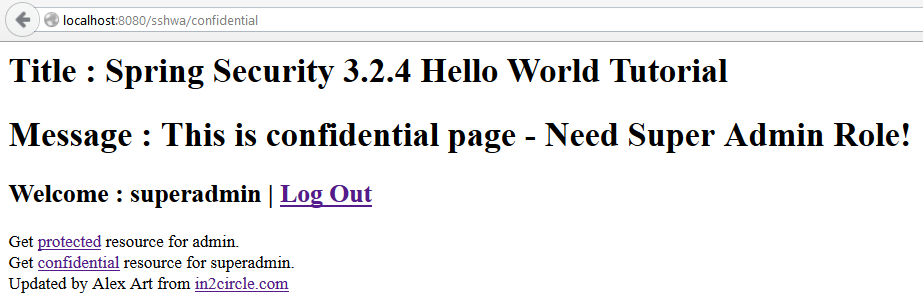
Run the Application: http: // localhost: 8080 / sshwa / helloworld /
As we wanted, the / helloworld resource is unprotected
When we change the URL to http: // localhost: 8080 / sshwa / protected / Spring Security will redirect us to / login , with the default authentication form. If we enter the wrong username or password, error messages will be displayed, and Spring will redirect to the URL / login? Error.
For unauthorized users, Spring will first throw us into root ("/"), and the next time you try to access the resource with the wrong role, it will display a page with code 403 .
The full application code is available at:
github.com/elennaro/sshwa/tree/0.2-SNAPSHOT
I hope in the future I will have time to gradually develop this tutorial (in plans to transfer everything to Spring Boot, and when Spring Security 4.0 Release is released try to fasten the tests).
Based on material from the source: javahash.com/spring-security-hello-world-example . The code has been reworked, the text has been supplemented with seemingly useful comments.
This is my first material, I will try to take into account all the wishes and comments.
PS Thank you drno-reg , for finding an error during logout (the text and source codes were updated).
Source: https://habr.com/ru/post/226791/
All Articles