Spring MVC - JavaConfig or project configuration without XML files
Good day, dear habravchane. Somehow I had to write a small project, since I had the opportunity to freely select technologies, I decided to use the Spring Framework . Immediately I want to say that I am not a guru in this framework, and I will be grateful for the edits.
A little searching on Habré, I could not find exactly what I want to tell you now and demonstrate. Therefore, I decided to write a post on this topic. It will be about JavaConfig , namely how to configure the Spring MVC project without using * .xml configurations, for example: (mvc-dispatcher-servlet.xml).
There is some good stuff on Spring MVC here and here , but these examples use xml configurations. I want to show how to create a Spring MVC project structure using JavaConfig .
JavaConfig is an alternative to the XML configuration we are used to, but using not the xml markup, but the Java syntax.
I like to use JavaConfig, first of all because it is Java, we see java code, which is convenient, secondly, most configuration errors can be caught at the time of writing the configuration; my favorite IDE will help you in my case, this is Intellij IDEA, but even if the IDE says it's cool, then you have a chance to catch a configuration error at the time of compilation.
')
1. The main advantage, in my opinion, is Java syntax;
2. You get all the features of IDE in relation to working with the code, automatic code generation, auto-support of values, hints, etc .;
3. More flexibility through the use of objects and their methods;
4. There is no need for a complete assembly and deployment of the project in order to catch a malfunction in the xml configuration. (but there are exceptions, for example: NullPointerException ).
JavaConfig used to exist as a separate project, but since Spring Core 3.0, this project has become part of the core project. Now in order to be able to write a configuration using JavaConfig, it is enough to use Spring Core 3+
First, let's look at the structure and configuration of the Spring MVC project using XML configurations, and then we will translate it into JavaConfig.
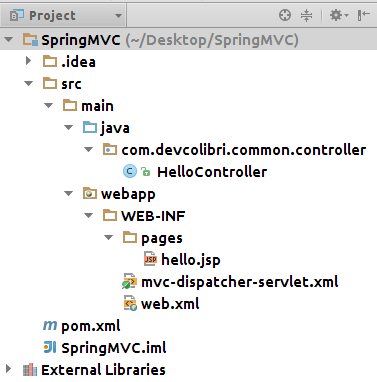
Here is the structure of the project:
Let's start by adding dependencies to pom.xml :
Now create a simple jsp page index.jsp :
And the last thing that does not concern the configuration is the HelloController.java controller:
Now we have everything we need to get a working Spring MVC project, in addition to the configuration. Next we look at it.
Please note that I do not explain all the details of the Spring MVC project, since the wound on the habr has already been posted on this issue.
Now let's look at how to configure a project using an XML file. Let's start with mvc-dispatcher-servlet.xml , this is the file that will configure our project, mainly here we describe all our beans .
Contents of the mvc-dispatcher-servlet.xml file:
In this configuration, we specify where to look for all our controllers, services, and other components using the: context: component-scan tag, and also initialize the InternalResourceViewResolver, which is responsible for showing the View in our case, this is the jsp page.
Since JavaConfig is a simple java class, we will create a config package for them as shown in Figure. below, and also here is our new project structure without web.xml and mvc-dispatcher-servlet.xml .
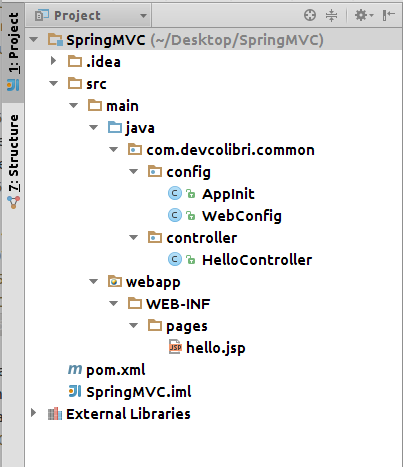
As can be seen from the project structure, we have two classes in the config package, and they are the replacement for the xml configuration.
Let's start with WebConfig :
@Configuration - this annotation itself says that this class is a Java Configuration ;
@EnableWebMvc - this annotation allows our project to use MVC;
@ComponentScan (“com.devcolibri.common”) - similar to the component-scan that was in mvc-dispatcher-servlet.xml , tells where to look for the components of the project.
Bean indicates that this is the initialization of the bean, and it will be created using the DI.
WebMvcConfigurerAdapter - inheriting from this class we will be able to configure ResourceLocations .
addResourceHandlers (ResourceHandlerRegistry registry) - by redefining this method we will be able to specify where our project resources will lie, such as css, image, js, and others.
InternalResourceViewResolver is a similar configuration with mvc-dispatcher-servlet.xml.
Now we need to register the configuration in the Spring Context; this will allow us to make our AppInit class:
Two more dependencies need to be added to pom.xml:
And now we need to add maven-war-plugin with the help of which we can disable the need for a web.xml file.
That's all. I hope this material was useful.
ps I'm not a guru, and I will be glad to edit the code.
A little searching on Habré, I could not find exactly what I want to tell you now and demonstrate. Therefore, I decided to write a post on this topic. It will be about JavaConfig , namely how to configure the Spring MVC project without using * .xml configurations, for example: (mvc-dispatcher-servlet.xml).
There is some good stuff on Spring MVC here and here , but these examples use xml configurations. I want to show how to create a Spring MVC project structure using JavaConfig .
What is JavaConfig?
JavaConfig is an alternative to the XML configuration we are used to, but using not the xml markup, but the Java syntax.
I like to use JavaConfig, first of all because it is Java, we see java code, which is convenient, secondly, most configuration errors can be caught at the time of writing the configuration; my favorite IDE will help you in my case, this is Intellij IDEA, but even if the IDE says it's cool, then you have a chance to catch a configuration error at the time of compilation.
')
Benefits:
1. The main advantage, in my opinion, is Java syntax;
2. You get all the features of IDE in relation to working with the code, automatic code generation, auto-support of values, hints, etc .;
3. More flexibility through the use of objects and their methods;
4. There is no need for a complete assembly and deployment of the project in order to catch a malfunction in the xml configuration. (but there are exceptions, for example: NullPointerException ).
JavaConfig used to exist as a separate project, but since Spring Core 3.0, this project has become part of the core project. Now in order to be able to write a configuration using JavaConfig, it is enough to use Spring Core 3+
Standard XML configuration
First, let's look at the structure and configuration of the Spring MVC project using XML configurations, and then we will translate it into JavaConfig.
Here is the structure of the project:
Let's start by adding dependencies to pom.xml :
<properties> <spring.version>3.2.9.RELEASE</spring.version> </properties> <dependencies> <dependency> <groupId>org.springframework</groupId> <artifactId>spring-core</artifactId> <version>${spring.version}</version> </dependency> <dependency> <groupId>org.springframework</groupId> <artifactId>spring-web</artifactId> <version>${spring.version}</version> </dependency> <dependency> <groupId>org.springframework</groupId> <artifactId>spring-webmvc</artifactId> <version>${spring.version}</version> </dependency> </dependencies> Now create a simple jsp page index.jsp :
<html> <body> <h1>Message : ${message}</h1> </body> </html> And the last thing that does not concern the configuration is the HelloController.java controller:
package com.devcolibri.common.controller; import org.springframework.stereotype.Controller; import org.springframework.ui.ModelMap; import org.springframework.web.bind.annotation.RequestMapping; import org.springframework.web.bind.annotation.RequestMethod; @Controller @RequestMapping("/welcome") public class HelloController { @RequestMapping(method = RequestMethod.GET) public String printWelcome(ModelMap model) { model.addAttribute("message", "Spring 3 MVC - Hello World"); return "hello"; } } Now we have everything we need to get a working Spring MVC project, in addition to the configuration. Next we look at it.
Please note that I do not explain all the details of the Spring MVC project, since the wound on the habr has already been posted on this issue.
Now let's look at how to configure a project using an XML file. Let's start with mvc-dispatcher-servlet.xml , this is the file that will configure our project, mainly here we describe all our beans .
Contents of the mvc-dispatcher-servlet.xml file:
<beans xmlns="http://www.springframework.org/schema/beans" xmlns:context="http://www.springframework.org/schema/context" xmlns:xsi="http://www.w3.org/2001/XMLSchema-instance" xsi:schemaLocation=" http://www.springframework.org/schema/beans http://www.springframework.org/schema/beans/spring-beans-3.0.xsd http://www.springframework.org/schema/context http://www.springframework.org/schema/context/spring-context-3.0.xsd"> <context:component-scan base-package="com.devcolibri.common.controller" /> <bean class="org.springframework.web.servlet.view.InternalResourceViewResolver"> <property name="prefix"> <value>/WEB-INF/pages/</value> </property> <property name="suffix"> <value>.jsp</value> </property> </bean> </beans> In this configuration, we specify where to look for all our controllers, services, and other components using the: context: component-scan tag, and also initialize the InternalResourceViewResolver, which is responsible for showing the View in our case, this is the jsp page.
JavaConfig configuration
Since JavaConfig is a simple java class, we will create a config package for them as shown in Figure. below, and also here is our new project structure without web.xml and mvc-dispatcher-servlet.xml .
As can be seen from the project structure, we have two classes in the config package, and they are the replacement for the xml configuration.
Let's start with WebConfig :
package com.devcolibri.common.config; import org.springframework.context.annotation.Bean; import org.springframework.context.annotation.ComponentScan; import org.springframework.context.annotation.Configuration; import org.springframework.web.servlet.config.annotation.EnableWebMvc; import org.springframework.web.servlet.config.annotation.ResourceHandlerRegistry; import org.springframework.web.servlet.config.annotation.WebMvcConfigurerAdapter; import org.springframework.web.servlet.view.InternalResourceViewResolver; import org.springframework.web.servlet.view.JstlView; @Configuration @EnableWebMvc @ComponentScan("com.devcolibri.common") public class WebConfig extends WebMvcConfigurerAdapter { @Override public void addResourceHandlers(ResourceHandlerRegistry registry) { registry.addResourceHandler("/WEB-INF/pages/**").addResourceLocations("/pages/"); } @Bean public InternalResourceViewResolver setupViewResolver() { InternalResourceViewResolver resolver = new InternalResourceViewResolver(); resolver.setPrefix("/WEB-INF/pages/"); resolver.setSuffix(".jsp"); resolver.setViewClass(JstlView.class); return resolver; } } Annotations:
@Configuration - this annotation itself says that this class is a Java Configuration ;
@EnableWebMvc - this annotation allows our project to use MVC;
@ComponentScan (“com.devcolibri.common”) - similar to the component-scan that was in mvc-dispatcher-servlet.xml , tells where to look for the components of the project.
Bean indicates that this is the initialization of the bean, and it will be created using the DI.
Configuration
WebMvcConfigurerAdapter - inheriting from this class we will be able to configure ResourceLocations .
addResourceHandlers (ResourceHandlerRegistry registry) - by redefining this method we will be able to specify where our project resources will lie, such as css, image, js, and others.
InternalResourceViewResolver is a similar configuration with mvc-dispatcher-servlet.xml.
<bean class="org.springframework.web.servlet.view.InternalResourceViewResolver"> <property name="prefix"> <value>/WEB-INF/pages/</value> </property> <property name="suffix"> <value>.jsp</value> </property> </bean> Now we need to register the configuration in the Spring Context; this will allow us to make our AppInit class:
package com.devcolibri.common.config; import org.springframework.web.servlet.support.AbstractAnnotationConfigDispatcherServletInitializer; public class AppInit extends AbstractAnnotationConfigDispatcherServletInitializer { // Beans // @Bean @Override protected Class<?>[] getRootConfigClasses() { return new Class<?>[]{ WebConfig.class }; } // , ViewResolver @Override protected Class<?>[] getServletConfigClasses() { return new Class<?>[]{ WebConfig.class }; } @Override protected String[] getServletMappings() { return new String[]{"/"}; } } Add necessary dependencies and plugins
Two more dependencies need to be added to pom.xml:
<dependency> <groupId>javax.servlet</groupId> <artifactId>javax.servlet-api</artifactId> <version>3.0.1</version> </dependency> <dependency> <groupId>jstl</groupId> <artifactId>jstl</artifactId> <version>1.2</version> </dependency> And now we need to add maven-war-plugin with the help of which we can disable the need for a web.xml file.
<plugin> <groupId>org.apache.maven.plugins</groupId> <artifactId>maven-war-plugin</artifactId> <configuration> <failOnMissingWebXml>false</failOnMissingWebXml> </configuration> </plugin> That's all. I hope this material was useful.
ps I'm not a guru, and I will be glad to edit the code.
Source: https://habr.com/ru/post/226663/
All Articles