Tesla coil from hozmag
Having a pathological craving for sanitary fittings, I can’t train myself to use it for its intended purpose. There are always ideas about what to make from pipes, fittings and adapters so that they never use them in plumbing. It happened this time. We make Tesla high-voltage generator on the sanitary fittings.
Why such a choice? Everything is very simple. I am a supporter of elegant and repeatable technical solutions. Minimum fitter, debugging, dopilki, doklepki. Life should make you happy with ease of decision and grace of form.
The store turned everything in stock and the purchase took just a few minutes.
')
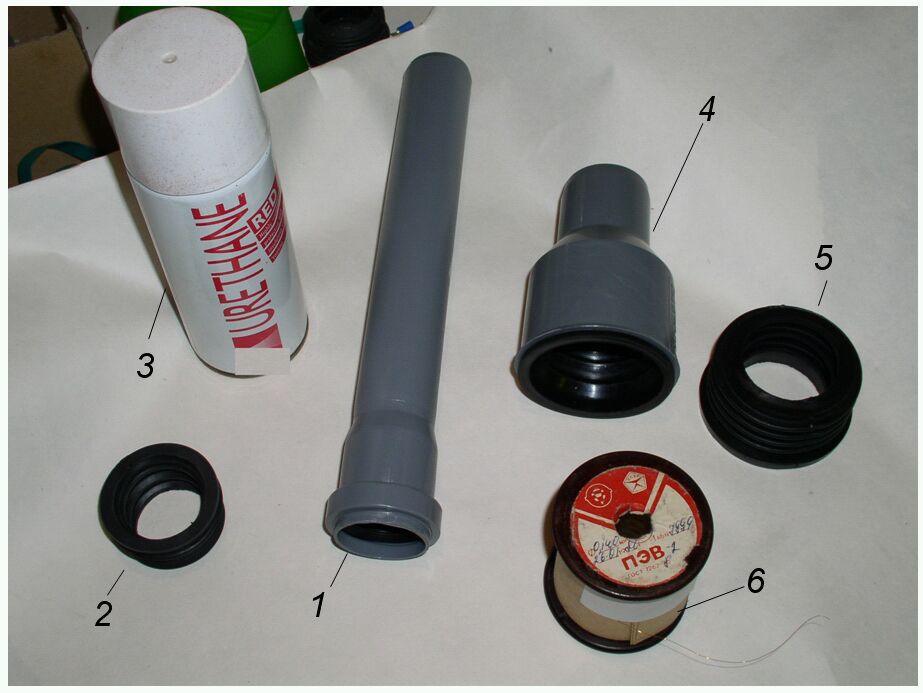
The picture is all that is needed. I quote the original names from the store labels.
1. Pipe 40x0.25m
2. Adapter ring on tube 40mm
3. High-voltage varnish (was in the arsenal)
4. Coupling transition to the smooth end of a cast-iron pipe 50mm
5. Rubber cuff 50mm
6. Copper wire 0,14mm PEV-2 (from old stocks)
The cost of all accessories is about 200 rubles. When buying, it is better to choose a bigger store, so as not to explain to the guards and managers why you connect unmatched elements with each other and how to help you find what you need. We also need a few more inexpensive parts, which are a little later. But first, let's digress a little ...
A lot has been said about Tesla and different things, but most people (including me) are unanimous in their opinion - Tesla has done a good deal for the development of science and technology for its time. Many of his patents have been realized, some of them still remain beyond the comprehension of the essence. But the main merit of Tesla can be considered the study of the nature of electricity. Especially high voltage. Tesla impressed his friends and colleagues with amazing experiments in which he easily controlled the high-voltage generators, which produced hundreds of thousands and sometimes millions of volts. In this article I describe the production of a Tesla miniature generator, whose theory has been studied quite well and in detail. And now to the point!
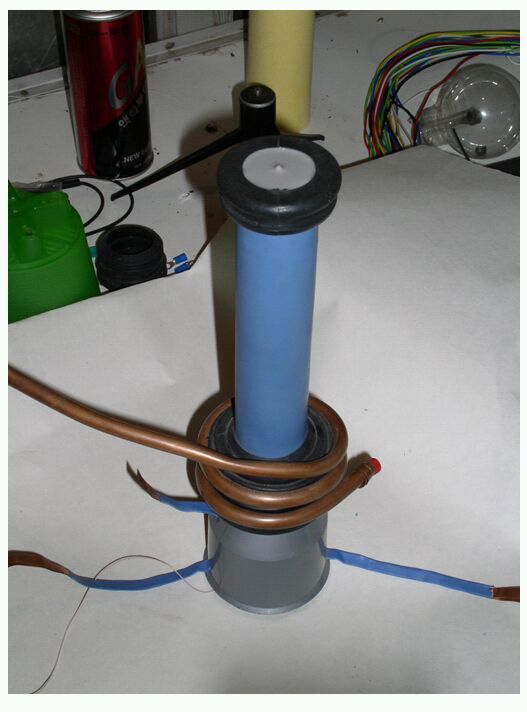
In the end, we have to assemble our device as shown in the photo:
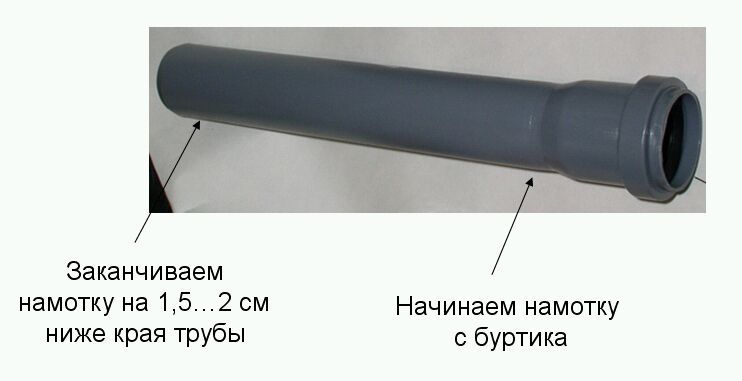
We wind the main high-voltage coil on the tube with a wire of 0.1-0.15 mm. I had in stock a wire of 0.14 mm. This is perhaps the most boring thing. Winding should be done as carefully as possible, turn to turn. You can use a snap, but I wrapped the coils by hand. By the way, I always do something in at least two copies. Why? First, the skill. The second product turns out to be just candy, and there is always a person who starts begging for the device (give, sell, let him use, etc.). I give the first, the second remains in the collection, the eye rejoices, the friendship grows stronger, the harmony in the world increases.
The next important step is the isolation of a high-voltage coil. I will not say that it is necessary to soak the coil 20 times with wax, to wrap with varnished cloth or to apply digestion in oil. All this Kolchak approaches. We are modern people, so we use high-voltage varnish (see the first photo. I do not indicate the brand of varnish, you can google it) and a wide shrink. Varnish covered in two - three layers. Dry the layer for at least 20-30 minutes. The varnish is applied perfectly. The result is great! The coil just becomes eternal! The cost of lacquer is not great. Three hundred rubles balloon. I think enough for a dozen of these devices. BUT!!!
Varnish was VERY TOXIC! Literally a minute later my head ached and the cat started vomiting. Work had to be stopped. The room is urgently aired, the application of varnish to stop. Urgently had to run to the store. I need to buy a beer, and a milk cat, to recover from the poisoning:

For good lacquering it is necessary to carry out under the hood, but (after saving myself and the cat) I did it on the street. The good weather had, there was no wind and dust, and the rain did not pour. Then it is necessary to put on a wide shrink and shrink the coil with a heat gun. This should be done carefully, from the middle to the edges. It should turn out tight and smooth.
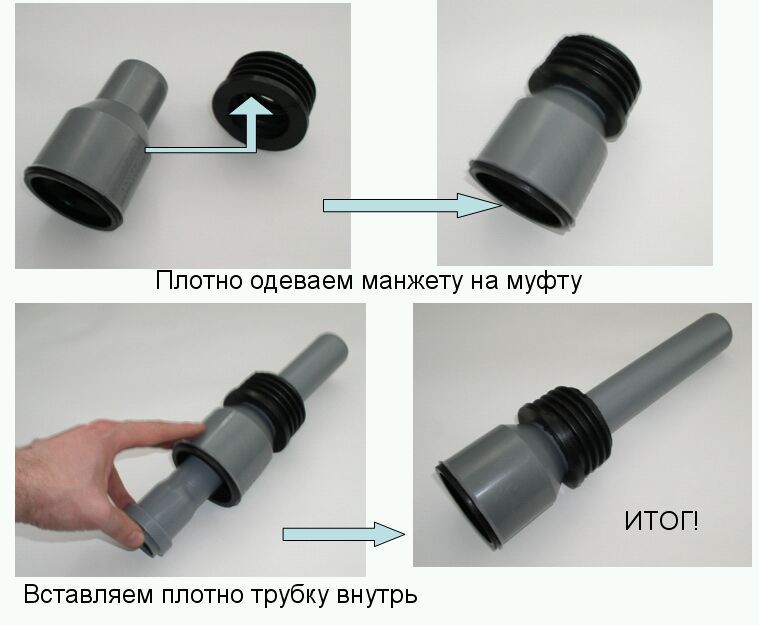
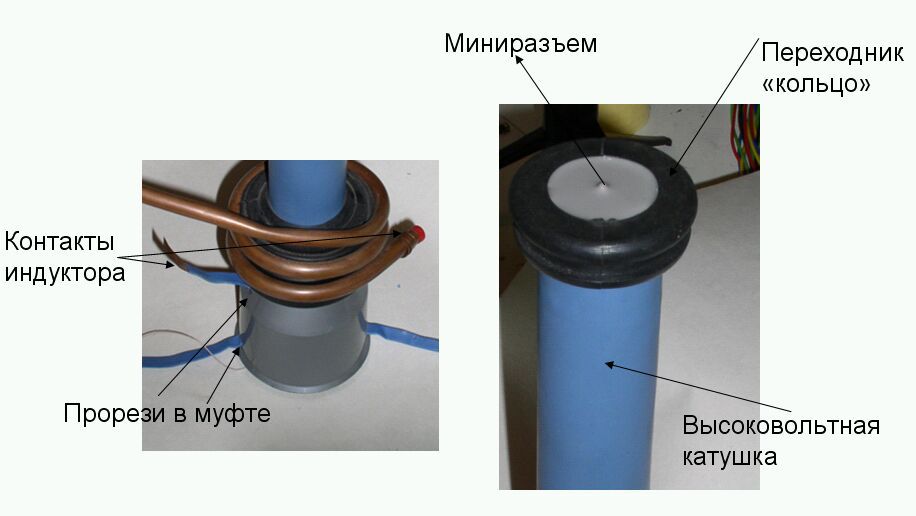
Perhaps the most important part of the generator. I analyzed many constructions of similar devices and many authors make the same mistake. First, rather thin wire is used, second, there is no uniform and significant (at least 1 cm) gap with a high-voltage coil and many turns are used. It is absolutely not necessary. Enough 2..4-x turns in the first third of the high-voltage coil. For the inductor, we use a hollow copper annealed tube with a diameter of 8 mm, which ensures minimal inductance and simply excellent generator characteristics during operation. Three turns are wound on the rubber cuff in the slots. To prevent the tube from wringing, fill it tightly with fine sand. After gently pour the sand. After collecting the whole structure, everything should look like in the photo:
Copper tube, perhaps the most expensive position in this homemade. Already as much as 150 rubles. Purchased also in hozmage.
Subtleties associated with the design of the contacts of the inductor. They are made of annealed copper strip and shrink closed. This provides the minimum inductance of the structure, which is very important. Contacts are hidden inside the coupling. All connections should be as short as possible and made with wide copper ribbons, which reduces various losses. On the top of the device we put on the adapter-ring, which presses the copper round contact, on which the upper pin of the high-voltage coil is soldered. The design at the top is poured by liquid rubber. In the center of the displayed mini-jack.
There are approximately 2 million ways to power such a device. Let us dwell on the simplest - using the scheme shown in this figure:
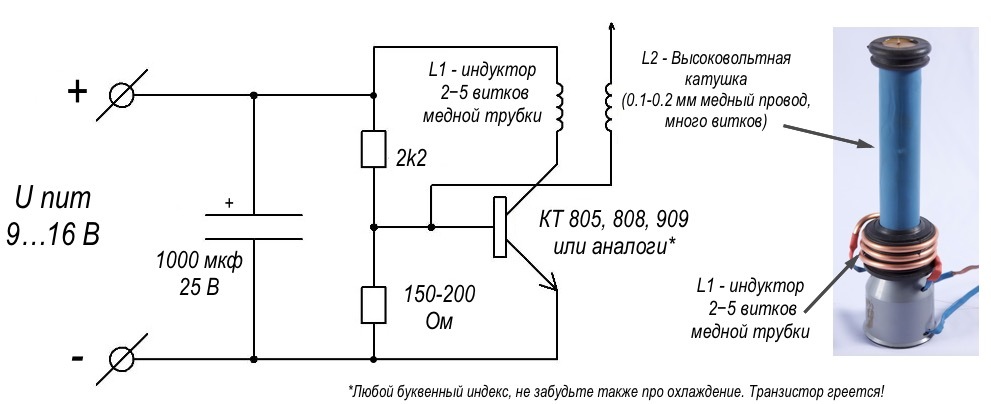
You will need a pair of resistors, a capacitor, a transistor, do not forget to put on the radiator. Ratings are indicated. The resource of the circuit, I think, is not great, but given the cheapness of transistors and the urgency of the desire to see the result, this is no longer counted.
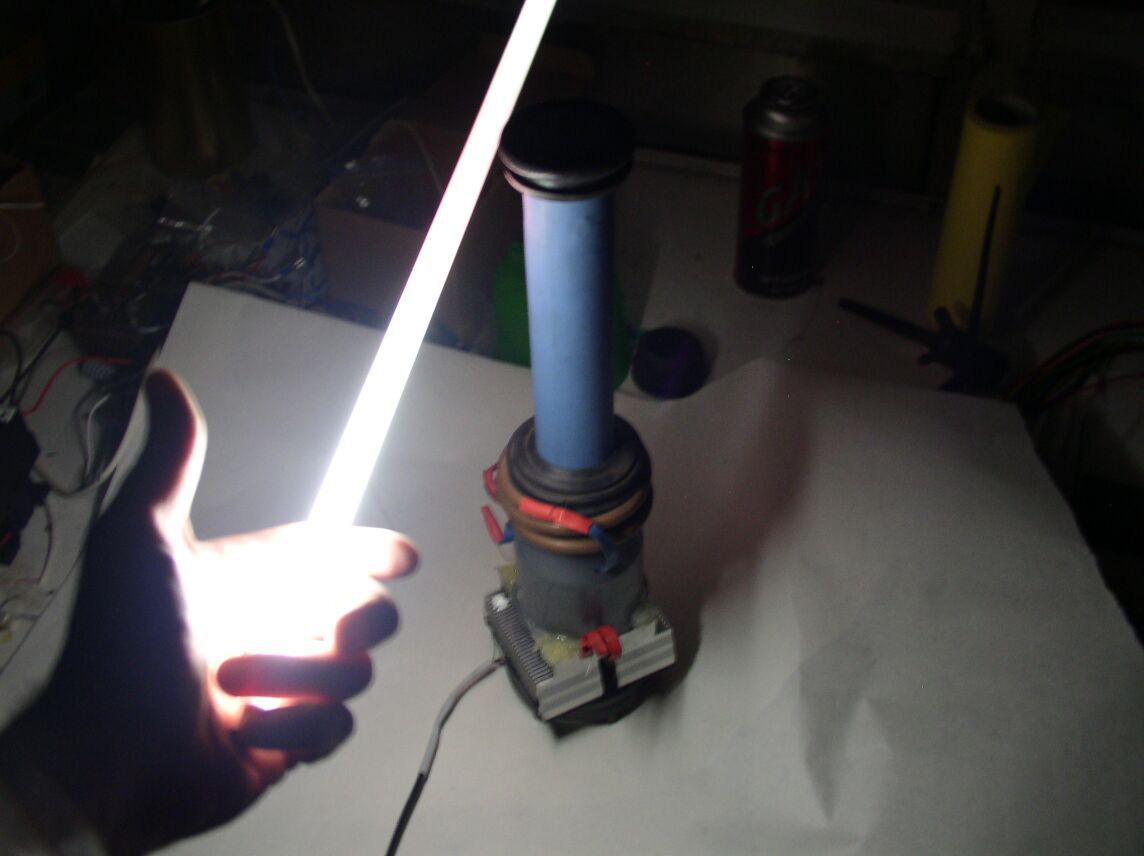
If everything is collected correctly, the scheme will work immediately. If there is no generation, then switch the inductor contacts in reverse. It worked right away. Generation starts at 5-7 volts. Already at 6 volts, the generation is steady, at 12 volts everything burns around. In the photo you can see that the whole structure is blown by the fan, since the transistor is pretty hot, although it is placed on the radiator. Surprisingly, the circuit is very reliable. At 12 volts it works for hours and is very stable. When the light is off and the "dead" light bulb shines brightly. The power source for the coil is better to take more powerful (with an output current of at least 2-3 amperes).
Video of the device can be viewed here .
Let's not forget about security. Such devices within a radius of up to 2-3 meters can easily disable thin electronics, such as a mobile phone, electronic watch on a hand, etc. A high-frequency high-voltage generator influences a person weakly due to the “skin effect”, but still be careful. Children, cats, birds, and unbalanced citizens should be at some distance from such devices when they are turned on.
Remember this!
PS - At the request of some readers add a video with some details of the design of the coil. The video is available here .
Why such a choice? Everything is very simple. I am a supporter of elegant and repeatable technical solutions. Minimum fitter, debugging, dopilki, doklepki. Life should make you happy with ease of decision and grace of form.
What is needed?
The store turned everything in stock and the purchase took just a few minutes.
')
The picture is all that is needed. I quote the original names from the store labels.
1. Pipe 40x0.25m
2. Adapter ring on tube 40mm
3. High-voltage varnish (was in the arsenal)
4. Coupling transition to the smooth end of a cast-iron pipe 50mm
5. Rubber cuff 50mm
6. Copper wire 0,14mm PEV-2 (from old stocks)
The cost of all accessories is about 200 rubles. When buying, it is better to choose a bigger store, so as not to explain to the guards and managers why you connect unmatched elements with each other and how to help you find what you need. We also need a few more inexpensive parts, which are a little later. But first, let's digress a little ...
Tesla coils and all that.
A lot has been said about Tesla and different things, but most people (including me) are unanimous in their opinion - Tesla has done a good deal for the development of science and technology for its time. Many of his patents have been realized, some of them still remain beyond the comprehension of the essence. But the main merit of Tesla can be considered the study of the nature of electricity. Especially high voltage. Tesla impressed his friends and colleagues with amazing experiments in which he easily controlled the high-voltage generators, which produced hundreds of thousands and sometimes millions of volts. In this article I describe the production of a Tesla miniature generator, whose theory has been studied quite well and in detail. And now to the point!
What should we get?
In the end, we have to assemble our device as shown in the photo:
Step 1. Winding a high-voltage coil
We wind the main high-voltage coil on the tube with a wire of 0.1-0.15 mm. I had in stock a wire of 0.14 mm. This is perhaps the most boring thing. Winding should be done as carefully as possible, turn to turn. You can use a snap, but I wrapped the coils by hand. By the way, I always do something in at least two copies. Why? First, the skill. The second product turns out to be just candy, and there is always a person who starts begging for the device (give, sell, let him use, etc.). I give the first, the second remains in the collection, the eye rejoices, the friendship grows stronger, the harmony in the world increases.
Step 2. Insulation of the high voltage coil
The next important step is the isolation of a high-voltage coil. I will not say that it is necessary to soak the coil 20 times with wax, to wrap with varnished cloth or to apply digestion in oil. All this Kolchak approaches. We are modern people, so we use high-voltage varnish (see the first photo. I do not indicate the brand of varnish, you can google it) and a wide shrink. Varnish covered in two - three layers. Dry the layer for at least 20-30 minutes. The varnish is applied perfectly. The result is great! The coil just becomes eternal! The cost of lacquer is not great. Three hundred rubles balloon. I think enough for a dozen of these devices. BUT!!!
Varnish was VERY TOXIC! Literally a minute later my head ached and the cat started vomiting. Work had to be stopped. The room is urgently aired, the application of varnish to stop. Urgently had to run to the store. I need to buy a beer, and a milk cat, to recover from the poisoning:
For good lacquering it is necessary to carry out under the hood, but (after saving myself and the cat) I did it on the street. The good weather had, there was no wind and dust, and the rain did not pour. Then it is necessary to put on a wide shrink and shrink the coil with a heat gun. This should be done carefully, from the middle to the edges. It should turn out tight and smooth.
Step 3. Making the inductor and collecting the whole structure
Perhaps the most important part of the generator. I analyzed many constructions of similar devices and many authors make the same mistake. First, rather thin wire is used, second, there is no uniform and significant (at least 1 cm) gap with a high-voltage coil and many turns are used. It is absolutely not necessary. Enough 2..4-x turns in the first third of the high-voltage coil. For the inductor, we use a hollow copper annealed tube with a diameter of 8 mm, which ensures minimal inductance and simply excellent generator characteristics during operation. Three turns are wound on the rubber cuff in the slots. To prevent the tube from wringing, fill it tightly with fine sand. After gently pour the sand. After collecting the whole structure, everything should look like in the photo:
Copper tube, perhaps the most expensive position in this homemade. Already as much as 150 rubles. Purchased also in hozmage.
Some subtleties ...
Subtleties associated with the design of the contacts of the inductor. They are made of annealed copper strip and shrink closed. This provides the minimum inductance of the structure, which is very important. Contacts are hidden inside the coupling. All connections should be as short as possible and made with wide copper ribbons, which reduces various losses. On the top of the device we put on the adapter-ring, which presses the copper round contact, on which the upper pin of the high-voltage coil is soldered. The design at the top is poured by liquid rubber. In the center of the displayed mini-jack.
Step 4. Connect and test the generator
There are approximately 2 million ways to power such a device. Let us dwell on the simplest - using the scheme shown in this figure:
You will need a pair of resistors, a capacitor, a transistor, do not forget to put on the radiator. Ratings are indicated. The resource of the circuit, I think, is not great, but given the cheapness of transistors and the urgency of the desire to see the result, this is no longer counted.
If everything is collected correctly, the scheme will work immediately. If there is no generation, then switch the inductor contacts in reverse. It worked right away. Generation starts at 5-7 volts. Already at 6 volts, the generation is steady, at 12 volts everything burns around. In the photo you can see that the whole structure is blown by the fan, since the transistor is pretty hot, although it is placed on the radiator. Surprisingly, the circuit is very reliable. At 12 volts it works for hours and is very stable. When the light is off and the "dead" light bulb shines brightly. The power source for the coil is better to take more powerful (with an output current of at least 2-3 amperes).
Video of the device can be viewed here .
Ruining people is not beer ...
Let's not forget about security. Such devices within a radius of up to 2-3 meters can easily disable thin electronics, such as a mobile phone, electronic watch on a hand, etc. A high-frequency high-voltage generator influences a person weakly due to the “skin effect”, but still be careful. Children, cats, birds, and unbalanced citizens should be at some distance from such devices when they are turned on.
Remember this!
PS - At the request of some readers add a video with some details of the design of the coil. The video is available here .
Source: https://habr.com/ru/post/226657/
All Articles