The price of 3D printing, and how to independently calculate the cost of 3D printing

Despite the growing popularity of 3D printing, the calculation of the price of the 3D printing service is a mystery to many. In this post I will try (on the basis of personal experience) to show a simple way of calculating the approximate cost of 3D printing, using the example of a free program for 3D printing - Cura (for this, the presence of a 3D printer is not necessary at all ). I will also give you approximate parameters that are included in the final price for which the 3D printing service is offered.
Suppose you have found (or created yourself) an interesting model for 3D printing, now you want to decide on its cost (depending on the size, etc.) - that is, estimate how much plastic is required and how long it takes to print.
')
The main expendable material for 3D printing is obviously plastic itself, so the very first component of the cost of a printed model is its weight . In the program Cura - the weight of the spent plastic is calculated automatically.
Program installation

Cura is a program created by the developers of the Ultimaker 3D printer, it is free and open-source, architecturally consists of Python GUI , and CuraEngine - the first is a GUI interface, and the second is used to translate 3D models into GCode commands for a 3D printer (essentially CNC machine ).
Cura can work with any RepRap compatible 3D printer (not only with Ultimaker). Also supports the extension through plug-ins written in Python.
To install Cura, you need to download it from the official website - http://software.ultimaker.com/ . The current version 14.06 is available for Win, Mac, Linux.
When installing, the path will be asked where to install the program, and the supported formats (by default STL - you can leave).
At the end of the installation, you will be prompted to install the Arduino driver (Device Driver) - you can not install it.
Printer setup
When you first start Cura asked to set the model 3d printer. As a rule, these are characteristics of the working print area (width, depth, height), number of nozzles, heated substrate:

Since we will not print 3D, but only view - then you can leave the Ultimaker2 printer selected by default, but you can reset the checkbox for sending anonymous usage information if you don’t want to know about anonymous software activity.
Interface
After the application itself is started, this is how it looks by default:
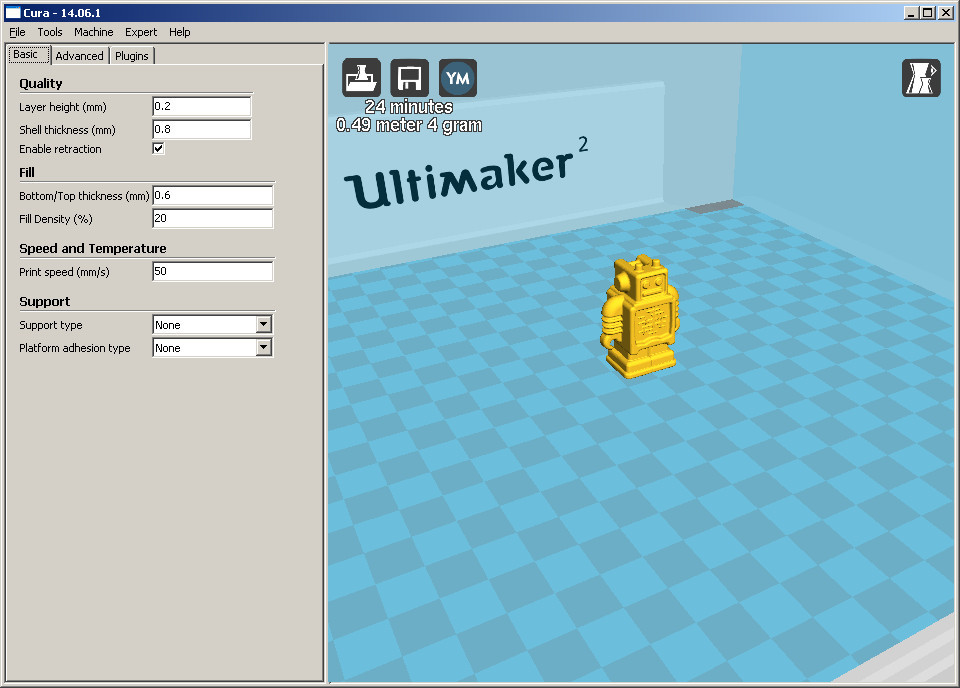
The print settings are displayed on the left, and the print workspace on the right, where, by default, is the model Ultimaker printer model.
And just at the top we see the data we need for us - printing time and plastic consumption. But let's try to add a little understanding of the process - and set up the parameters on which 3D printing depends.
Loading model
In order to load another model, you can select the current model with the mouse - by pressing Del - delete, and to load the model we need to open the file in the STL format - “File / Load model file ...”
After that, the model will appear on the working field.
Print options
3D printing has the following parameters that affect the quality, weight of the printed model and the print duration:
- nozzle diameter
- printhead movement speed
- layer thickness (horizontal)
- filling percentage
- Wall thickness
- support
The diameter of the nozzle is usually from 0.1mm to 0.5mm, we will assume that we have installed 0.3mm.
The speed of the print head movement - this indicator affects the speed and quality of printing - the faster the head movement - the worse the print can turn out, the slower the better, but the longer the print - you can leave 40 mm / s.
Layer thickness - each model is printed in layers from bottom to top, depending on the accuracy of the printer, the thickness can vary from 0.05mm to 0.3mm, in practice 0.2mm is quite enough (reducing the thickness of the layer - increases printing time)
The percentage of filling - the printed figure is not filled with 100% plastic - as a rule, this is not necessary, instead it is filled with a structure similar to cells, and you can specify the percentage of filling - 20% is quite normal. The more filling - the greater the consumption of plastic and an increase in printing time.
Wall thickness - the 3D model does not contain information about the wall thickness - there is information only about the shape, so you need to specify how thick we want to make the walls (top, bottom and side) - this affects the strength of the model.
Support is a technical element - with the help of which “mounted” structures are printed, after printing they are removed - this affects the consumption of plastic and the duration of printing - for our assessment tasks - this parameter should be included.
Here is an example of support (support), when printing Fox:

In addition to these parameters, there are additional “tuning” settings, but we will not touch them.
We also note (for the future) - that the extruder temperature is important, and the substrate temperature - these parameters do not affect the printing speed and plastic consumption, but directly affect the fact of printing the figure - because for different types of plastic (ABS or PLA) - the parameters are different, and choosing the wrong temperature mode - you can either not print the figure at all, or “hammer” the extruder head. But for our current tasks of preliminary assessment (without 3D printing) - these parameters are not important.
But the plastic itself, from which the model will be printed, matters, because PLA plastic is more expensive than ABS.
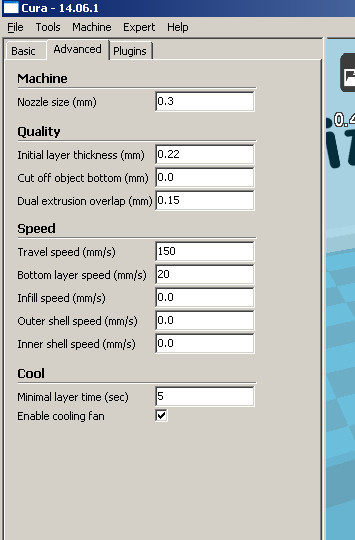
Set these settings - to adjust the thickness of the nozzle go to the
Advanced tab.And put 0.3mm on the nozzle, and 0.22mm on the first layer (for better adhesion):
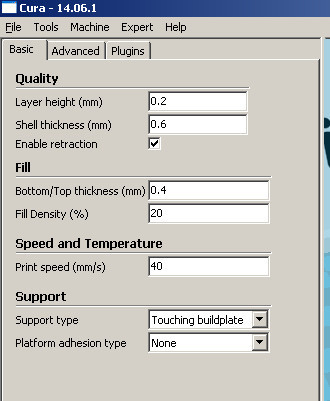
Next, on the Basic tab, we set the layer thickness to 0.2mm , the side walls thickness is 0.6mm (= nozzle diameter * 2), the top / bottom walls thickness is 0.4mm (two layers), the percent of filling is 20% , the print speed is 40mm / s , we also set caliper - "Touching buildplate" , approximately will look like this:
Model setting
By default, Cura automatically places the model in the work area, and its dimensions correspond exactly to those specified in the STL file.
With the Cura interface you can:
- resize model
- rotate model
- flip model
- move it around the print area
Model size - you can increase or reduce the model - this directly affects plastic consumption and printing time, for example, reducing / increasing the height by 1 cm - can change the printing time by several hours.
Model rotation - model rotation is important from the point of view of the need for support; perhaps in some plane, the model can be printed “as-is”, and in another version, the presence of “support” is needed - which can increase consumption and printing time.
Moving around the work area - if the model is one, then it does not give any changes, but if you want to print 6 models at once, then it is logical to understand the time that the 3D head will spend on moving from one model to another.
All this can be done in Cura using the icons at the bottom left when you click on the model with the mouse:

This is respectively: turns, resizing and mirroring. You can move a shape around the workspace simply by
Drag and Drop .Example
With each change of parameters - Cura automatically recalculates the printing time and weight of the model, in our example it turns out:
28 minutes, and 3 grams (height of the robot - 3 cm.)

Taking the price of plastic (approximate prices): ABS - 1200 rubles / kg, PLA - 1900 rubles / kg.
Thus, printing ABS - we get the cost of the model - 3 rubles 60 kopecks .
In my opinion, the price of owning a 3D printer is not so high - for very little money you can print unique items.
It should be noted that Cura is only one of the programs used for 3D printing, there are many others as well as free (Repetier-Host) and supplied with 3D printers, so this data can only be used for approximate estimates.
3D printing price
Of course, we cannot expect the price of 3D printing to be equal to the spent plastic, which is similar to counting taxi services at the cost of spent gasoline.
What are the elements of the final price of 3D printing services?
1. Type plastic
2. Price of a 3d printer - the seller includes in the 3d print a refund of the money spent on the purchase of a 3d printer
3. Maintenance of the 3D printer (like any mechanism it requires maintenance costs - at least lubrication)
4. Electricity
5. Room rental
6. Maintenance staff - 3D printer operator
7. Possible optimization of the 3D model before printing, and processing of the printed model after
8. Profit
I also note that 3D printing is not the same thing as inserting an A4 sheet into a laser printer and getting printed text.
The process of launching 3D printing is setting up a variety of parameters, controlling that the plastic is stuck on the first layer, and if for some reason the first layer does not “grab” the substrate - then we can assume that all plastic will be “wound” on the extruder head.
In the process of printing, if the overall model, then a slight deformation of ABS plastic may occur, and for example, after 8 hours of printing - a point shift will occur - and the extruder head will not capture the new layer from the bottom - and the model will not be printed.
Such a “beard” may turn out:

The process of changing the color of plastic - means the replacement of plastic from an extruder - it can take up to 30 minutes.
Also, the process of changing the type of plastic - replacing ABS with PLA, or vice versa - is also manual work that needs to be performed without errors (in the extruder heating settings) - otherwise you can spoil the extruder head. You can also add that different manufacturers of ABS and PLA plastic - can vary operating temperatures.
Summary table
Parameters that affect the final pricing:
| Parameter | Comment |
|---|---|
| Plastic type | Basic - ABS and PLA |
| Consumed plastic | Layer thickness, percent filling, model dimensions, calipers, etc. |
| Print time | Layer thickness, percent filling, model dimensions, calipers, etc. |
| Infrastructure | Room rental, etc. |
| Electricity consumption | Print time |
| Depreciation 3d printer | 3d printer price |
| Costs for Operator 3D printing | Plastic change, 3D model correction before printing, post-processing of a printed 3D model |
| Profit |
Finally

The 3D printing service is already appearing in many cities of Russia: hackspaces, fablabs, TsMITs, techspaces, some distributors of 3D printers, companies specializing in 3D printing - offer 3D printing services.
Tariffing is either in terms of print volume, or weight, or print time.
For example, in our hackspace of Ekaterinburg MakeItLab - the cost of 3D printing is based on the printing time, and is 100 rubles / hour - for participants of the hackspace, for non-commercial projects, which covers maintenance costs and consumables.
As a rule, in Hackspaces, a 3d printer is bought by the participants themselves, and for participants, so the goals of commercial outlets are not there, and therefore the price for participants may be lower than the market price.
Source: https://habr.com/ru/post/226477/
All Articles