Self-Service with Cisco UCS Director: How to enable users to independently create virtual servers

Have you heard about Cisco UCS Director ?
Ready to start exploring this product?
Then I will show you how to make the end users to create a request on the Cisco UCS Director self-service portal and automatically get a ready-made virtual machine.
To do this, we will learn how to create sets of policies and merge several policies into a group within the vDC framework, as well as create a directory (template) based on these policies, to provide users with access to this directory through the self-service portal.
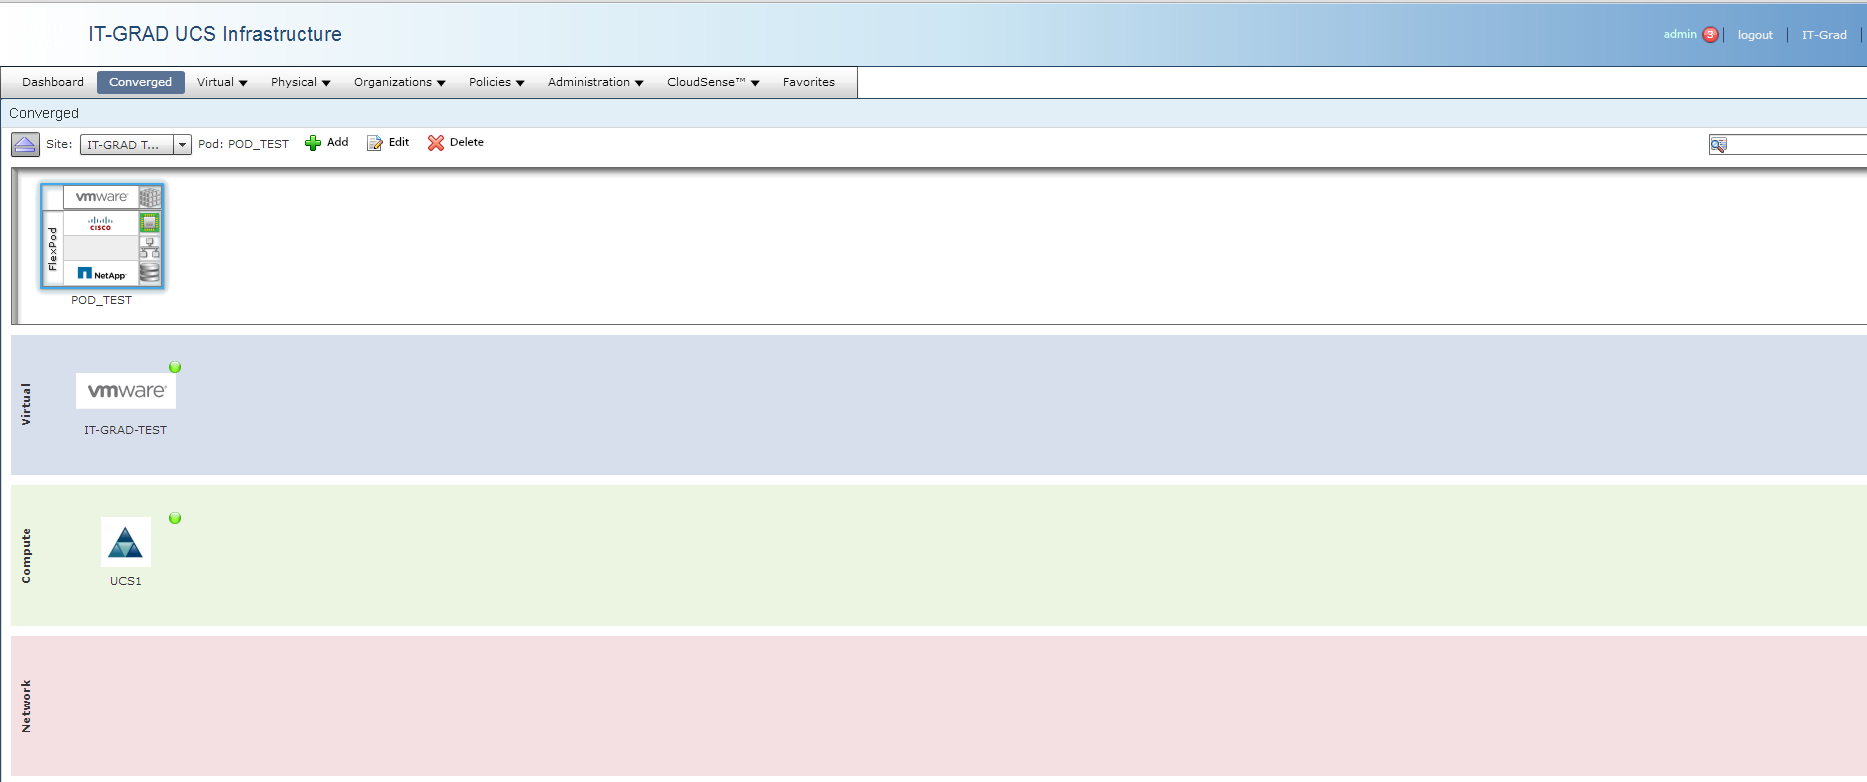
Let's start with the infrastructure. The infrastructure, on the basis of which we will perform all the settings, consists of:
- NetApp Clustered DataONTAP 8.2 Simulator as a disk array;
- virtual infrastructure deployed on the base:
- ESXi appliance 5.5.0;
- vCenter appliance 5.5.0a.
It looks like this:
')
Immediately, I note that all the settings of policies and parameters for the template (s) of virtual machines in our post will be related to the VMWare vSphere infrastructure.
Creating a template (directory) based on policies
In this section, I will describe the process of preparing a template for a virtual machine based on the CentOS 6.4 distribution, publishing this template on the Self-service portal and providing access for the end user to this template (directory).Policies
First of all, we will create a set of policies that allow us to manage the virtual machine template, limit the set of resources (CPU, Memory, Disk usage) and allow the user to select a certain amount of resources when creating the machine (within the limits allowed, of course).First, let's understand what “Policy” is in UCSD terminology. Almost literal translation of the documentation is:
Policies are a set of rules that determine where and how a virtual machine will be deployed, taking into account the existing infrastructure and the availability of system resources.
In general, this is a comprehensive explanation. It remains to add that policies can (and should) be defined not only for virtual machines, but also for hardware servers, disk arrays and even network devices. A description of such policies is beyond the scope of my post.
Policies for virtual machines in UCSD are divided into four groups:
- Computing;
- Storage;
- Network;
- System.
Computing policy
This type of policy:
- Allows you to explicitly select the desired ESX server (s), cluster and resource pool to host the virtual machine;
- Automate the selection of an ESX server using the task conditions (Minimum conditions) for hosting a virtual machine (in other words, it allows you to specify the criteria for selecting an ESX server);
- Change the deployment options of the machine;
- Provide the user with the ability to independently select the required amount of resources (the amount of vCPU and memory) from the range specified by the administrator.
To create a policy in the UCSD interface, go to the Policies -> Computing -> VMWare Computing Policy tab.

And we add a new policy by clicking on the Add button:
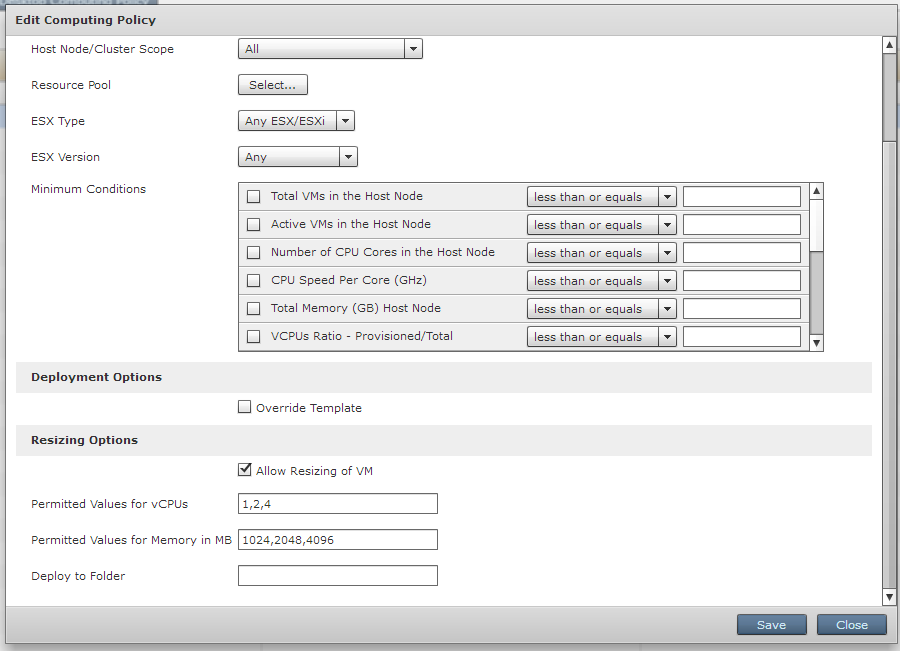
In our case, we will set the following parameters:
| Policy name | CentOS_vm_computing |
|---|---|
| Cloud name | IT-GRAD-TEST |
| Resizing options | Allow resizing of VM (checkbox enable) |
| Permitting value for vCPUs | 1,2,4 |
| Permitting value for Memory in Mb | 1024.2048,4192 |
Save the policy in the directory.
Storage policy
This type of policy:
- Defines a set of datastores on which a virtual machine can be placed, and also provides the choice of the required datastore for the user
- Allows you to specify the type of datastore allowed for use;
- Allows you to specify a set of conditions (Minimum condition) for selecting a datastor (Capacity, latency, etc);
- Allows you to set additional policies for disks - choosing the type of disk: data, database, log, swap (do not ask me how these policies affect the distribution of disk space and performance, I don’t have an answer to this question;)).
To create a policy in the UCSD interface, go to the Policies -> Storage -> VMWare Storage Policy tab.

Set the parameters:
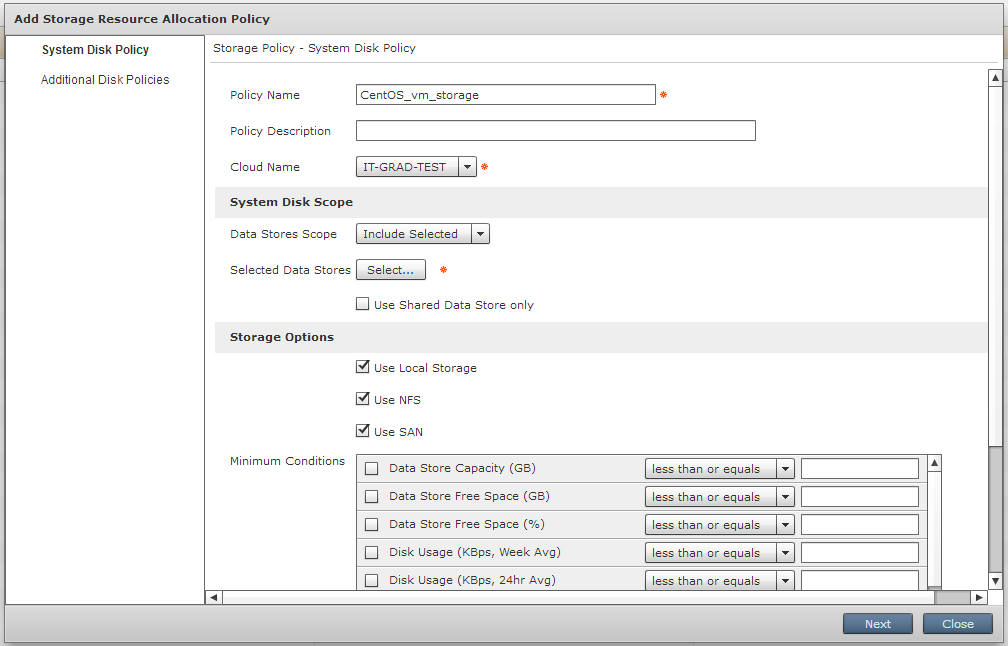
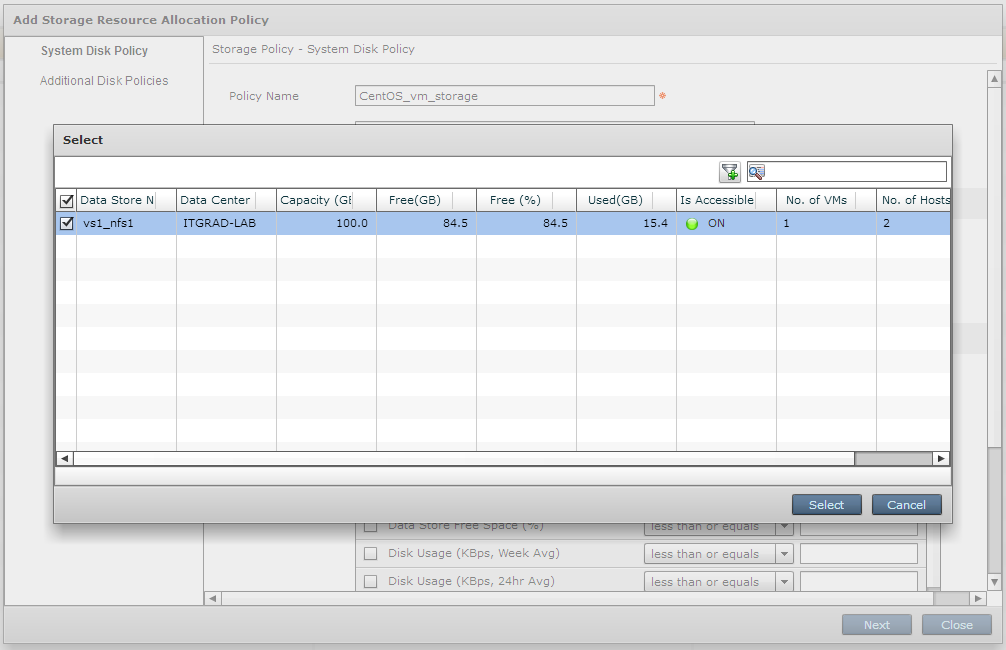

Click Next, go to the very mysterious page with the settings Additional Disk Policy, leave it all unchanged.
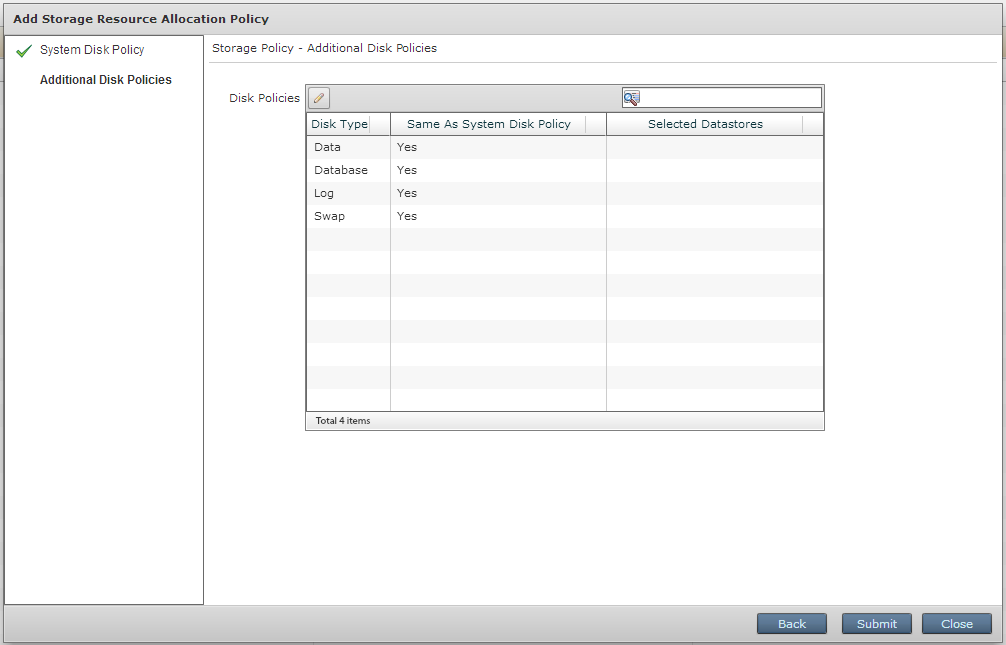
Total we got a new entity - VMWare Storage Policy with the following settings:
| Policy name | CentOS_vm_computing |
|---|---|
| Cloud name | IT-GRAD-TEST |
| Datastore scope | Include selected |
| Selected datastore | vs1_nfs1 (in our case) |
| Use shared datastore | checkbox uncheck |
| Use local storage | checkbox uncheck |
| Use NFS | checkbox enable |
| Use SAN | checkbox enable |
| Allow resizing of disk | checkbox enable |
| Permitted values of disk in Gb | 16.40 |
Network policy
At once I will specify that the described policy has no relation to the network equipment and is responsible only for the configuration of the network subsystem of the virtual machine being created.
This type of policy:
- Allows you to configure ip address selection parameters (DHCP, IP Pool or Static IP);
- Allow adding additional network adapters when creating a virtual machine;
- Allows you to specify the required PortGroup to host the virtual machine;
- Allows you to determine the type of network adapter.
To create a policy in the UCSD interface, go to the Policies -> Network -> VMWare Network Policy tab.

Set the parameters:
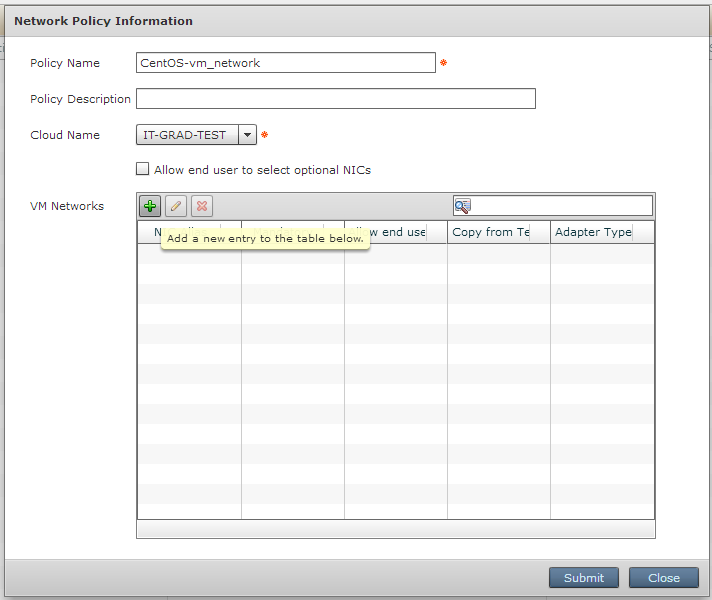


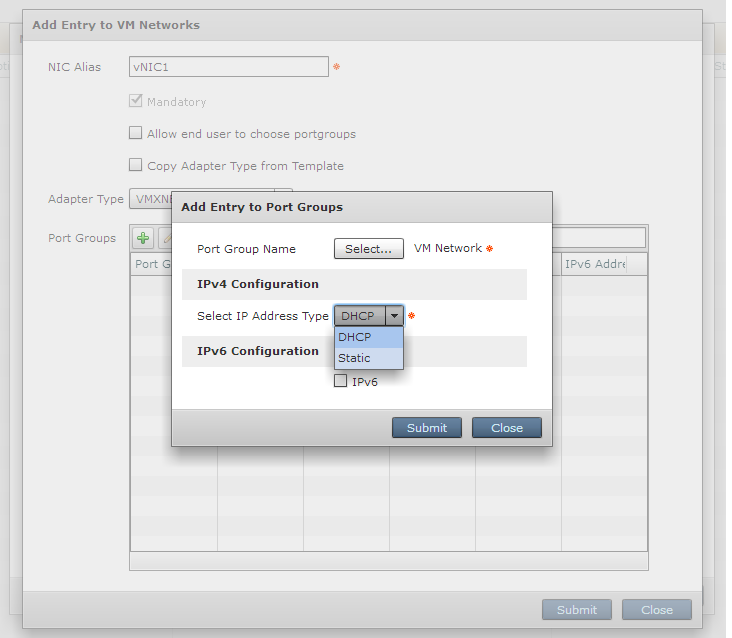
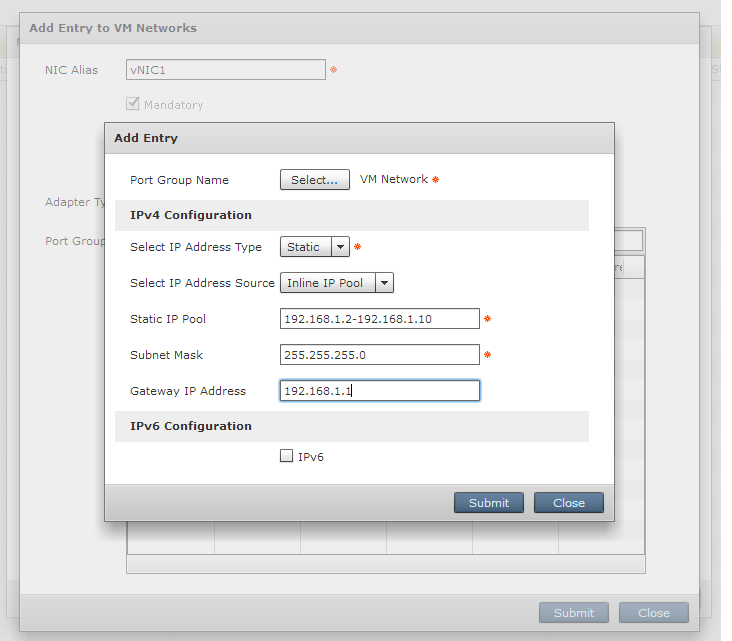
Next, click Submit to win. As a result, we received a policy in which the number of adapters, the type of adapter, the PortGroup on the virtual switch, the pool of static addresses from which the address for the virtual machine can be taken is determined.
| Policy name | CentOS_vm_computing |
|---|---|
| Cloud name | IT-GRAD-TEST |
| VM Network | |
| Nic alias | vNIC1 |
| Adapter type | VMXNET3 |
| Port group | VM Network |
| IPv4 configuration | |
| Select IP address type | Static |
| Select IP address source | Inline IP Pool |
| Static IP Pool | 192.168.1.2-192.168.1.10 |
| Netmask | 255.255.255.0 |
| Gateway ip address | 192.168.1.1 |
System policy
The final type of policy that we will look at in this post is the system policy.
This type of policy:
- Defines the system parameters of a virtual machine, such as the VM name pattern and the host name pattern (the hostname at the OS level);
- DNS settings, such as name servers and domain suffix;
- Timezone settings for Linux OS;
- The choice of the operating system to be installed, and many others (see Cisco UCS Director Administration Guide, Release 4.1).
To create a policy in the UCSD interface, go to the Policies -> Service Delivery -> VMWare System Policy tab.

There are few settings in this section:
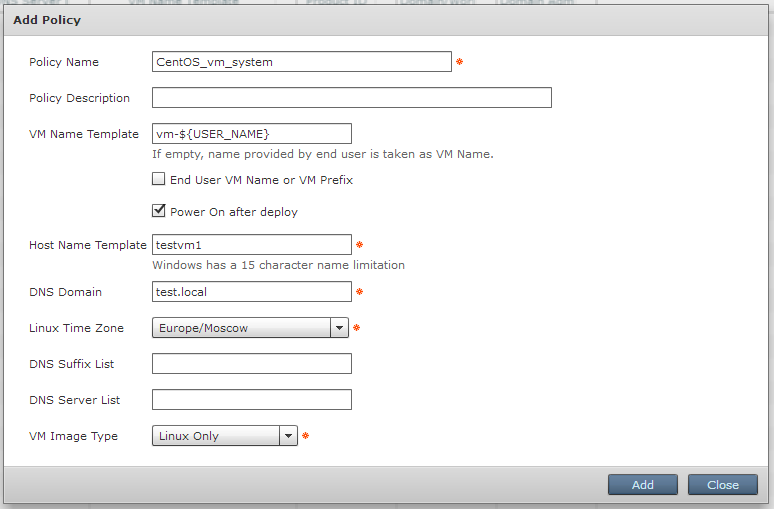
| Policy name | CentOS_vm_computing |
|---|---|
| VM name template | vm - $ {USER_NAME} |
| Power on after deploy | Checkbox enable |
| Host name template | testvm1 |
| DNS domain | Test.local |
| Linux time zone | Europe / Moscow |
| VM Image Type | Linux only |
At this policy settings are finished, all the necessary policies are created. Next, we must combine all our policies into a group and publish our template (application) on the self-service portal.
VDC creation
In terminology, UCSD vDC is an object within which a certain set of virtual resources, virtual machine images (templates) and policies are grouped together. vDC provides the ability to provide management of a strictly defined set of resources at the level of user groups or organizations created in UCSD.
Using vDC, we can:
- Provide the ability to manage resource sets to organizations or groups;
- Set resource quotas for organizations or groups;
- Determine the set of actions allowed to the end user with respect to the virtual machines associated with the vDC;
- Determine the policy that will perform the set of actions described using WorkFlow, after the end user creates a virtual machine;
- Define a set of predefined actions (based on regular workflows) that a user can perform with a virtual machine in a given vDC;
- Specify requirements for up-to-date resource allocation requests and identify users responsible for aprvuv requests at the vDC level.
To create a policy in the UCSD interface, go to the Policies -> Virtual Data Centers -> vDC tab:

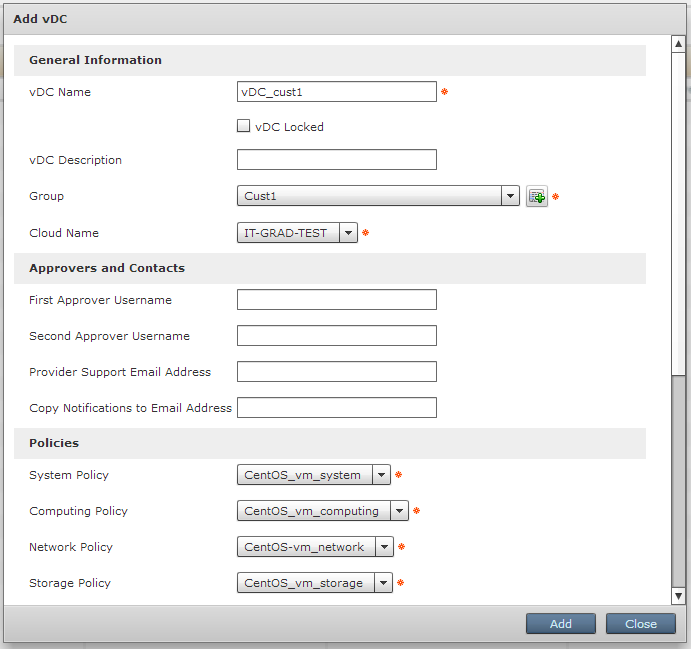

In our case, we have defined the following settings:
| vDC Name | vDC_cust1 |
|---|---|
| Group | Cust1 |
| Cloud name | IT-GRAD-TEST |
| Policies | |
| System policy | CentOS_vm_system |
| Computing policy | CentOS_vm_computing |
| Network policy | CentOS_vm_network |
| Storage policy | CentOS_vm_storage |
| End User self-service options | |
| Vm power management | checkbox enable |
| VM snapshot management | checkbox enable |
| VM Network management | checkbox enable |
So, we have configured the vDC. Setting a group in the settings of our vDC means that users of the specified group get access to the resources grouped for our vDC.
We also gave our users the ability to manage the state (on / off), manage snapshots and network settings for virtual machines associated with vDC.
Catalog creation
We are gradually approaching the finale of our work and at the final stage we need to create a catalog. What is it?
Catalog is an object on the basis of which the user on the self-service portal will be able to form a request to create a virtual machine (and not only that, of course, but we also make out a special case). In other words, it is an interface for providing a certain service or set of services for the end user.
There are four types of directories in UCSD (for details, see the Cisco UCS Director Administration Guide, Release 4.1). In our case, we will use the Standard type directory, which is intended just for storing virtual machine templates for creating ready-made VMs at the user's request.
To create a policy in the UCSD interface, go to the Policies -> Catalog tab:

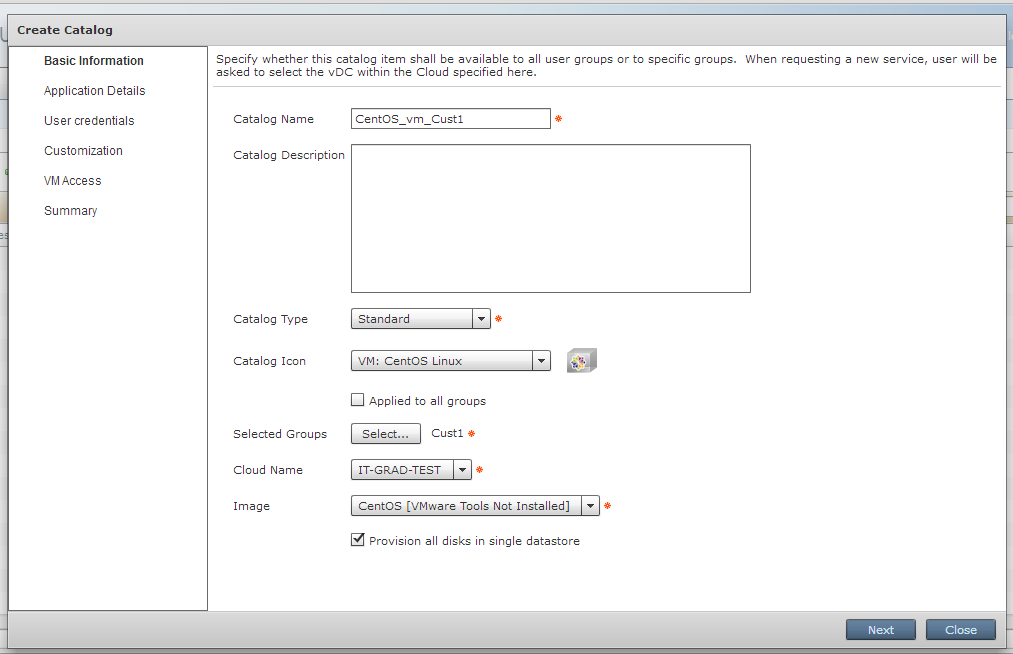
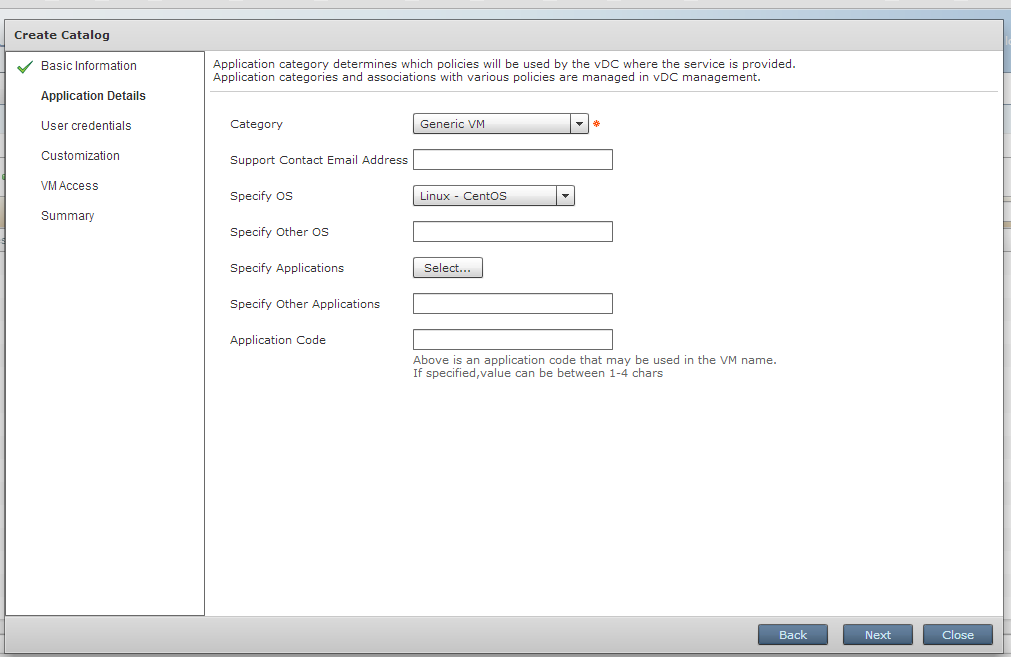
| Catalog name | CentOS_vm_Cust1 |
|---|---|
| Catalog type | Standard |
| Catalog Icon | VM: CentOS Linux |
| Selected groups | Cust1 |
| Cloud Name | IT-GRAD-TEST |
| VM Images | CentOS |
| Category | Generic vm |
| Specify OS | Linux - CentOS |
Actually, we set all the necessary settings for us on the first two pages of the catalog creation form: Basic Information and Application Details. I will leave the rest of the settings unchanged, if someone wants to know more about these settings - more, we’ve repeatedly mentioned the UCSD administrator’s manual.
After creating the catalog, it is automatically published on the self-service portal and is available to the members of the group that we have chosen.
So, we have finished the basic part of our settings, having received as a result vDC with a set of policies and a directory with a given operating system template. What's next?
Work with Self-Service Portal
Users and groups in UCSD
First of all, I will describe the procedure for creating a group (I hope everyone understands that our group Cust1 was created before the creation of the vDC and the directory). To do this, go to the tab Administration -> Users and Groups -> User Groups:

And run the form to create a new group:

Actually creating a group should not cause any difficulties. The most interesting thing we will do after the creation of the group - we will set a set of restrictions on the resources that can be used by users belonging to our group. We can set limits for:
- Virtual resources;
- Operating system resources;
- Physical resources.
In order to set the limits, we need to select the group we need from the list of already created ones and run the “Edit resource limits” form
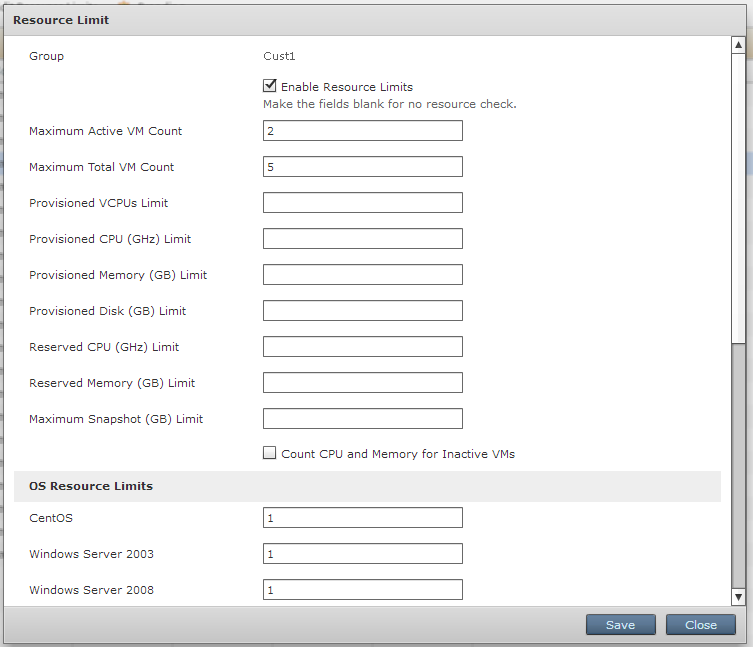
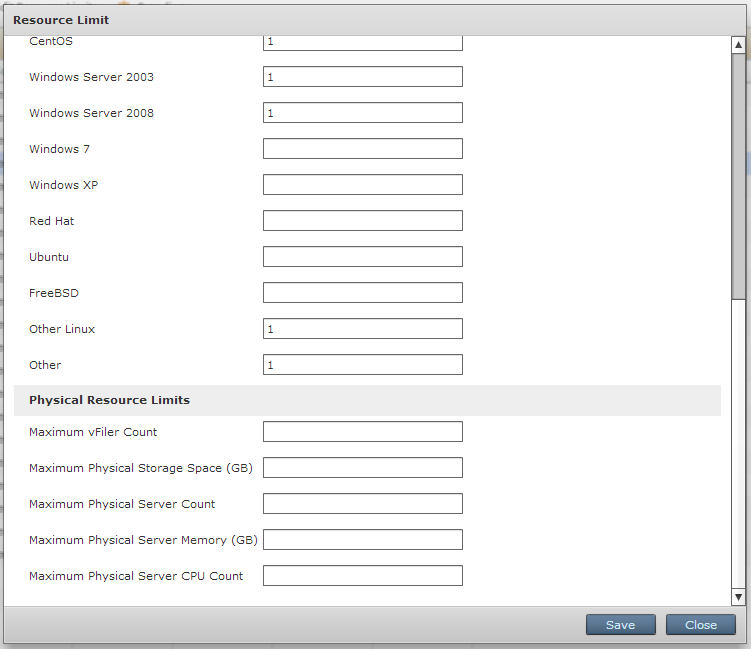
Do not forget to enable the checkbox "Enable resource limits". A detailed description of all the form settings is in the document "Cisco UCS Director Administration Guide, Release 4.1".
Now let's create our user who will be given access to the self-service portal. To do this, go to the tab Administration -> Users and Groups -> Login Users

And add a new user
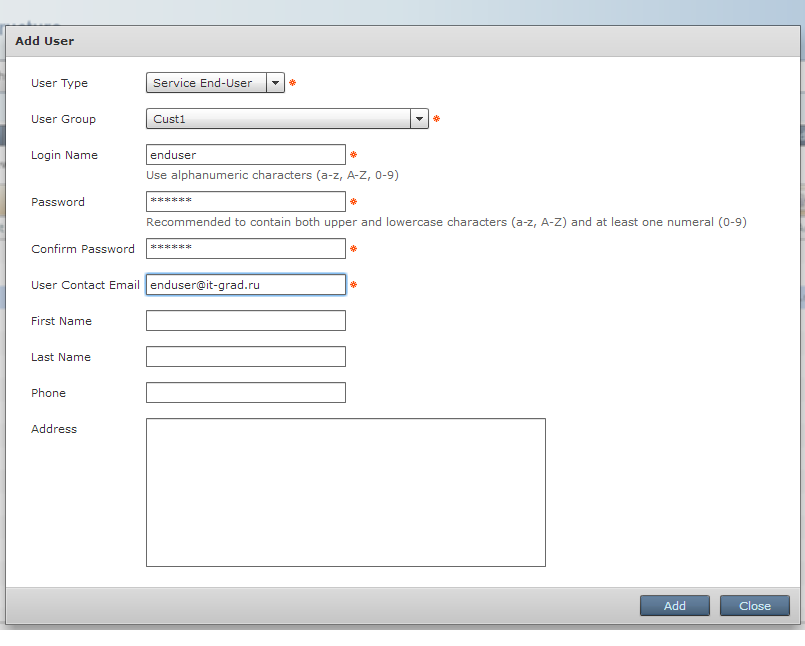
A few comments:
- The type of user Service End-User defines the ability for a user to log in and use the self-service portal. In other words, this is a built-in role that defines the user's access rights to the set of resources of the service portal.
- Pay attention to the group that we set for the user. This is the group we specified when creating the vDC and directory. Actually due to the binding of our user to the desired group, we give him the opportunity to use the directory created by us (in other words, receive the service).
Self-Service portal
And finally, for the sake of which we did all the previous settings - the self-service portal. Access to the portal is very easy to get; all you need to do is to access the standard link under the enduser user we created.
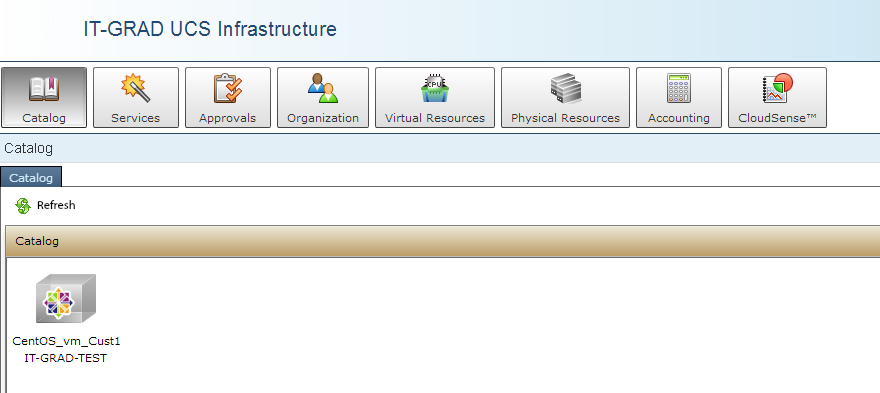
On the portal interface, the CentOS-vm_Cust1 directory created earlier will automatically be available to us. Let's try to create a virtual machine deployment request. To do this, you can either select an available directory and click on “Create Request”
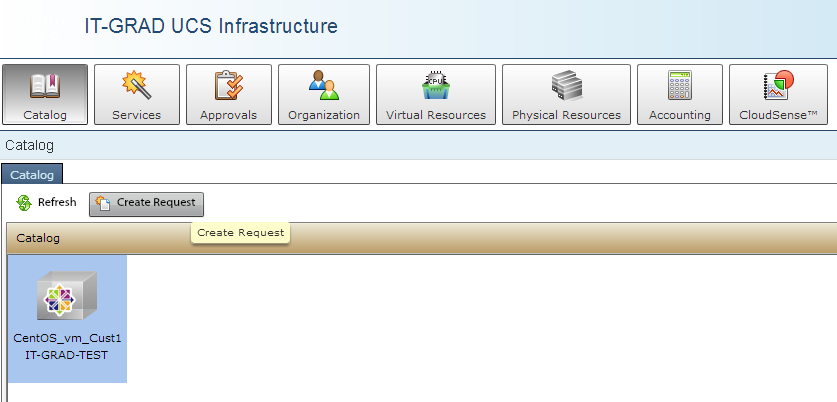
Or simply double-click on the desired directory. In both cases, a request creation form will appear:
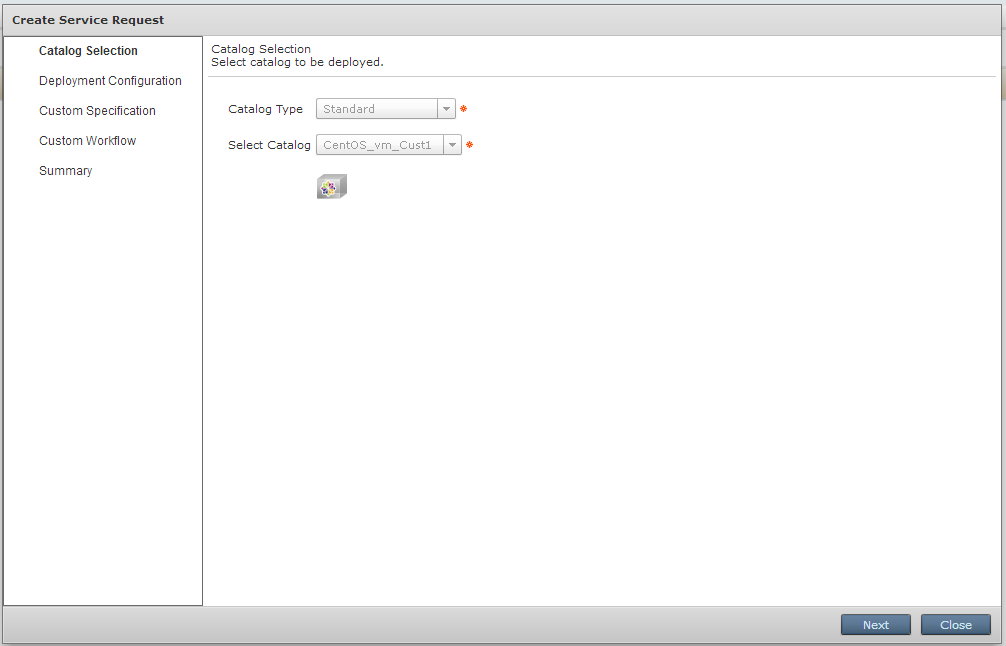
Click Next
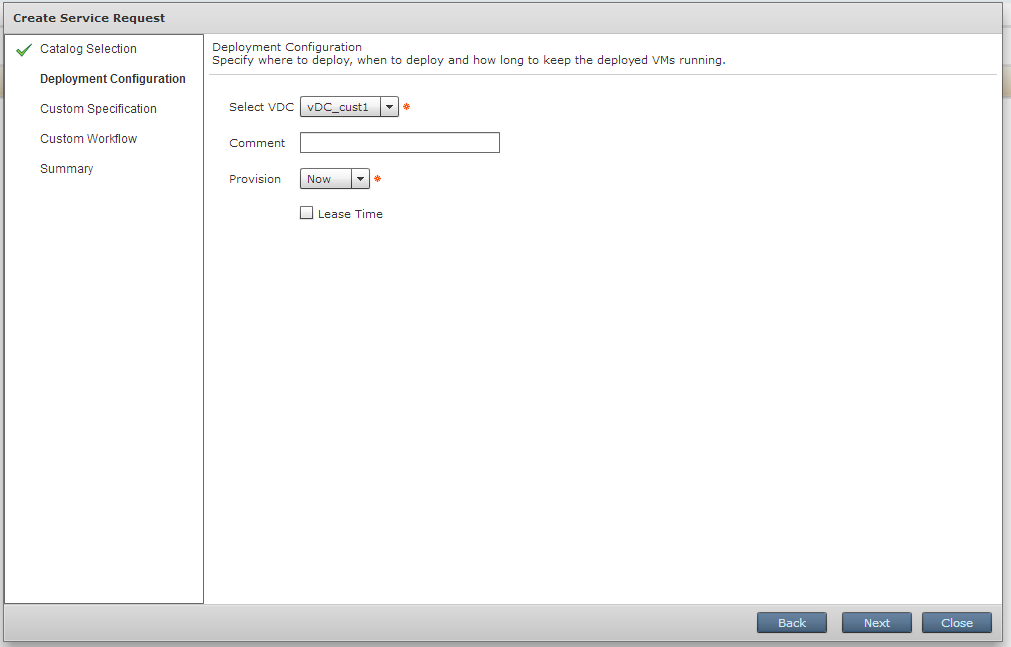
Here we can choose the vDC available to us and the deployment time of the virtual machine (we can schedule the time we need). We say that we want to deploy the machine right now and click Next.
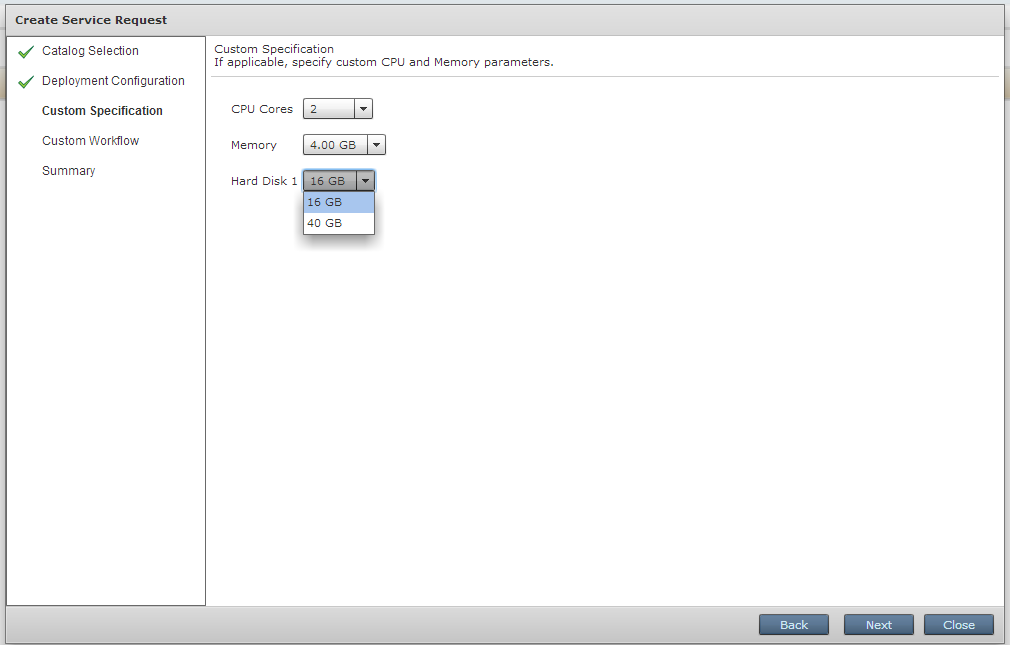
I want to get a virtual machine with 2 vCPUs, 4 gigs of RAM and 16 GB of vHDD. I set the necessary parameters, as shown in the figure above. And shake Next.
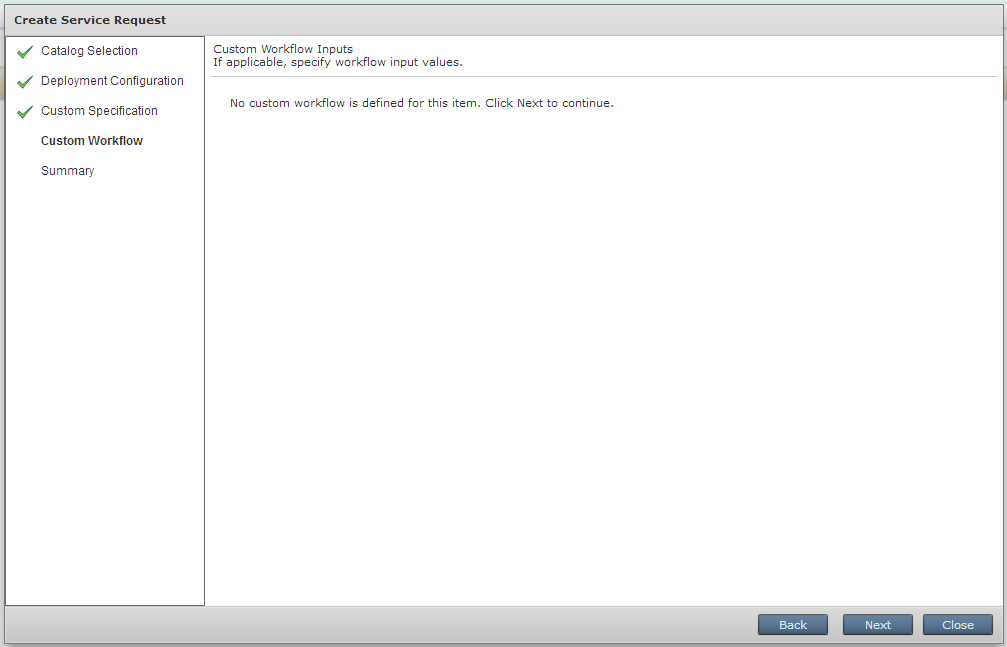
Custom workflow we have not yet tied to our template, so just click Next.
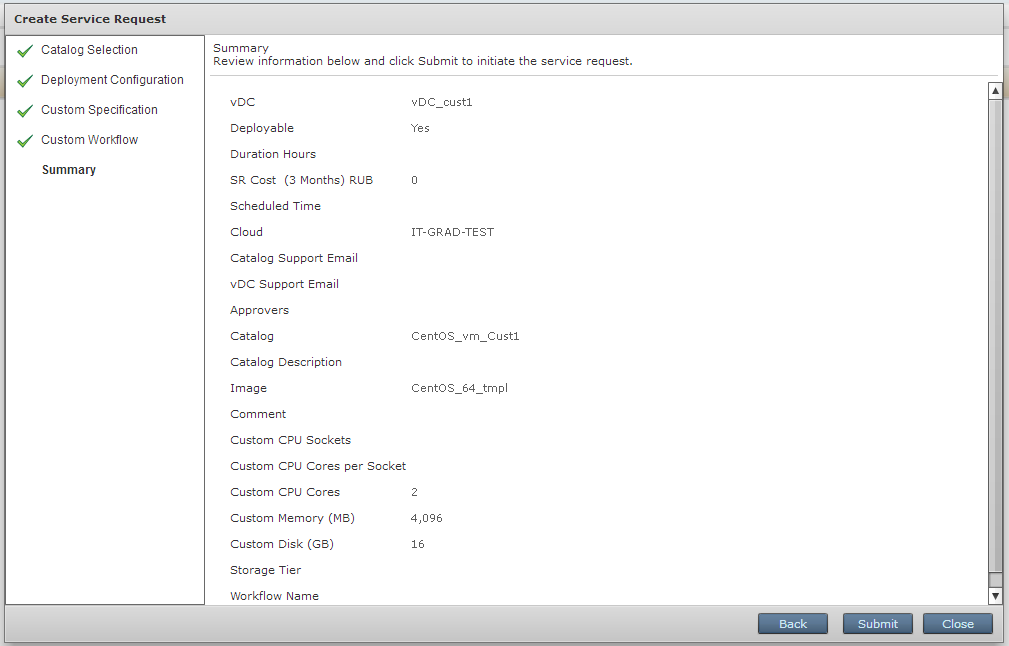
This completes the creation of the request, you can view the summary and click Submit.
Service Request Status
Of course, it will be interesting for us to follow the progress of our application. UCSD self-service portal has a convenient interface for viewing the status and logs of the request execution.
We need to go to the portal page called “Services” and select the request we need from the list:

To view the details, either double-click on the necessary request, or click “View Details”
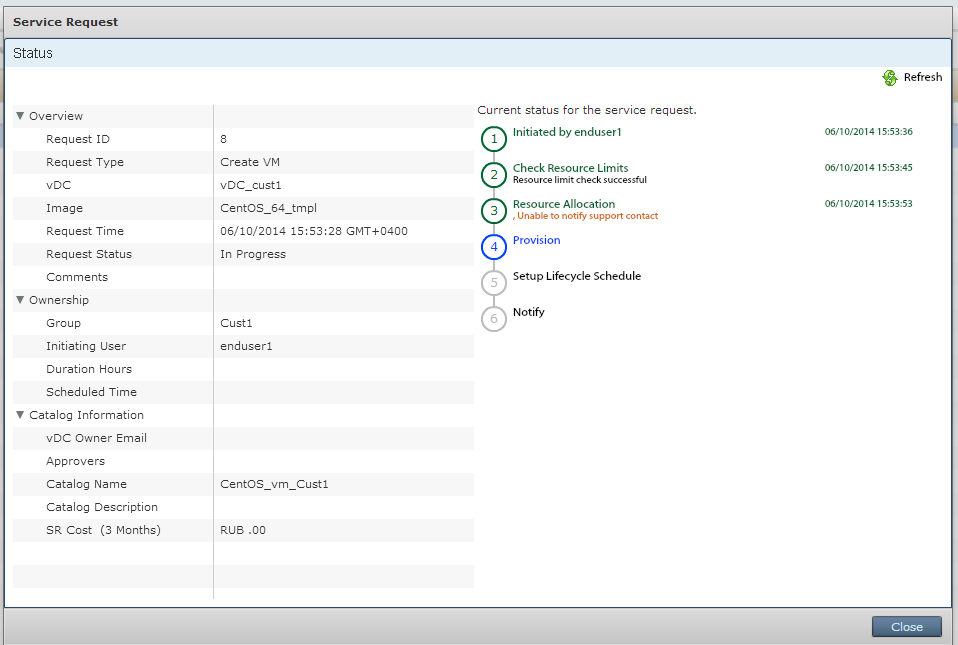
We see the stages of the request and their current status. What is done, what is performed, what results.
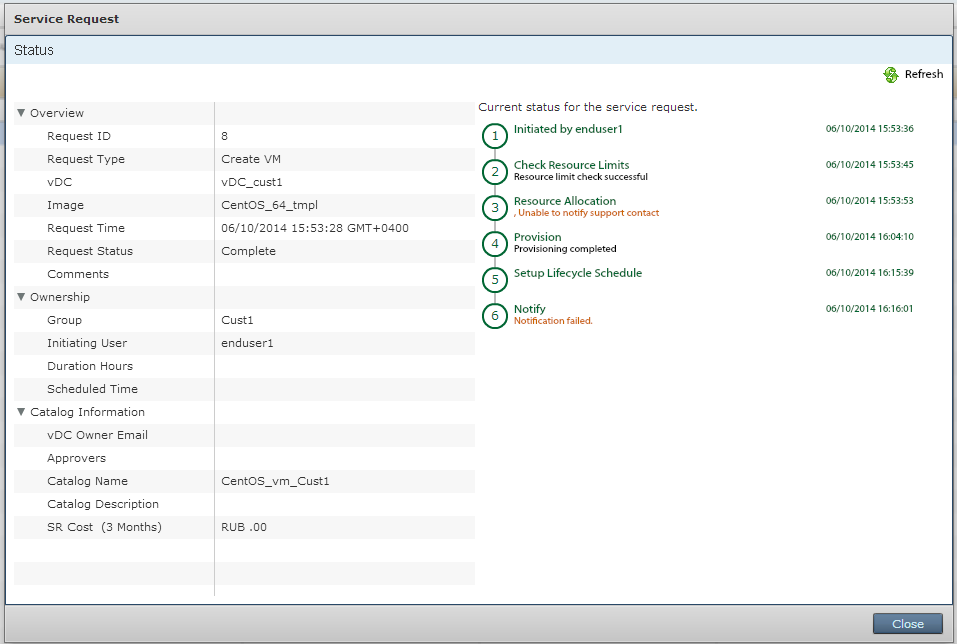
All stages of our request completed successfully. The result is a new virtual machine.
And now a few words about setting up confirmation of user actions on the UCSD self-service portal.
Configuring user confirmation in the UCSD self-service portal
To do this, go to the menu Policies -> Virtual Data Centers. We select vDC vDC_Cust1, the creation of which was described in the post “Self-Service with Cisco UCS Director: How to enable users to independently create virtual servers” and edit it.
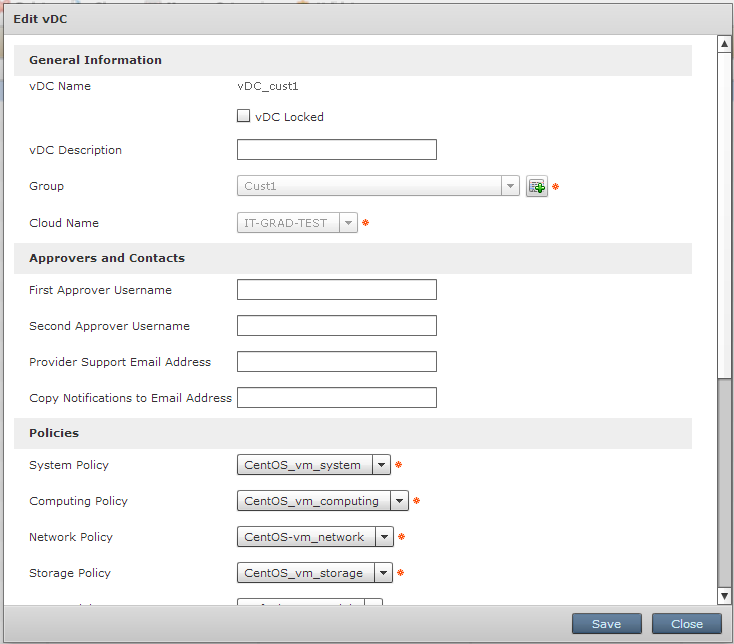
We are interested in the section "Approvers and Contacts". In the field “First Approver Username” we can specify the name of the user to whom a confirmation request will be sent. Let's set the username as admin and save the settings.
A user in the self-service portal generates a request to create a VM. Let's look at the query execution log:
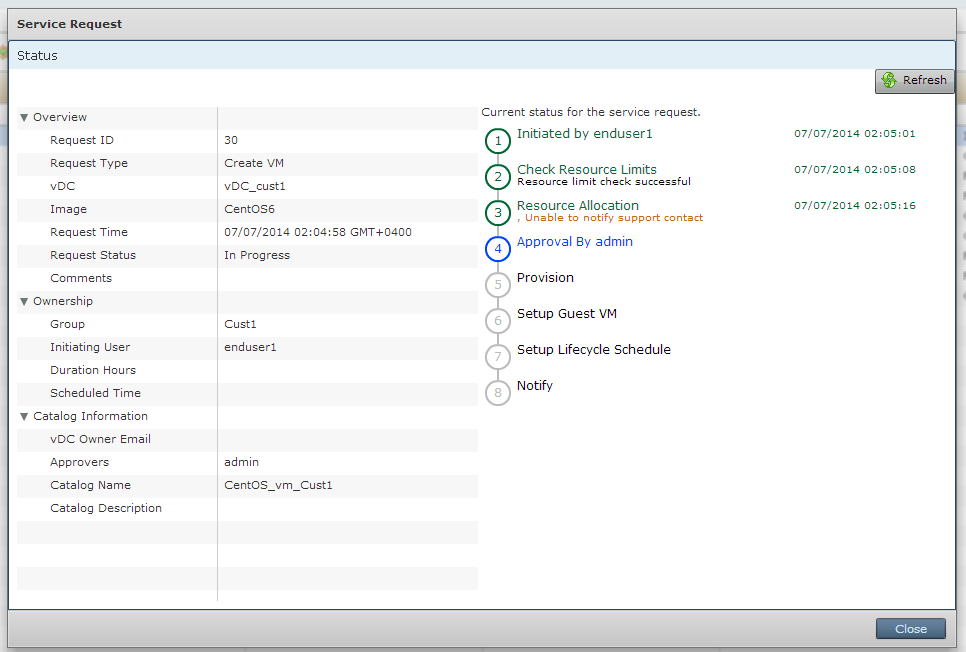
Administrator to confirm the execution of the request, go to the menu Organizations -> My approvals, select the desired request in the status of Pending

And choose Approve or Reject

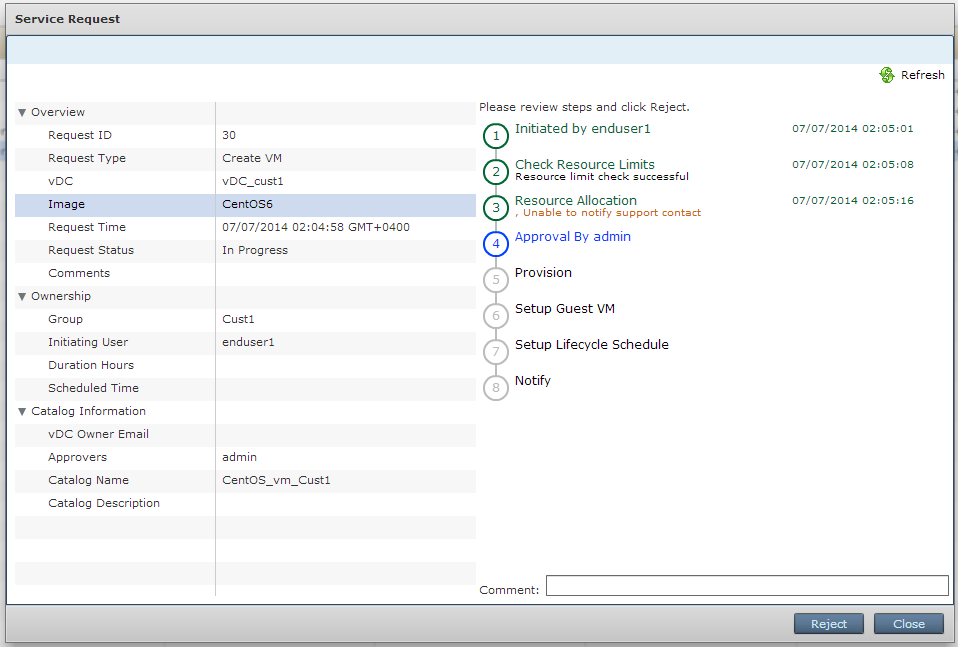

With this, I’ll finish the story about the functionality of UCSD in the field of provisioning virtual machines and the self-service portal. Thanks to those who read to the end, I hope the post will be useful for those who are starting to get acquainted with the product.
Source: https://habr.com/ru/post/226473/
All Articles