Hello, silverlight!
After thorough preparation and installation of all the necessary software for Silverlight development, we finally got ready to say our first “hello world”.
Since the writing of various helovords has already filled the strongest teeth (at least personally with me), then in general, our first example will be more difficult (but no less trivial).
We will write a super online web2.0 number calculator. If someone has a question about web2.0, everything is elementary. Our adder will add exactly 2 numbers, and who says that it is not 2.0 - let it go to write cgi in assembler :).
')
In general, the main thing in any business is a good start. And first we need to create a new project in Visual Studio by selecting the “Silverlight Application” project type for it.

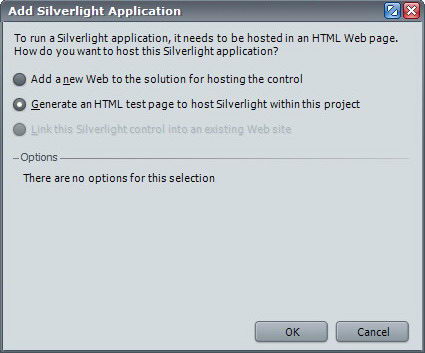
After that, VS will ask us how we want to open this project: whether to create an ASP.NET container project for this purpose, or simply to embed the creation we created into a simple HTML page. I usually choose the second option, although in general they are approximately equivalent in functionality.
Having overcome the agony of choice, we find ourselves in an almost familiar WPF editor. Those unfamiliar with WPF , but those familiar with ASP.NET will find here also a lot of reasons for the emergence of DejaVu.

In short, at the top of the designer’s window, our application is located so to speak “in the flesh,” and at the bottom, we edit the source XAML file, which defines the appearance of our program. Thanks to the well-functioning IntelliSence, as a rule, there are no problems with mastering its syntax (and we will deal with emerging issues in future lessons). In addition to xaml (by default it is called Page.xaml), a source file is created in the language we choose, for C # its name will be Page.xaml.cs. This file is called the “separated” code file, and is used to write all the program logic. As you can see, WPF in general, and Silverlight in particular, welcome the separation of code and presentation. Although ASP.NET programmers are not surprised.
First we will create the necessary controls for our future application.
Let's sort it all out by individual tags.
- defines the property of the Silverlight component itself. We are now mainly interested in the Width and Height properties, which define its width and height, respectively. If you remove these properties, the control will occupy all the available space in the HTML page.
- one of the containers for the automatic placement of elements. We will look at them in more detail in one of the following classes, but for the time being, the most important thing we need to know is that by default StackPanel will “stack” all the components in a neat vertical stack, stretching them in width. The x: Name property is responsible for the name under which the component will be available to us in the source file. The Background property is responsible, as it is not difficult to guess for the background color of this component.
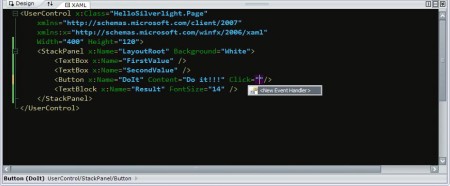
After that, with the help of tags, we create 2 input fields in which you will need to enter the added numbers. Let's call them FirstValue and SecondValue. In addition, for a beautiful appearance, we will set the Margin property to 10. This will add small indents around these fields to each side.
Then, create a button by clicking on which the result will be calculated. Its Content property determines what is written on it. For the button, you must specify a Click event handler. As soon as we write Click, VisualStudio will prompt us to create this handler.
I see no reason to refuse.
To display the result you need to create the last component -. I will not even describe its properties, as the purpose is clear from the name.
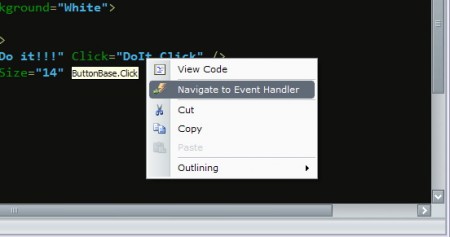
Now you can go to the creation of code directly with peace of mind. The easiest way to do this is by calling the context menu on the name of the “DoIt_Click” handler.
We will go straight to the code editor, in which we will be waiting for the event handler, kindly created by VisualStudio, to wait for us.
We need to enter a little code.
The code, of course, is simplified to a disgrace and is far from ideal, but it does it to the owl. This program will try to translate user input into a number and, if possible, output the result. And if you do not get an error message.
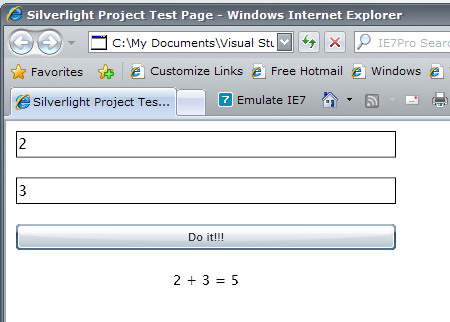
It remains for us to correct syntax errors, and run our program, which has enjoyed the result.
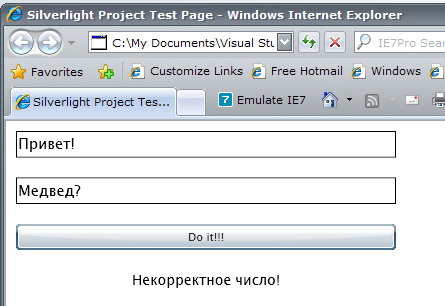
Emergency situations are also handled correctly.
That's all for today, thank you for your attention. Continued to be sure.
PS Maybe I should not publish this in my blog, but one of the existing ones (if so, tell me which one is better), or is it better to have a separate one for Silverlight?
Since the writing of various helovords has already filled the strongest teeth (at least personally with me), then in general, our first example will be more difficult (but no less trivial).
We will write a super online web2.0 number calculator. If someone has a question about web2.0, everything is elementary. Our adder will add exactly 2 numbers, and who says that it is not 2.0 - let it go to write cgi in assembler :).
')
In general, the main thing in any business is a good start. And first we need to create a new project in Visual Studio by selecting the “Silverlight Application” project type for it.
After that, VS will ask us how we want to open this project: whether to create an ASP.NET container project for this purpose, or simply to embed the creation we created into a simple HTML page. I usually choose the second option, although in general they are approximately equivalent in functionality.
Having overcome the agony of choice, we find ourselves in an almost familiar WPF editor. Those unfamiliar with WPF , but those familiar with ASP.NET will find here also a lot of reasons for the emergence of DejaVu.
In short, at the top of the designer’s window, our application is located so to speak “in the flesh,” and at the bottom, we edit the source XAML file, which defines the appearance of our program. Thanks to the well-functioning IntelliSence, as a rule, there are no problems with mastering its syntax (and we will deal with emerging issues in future lessons). In addition to xaml (by default it is called Page.xaml), a source file is created in the language we choose, for C # its name will be Page.xaml.cs. This file is called the “separated” code file, and is used to write all the program logic. As you can see, WPF in general, and Silverlight in particular, welcome the separation of code and presentation. Although ASP.NET programmers are not surprised.
First we will create the necessary controls for our future application.
 <UserControl x: Class = "HelloSilverlight.Page"
     xmlns = "http://schemas.microsoft.com/client/2007"
     xmlns: x = "http://schemas.microsoft.com/winfx/2006/xaml"
     Width = "400" Height = "180">
     <StackPanel x: Name = "LayoutRoot" Background = "White">
         <TextBox x: Name = "FirstValue" Margin = "10" />
         <TextBox x: Name = "SecondValue" Margin = "10" />
         <Button x: Name = "DoIt" Content = "Do it !!!"  Margin = "10" Click = "DoIt_Click" />
         <TextBlock x: Name = "Result" FontSize = "14" TextAlignment = "Center" Margin = "10"> Result goes here </ TextBlock>
     </ StackPanel>
 </ UserControl>
Let's sort it all out by individual tags.
- defines the property of the Silverlight component itself. We are now mainly interested in the Width and Height properties, which define its width and height, respectively. If you remove these properties, the control will occupy all the available space in the HTML page.
- one of the containers for the automatic placement of elements. We will look at them in more detail in one of the following classes, but for the time being, the most important thing we need to know is that by default StackPanel will “stack” all the components in a neat vertical stack, stretching them in width. The x: Name property is responsible for the name under which the component will be available to us in the source file. The Background property is responsible, as it is not difficult to guess for the background color of this component.
After that, with the help of tags, we create 2 input fields in which you will need to enter the added numbers. Let's call them FirstValue and SecondValue. In addition, for a beautiful appearance, we will set the Margin property to 10. This will add small indents around these fields to each side.
Then, create a button by clicking on which the result will be calculated. Its Content property determines what is written on it. For the button, you must specify a Click event handler. As soon as we write Click, VisualStudio will prompt us to create this handler.
I see no reason to refuse.
To display the result you need to create the last component -. I will not even describe its properties, as the purpose is clear from the name.
Now you can go to the creation of code directly with peace of mind. The easiest way to do this is by calling the context menu on the name of the “DoIt_Click” handler.
We will go straight to the code editor, in which we will be waiting for the event handler, kindly created by VisualStudio, to wait for us.
We need to enter a little code.
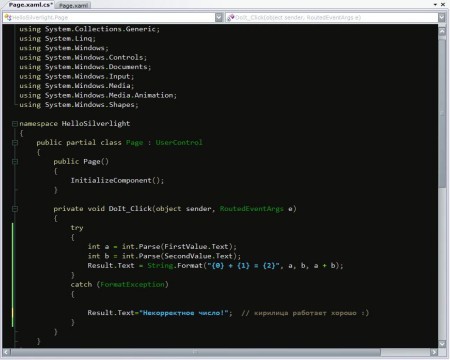
 private void DoIt_Click (object sender, RoutedEventArgs e)
 {
     try
     {
         int a = int.Parse (FirstValue.Text);
         int b = int.Parse (SecondValue.Text);
         Result. Text = String. Format ("{0} + {1} = {2}", a, b, a + b);
     }
     catch (FormatException)
     {
         Result.Text = "Incorrect number!";  // Cyrillic works well :)
     }
 }
The code, of course, is simplified to a disgrace and is far from ideal, but it does it to the owl. This program will try to translate user input into a number and, if possible, output the result. And if you do not get an error message.
It remains for us to correct syntax errors, and run our program, which has enjoyed the result.
Emergency situations are also handled correctly.
That's all for today, thank you for your attention. Continued to be sure.
PS Maybe I should not publish this in my blog, but one of the existing ones (if so, tell me which one is better), or is it better to have a separate one for Silverlight?
Source: https://habr.com/ru/post/22642/
All Articles