We sit, do not touch anyone, we repair old headphones
That moment came when the next headphones out of order. They would have worked for a hundred years, but the weakest point of modern headphones - the wire in the connector area - again made itself felt. Back to the store? Well, no, too straight arms. In addition, you will have to look for exactly such a model, which is not easy, because the liners are gradually replaced by hateful (in me) in-ear earrings. And the sound they have unexpectedly good for this class of headphones.
So, we take a tool in hand, and let's go. Under the cut of photos at 800 KB.
With this technology, I have repaired several pairs of headphones. The lifetime after such a repair still depends on the quality of the wire itself, however it is much longer than from the factory. Old monitor headphones have been living with a similar connector for five years, and some Japanese have lived only 3 weeks (one and a half before the repair).
')
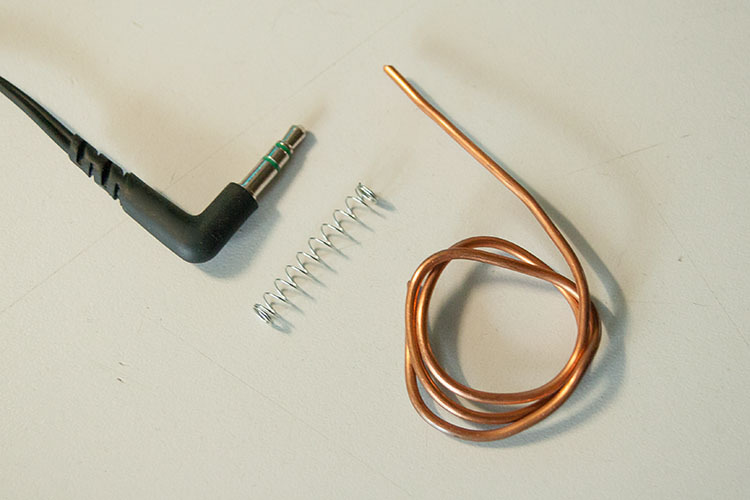
From the materials we need:
From the tools we need first of all a soldering iron and pliers for fine work.
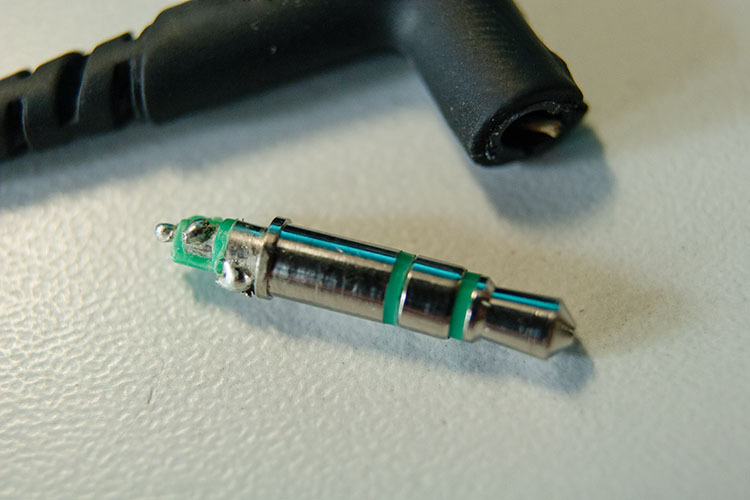
So, the patient in the first photo. First you need to release the plug itself from the rubber case. To do this, make the following incision:

Usually soldered to the plug wires are filled with plastic, which is formed from a small keg. This design is then inserted into a pre-cast rubber casing. At the same headphones, the casing is cast, apparently, right on this keg, and tightly attached to it. It is impossible to disassemble carefully step by step, therefore, after making an incision, we break out the necessary part from plastic. Wires are thin enough to almost unnoticeably come off. Result:
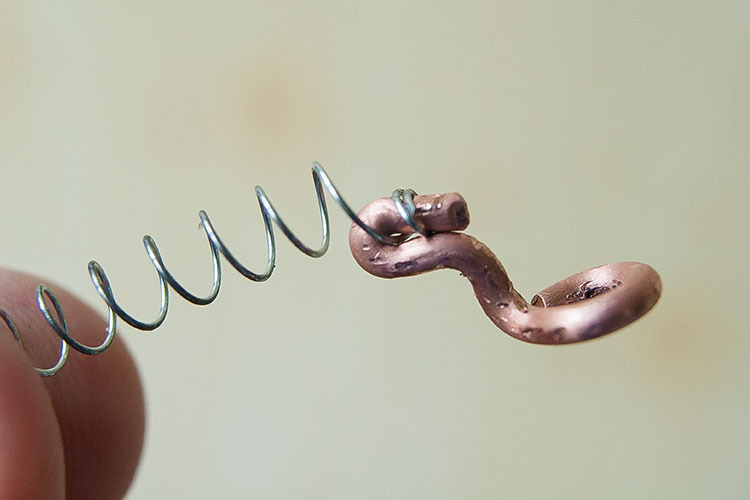
Now we need to make the basis of the structure of copper wire. Before that, it should be cleaned with sandpaper. At first we bend such a loop:


It should fit tightly on the part of the solder pins. Next, we give the basis of this form:

The base is ready. The resulting hook will serve to secure the spring, which will serve as protection against excessive bending of the wire. Now we take the spring, and unwind a few turns:

The rectified part of the spring is folded again. At this time, the diameter of the coils should be slightly less than the diameter of the copper wire. Put the spring on the hook and clamp with pliers like this:
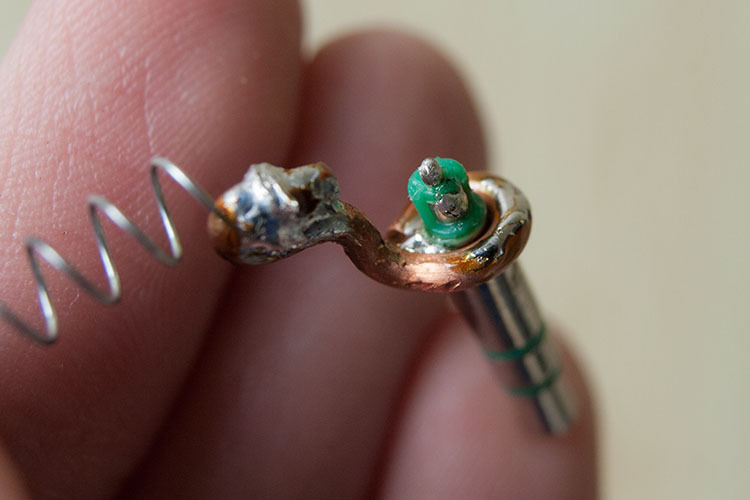
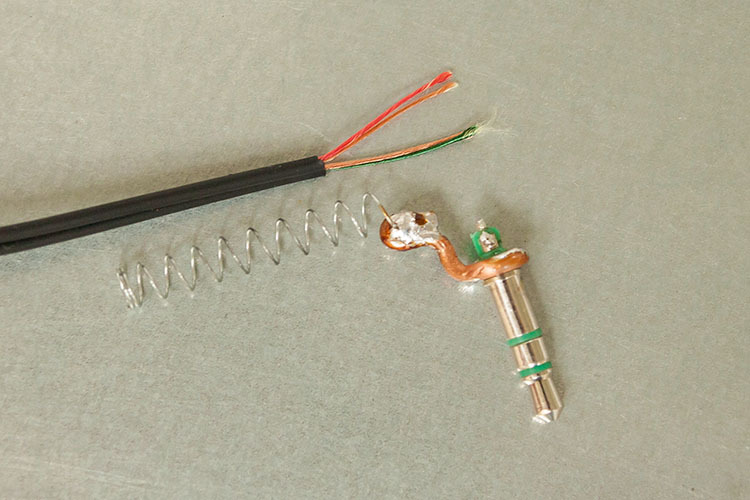
Solder to the base of the plug and spring. On the basis, we immediately pound a small area to which the common wire is soldered. Despite the fact that the spring is made of steel, it is remarkably soldered using a simple rosin flux:
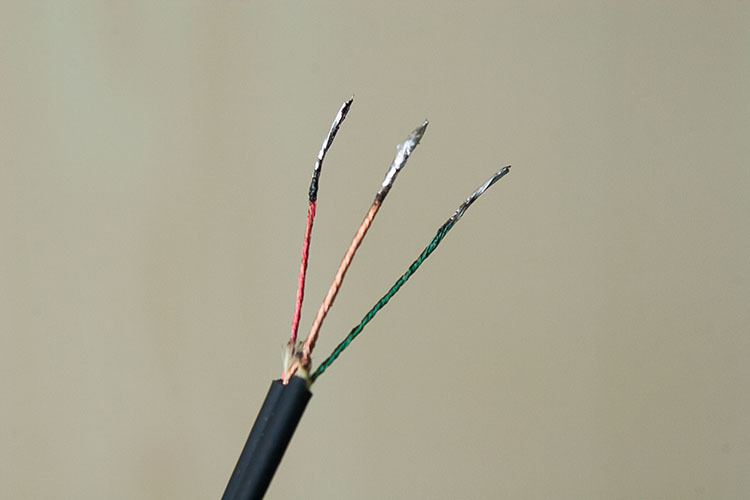
Now we take the wires. We clean a small area from isolation:
The worst thing is to get rid of the fiber on which the wires are twisted. For this, I clamp the wire between the thumbnail and the index pad, and in a movement similar to stripping the wire, I disintegrate the wiring. The veins are collected in a pile with tweezers and twisted together, and the fiber is burned. It used to burn immediately, but the wires after that became brittle, the lacquer burned at great length.
For tinning, I used an aspirin tablet as a flux. Acetylsalicylic acid perfectly removes varnish. Important: her couples are very caustic, do not let them inhale or get into your eyes !
This is what the result should be:
As can be seen, "earth to earth." Finish the wire through a spring and put it on the base with threads, which are then impregnated with superglue:
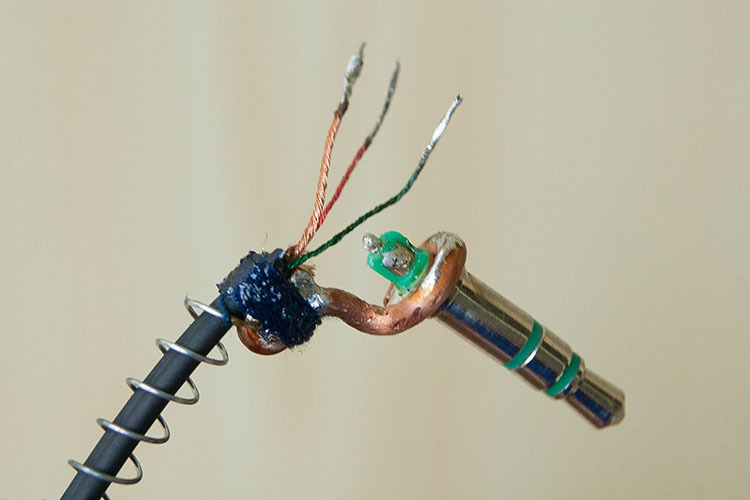
Solder the wires into place. Red wire (right channel) corresponds to the extreme contact. Green, he's left, solder to the middle. The land is soldered to a pre-prepared patch on the basis of.
This is also kung fu, the wires spring and do not want to stay in place. It's time to check the performance of the headphones. If everything is OK - we make the case.
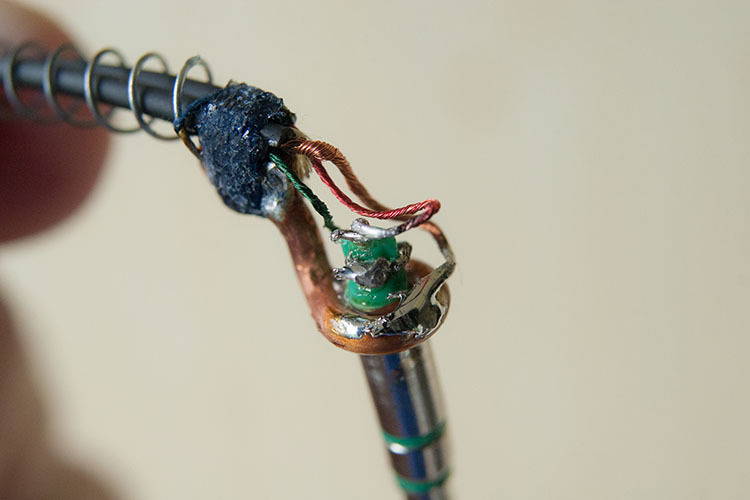
I used to sculpt it from a piece of cold welding. A very simple way, even without requiring a description. The only drawback is that in small quantities it is rather difficult to keep mixing proportions, and hardened welding can be very loose and fragile. This time I decided to try “home composite” - superglue and baking soda. The technology is quite well-known: we pour a handful of soda in the right place, gently dripping into it with superglue. Soda is soaked in a couple of seconds, the glue instantly seizes, and we get a solid and durable plastic. Layer by layer we increase the object, in some places you can put cracked clumps of soda instead of powder.
For example, between the base and the wires in this photo:

I assumed it was more difficult than cold welding. But the reality was even worse than expected. This process took a good half an hour! However, the result is very good. After processing the file, I got this connector:

After painting in black will look very good.
As you can see, the process for assiduous. But once purchased 3.5 mm plugs, except for the Chinese, do not find what to do? Players of one fruit firm have a reliable, but very picky nest, in which the curve of the Chinese plug simply does not touch the contacts. Somehow I was lucky to buy several straight mini-jacks from Neutric, which turned out to be too big and therefore dangerous for the nest, but we could not find corners for sale. Therefore, my instruction will help someone, I am sure.
New dress
Finally painted. The paint on the body lay great, although it was worth a little longer to work with a file.

Well, the hanging test. In my opinion not bad)

So, we take a tool in hand, and let's go. Under the cut of photos at 800 KB.
With this technology, I have repaired several pairs of headphones. The lifetime after such a repair still depends on the quality of the wire itself, however it is much longer than from the factory. Old monitor headphones have been living with a similar connector for five years, and some Japanese have lived only 3 weeks (one and a half before the repair).
')
From the materials we need:
- thick copper wire;
- spring from a fountain pen;
- liquid superglue + soda or cold welding;
- thread.
From the tools we need first of all a soldering iron and pliers for fine work.
So, the patient in the first photo. First you need to release the plug itself from the rubber case. To do this, make the following incision:
Usually soldered to the plug wires are filled with plastic, which is formed from a small keg. This design is then inserted into a pre-cast rubber casing. At the same headphones, the casing is cast, apparently, right on this keg, and tightly attached to it. It is impossible to disassemble carefully step by step, therefore, after making an incision, we break out the necessary part from plastic. Wires are thin enough to almost unnoticeably come off. Result:
Now we need to make the basis of the structure of copper wire. Before that, it should be cleaned with sandpaper. At first we bend such a loop:
It should fit tightly on the part of the solder pins. Next, we give the basis of this form:
The base is ready. The resulting hook will serve to secure the spring, which will serve as protection against excessive bending of the wire. Now we take the spring, and unwind a few turns:
The rectified part of the spring is folded again. At this time, the diameter of the coils should be slightly less than the diameter of the copper wire. Put the spring on the hook and clamp with pliers like this:
Solder to the base of the plug and spring. On the basis, we immediately pound a small area to which the common wire is soldered. Despite the fact that the spring is made of steel, it is remarkably soldered using a simple rosin flux:
Now we take the wires. We clean a small area from isolation:
The worst thing is to get rid of the fiber on which the wires are twisted. For this, I clamp the wire between the thumbnail and the index pad, and in a movement similar to stripping the wire, I disintegrate the wiring. The veins are collected in a pile with tweezers and twisted together, and the fiber is burned. It used to burn immediately, but the wires after that became brittle, the lacquer burned at great length.
For tinning, I used an aspirin tablet as a flux. Acetylsalicylic acid perfectly removes varnish. Important: her couples are very caustic, do not let them inhale or get into your eyes !
This is what the result should be:
As can be seen, "earth to earth." Finish the wire through a spring and put it on the base with threads, which are then impregnated with superglue:
Solder the wires into place. Red wire (right channel) corresponds to the extreme contact. Green, he's left, solder to the middle. The land is soldered to a pre-prepared patch on the basis of.
This is also kung fu, the wires spring and do not want to stay in place. It's time to check the performance of the headphones. If everything is OK - we make the case.
I used to sculpt it from a piece of cold welding. A very simple way, even without requiring a description. The only drawback is that in small quantities it is rather difficult to keep mixing proportions, and hardened welding can be very loose and fragile. This time I decided to try “home composite” - superglue and baking soda. The technology is quite well-known: we pour a handful of soda in the right place, gently dripping into it with superglue. Soda is soaked in a couple of seconds, the glue instantly seizes, and we get a solid and durable plastic. Layer by layer we increase the object, in some places you can put cracked clumps of soda instead of powder.
For example, between the base and the wires in this photo:
I assumed it was more difficult than cold welding. But the reality was even worse than expected. This process took a good half an hour! However, the result is very good. After processing the file, I got this connector:
After painting in black will look very good.
As you can see, the process for assiduous. But once purchased 3.5 mm plugs, except for the Chinese, do not find what to do? Players of one fruit firm have a reliable, but very picky nest, in which the curve of the Chinese plug simply does not touch the contacts. Somehow I was lucky to buy several straight mini-jacks from Neutric, which turned out to be too big and therefore dangerous for the nest, but we could not find corners for sale. Therefore, my instruction will help someone, I am sure.
New dress
Finally painted. The paint on the body lay great, although it was worth a little longer to work with a file.
Well, the hanging test. In my opinion not bad)
Source: https://habr.com/ru/post/226341/
All Articles