Setting up a remote interpreter on Pycharm for Django

In this article I want to tell, as well as show the setting of a useful tool for remote development from the company JetBrains built into IDE Pycharm. This tool has been around for a long time, but many developers do not take this seriously, and prefer to deploy it locally to make changes to the project. When it is much easier on the same server, make a copy of a part of the project and modify or test it on another port using the built-in tools of the remote Pycharm interpreter. Of course, not in all situations is a good option, but for editing, and fine-tuning small projects is very suitable. And if the project is from scratch, then creating it on a remote server eliminates the need for porting and adapting it to the server (hosting), which inevitably leads to the appearance of many bugs and incompatibilities.
Moreover, this approach saves us from such problems:
• on different servers, your Unix and your own jokes, it can take a decent amount of time to deploy locally and adjust the environment to the features of a particular server;
• different versions of python;
• And if in the file req.txt for Django all dependencies are not listed;
etc.
The process of setting up a remote interpreter Pycharm for Django
Go to file-> settings-> deployment
')
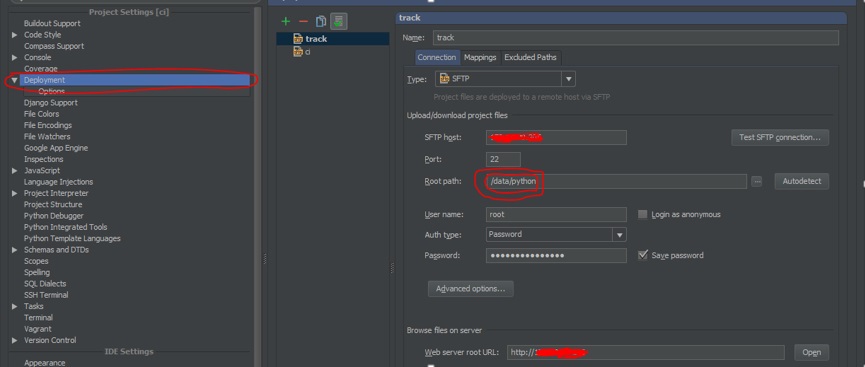
Enter the server connection settings, who has what (SFTP, FTP, etc.). In the "root path" - you need to specify the path to the folder with the projects. In the “Mapping” tab in the “Deployment path on server” field, you must specify the path from the “root path” to the project folder.
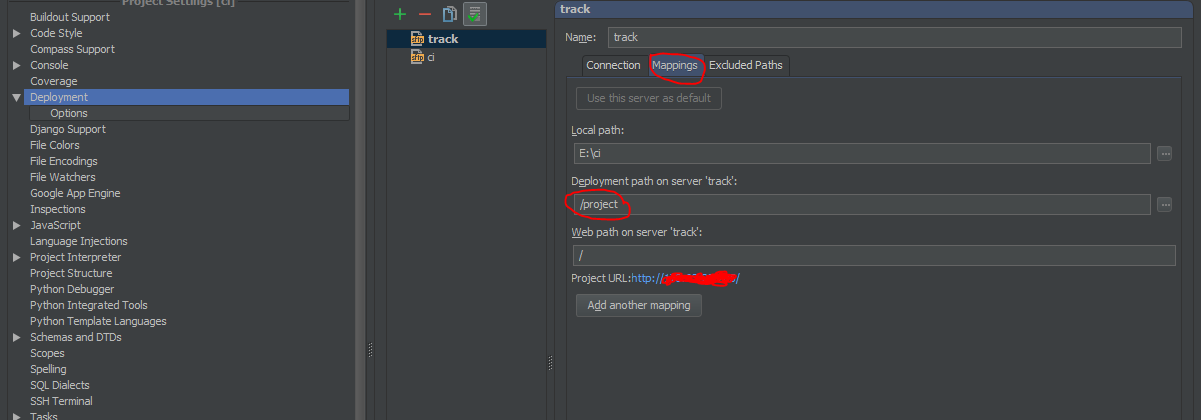
For example:
"Root path" = / data / python
"Deployment path on server" = / project
Under deployment there are options, it is useful to set file uploads to the server using hotkeys, for example, ctrl + s and other settings.
Preparation is completed, proceed accordingly to the settings of the remote interpreter.

The interpreter setting is not much different from the deployment setting (you can fill in part of the settings with the “Fill from deployment server settings” button). Click "Configure Interpreters", select the remote, or if some have already been created, then with the help of a plus sign. Next, you need to specify the path to the python interpreter on the server. After clicking "ok" and wait a little while Pycharm downloads (creates) the image of skeleton python in a place with applications that were installed via pip or similar, which is very convenient, later you can safely move to these files from the code!
The next step is to configure the launch of the Django server using the Pycharm development tools.

In the tools with the right choose "Edit configuration"

In the window that appears, enter “host” 0.0.0.0 in order to receive calls from any ip and “port” which is free on your server. Select the remote interpreter in the “Python interpreter” field that you configured earlier. In the “Environment variables” field, you must specify the variable “DJANGO_SETTINGS_MODULE” and its value, consisting of the name of the main Django application and the file with settings in it.

This completes the configuration of the remote interpreter; to launch it, you can use the button on the toolbar with the right.

Then from the bottom of the server log window appears with all sorts of tools.

It should be noted that in addition to remote debugging, very useful tools (menu-> tools) were built into Pycharm: SSH client, Django-console, Python-console, Debug, and others.
In the screenshot below, the Django console and the SSH client are in split mode.

Conclusion
The development (debugging) method that was presented above is essentially an attempt to reach a new level. Deploying development on the locale is like a patented proven method, but the one described above is a new approach, and no one guarantees its support, although JetBrains try, but as you know, the former always stuff cones. Good luck.
PS
Also, when setting up a remote interpreter, you can use virtualenv, where you can perform completely independent tests when developing or finalizing a project and not affect the server, but this is a separate topic.
Source: https://habr.com/ru/post/226331/
All Articles