Switch to Sketch. Part 2
So, let's continue to explore the program Sketch 3 with the aim of subsequent switching into it from Photoshop. The first part can be read here .
One of the main reasons for pride among developers of Bohemian Coding is the absolute sharpening of all tools for working with pixels. Surely the creators of the program themselves once suffered with Photoshop and Illustrator, until they had the idea to create a graphic editor from scratch, where the most optimal pixel fitting algorithms would be implemented.
')
When you create graphics in Sketch, it is automatically attached to the pixel grid, so you will never get fractional values, which means blurred edges, fluffy lines, and other absurdities. All edges are formed perfectly smooth, and roundness is smoothed out in the best possible way.
But the most impressive feature of Sketch is the ability to fix in one fell swoop any objects that have for some reason formed irregularities and blurring along the edges.
Let's take, for example, a set of simple glyphs created in Illustrator. All of them, when transferred to Sketch, turned out to be somewhat blurred, which can be clearly seen with a high magnification:

And now apply the command Layer> Round To Nearest Pixel Edge. Voila! All the icons are aligned in such a way that there are no deviations from the normal thickness of the lines:
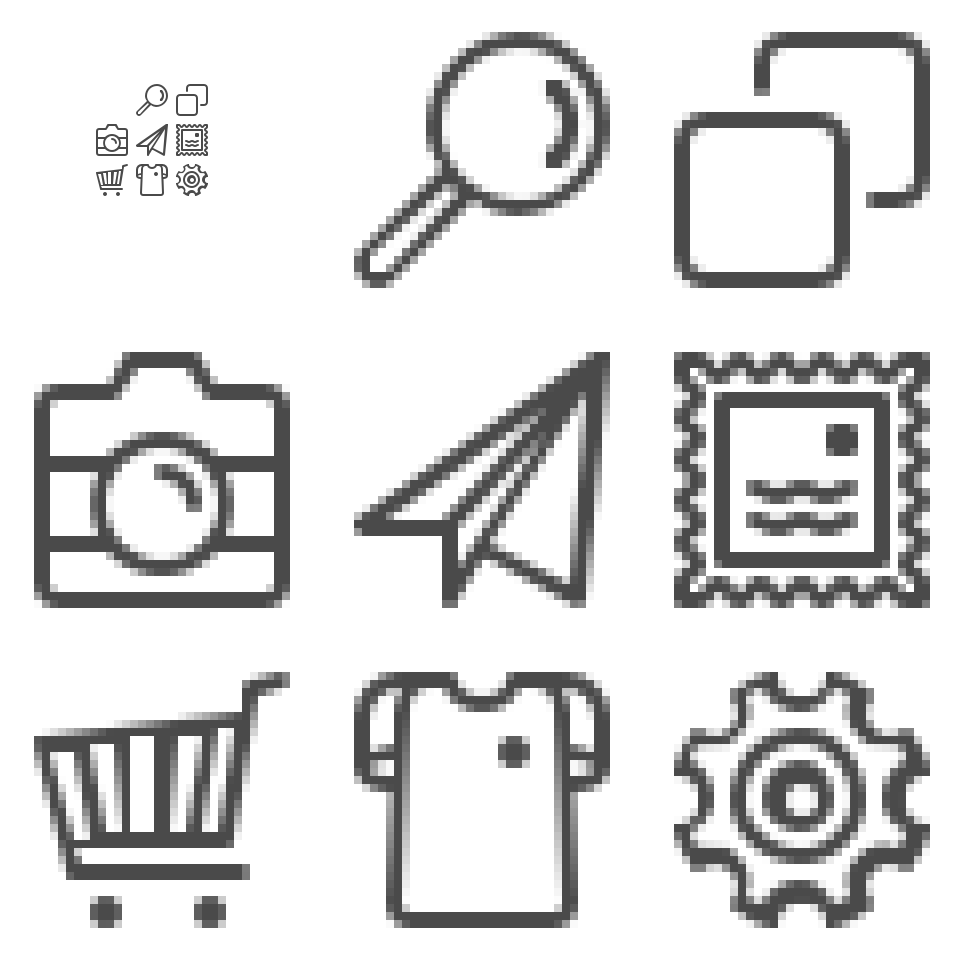
This surprisingly simple, but effective feature can significantly shorten the running time. Personally, I remember many tedious hours spent in cleaning and trimming icons and logos for the client. Moreover, each object had to be processed manually in order to fit to the pixel grid. In Sketch, this is a matter of seconds. Impressive.
However, be careful. Sometimes this function does not work in the best way and some bezier-splines are corrupting, artifacts may appear. It is worth hoping that the developers will refine the algorithm, and the pixelation guarantee will be 100% predictable.
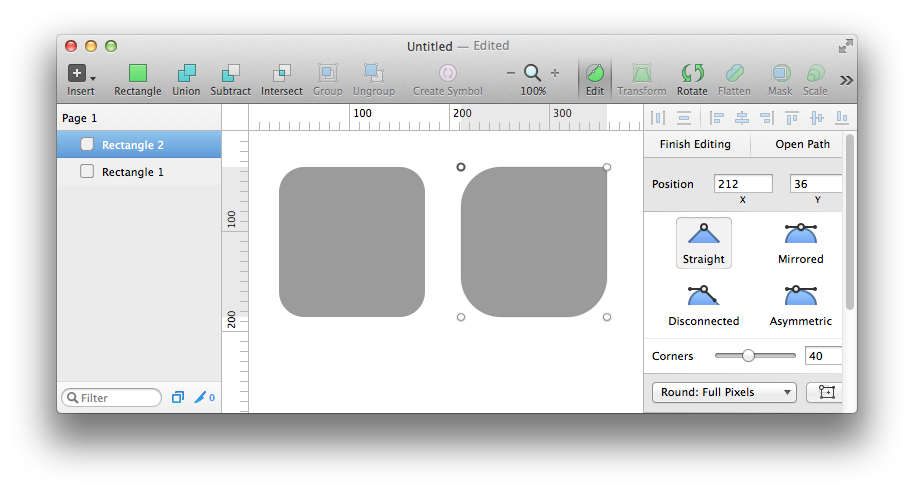
Of course, Sketch is perfectly implemented to create rectangles with rounded corners. Whatever you do with your rectangles, there is always the possibility to change the rounding of the corners of both individual rectangles, and all selected at once, as well as specifically selected corners:
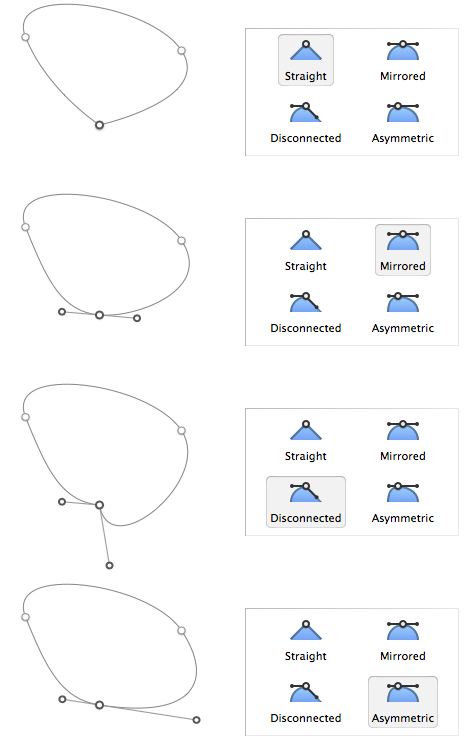
By the way, by double-clicking on an object or pressing the Enter key you get into the editing mode of its components. And then you can choose and smash the knots of bezier-splines, convert an anchor point into one of four types and do a number of other useful manipulations.
In this mode, you can select individual points, as well as specify how they interact with each other. In Bohemian Coding, it was decided that pixel splitting is not very desirable, therefore integer values are taken as a basis. But sometimes there are cases when a finer adjustment is needed. And in this case, the ability to adjust nodes on an object with a half-pixel value was added:

In this mode, you can select one or several nodes and, using the mouse, gently move so that the desired border is formed with half transparency. In some cases this can be very useful.
In edit mode, the nodes and segments of the curve are highlighted when you hover the cursor.
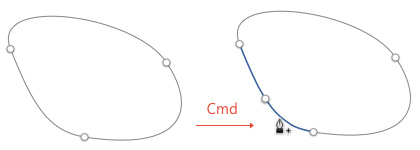
You can easily add new nodes on curves. It is enough to move the cursor to one of the faces, which is highlighted by a blue line. When you click a new nodal point will be created. Double click on the created point will switch it between the corner (Straight) and smoothed with symmetrical guides (Mirrored). When the Cmd key is held down and when you hover the cursor on any of the segments of the curve, a probable point in this part of the curve, equidistant from the existing node points, can be shown, which you can create with a subsequent click. Very handy feature:
You can delete any point by selecting it and pressing the Backspace or Delete key.
It is a pity, but the program developers overdid it a bit, hiding two important functions when creating Bezier curves. Both “Finish Editing” buttons (replaced by pressing Esc or Enter) and “Close Path” (alas, by default they are not replaced by anything) are barely visible at the top in the inspector panel:
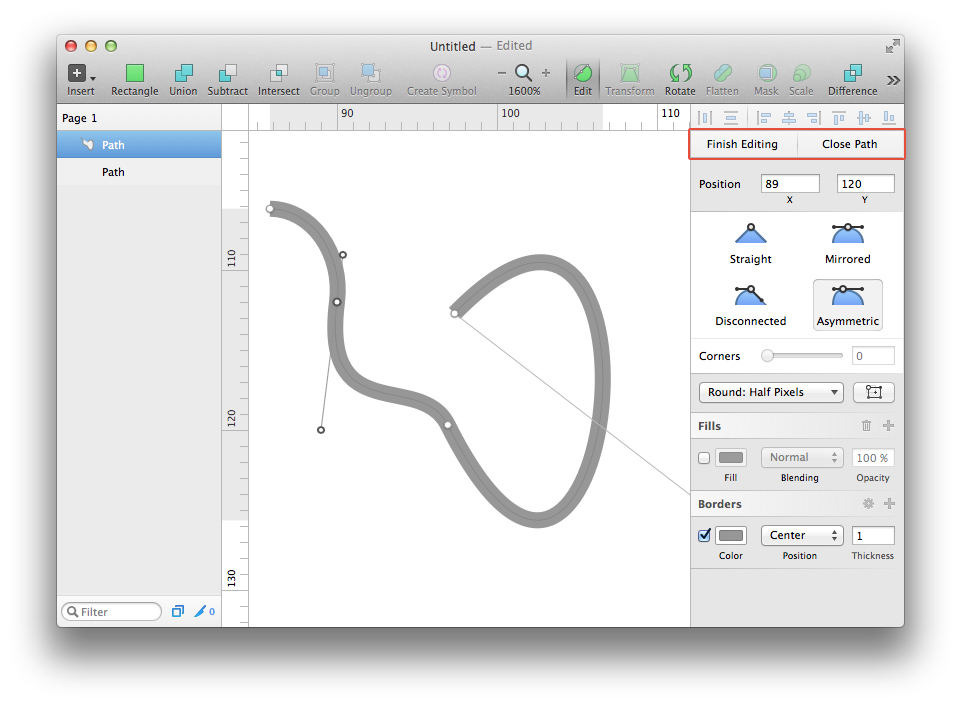
Working with the Pencil or Vector tools you will not be able to stop further drawing the curve if you did not press the Close Path button or the Esc key. After that, you can select arbitrary points of your object (by simply pressing or framing around the desired points) and make any transformations with them, for example, change the type of selected points:
If you press the “Open Path” button on a closed curve, you will again get the curve drawing tool without being able to stop it and proceed to the selection of the required points. And while you can not close the vector shape, just by moving the cursor to the end point, as in Illustrator. The logic is not entirely clear, but you can get used to it.
I assigned the Cmd-Alt-P keyboard shortcut to the Layer> Paths> Close Path function, and now in the process of creating Bezier curves, you can easily close the leaf nodes:

In general, creating and editing curves in Sketch is a pleasure, especially after rather ridiculous attempts to introduce the functions of the illustrator inside Photoshop.
And by the way, you should remember one rule for Sketch: if you go somewhere wrong or press something wrong, always press the Esc key - almost everywhere in Sketch it cancels the inclusion of any mode, so it’s hard to make a mistake.
Sketch has a function for changing the width of the stroke on arbitrary sections. You need to select an object with a stroke and enable Layer> Paths> Stroke Width. You will be able to add or remove paired control points on the contour, which allow you to narrow or expand the stroke:

Any stroke can be easily turned into a fill using the Layer> Paths> Vectorize Stroke function. I have assigned the Cmd-Alt-R keyboard shortcut to this feature:

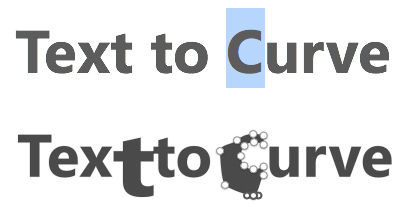
Text can also be turned into editable curves using the command Type> Convert Text To Outlines (Shift-Cmd-O):
In most cases, the conversion will be successful, but at times unwanted artifacts may appear.
When converting to curves, Sketch creates a group in which each letter of the converted text is a separate layer. Accordingly, only each character will be edited separately. Select all the characters at once and edit all the nodal points of different characters at the same time will not work.
The fact is that Sketch has a somewhat peculiar and not quite familiar work with boolean operations. The developers of Bohemian Coding have decided that any Boolean operations on vector forms will be non-destructive. That is, at any time you can change the type of interaction forms, as well as edit any component.
In this case, the result of a Boolean operation becomes a group containing the original forms in an intact form. This group is displayed in the layers panel with a small icon, which is a contour resulting from the articulation of the original forms. A gray icon appears on the right, indicating what type of joint the overlying form interacts with the underlying. Clicking on this icon causes the popup to appear, where you can select any other type of boolean operation:
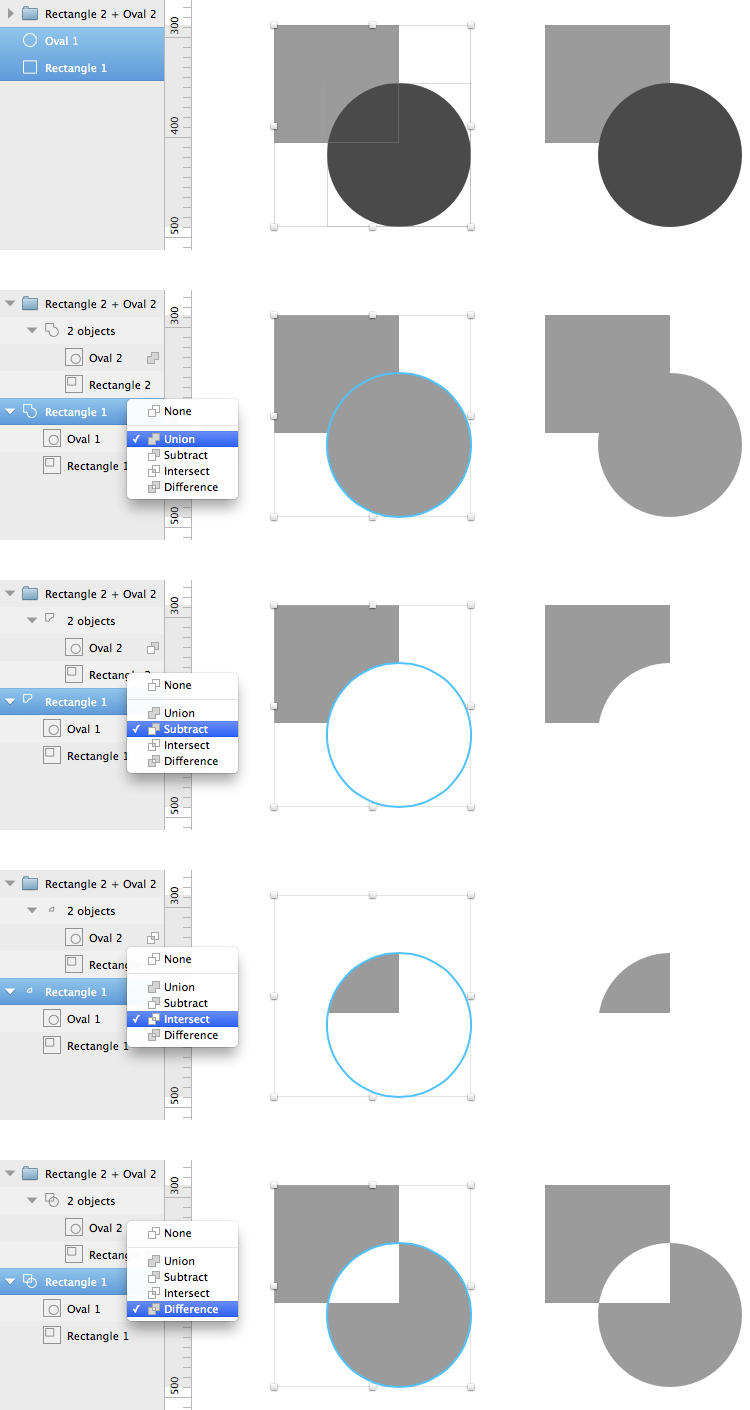
However, the developers have provided the possibility of combining several forms into one. Using the Layer> Paths> Flatten command (or when you click on the corresponding button on the toolbar), you merge those parts of the original forms that either complement each other (Union), either subtract one from the other (Substract), or intersect (Intersect). In this case, the result will be just one new object. If there are areas of intersection or holes, then such areas will appear as separate layers. Therefore, in the case of a Boolean Difference operation, you always get at least two objects placed in a group. Much more unexpected options will be obtained if you try to apply Flatten to more complex joint types between several forms. A bit unusual, but you can get used to:

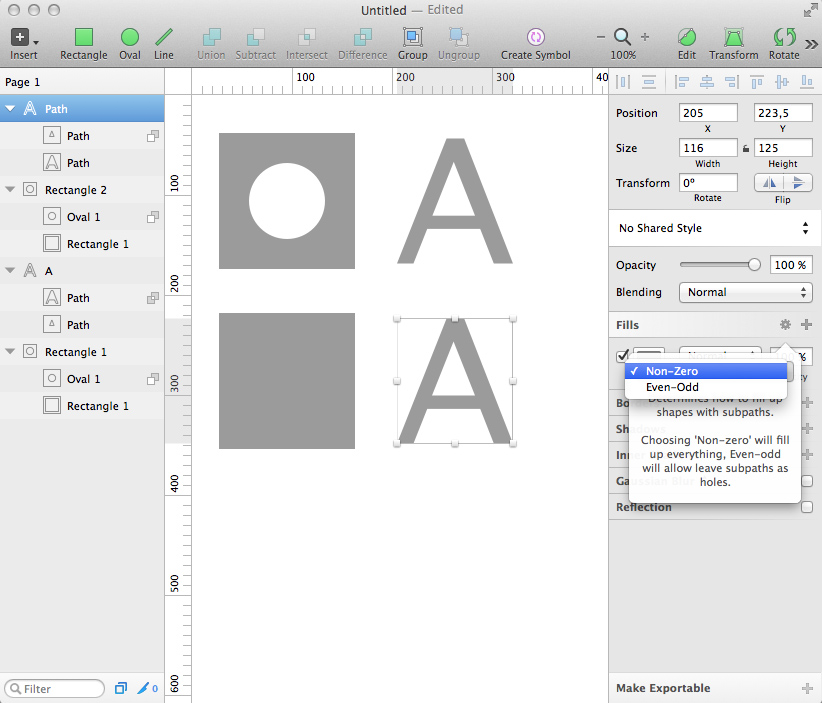
By the way, you can hide the display of holes without changing the type of Boolean operation and without touching the forms themselves. To do this, in the inspector's panel on the right, click on the small gear icon in the Fill section and instead of Even-Odd mode, select the Non-Zero mode from the pop-up list. However, this method does not always work. For example, in the curved letter A, the hole remained uncovered, while the round hole inside the rectangle disappeared (although the round form itself is still present in the group):
If Flatten was not used, objects combined using any Boolean operations can be disconnected using the command Layer> Paths> Split:

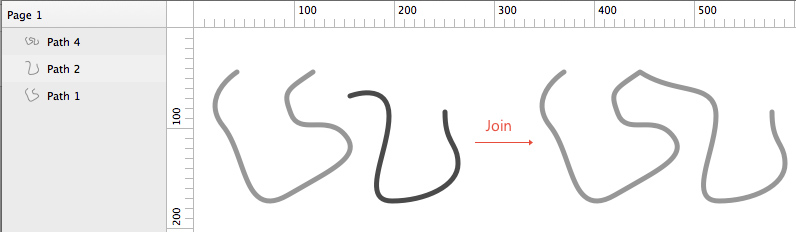
In addition, you can join unclosed forms using the command Layer> Paths> Join. Select two or more such objects, apply Join, and one object is formed, in which the nearest ends of the original forms will be connected to one anchor point:
That's all for now. In the following sections, I will talk about my further discoveries in the wonderful program Sketch.
Source: https://habr.com/ru/post/226099/
All Articles