Restore order in the hierarchy view
 Not so long ago, the Unity developers pleased us with the new version 4.5 (and in 4.6, very soon, we are waiting for a new GUI, hooray!), And among the list of changes one item concerns the sorting in the Hierarchy window: "sorting of elements is of name. "
What does it mean? You can manually drag and drop items in the hierarchy window in the order you want. And if earlier you collected a scene based on the automatic sorting by name, now the list of objects on the scene has turned into a mess.
We could just do as it was ... but we will do better.
')
In the picture you see the usual sorting by name, with the exception of three auxiliary objects, which are located below. In addition, to focus on complex scenes will be easier due to the color differentiation of
To begin with, I want to say that Unity is an extremely flexible tool that you can modify at will, or use more than a thousand ready-made modifications . To do this, you need to write scripts using types located in the UnityEditor namespace, and put the scripts themselves in the Editor folder (after creating it).
First look at BaseHierarchySort . If you worked with the IComparable interface in C #, then you will immediately understand how it works. In Unity, we need to create a script that inherits from the BaseHierarchySort class and overrides the int Compare method (GameObject, GameObject) , in which you compare two objects. If the first must go before the second, the method must return -1, if after - 1, otherwise - 0.
The documentation recommends using the ready-made EditorUtility.NaturalCompare method (string, string) , which compares two strings in a “human” way (counting the consecutive digits as one number). Thus, "xx11" comes after "xx2".
I’m more used to standard
public class CustomHierarchySorting : BaseHierarchySort { public override int Compare(GameObject lhs, GameObject rhs) { if (lhs == rhs) return 0; if (lhs == null) return -1; if (rhs == null) return 1; if (lhs.tag == "Auxiliary" && rhs.tag != "Auxiliary") return 1; if (lhs.tag != "Auxiliary" && rhs.tag == "Auxiliary") return -1; return String.Compare(lhs.name, rhs.name); } } In my example, the objects with the “Auxiliary” tag when sorting will be at the end of the list.
As soon as this script is in the Editor folder, a button will appear in the Hierarchy window, allowing you to choose which script to use for sorting:
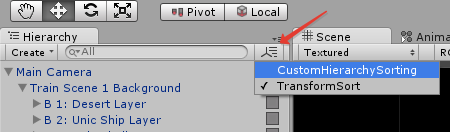
Great, we quickly implemented the necessary functionality in several lines. Icons will be a bit more complicated.
In a hurry, I drew several multi-colored icons and added them to the Editor \ Icons folder:


Adding icons, as well as various types of sorts, were left for implementation by Unity users, providing for this a set of methods and events .
We will use the EditorApplication.hierarchyWindowChanged () event that occurs each time the hierarchy window is updated and EditorApplication.hierarchyWindowItemOnGUI (int, Rect) , which is called when an element is drawn in the hierarchy window, passing the element id method and the Rect to the drawing area.
We will also use the class attribute InitializeOnLoad , thanks to which the class constructor (in which we subscribe to these events) will be called automatically when Unity is launched:
[InitializeOnLoad] public class HierarchyIcons { static readonly Texture2D Cyan; static readonly Texture2D Orange; static readonly Texture2D Yellow; static readonly Texture2D Gray; static readonly List<int> CyanMarked = new List<int>(); static readonly List<int> OrangeMarked = new List<int>(); static readonly List<int> YellowMarked = new List<int>(); static readonly List<int> GrayMarked = new List<int>(); static HierarchyIcons() { Cyan = AssetDatabase.LoadAssetAtPath("Assets/Editor/Icons/IconCyan.png", typeof(Texture2D)) as Texture2D; Orange = AssetDatabase.LoadAssetAtPath("Assets/Editor/Icons/IconOrange.png", typeof(Texture2D)) as Texture2D; Yellow = AssetDatabase.LoadAssetAtPath("Assets/Editor/Icons/IconYellow.png", typeof(Texture2D)) as Texture2D; Gray = AssetDatabase.LoadAssetAtPath("Assets/Editor/Icons/IconGray.png", typeof(Texture2D)) as Texture2D; EditorApplication.hierarchyWindowChanged += Update; EditorApplication.hierarchyWindowItemOnGUI += DrawHierarchyItemIcon; } static void Update() { CyanMarked.Clear(); OrangeMarked.Clear(); YellowMarked.Clear(); GrayMarked.Clear(); GameObject[] go = Object.FindObjectsOfType(typeof(GameObject)) as GameObject[]; foreach (GameObject g in go) { if (g == null) continue; int instanceId = g.GetInstanceID(); if (g.tag == "Player") OrangeMarked.Add(instanceId); else if (g.tag == "Interactive") CyanMarked.Add(instanceId); else if (g.tag == "Auxiliary") YellowMarked.Add(instanceId); else GrayMarked.Add(instanceId); } } static void DrawHierarchyItemIcon(int instanceId, Rect selectionRect) { Rect r = new Rect(selectionRect); rx += r.width - 25; r.width = 18; if (CyanMarked.Contains(instanceId)) GUI.Label(r, Cyan); if (OrangeMarked.Contains(instanceId)) GUI.Label(r, Orange); if (YellowMarked.Contains(instanceId)) GUI.Label(r, Yellow); if (GrayMarked.Contains(instanceId)) GUI.Label(r, Gray); } } In this example, at each update, the HierarchyView rebuilds the lists of objects corresponding to different icons. To compile these lists, I use the tag definition, but you can use the search by object components. So you can assign an icon to all objects that have a Collider with the property isTrigger = true, for example.
Done!
Separately, I want to note that such manipulations with icons can seriously affect the performance while working in the editor, especially if you use the search by object components. To temporarily disable icon rendering, if necessary, test the performance of the game, you could add to the HierarchyIcons class static methods for subscribing / unsubscribing for hierarchy window update events.
Source: https://habr.com/ru/post/226009/
All Articles