How we implemented DKIM in Mail.Ru for business

Recently, Habré already had an article about how “Mail.Ru for business” is getting better thanks to your comments: we told you how to realize your wishes. Today, I want to dwell on one of the embodied womens - the ability to customize your own DKIM-signature. For us, it was one of the priorities: setting DKIM allows domain owners to verify the sender of a letter. In this post, I will talk about how we implemented this feature and how to set up a DKIM signature for your domain.
A little about why DKIM technology is needed.
Wikipedia reminds us that “DomainKeys Identified Mail (DKIM) technology combines several existing anti-phishing and anti-spam methods in order to improve the quality of the classification and identification of legitimate email. Instead of the traditional IP address, the DKIM adds a digital signature associated with the organization’s domain name to determine the sender of the message. The signature is automatically verified on the recipient’s side. ”That is, whenever a user sends an email, our server adds a special header with a digital DKIM signature to it. When generating a signature, a secret key is used (for each domain its own) and extracts from the letter. This header allows the recipient server to verify that the email was indeed sent by the owner of this domain.
')
DKIM signatures are one of the factors that allow ours, as well as other anti-spam systems, to separate letters of trustworthy senders from fakes. For example, DKIM provides the technology DMARC, which we have already written about . DMARC allows you to recognize and filter spam and phishing emails disguised as messages from well-known services.
In addition, the DKIM signature is needed for the FBL technology to work (thanks to the FBL, mailing list senders can collect feedback on customer base status and loyalty, as well as check how subscribers respond to mailings and refine the content of letters).
In general, setting up DKIM signatures is certainly a useful and necessary thing, so the question “To do or not?” Did not arise. We set to work. Then we will talk in detail about how we implemented this functionality in Mail.Ru for Business. If you do not want the details, we recommend that you immediately go to the “How do I set up DKIM?” Item.
How setting up DKIM signatures appeared in Mail.Ru for Business
To send letters, we use a very common mail transfer agent (MTA, Mail Transfer Agent) exim4. It already has built-in tools for placing DKIM signatures in outgoing messages. Until recently, we all signed our letters in exactly this way. However, the problem is that the number of connected business domains is constantly growing, and each domain has its own secret key. If earlier it was enough to decompose the keys once for all servers and specify the path to these keys to Exim, now this solution is no longer valid. The problem could be solved by “teaching” Exim to apply for a key to a centralized database. So we decided to do.No sooner said than done. Many experts value Exim for its rich customization options. Using the built-in configuration language, you can easily teach Exim to access data in flat files, Berkeley databases, and even execute SQL queries in relational databases such as MySQL. For the needs of the mail server of an average company, the configuration capabilities are enough for the eyes. If something more is needed, then Exim has opportunities for writing its own lookup module that can be used in configurations along with built-in capabilities.
To request a key from the database, a small auxiliary lookup module is created. He installs a connection to the database, authorizes, searches for the necessary shard, replica, decrypts data, etc., providing a simple dictionary interface to the outside. The process of creating a module is briefly described below.
First, add the src / lookups / dkim.c file to the source tree (do not forget to add it to the build system by analogy with already existing modules). It contains the source of our module.
Next, we describe in the file the structure of the new lookup requests:
/* */ static lookup_info _lookup_info1 = { US"dkim_privkey", /* lookup name */ lookup_querystyle, _open_connection, /* open function */ NULL, /* no check function */ _get_priv_key, /* find function */ _close_connection, /* close function */ _tidy_cache, /* tidy function */ NULL, /* no quoting function */ NULL /* no version function */ }; /* */ static lookup_info _lookup_info2 = { US"dkim_selector", /* lookup name */ … }; /* */ static lookup_info _lookup_info3 = { US"dkim_domain", /* lookup name */ … }; static lookup_info *_lookup_list[] = { &_lookup_info1, &_lookup_info2, &_lookup_info3 }; lookup_module_info dkim_lookup_module_info = { LOOKUP_MODULE_INFO_MAGIC, _lookup_list, 3 }; Callback functions in structures have a clear interface and purpose. Details of the implementation of these functions are beyond the scope of the article. I note only that the documentation and examples are enough for the eyes to understand all this.
After the implementation of the module internals, it remains to register it. We go to the src / drtables.c file and add the description of the module (where specifically to insert the lines, it is clear from the context - by analogy with the standard code):
extern lookup_module_info dkim_lookup_module_i void init_lookup_list(void) { … addlookupmodule(NULL, &dkim_lookup_module_info); ... } This is what the use of the module in the Exim configuration looks like:
begin transports remote_smtp: driver = smtp dkim_domain = ${lookup dkim_domain{$sender_address_domain}{$value}{DKIM_DEFAULT_DOMAIN}} dkim_selector = ${lookup dkim_selector{$sender_address_domain}{$value}{DKIM_DEFAULT_SELECTOR}} dkim_private_key = ${lookup dkim_privkey{$sender_address_domain}{$value}{DKIM_DEFAULT_KEY}} Probably, you have already noticed that in order to fill all the parameters in the config, three lookups are made. We decided to just use caching: the first request receives all the necessary information at once and stores it in the internal variable of the module, subsequent requests check whether the necessary information is cached, and if so, then they don’t apply to the database, they give it ready.
The scheme of work is as follows: the domain administrator through the admin panel adds an existing one or generates a new secret and public DKIM key. The admin panel stores them in the keystore. Each time an email is sent on behalf of the business domain, Exim requests its secret key from the database. If there is no key, then the default key is used for signing.
To communicate with the database, our standard component Kapron is used, which we already described earlier in another article .
How do I configure DKIM?
If you already use Mail.Ru for business, then setting up your own DKIM signature is very simple: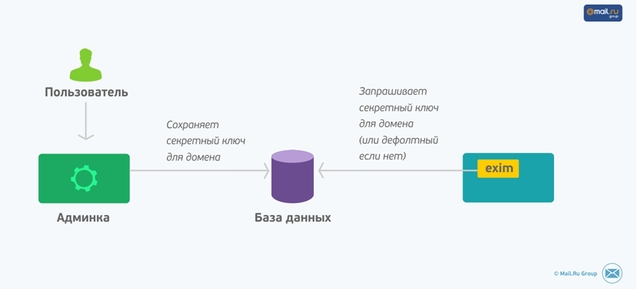
- Go to biz.mail.ru with authorization of the domain administrator's mailbox.
- Select the connected domain for which you want to configure the DKIM signature.
- Go to the "Server Status" section and check whether the MX record is configured correctly. After the successful verification of the MX record, the value of the TXT record will appear, which must be set in the DNS editor.
- Copy the value of the TXT record and set it in your domain’s DNS editor.
- Wait a few hours after setting the record so that the information will spread to all DNS servers.
- If the record is set up correctly and has passed all of our checks, we will send you a letter about successful setup and start signing all your letters with the correct DKIM signature.
If you have any questions about the configuration and use of DKIM-signature, leave them in the comments.
Source: https://habr.com/ru/post/225955/
All Articles