Creating audio plug-ins, part 5
All posts series:
Part 1. Introduction and setup
Part 2. Learning Code
Part 3. VST and AU
Part 4. Digital Distortion
Part 5. Presets and GUI
Part 6. Signal synthesis
Part 7. Receive MIDI Messages
Part 8. Virtual Keyboard
Part 9. Envelopes
Part 10. Refinement GUI
Part 11. Filter
Part 12. Low-frequency oscillator
Part 13. Redesign
Part 14. Polyphony 1
Part 15. Polyphony 2
Part 16. Antialiasing
Let's add some presets for the plugin and create a [relatively] nice interface.
Preset - this is the setting that allows you to store specific values of the parameters. At the moment, in our code, presets consist of names and values for all parameters, but, as we will see later, other data can be stored here. Presets are sometimes called programs.
First, let's make the GUI window wider. Change the corresponding constant in resource.h :
')
In DigitalDistortion.h, we will declare a
Note that the parameter values vary from 0 to 100, not from 0 to 1. These values refer to the
Instead of calling the
Finally, we need to change the constant that is passed when the base class constructor is called (this is somewhere around the 13th line):
If the value of this constant is greater than the actual number of presets, the rest will simply be called “Empty”.
Run the build of VST2. You may have to remove the plugin from the track and reload it in order for the freshly written presets to appear. They can be changed using the drop-down list, which is located directly above the plug-in GUI. Try different - the handle rotates according to the value in the preset.
I remind you that
To the right of the drop-down menu there is a button that opens the presets menu:
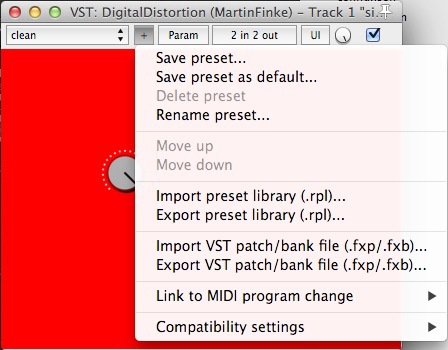
Try renaming the preset and twisting the knob. Its position will not be remembered if you remove the plugin from the track and load it again. To save this data, click the “Export VST patch / bank file (.fxp / .fxb) ...” and save the test.fxb file to your desktop. Now remove the plugin, add it again and load this file with the settings.
VST plug-ins for storing a separate preset use FXP format, and FXB for storing a bank of presets.
Run the target AU (you may first have to go to the Edit Scheme so that it runs along with the host). REAPER defaults to “No preset”, but in the drop-down list all the presets are in place and everything works as it should. Saving presets in the plugin works differently - we cannot import and export preset banks. The processes of saving / loading are described by Oli Larkin in more detail in this post .
It's time to finally start creating a beautiful interface!
We want to achieve this result:
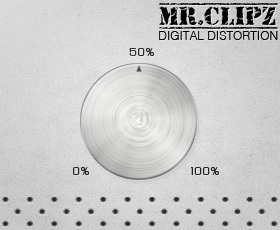
This is certainly not awesome cool, but we will learn how to add graphics and, even more interesting, how to make a rotating pen.
Download this tiff with design. Open in Photoshop (or whatever you like) and take a look at the different layers and groups.
As you can see, the only thing that changes is a pen. So the rest can be simply saved in one png:

Save the picture above to your desktop. In Xcode in Project Navigator, expand the Resources folder and drag the background image there:

It is necessary to put a tick in front of the Copy items in folder and add our image for all targets:

In Visual Studio, adding resources (such as graphics) is a bit different. Adding for all Targets on Macs means that the image will be included in the .app , .vst and .component files that you provide to your users. In Visual Studio, to do this, first drop our image into the project \ resources \ img subfolder, and then edit the .rc file in the project. In this case, DigitalDistortion.rc . His hat looks like this:
First, resource.h is connected, so that all
After a minute, add
Every time we add an image to the project, we need to add a similar line.
Let's pick up our picture in the plugin. Somewhere around the 60th line in the resource.h file you need to resize the window:
and add a unique ID and image file name:
In DigitalDistortion.cpp, you need to change the constructor to use our file instead of red:
It was easy. Let's collect the APP and admire the picture:

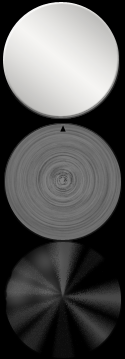
The handle is a little tricky. It has a texture and reflections, it consists of several layers. When you twist the knob, the metal rotates, but the lamp on the ceiling does not (hopefully). So some components must rotate, and some related to lighting, should not. Therefore, we can not save the pen as one picture and twist it in the process.
I did this: the pen has a base that does not rotate; on top of it is a metallic texture that rotates; and on top of all this are reflections that do not rotate. All three parts are presented separately (here I added a black background, just so that the borders and light parts could be seen):
For our task there is a very good tool: KnobMan. This is a free program, especially for creating pens. Download , run, and open the file I prepared in it:

All I did here was add three layers and slightly change some coordinates so that the metal texture rotates correctly. If you want to understand the program better, read the manual .
Export this handle (Cmd + E on Mac, Ctrl + E on Windows) and name the file knob.png (or download mine ). In this png there are 128 frames for different positions of the handle, and only metal with an arrow rotates. That is necessary.
In Xcode, delete the existing knob.png (right click, Delete ). In the dialog that appears, select Move to Trash . Now drag the new knob.png into the img folder and do the same as we did with the background image.
Since the file name has not changed, we do not need to change resource.h . Switch to DigitalDistortion.cpp right away; change the
As you can see, we don’t even have to specify for the WDL that the new pen is bigger. We only need to specify the number of frames and set the coordinates.
Start VST2 and see how the frames change when you turn the knob. However, I was confused by the fact that the plugin is called distortion, and with the handle turned out 100%, we have clear sound.
Somewhere around the 90th row, you need to make changes:
To prevent division by zero, which we talked about earlier, you need to change the default value to
Now everything should work as it should. From the semantic point of view, it would be good to rename the
With a minimal amount of theoretical bells and whistles, we have created a working distortion with a custom interface. This gave us a general idea of what plugin development involves.
Now that we have this understanding, we can proceed to more interesting things. Next time I will talk about the synthesis of sound waves.
Files with all the results of the work can be downloaded .
There are many free examples for KnobMan here and here .
When creating the GUI, I used this Photoshop tutorial. Thanks to the author!
And thanks g200kg for KnobMan!
Original articles:
martin-finke.de/blog/articles/audio-plugins-006-presets
martin-finke.de/blog/articles/audio-plugins-007-gui
Part 1. Introduction and setup
Part 2. Learning Code
Part 3. VST and AU
Part 4. Digital Distortion
Part 5. Presets and GUI
Part 6. Signal synthesis
Part 7. Receive MIDI Messages
Part 8. Virtual Keyboard
Part 9. Envelopes
Part 10. Refinement GUI
Part 11. Filter
Part 12. Low-frequency oscillator
Part 13. Redesign
Part 14. Polyphony 1
Part 15. Polyphony 2
Part 16. Antialiasing
Let's add some presets for the plugin and create a [relatively] nice interface.
Presets
Preset - this is the setting that allows you to store specific values of the parameters. At the moment, in our code, presets consist of names and values for all parameters, but, as we will see later, other data can be stored here. Presets are sometimes called programs.
First, let's make the GUI window wider. Change the corresponding constant in resource.h :
')
// GUI default dimensions #define GUI_WIDTH 400 In DigitalDistortion.h, we will declare a
private member function of the class: private: double mThreshold; void CreatePresets(); DigitalDistortion.cpp void DigitalDistortion::CreatePresets() { MakePreset("clean", 100.0); MakePreset("slightly distorted", 80.0); MakePreset("woooo", 40.0); MakePreset("waaaa", 20.0); MakePreset("buzzz!!!", 0.01); } MakePreset takes the preset name and values for all parameters as arguments. The order of the arguments is defined in enum EParams at the top of the file.Note that the parameter values vary from 0 to 100, not from 0 to 1. These values refer to the
kThreshold parameter, not to the mThreshold variable.Instead of calling the
MakeDefaultPreset function at the end of the constructor, write a call to CreatePresets : DigitalDistortion::DigitalDistortion(IPlugInstanceInfo instanceInfo) : IPLUG_CTOR(kNumParams, kNumPrograms, instanceInfo), mThreshold(1.) { // ... CreatePresets(); } Finally, we need to change the constant that is passed when the base class constructor is called (this is somewhere around the 13th line):
const int kNumPrograms = 5; If the value of this constant is greater than the actual number of presets, the rest will simply be called “Empty”.
Run the build of VST2. You may have to remove the plugin from the track and reload it in order for the freshly written presets to appear. They can be changed using the drop-down list, which is located directly above the plug-in GUI. Try different - the handle rotates according to the value in the preset.
I remind you that
OnParamChange is called when each parameter changes.To the right of the drop-down menu there is a button that opens the presets menu:
Try renaming the preset and twisting the knob. Its position will not be remembered if you remove the plugin from the track and load it again. To save this data, click the “Export VST patch / bank file (.fxp / .fxb) ...” and save the test.fxb file to your desktop. Now remove the plugin, add it again and load this file with the settings.
VST plug-ins for storing a separate preset use FXP format, and FXB for storing a bank of presets.
Run the target AU (you may first have to go to the Edit Scheme so that it runs along with the host). REAPER defaults to “No preset”, but in the drop-down list all the presets are in place and everything works as it should. Saving presets in the plugin works differently - we cannot import and export preset banks. The processes of saving / loading are described by Oli Larkin in more detail in this post .
It's time to finally start creating a beautiful interface!
GUI
We want to achieve this result:
This is certainly not awesome cool, but we will learn how to add graphics and, even more interesting, how to make a rotating pen.
Download this tiff with design. Open in Photoshop (or whatever you like) and take a look at the different layers and groups.
As you can see, the only thing that changes is a pen. So the rest can be simply saved in one png:
Add background for Mac builds
Save the picture above to your desktop. In Xcode in Project Navigator, expand the Resources folder and drag the background image there:
It is necessary to put a tick in front of the Copy items in folder and add our image for all targets:
Add background for builds on Windows
In Visual Studio, adding resources (such as graphics) is a bit different. Adding for all Targets on Macs means that the image will be included in the .app , .vst and .component files that you provide to your users. In Visual Studio, to do this, first drop our image into the project \ resources \ img subfolder, and then edit the .rc file in the project. In this case, DigitalDistortion.rc . His hat looks like this:
#include "resource.h" KNOB_ID PNG KNOB_FN First, resource.h is connected, so that all
#define from it are available in this file. The next line announces that a pen will be added. To add a background, add this line: BACKGROUND_ID PNG BACKGROUND_FN After a minute, add
BACKGROUND_ID and BACKGROUND_FN to resource.h .Every time we add an image to the project, we need to add a similar line.
Background image
Let's pick up our picture in the plugin. Somewhere around the 60th line in the resource.h file you need to resize the window:
// GUI default dimensions #define GUI_WIDTH 280 #define GUI_HEIGHT 230 and add a unique ID and image file name:
// Unique IDs for each image resource. #define KNOB_ID 101 #define BACKGROUND_ID 102 // Image resource locations for this plug. #define KNOB_FN "resources/img/knob.png" #define BACKGROUND_FN "resources/img/background.png" In DigitalDistortion.cpp, you need to change the constructor to use our file instead of red:
// pGraphics->AttachPanelBackground(&COLOR_RED); pGraphics->AttachBackground(BACKGROUND_ID, BACKGROUND_FN); It was easy. Let's collect the APP and admire the picture:
A pen
The handle is a little tricky. It has a texture and reflections, it consists of several layers. When you twist the knob, the metal rotates, but the lamp on the ceiling does not (hopefully). So some components must rotate, and some related to lighting, should not. Therefore, we can not save the pen as one picture and twist it in the process.
I did this: the pen has a base that does not rotate; on top of it is a metallic texture that rotates; and on top of all this are reflections that do not rotate. All three parts are presented separately (here I added a black background, just so that the borders and light parts could be seen):
For our task there is a very good tool: KnobMan. This is a free program, especially for creating pens. Download , run, and open the file I prepared in it:
All I did here was add three layers and slightly change some coordinates so that the metal texture rotates correctly. If you want to understand the program better, read the manual .
Export this handle (Cmd + E on Mac, Ctrl + E on Windows) and name the file knob.png (or download mine ). In this png there are 128 frames for different positions of the handle, and only metal with an arrow rotates. That is necessary.
In Xcode, delete the existing knob.png (right click, Delete ). In the dialog that appears, select Move to Trash . Now drag the new knob.png into the img folder and do the same as we did with the background image.
Since the file name has not changed, we do not need to change resource.h . Switch to DigitalDistortion.cpp right away; change the
enum ELayout : enum ELayout { kWidth = GUI_WIDTH, kHeight = GUI_HEIGHT, kThresholdX = 79, kThresholdY = 62, kKnobFrames = 128 }; As you can see, we don’t even have to specify for the WDL that the new pen is bigger. We only need to specify the number of frames and set the coordinates.
Start VST2 and see how the frames change when you turn the knob. However, I was confused by the fact that the plugin is called distortion, and with the handle turned out 100%, we have clear sound.
Handle direction
Somewhere around the 90th row, you need to make changes:
mThreshold = 1 - (GetParam(kThreshold)->Value() / 100.); To prevent division by zero, which we talked about earlier, you need to change the default value to
0 , and the maximum value to 99.99 (approximately line 30): GetParam(kThreshold)->InitDouble("Threshold", 0.0, 0.0, 99.99, 0.01, "%"); Now everything should work as it should. From the semantic point of view, it would be good to rename the
Threshold variable to something like DistortionAmount , since the only thing that represents the threshold value is the mThreshold variable.Interim results
With a minimal amount of theoretical bells and whistles, we have created a working distortion with a custom interface. This gave us a general idea of what plugin development involves.
Now that we have this understanding, we can proceed to more interesting things. Next time I will talk about the synthesis of sound waves.
Files with all the results of the work can be downloaded .
Additional materials
There are many free examples for KnobMan here and here .
When creating the GUI, I used this Photoshop tutorial. Thanks to the author!
And thanks g200kg for KnobMan!
Original articles:
martin-finke.de/blog/articles/audio-plugins-006-presets
martin-finke.de/blog/articles/audio-plugins-007-gui
Source: https://habr.com/ru/post/225755/
All Articles