Useful tools for development on Laravel

A few months ago, our company decided to choose a corporate PHP framework that we would use for most projects. Before that, we had a whole zoo: Symfony, Zend Framework, Yii - who liked what more. After reviewing popular frameworks, we decided to try Laravel . The result of several training days was a synopsis in which a simple application is built, but since the detailed tutorial is already present on Habré , I decided to write only four tools that will be useful in development and which are not mentioned for some reason in tutorials:
Laravel IDE Helper Generator
For the first time installing Laravel and opening your favorite IDE, you will experience shock (well, I was certainly shocked, maybe you will be
')
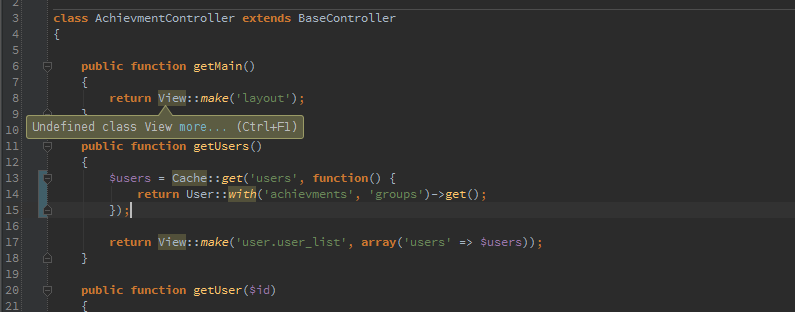
Of course, you can completely abandon the façades in your code, but there is not a radical solution - Laravel IDE Helper Generator . This is a package that, based on the code used in your application, generates a helper file containing generated static facade classes. Classes are not used by the application in any way, but are needed only for IDE autocompletion.
Installation
Install via composer
composer require barryvdh/laravel-ide-helper:1.* Add a new service provider to the array of providers in the file
app/config/app.php : 'Barryvdh\LaravelIdeHelper\IdeHelperServiceProvider' You can now generate a helper file for facades.
php artisan clear-compiled php artisan ide-helper:generate php artisan optimize if you did not describe the connection with the database, then the error Could not determine driver/connection for DB - this is normal, the file will still be generatedIn order to generate a dock unit with a description of eloquent-models (based on their respective tables):
php artisan ide-helper:models The generator will offer you to add the dock unit to the existing class of the model or to a separate _ide_helper_models.php file. I prefer to add to models, but this is a matter of taste.Laravel 4 Debugbar
Laravel Debugbar is a package that integrates into the PHP Debug Bar framework.
Very handy tool that allows you to control and debug code. You will always be aware of how many requests occurred (if you suddenly forgot to add
::with('smth') ), how much time they took, what was recorded in the log, you can see information about the current user, which views were used to generate the page, which data was transferred to them and much more. Also, at any time you can view information about previous requests, even if there was a redirect.This is what an open debagbar looks like:
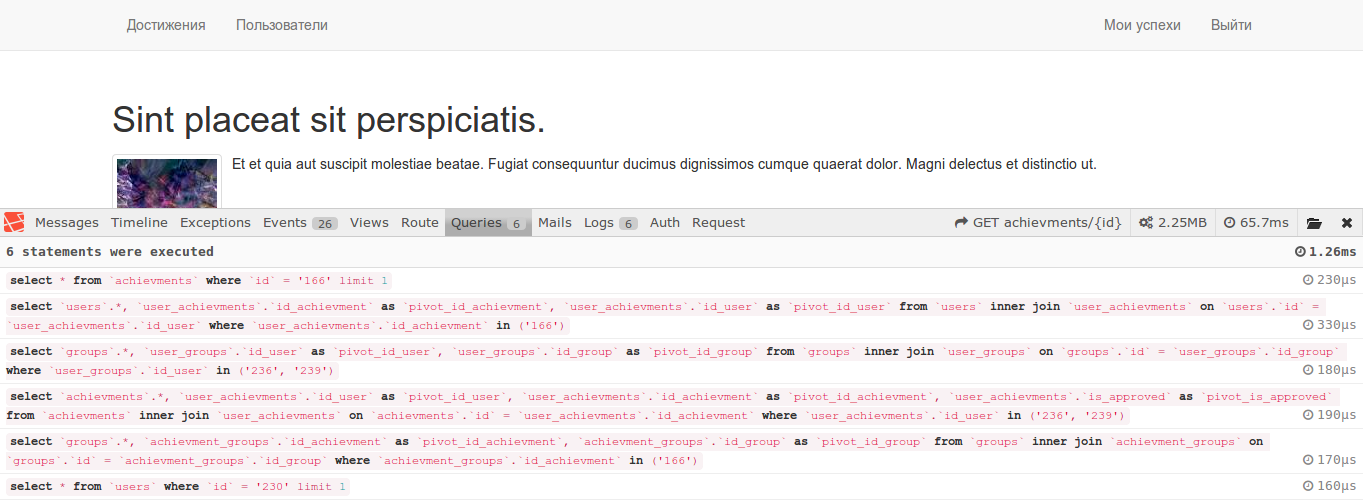
Debugbar can display the following information (besides standard PHP Debug Bar collectors, some custom ones are included):
QueryCollector: All completed queries and how long they tookRouteCollector: Current Route InformationViewCollector: Used views (optionally can show data transferred to views, but this may affect the speed of your application)EventsCollector: All events - it is worth studying, in Laravel many different eventsLaravelCollector: Laravel version and environment information (disabled by default)SymfonyRequestCollector: Request and Answer InformationLogsCollector: Shows the latest log entries (even made with previous requests). (disabled by default)FilesCollector: .php files that were used during the request (disabled by default)ConfigCollector: Application Configuration (disabled by default)LogCollector: Log Monolog. If theMessagesCollectorcollector is enabled, then this log also shows aMessageCollectorPhpInfoCollector: PHP Version InformationMessagesCollector: Log messages (works with any PSR-3 loggers)TimeDataCollector: RuntimeMemoryCollector: The amount of memory usedExceptionsCollector: Exceptions
By the way, in Laravel 4.2.2 , Whoops was removed from the framework (this is the most beautiful error page for developers), now it uses SymfonyDisplayer, which simply shows the stack-trace. If you are used to seeing request parameters and stuff, then Laravel Debugbar will help you relive this change more easily. It works, of course, only in
debug mode.Installation
composer require barryvdh/laravel-debugbar:dev-master Add a new provider to the array of providers in the file
app/config/app.php : 'Barryvdh\Debugbar\ServiceProvider', Add the resources of this package (styles, js)
php artisan debugbar:publish In the documentation for the package, the author notes that resources may vary from version to version and advises adding this line to your
composer.json : "post-update-cmd": [ "php artisan debugbar:publish" ], In order to edit the list of collectors used, you first need to add a configuration file for this package:
php artisan config:publish barryvdh/laravel-debugbar And then edit the file
app/config/packages/barryvdh/laravel-debugbar/config.php .Faker
Faker is a library that is not tied to Laravel, but very convenient to use in siders. Faker generates a variety of test data: strings, numbers, texts of any size. Different kinds of user data: names (including gender), phone numbers, emails. Address data: streets, countries, coordinates, etc. Time in various formats, addresses of sites, ip, user agents of browsers, data of bank cards, colors, barcodes, various hashes.
We should also mention the generation of images; for this, Faker uses the LoremPixel generator and carefully copies image files of the required size and directionality to the specified folder:
$filename = $faker->image('image/dir', 300, 300, 'cats'); It is also possible to “fix” random test data, that is, to make so that Faker generates the same data each time, it’s enough to set the seed:
$faker = Faker\Factory::create(); $faker->seed(1234); echo $faker->name; // 'Vera Gzhel' You can ensure the uniqueness and optional data:
for ($i=0; $i < 5; $i++) { // $values[]= $faker->unique()->randomDigit; } for ($i=0; $i < 5; $i++) { // , null $values[]= $faker->optional()->randomDigit; } You can also localize data by passing the desired locale to the constructor.
$faker = Faker\Factory::create('ru_RU'); echo $faker->name; // There is no installation as such, just load it with a composer
composer require fzaninotto/faker:1.4.*@dev and use
$faker = Faker\Factory::create('ru_RU'); echo $faker->name; Homestead
In Laravel 4.2, we were presented with Homestead - Vagrant- box (virtual machine image), which contains everything needed for development on Laravel (and not only, ultimately, it is just a virtual machine). I think it’s very cool that the popular framework introduced us to official boxing. Hopefully this will help popularize Linux for developers in general. And many novice developers who use Windows and try to start sitting on Denver or something like that, having tried Linux (and with the vagrant is not difficult at all) will develop in a professional and close-to-combat environment. Therefore, I will continue to pay more attention to installing Homestead on Windows, and I hope I will make the world a bit better.
Homestead will eliminate the need to think about your operating system or your coworker's operating system, versions or the availability of the required software required for development.
It will allow you to add new sites to your developer environment using only one command, and also synchronizes any number of specified folders in the configuration between your “real” system (we will call it guest ), and the virtual machine. That is, you can continue to edit the code in your operating system using your favorite editor, and the files will be automatically synchronized with the virtual machine.
Homestead includes:
- Ubuntu 14.04
- PHP 5.5
- Nginx
- Mysql
- Postgres
- Node (+ Bower, Grunt and Gulp)
- Redis
- Memcached
- Beanstalkd
- Laravel envoy
- Fabric + HipChat Extension
Installation
To begin, install Vagrant and VirtualBox , the installers do not ask too many questions, so the installation will take place without serious consequences.
After installing the installer, the installer will ask you to reboot the system. During the reboot, go into the BIOS and check if Intel Virtualization Technology (VT-x, AMD-V, to be honest, I'm not sure how it can be called on different systems) is enabled, if not, then turn it on.
Open the console, if you are using Windows, then open Git Bash (and if it is not installed, then install ), we still need it, add the Homestead box by doing:
vagrant box add laravel/homestead While the box is downloading, clone the repository with the configuration for Homestead. Documentation advises to clone to the folder where all your projects will be stored (for example,
C:/Users/YourName/Workspace ): git clone https://github.com/laravel/homestead.git Go to the
homestead folder and open the Homestead.yaml configuration file, this is how it will look like: --- ip: "192.168.10.10" # ip memory: 2048 # cpus: 1 # authorize: /Users/me/.ssh/id_rsa.pub # keys: - /Users/me/.ssh/id_rsa # folders: # , - map: /Users/me/Code # ( ) to: /home/vagrant/Code # sites: # , - map: homestead.app # , to: /home/vagrant/Code/Laravel/public # (!) , (index.php) If you do not have ssh keys, generate them using
ssh-keygen (available in Git Bash on Windows): ssh-keygen -t rsa -C "your@email.com" Register public and private keys in
Homestead.yaml .Specify the folder where your projects will be stored (or already stored) on the guest (your) machine and the corresponding path on the virtual one.
Create a test site folder, for example,
test in the projects directory and add the file test/public/index.php : // test/public/index.php <?php phpinfo(); Register in
Homestead.yaml path to it and the desired address. As a result, Homestead.yaml (for Windows) will look something like this: --- ip: "192.168.10.10" memory: 2048 cpus: 1 authorize: C:\Users\YourName\.ssh\id_rsa.pub keys: - C:\Users\YourName\.ssh\id_rsa folders: - map: C:\Users\YourName\Workspace to: /home/vagrant/Workspace sites: - map: test.dev to: /home/vagrant/Workspace/test/public - map: anothersite.dev to: /home/vagrant/Workspace/anothersite/public Add the following lines to the guest's hosts file (for Windows:
C:\Windows\System32\drivers\etc\hosts ): 127.0.0.1 test.dev This setup is complete, it is worth noting that you will have to configure the system once, in future work you will not have to repeat these steps.
Run by running in the homestead directory:
vagrant up After vagrant initializes and starts the virtual machine, you can test its work by going to test.dev : 8000.
That's all. Now the only thing you need to work is the
vagrant up command.Using
The following guest ports are redirected to your virtual machine:
SSH: 2222 -> 22
HTTP: 8000 -> 80
MySQL: 33060 -> 3306
Postgres: 54320 -> 5432
That is, you can connect, for example, to mysql from the client machine like this:
mysql -u homestead -p -P 33060 -h 127.0.0.1 User names and passwords for postgresql and mysql - both vagrant / secret and root / secret.
If you connect to the database from inside your virtual machine, then use the standard ports.
Log in to the virtual machine via ssh:
vagrant ssh Allvagrant-commands must be run from thehomesteaddirectory
There are two ways to add new sites:
Add a new website to Homestead.yaml
sites: - map: test.dev to: /home/vagrant/Workspace/test/public - map: anothersite.dev to: /home/vagrant/Workspace/anothersite/public - map: new.dev to: /home/vagrant/Workspace/new/public
and execute:vagrant provisionOr go to the virtual machine and use the serve command
vagrant ssh serve new.dev /home/vagrant/Workspace/new/public
After adding any of these methods, do not forget to update the hosts file:
127.0.0.1 new.devThat's all. Pleasant development!
Source: https://habr.com/ru/post/225627/
All Articles