Develop iOS8 application on Apple Swift
The article is a kind of continuation of the article “ Meet, Swift! » By Helecta , as well as the free translation of the article Developing iOS Apps Using Swift Tutorial Part 2 .
So, in the first article we wrote a simple Single View application that includes a table with several cells.
This time we will dive a bit and do some more ambitious things. We will access the iTunes Search API, parse the response received in JSON and display the results in the Table View.
At first glance it may seem that all this is quite difficult and there is a lot of work to be done, but in fact it is not. All of the above is a fairly simple functionality for iOS applications, and every self-respecting iOS developer should be able to.
We will need a Single View Application with the added Table View. We will not dwell on this, since all this is simply described in the first article.
')
First, we need to get a pointer to our Table View in order to use it in the application code. Go to the ViewController.swift file and immediately in the initialization of the class (class ViewController: UIViewController, UITableViewDataSource, UITableViewDelegate {) add the following line:
This will allow us to associate the Table View in the Storyboard with the variable “appsTableView”.
Go to Storyboard. Click on the View Controller with the control held down and drag the cursor to the Table View, thereby linking these objects. In the Outlets menu that appears, select “appsTableView”.

Now, after we have connected the interface, we can execute our API requests.
In the ViewController.swift file inside the initialization of the ViewController class, we create the searchItunesFor (searchTerm: String) function.
Let's take it in order.
We correct our search query so that the iTunes API gets a text like “First + Second + Third + Words” instead of “First% 20Second% 20 ...”. To do this, we use the stringByReplacingOccurencesOfString method available in NSString, which replaces spaces with a "+".
Next, we clear the resulting string from characters that are not supported by the URL.
The next two lines define the NSURL object that will be used as a request to the API.
Pay attention to the following two lines:
The first takes the standard NSURLSession object that is used for network calls.
The second creates a task that sends the request.
Finally, the task.resume () line starts the query.
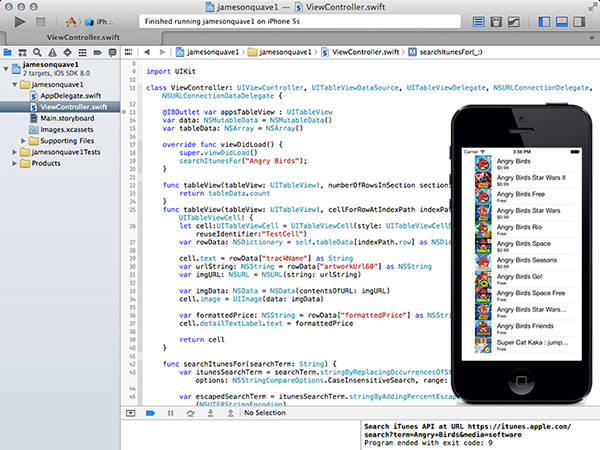
We got a method that, when called, performs a search in iTunes. Paste it at the end of the viewDidLoad method in our ViewController.
Now, in order to get an answer, you need to add an object that will store the search results.
Therefore, we add an NSMutableData instance and an NSArray array to store the data for our table (inside the ViewController class initialization, for example, immediately after the @IBOutlet pointer var appsTableView: UITableView).
Now, let's combine the functions that the NSURLConnection will send to our class. Since this is a delegate of our request, any information from NSURLConnection will be returned by the protocol methods defined in NSURLConnectionDataDelegate and NSURLConnectionDelegate. Therefore, in the initialization of ViewController, we also indicate NSURLConnectionDelegate, NSURLConnectionDataDelegate, there will be something like:
We have to add the largest part of the code of our application for processing the received information.
When the NSURLConnection receives a response, the didReceiveResponse method is called.
Here we simply reset our data, if they were, by setting self.data = NSMutableData () to create a new object.
After the connection is established, we begin to receive data in the didReceiveData method. Here, the data: NSData argument is passed, where all the information we are interested in is located. We need to keep all the parts received in the response, so we attach them to the self.data object created above.
Finally, after we receive all the information in the response, the connectionDidFinishLoading method is called, where we can already start using the result.
We will use the NSJSONSerialization class to convert raw data into useful information in the form of NSDictionary dictionary objects.
Now that we’ve made sure that we’ve received a response from iTunes, a simple verification of the “results” key will be enough to make sure that we got exactly what we expected, so we can set the self.tableData object to be equal to the results, and also call the method The appsTableView.reloadData () table to update its contents.
To initialize the Table View in the first article, we needed to define two functions: one returns the number of rows in the table, the second created the cells and described their contents.
Let's update these functions, according to new functionality.
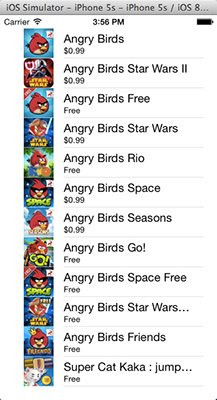
The numberOfRowsInSection function now simply returns the number of objects received in the response.
The cellForRowAtIndexPath function instead of displaying the line number now displays the name of the object, its cover and cost.
If everything is good and you managed to launch the application, you may notice some “lags” during its operation. This is due to the fact that we have not foreseen several things that we will pay attention to in the next article.
PS: After the release of my translation, the author has updated the lesson a little by optimizing the code a little. I tried to bring the translation into conformity.
So, in the first article we wrote a simple Single View application that includes a table with several cells.
This time we will dive a bit and do some more ambitious things. We will access the iTunes Search API, parse the response received in JSON and display the results in the Table View.
At first glance it may seem that all this is quite difficult and there is a lot of work to be done, but in fact it is not. All of the above is a fairly simple functionality for iOS applications, and every self-respecting iOS developer should be able to.
We will need a Single View Application with the added Table View. We will not dwell on this, since all this is simply described in the first article.
')
Interface connection
First, we need to get a pointer to our Table View in order to use it in the application code. Go to the ViewController.swift file and immediately in the initialization of the class (class ViewController: UIViewController, UITableViewDataSource, UITableViewDelegate {) add the following line:
@IBOutlet var appsTableView : UITableView This will allow us to associate the Table View in the Storyboard with the variable “appsTableView”.
Go to Storyboard. Click on the View Controller with the control held down and drag the cursor to the Table View, thereby linking these objects. In the Outlets menu that appears, select “appsTableView”.
Execution of the request API
Now, after we have connected the interface, we can execute our API requests.
In the ViewController.swift file inside the initialization of the ViewController class, we create the searchItunesFor (searchTerm: String) function.
func searchItunesFor(searchTerm: String) { // The iTunes API "+", . var itunesSearchTerm = searchTerm.stringByReplacingOccurrencesOfString(" ", withString: "+", options: NSStringCompareOptions.CaseInsensitiveSearch, range: nil) // , URL-friendly var escapedSearchTerm = itunesSearchTerm.stringByAddingPercentEscapesUsingEncoding(NSUTF8StringEncoding) var urlPath = "https://itunes.apple.com/search?term=\(escapedSearchTerm)&media=software" var url: NSURL = NSURL(string: urlPath) var session = NSURLSession.sharedSession() var task = session.dataTaskWithURL(url, completionHandler: {data, response, error -> Void in println("Task completed") if(error) { println(error.localizedDescription) } var err: NSError? var jsonResult = NSJSONSerialization.JSONObjectWithData(data, options: NSJSONReadingOptions.MutableContainers, error: &err) as NSDictionary if(err?) { println(error.localizedDescription) } var results: NSArray = jsonResult["results"] as NSArray dispatch_async(dispatch_get_main_queue(), { self.tableData = results self.appsTableView.reloadData() }) }) task.resume() } Let's take it in order.
We correct our search query so that the iTunes API gets a text like “First + Second + Third + Words” instead of “First% 20Second% 20 ...”. To do this, we use the stringByReplacingOccurencesOfString method available in NSString, which replaces spaces with a "+".
Next, we clear the resulting string from characters that are not supported by the URL.
The next two lines define the NSURL object that will be used as a request to the API.
Pay attention to the following two lines:
var session = NSURLSession.sharedSession() var task = session.dataTaskWithURL(url, completionHandler: {data, response, error -> Void in The first takes the standard NSURLSession object that is used for network calls.
The second creates a task that sends the request.
Finally, the task.resume () line starts the query.
Preparing to receive a response
We got a method that, when called, performs a search in iTunes. Paste it at the end of the viewDidLoad method in our ViewController.
override func viewDidLoad() { super.viewDidLoad() searchItunesFor("Angry Birds") } Now, in order to get an answer, you need to add an object that will store the search results.
Therefore, we add an NSMutableData instance and an NSArray array to store the data for our table (inside the ViewController class initialization, for example, immediately after the @IBOutlet pointer var appsTableView: UITableView).
var data: NSMutableData = NSMutableData() var tableData: NSArray = NSArray() Now, let's combine the functions that the NSURLConnection will send to our class. Since this is a delegate of our request, any information from NSURLConnection will be returned by the protocol methods defined in NSURLConnectionDataDelegate and NSURLConnectionDelegate. Therefore, in the initialization of ViewController, we also indicate NSURLConnectionDelegate, NSURLConnectionDataDelegate, there will be something like:
class ViewController: UIViewController, UITableViewDataSource, UITableViewDelegate, NSURLConnectionDelegate, NSURLConnectionDataDelegate { Getting an answer
We have to add the largest part of the code of our application for processing the received information.
func connection(didReceiveResponse: NSURLConnection!, didReceiveResponse response: NSURLResponse!) { self.data = NSMutableData() } func connection(connection: NSURLConnection!, didReceiveData data: NSData!) { self.data.appendData(data) } func connectionDidFinishLoading(connection: NSURLConnection!) { var err: NSError var jsonResult: NSDictionary = NSJSONSerialization.JSONObjectWithData(data, options: NSJSONReadingOptions.MutableContainers, error: nil) as NSDictionary if jsonResult.count>0 && jsonResult["results"].count>0 { var results: NSArray = jsonResult["results"] as NSArray self.tableData = results self.appsTableView.reloadData() } } When the NSURLConnection receives a response, the didReceiveResponse method is called.
Here we simply reset our data, if they were, by setting self.data = NSMutableData () to create a new object.
After the connection is established, we begin to receive data in the didReceiveData method. Here, the data: NSData argument is passed, where all the information we are interested in is located. We need to keep all the parts received in the response, so we attach them to the self.data object created above.
Finally, after we receive all the information in the response, the connectionDidFinishLoading method is called, where we can already start using the result.
We will use the NSJSONSerialization class to convert raw data into useful information in the form of NSDictionary dictionary objects.
Now that we’ve made sure that we’ve received a response from iTunes, a simple verification of the “results” key will be enough to make sure that we got exactly what we expected, so we can set the self.tableData object to be equal to the results, and also call the method The appsTableView.reloadData () table to update its contents.
Update Table View UI
To initialize the Table View in the first article, we needed to define two functions: one returns the number of rows in the table, the second created the cells and described their contents.
Let's update these functions, according to new functionality.
func tableView(tableView: UITableView!, numberOfRowsInSection section: Int) -> Int { return tableData.count } func tableView(tableView: UITableView!, cellForRowAtIndexPath indexPath: NSIndexPath!) -> UITableViewCell! { let cell: UITableViewCell = UITableViewCell(style: UITableViewCellStyle.Subtitle, reuseIdentifier: "MyTestCell") var rowData: NSDictionary = self.tableData[indexPath.row] as NSDictionary cell.text = rowData["trackName"] as String // artworkUrl60 var urlString: NSString = rowData["artworkUrl60"] as NSString var imgURL: NSURL = NSURL(string: urlString) // NSData var imgData: NSData = NSData(contentsOfURL: imgURL) cell.image = UIImage(data: imgData) // formattedPrice subtitle var formattedPrice: NSString = rowData["formattedPrice"] as NSString cell.detailTextLabel.text = formattedPrice return cell } The numberOfRowsInSection function now simply returns the number of objects received in the response.
The cellForRowAtIndexPath function instead of displaying the line number now displays the name of the object, its cover and cost.
If everything is good and you managed to launch the application, you may notice some “lags” during its operation. This is due to the fact that we have not foreseen several things that we will pay attention to in the next article.
PS: After the release of my translation, the author has updated the lesson a little by optimizing the code a little. I tried to bring the translation into conformity.
Source: https://habr.com/ru/post/225577/
All Articles