Creating a game on the engine Sprite Kit (Part 1)
With the advent of iOS 7, the world saw the new Apple game engine - SpriteKit . In the light of the fact that he appeared quite recently about this engine, little has been written yet, of course, several tutorial programs can be found on the network, but mostly they are all in English. And for this, I set out to write a detailed Tutorial about this wonderful engine.
SpriteKit is a 2D engine optimized for creating games for Apple devices. It is based on the popular physics engine Box 2D . Since the developers created it sharpened specifically for Apple devices, it significantly wins in speed from the rest of the engines.
In SpriteKit, OpenGl assumes the whole role of optimizing and drawing graphics, this all happens at a low level and therefore you can focus your efforts on solving higher level problems and creating large 2D games. To create games on SpriteKit, Objective-c is used , but with the release of iOS 8 and the new language Swift , games can also be created on it.
I would like to add from myself that in some way it is even easier to write on Swift , so if you are just starting out and thinking which language to choose, I advise you to choose Swift .
Below, I have provided a video with a demonstration of the gameplay SpriteKit, if you are interested, then you are welcome.
')
So let's get started, open Xcode.
Create a new project when you are prompted to select the Application template and select the Game type.

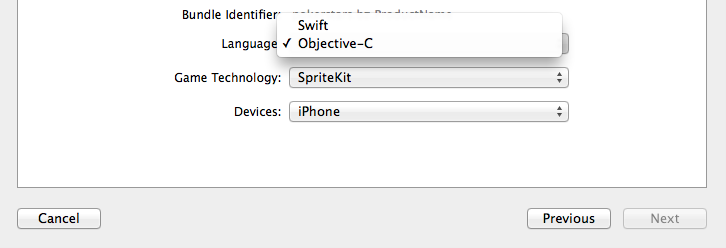
Further, after entering the data, you will be prompted to select a language: this is either Objective-c , or a completely new Swift .
You can choose any, in this article examples will be on both.
Next in Game Tehnology, select SpriteKit .
Also do not forget to choose the device for which you are going to write, in our case it is an Iphone.
So, we created our project, on the left we see our files for Objective-C :
For Swift :
As you have already noticed, the project with Swift files is half the size.
On the left we see:
Let's look at some of the files and see what's inside them.
GameViewController - he is responsible for creating and initializing our scene. All the initial settings serving to display our scene should be carried out here.
In general, all that happens in GameViewController is the same for both languages:
At the very beginning, the viewDidLoad method or function is called .
In this method or function occurs: the creation and adjustment of our scene and some parameters of its display.
At the very beginning, a pointer or a constant to an object of type SKView is created in this method or function and the current View is assigned to it.
SKView is the heir to UIView , it serves to display our scene.
Next comes the basic properties of our SKView :
Next is the creation of the Object of our scene - GameScene . In the case of Swift, it was already created before the configuration of our View .
By default, the object of our scene is initialized with a call to a method or function:
Objective c
Swift
What happens when you call it, it finds the file of our visual designer GameScene.sks, then unzips it, and then returns an object of type SKScene for subsequent initialization of our scene.
Note that the object of our scene has properties:
scaleMode as you can guess from the name, this property stretches the scene across the screen, experiment with this property!
After we set up our SKView and created an object of our scene, we can now display it. This is done very simply, we call the function or method of the class SKView :
Below I have the full code GameViewController .

Well, after we set up our scene, she is ready to fight, and then my friends begin all the fun!
As you have already noticed, by default we start a scene with some objects already added.
Delete everything in GameScene so that it matches the code below:
Now we compile our project and we will see:

We see a blank gray screen and nothing more than the number of Node objects and the frequency of scene updates, now let's stop and analyze the code in GameScene .
To understand how our scene works, we first need to understand its main methods or functions, below I will give the main ones, the rest you can see in the .h file for yourself.
Basic properties:
Basic methods or functions
The main events of our scene
So, friends, now when we saw the main methods or functions, Properties and events of our scene, we can change our code a little. Let's try to change the color of our scene, for this we turn to the backgroundColor property and paint our scene orange. As we have already seen above, when initializing the scene, the method or function initWithSize: should be called first, and after our scene has already been displayed, didMoveToView: is called . In our case, the scene is initialized with a call to the unarchiveFromFile method or function and therefore we can no longer re-write the initialization method. And therefore, it remains for us to determine our initial settings in didMoveToView:.
Objective c
Swift
As you can see from the examples above, the method or the function didMoveToView is first called, then the method or function SceneSetting is called in it (s), and then the color of our scene changes. Please note that when changing colors we don’t refer to the UIColor object as we are used to, we turn to SKColor , in fact it is define UIColor and therefore you can write this way and that, it will not be an error. You probably ask why I made the settings in a separate method or function. I did it for convenience, in large projects it is sometimes very difficult to navigate, and it will be very convenient for us if we do everything neatly at the very beginning.
So, what we got you see on the image below.

On our stage, nothing is happening yet, so let's fix it friends!
Otherwise, what are we doing here!
Well, friends, as you can see, we changed the color of our scene and you probably wondered, that's all? and for this we went here?
Friends, unfortunately I can not demonstrate to you all the power that our scene has, for this we need to explore another very important point - SKNode .
SKNode is an essential element. In SpriteKit, it is considered the main one, all other elements are inherited from it.
Even our scene is essentially its successor and has all its properties.
Let's look at the Property, Methods or Functions of our SKNode .
Property
Methods or Functions
So, we’re almost done, be patient a little bit more. As we can see, a little higher, SKNode is not so complicated in its structure!
And in general, SpriteKit itself is not complicated, you just need a little patience and that's it!
Let's continue, several main Objects are inherited from SKNode , let's have a quick look at them:
1) SKSpriteNode - This is a standard Sprite.
2) SKShapeNode - This is a composite Sprite - an object that can take almost any shape.
3) SKFieldNode - These are fields with the effect of physical forces on other bodies.
4) SKEmitterNode - This is a special Node (particle), these are special particles from which you can create cool effects.
5) SKLabelNode - This is a Node that displays text with various options.
6) SKEffectNode - This is a Node that adds special effects to its descendants.
7) SKLightNode - This is a Node that adds light and shadow to our Scene, appeared with the release of iOS 8.
8) SKVideoNode - This is a Node that allows you to display video in our scene.
9) SKCropNode - This is a Node that allows you to change the texture of an object of a certain shape.
10) SK3DNode - As the name implies , this is a Node that allows you to add 3D objects.
All the above elements are the most used objects, they serve as the basis for creating games on SpriteKit .
The time has come when we can look at our Node live. I deliberately began this article with a little theoretical material so that you had a little idea about the engine itself and its enormous capabilities. Now let's take a look at examples of what some of them are doing, let's go in order and start with SKSpriteNode .
Before proceeding with the review, we will block the orientation and change the property of our scaleMode scene, what is it for?
For convenience, it will be more convenient for me to show you the whole process on an upturned screen, and you won’t get tired of turning the screen over and over again.
Let's find our ViewController and change this property in it.
Objective c
Swift
SKSpriteNode is a standard sprite that displays Textures (Graphics).
Let's look at it closely, in the image below we see three objects (Sprite):
Blue square, Sprite with the image of the plank, and Sprite background.
I specifically created 3 objects of type SKSpriteNode , so that you could see the differences in their creation.
First, open Xcode and create a new folder in our project and name it SpriteKitImage (you can name it as you wish)
Next, download the archive with images from here , then unpack it and add these images to our newly created folder.
All the code describing the creation process is just below, here I will explain some points.
The first sprite is named BackgroundSprite , before creating it, we create an object of type SKTexture , and in it we pass the name of our image as a parameter. Why do you need this object?
Textures are very useful for working with images even before we create sprites ourselves, with their help you can economically manage resources, the same object can be used by several sprites.
Next we set the size and position. A few words about the position, in SKSpriteNode we count it from the middle of our object , that is, when they say we shifted such a sprite by 100px, which means we shifted its center point by 100px.
After we set the size and position, we change the anchorPoint property. It is not necessary to change it, I did it in order to make it more convenient to fit our image under the entire screen. Now you will understand everything!
As you already know, anchorPoint is a point of reference, and as I already wrote above, the position of our Sprite is determined by a point in the middle, so an anchorPoint changes it. To better understand, let's look at the picture below:
As can be seen on the image drawn Cartesian coordinates. By default, SKSpriteNode objects have anchorPoint equal to (0.5, 0.5) , that is, in the center. In the example, I changed this property and set it to (0, 0) , if we again look at the image, we will see that this point is in the lowest left corner, which means that now our starting point will not be in the middle, but below left. And now if they say that we have shifted such a sprite by 100px, that means we have shifted its lowest and leftmost point by 100px.
Next, we set the name, this is also a very important property, in this case it was not necessary to write it, since so far we have not taken any action.
Why do you need a name? On it we will find, define and distinguish our objects. Be careful with the choice of name! .
After we set the properties we need, we call our scene and call its method or function:
As I wrote above, our scene is also a successor from SKNode and therefore we add one Node to another.
This method or function works the same way if you want to, say, add one sprite to another.
The second Sprite called SimpleSprite , when creating it, we pass two parameters: Color and size.
As a color, we pass an object of type UIColor , as I already wrote above, we can pass on SKColor , it will not be a mistake.
Another point is zPosition , as you already know zPosition - Determines the position of our Node relative to the Z axis.
By default, this property is 0 . When I created our objects, for some reason the object named SimpleSprite is the second object, it was under the others, apparently due to the peculiarities of its initialization, and therefore I assigned the zPosition property to this sprite to 1 .
Another very important note: Node that is not on the same plane cannot interact!
That is, if one zPosition is 0, and the other 1, then they will not contact!
The third Sprite, named ImageSprite , when it was initialized, we gave it the name of our image as a parameter.
This method, of course, differs from the first, where we created an object of type SKTexture , but it is quite suitable for normal initialization.
Objective c
Swift
, SKSpriteNode , , Node — SKShapeNode .
SKShapeNode - This is a composite Sprite - an object that can take almost any shape. That is, it can be almost any geometric figure: Circle, Square, Triangle, Ellipse.
In the structure, it is a bit more complicated than SKSpriteNode, since here the whole form is composite. But it is indispensable in the construction of complex forms, without it is very difficult to cope.
Okay, enough words get to the point!
Let's look at the method or function in which (th) the figures above are implemented, the full code can be found below.
So, for convenience, I commented out the previous method or function, so do not be alarmed if you suddenly see the previous objects.
Objective c
Swift
In SKShapeNode there are several ways to initialize, they can be divided into two groups:
Standard initialization or initialization using the object UIBezierPath .
Consider them separately!
Standard initialization
• Objects with simple initialization fall into the first group. What does it mean? These are, for example, objects during initialization of which the form has already been created, and you just have to set its parameters. Now you will understand everything!
Well, you saw some methods or functions of simple initialization, from the first group. Of course, I cannot enumerate everything, and I think it will be more interesting for you to sort it out yourself.
Initialization with the UIBezierPath object
• The second group includes objects whose initialization takes place with the help of the UIBezierPath object .
What does it mean?So far, we have considered objects whose forms were known and we only had to pass a parameter, but what if we wanted to create a triangle, for example? There is no such initialization method! For such cases, we need an object of type UIBezierPath .
Using this object, you can create any form, and then pass it to our SKShapeNode, which will then display it.
• The Internet is full of information about an object of type UIBezierPath , I advise you to find and read!
I promised to explain why the centered parameter is needed . I have not done this before, only so that you understand the basic structure of objects of type SKShapeNode . So, the centered parameter , if it takes a Positive value, then the position of an object of type SKShapeNode will be counted from the middle. Remember, when I explained to you about the position of objects of type SKSpriteNode , I told you that their position is counted from the middle. So, if the centered parameter is positive, then the position of this object will be calculated from the middle.
This raises the quite relevant question of how the position of simple objects of the type SKShapeNode is calculated., because not every object is created with the centered initialization parameter ?
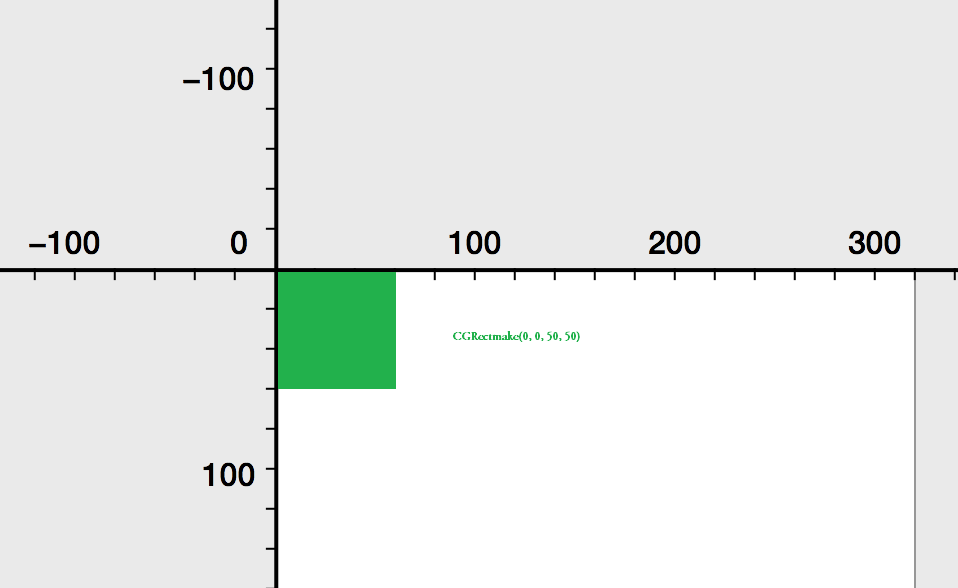
Let's take as an example the object we considered earlier with the name Quad . We looked at its initialization, which begins with passing a function with the name (CGRectMake) as a parameter. As I wrote earlier, this function returns the position and size.
In it, the first two parameters define its origin position (x, y), and the remaining width and length, respectively.
If with width and length it is clear, then with origin is a bit dull. The point is that objects of the type SKShapeNode use the position calculus system a little differently than objects of the type SKSpriteNode whose position reading starts from the middle. Let's look at the image above: so, when we initialized our object with the name Quad, we passed the CGRectMake function (0, 0, 50, 50) as a parameter to it . As we see in the image, origin is equal to (0, 0) from the image that the counting of the position starts from the upper left corner.
Now let's change our origin and transfer our former function, but with different coordinates.

And what do we see? Our square during initialization has a starting point of reference position from the middle.
In other words, our object now has the same reference system as the SKSpriteNode objects , in which the reference position starts from the middle.
• It turns out that origin plays the role of an anchor a bit similar to the one we saw earlier on objects of type SKSpriteNode .
You may ask why I specified the origin coordinates as equal (-25, -25)?
• The fact is that the size of our square is (50, 50), which means that its middle point is (50/2, 50/2), that is, half the width and length!
In the first image, we see that for objects of type SKShapeNodethe starting point is (0, 0), so its position is determined from the upper left corner,
but if we move it to (-25, -25), then its starting point will be in the middle and the position will start in the middle.
• Now, if they say that we have shifted such a sprite by 100px, it means we have shifted its midpoint by 100px.
Well, I think you liked SKShapeNode . As you can see there is nothing difficult in it, but if you don’t understand some moments, then it’s not scary, then you will understand everything during the physics demonstration. A word of advice: to better understand this Sprite object, learn more about the UIBezierPath and practice all the time!
Objective c
Swift
SKLabelNode - This is Sprite, which allows you to display text on our scene. Moreover, the text can be displayed with the parameters:
Font size, font color, font name.
Adjust the font alignment both vertically and horizontally. But now you will see everything yourself.
Objective c
Swift
In the image above, we see 2 sprites. Let's first analyze their ways to create.
First sprite named First . When it is initialized, we pass the name of the Font as a parameter. Sprite type SKLabelNode supports almost all major fonts. In this case, I am passing a font named Chalkduster . Next, we configure all the basic properties:
After setting these properties, we add our object to our scene. You can see the result in the image above.
The second object is named Second . When it is initialized, we pass the text we want to display as a parameter, and then configure all other properties. You already know its basic properties, since they are almost identical to the previous Sprite, so let's not waste time and move on.
Objective c
Swift
As you can see, SKLabelNode is very simple to use, I would even say very simple!
! , — . — . , ! , ! «» . SKPhysicsBody
SKPhysicsBody - This is essentially the body of our object. It is precisely this that is responsible for all the basic physical characteristics of our objects; it is this that gives them physical form, it is they that are responsible for such characteristics as: Friction, elasticity, resistance, mass, speed, gravity.
Let's take a closer look at it and start of course with its properties, methods or functions.
Property
So, above you can see all the methods or functions and properties of the SKPhysicsBody object . As you can see, he has few of them.
I’ll say at once that some of the points above may seem incomprehensible or difficult to understand . Do not worry if something is not understood. Then we will all look at it and experiment with it a few times!
Okay, let's continue, but before we start implementation, we have to do something!
, SceneSetting
Physics of bodies can be divided into 3 categories:
1) Dynamic - Bodies that can change their position.
2) Static - Bodies that cannot change their position.
3) EDGE - Peculiar borders.
Dynamic
Dynamic bodies are best used when you want to move something on the stage or push it. These can be: shells, flying objects, all possible animated characters. They have mass and volume, they can be affected by the forces of gravity, they can take on basic physical properties.
Static
Static bodies. They all have the same thing as the dynamic ones, the main difference is that they cannot move! However, other objects can still collide and interact with them. It is best to use them, for example for some kind of supports or walls. All that takes up a lot of space.
EDGE
EDGE is in fact not a physical body, it is certain boundaries with which the whole interaction takes place. They have no mass or volume, and cannot move!
EDGE is used to provide a hollow part inside the object or for any invisible borders.

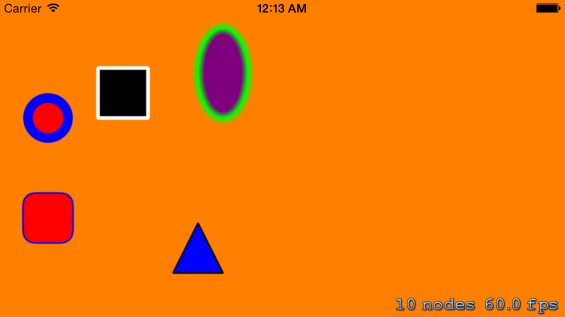
Let's look at the image above. We see five objects. I specifically chose different types of objects so that you could see the difference between them.
Well, let's look at them in more detail!
Objective c
Swift
RectanglePhysics
The first Object is named RectanglePhysics . You already know what its basic properties are doing, so I will not dwell on them and go directly to the new ones. As you can see, at the very beginning we refer to the physicsBody property ofour object and assign it an object of type SKPhysicsBody . This is necessary in order to give the physical body to our Sprite.
If you have carefully studied the methods or functions of SKPhysicsBody , which I wrote about above, then you can see that the object that we pass as a property is initialized by calling the bodyWithRectangleOfSize methodor the rectangleOfSize functionand at its initialization we transfer the size of our Sprite, and our physical body is built on it.
There is one important point that is worth mentioning!
Any contact or contact does not occur with the sprite itself, but with its physical body!
After installing our physical body, we set another property, this is dynamic .
As I wrote above, it is responsible for the dynamism of objects. Here we assign a negative value to it, which means that now our object will not be able to move, which ideally suits us as a supporting surface!
CirclePhysics
TexturePhysics
TrianglePhysics
LabelPhysics
Comparison of Some Physical Properties
And so friends, we learned how to create physical bodies for our objects and now it's time to look at physical properties. In the video below, we see a comparison of several physical properties. As we see at the very beginning two balls of the same size and from the same height fall. When you drop one of them bounces off, and the other does not. We also see two squares of the same size too. They also fall from the same height, but on an inclined surface. One of them slips and falls, while the other immediately stops. All this is a demonstration of some physical properties. Let's better go directly to the code!
And so let's look at our code!
Objective c
Swift
At the very beginning, I create two objects of type SKShapeNode , with the names Opora1 and Opora2 . In the video, these are tilted objects with green and red respectively. There is nothing unusual in their creation except the zRotation property about which I wrote above, but so far we have not used it. As we remember:
The zRotation property takes its value in radians! And therefore, in order to rotate an object at a certain angle, we must first convert this angle to radians. This is done very simply:
Objective-c
Swift
As you can see, there is nothing difficult in turning objects!
Next, I create another object named Opora3 , it is the one that is yellow in color at the very bottom. There is nothing unusual in its creation either, so we can move on. And further, we have two more objects - circles with the names Circle1 and Circle2 . In their structure, they are very similar to each other, but there are differences in physical properties. Their physical form is absolutely identical, but the property is different:
The property with the name restitution, as we remember, defines:
So, in the object with the name Circle1 I set its value to “0” , and in another object with the name Circle2 it is set to the value “1” . Changing the value of this property affects the behavior of an object when it collides with other objects. As we can see in the video, one of the two balls as the drop bounces, and the other opposite lies motionless. All this is the result of the action of this property.
We can see another example in two other objects with the names Quad1 and Quad2 . They are square in shape and identical in everything except the physical property named friction .
For one object, its value is “1” , for another, “0.1” and as a result: one square barely slides along the surface, and the other, on the contrary, slips the entire surface down.
The complete code of our project
Objective-c
Swift
, . : , . , , . SpriteKit , . , .
Well friends, here I would like to stop and let you understand everything that I wrote above. As you can see, SpriteKit is a very powerful engine. Experts from Apple have tried their best. Of course, there are no features in it that are present in cocos2d , but SpriteKit is still much younger than him and I think he is still ahead!
While writing this article, I created a simple puzzle game to demonstrate some of the features of SpriteKit .
Unfortunately, for some reasons beyond my control, at the moment I cannot change its status to free. But I promise you that with writing a new part, I will post the full code for this game on GitHub .
The game is called: Soul Shift: Next Generation
For those who are just learning to create applications, there are very good video tutorials on Objective-c and Swift languages . They are created by a guy named Alex . He is on habrahabr: ezeki . In each video, he examines in great detail the main aspects of the language and clearly demonstrates it. These lessons will be very useful for both beginners and those who are already free to program under iOS .
Objective c
Swift
PS Friends! I think you will not judge me strictly for my grammatical errors, for this is my second language, which I diligently study.
PPS In conclusion, I want to thank the user AbyssMoon , who has honored me to be among you!
So what is SpriteKit?
SpriteKit is a 2D engine optimized for creating games for Apple devices. It is based on the popular physics engine Box 2D . Since the developers created it sharpened specifically for Apple devices, it significantly wins in speed from the rest of the engines.
In SpriteKit, OpenGl assumes the whole role of optimizing and drawing graphics, this all happens at a low level and therefore you can focus your efforts on solving higher level problems and creating large 2D games. To create games on SpriteKit, Objective-c is used , but with the release of iOS 8 and the new language Swift , games can also be created on it.
I would like to add from myself that in some way it is even easier to write on Swift , so if you are just starting out and thinking which language to choose, I advise you to choose Swift .
Below, I have provided a video with a demonstration of the gameplay SpriteKit, if you are interested, then you are welcome.
')
Start
So let's get started, open Xcode.
Create a new project when you are prompted to select the Application template and select the Game type.
Further, after entering the data, you will be prompted to select a language: this is either Objective-c , or a completely new Swift .
You can choose any, in this article examples will be on both.
Next in Game Tehnology, select SpriteKit .
Also do not forget to choose the device for which you are going to write, in our case it is an Iphone.
So, we created our project, on the left we see our files for Objective-C :
Objective c
For Swift :
Swift
As you have already noticed, the project with Swift files is half the size.
On the left we see:
| 1) AppDelegate - the delegate of our project. 2) GameViewController - our project controller. 3) GameScene - the main scene of our game. 4) GameScene.sks is a visual designer of our scene, it was added with the release of iOS 8 , it is used to visually add some elements. |
Let's look at some of the files and see what's inside them.
GameViewController
GameViewController - he is responsible for creating and initializing our scene. All the initial settings serving to display our scene should be carried out here.
In general, all that happens in GameViewController is the same for both languages:
At the very beginning, the viewDidLoad method or function is called .
In this method or function occurs: the creation and adjustment of our scene and some parameters of its display.
Objective c
- (void)viewDidLoad { [super viewDidLoad]; // Configure the view. SKView * skView = (SKView *)self.view; // SKView View. skView.showsFPS = YES; // skView.showsNodeCount = YES; // Node ( ). /* Sprite Kit applies additional optimizations to improve rendering performance */ skView.ignoresSiblingOrder = YES;// // Create and configure the scene. GameScene *scene = [GameScene unarchiveFromFile:@"GameScene"]; // . scene.scaleMode = SKSceneScaleModeAspectFill; // ScaleMode Scene SKSceneScaleModeAspectFill. // Present the scene. // presentScene, skView [skView presentScene:scene]; } Swift
override func viewDidLoad() { super.viewDidLoad() // if let scene = GameScene.unarchiveFromFile("GameScene") as? GameScene // GameScene { // Configure the view. let skView = self.view as SKView // SKView UIView skView.showsFPS = true // skView.showsNodeCount = true // Node ( ). /* Sprite Kit applies additional optimizations to improve rendering performance */ skView.ignoresSiblingOrder = true // /* Set the scale mode to scale to fit the window */ scene.scaleMode = .AspectFill // ScaleMode Scene AspectFill. // presentScene, skView skView.presentScene(scene) } } At the very beginning, a pointer or a constant to an object of type SKView is created in this method or function and the current View is assigned to it.
SKView is the heir to UIView , it serves to display our scene.
Next comes the basic properties of our SKView :
| showFPS - this property displays the frequency of updates to our scene. showsNodeCount - shows the number of Node (Objects in our scene). ignoressSiblingOrder - applies additional optimization to improve rendering performance. In addition to these, SKView has many other useful properties, look and experiment with them! |
Next is the creation of the Object of our scene - GameScene . In the case of Swift, it was already created before the configuration of our View .
By default, the object of our scene is initialized with a call to a method or function:
Objective c
+ (instancetype)unarchiveFromFile:(NSString *)file { /* Retrieve scene file path from the application bundle */ NSString *nodePath = [[NSBundle mainBundle] pathForResource:file ofType:@"sks"]; /* Unarchive the file to an SKScene object */ NSData *data = [NSData dataWithContentsOfFile:nodePath options:NSDataReadingMappedIfSafe error:nil]; NSKeyedUnarchiver *arch = [[NSKeyedUnarchiver alloc] initForReadingWithData:data]; [arch setClass:self forClassName:@"SKScene"]; SKScene *scene = [arch decodeObjectForKey:NSKeyedArchiveRootObjectKey]; [arch finishDecoding]; return scene; } Swift
class func unarchiveFromFile(file : NSString) -> SKNode? { let path = NSBundle.mainBundle().pathForResource(file, ofType: "sks") var sceneData = NSData.dataWithContentsOfFile(path, options: .DataReadingMappedIfSafe, error: nil) var archiver = NSKeyedUnarchiver(forReadingWithData: sceneData) archiver.setClass(self.classForKeyedUnarchiver(), forClassName: "SKScene") let scene = archiver.decodeObjectForKey(NSKeyedArchiveRootObjectKey) as GameScene archiver.finishDecoding() return scene } What happens when you call it, it finds the file of our visual designer GameScene.sks, then unzips it, and then returns an object of type SKScene for subsequent initialization of our scene.
Note that the object of our scene has properties:
scaleMode as you can guess from the name, this property stretches the scene across the screen, experiment with this property!
After we set up our SKView and created an object of our scene, we can now display it. This is done very simply, we call the function or method of the class SKView :
Objective c Swift and then we pass the object of our scene as a parameter, now we compile and “voila” our scene is ready! |
Below I have the full code GameViewController .
Objective c
#import "GameViewController.h" #import "GameScene.h" @implementation SKScene (Unarchive) + (instancetype)unarchiveFromFile:(NSString *)file { /* Retrieve scene file path from the application bundle */ NSString *nodePath = [[NSBundle mainBundle] pathForResource:file ofType:@"sks"]; /* Unarchive the file to an SKScene object */ NSData *data = [NSData dataWithContentsOfFile:nodePath options:NSDataReadingMappedIfSafe error:nil]; NSKeyedUnarchiver *arch = [[NSKeyedUnarchiver alloc] initForReadingWithData:data]; [arch setClass:self forClassName:@"SKScene"]; SKScene *scene = [arch decodeObjectForKey:NSKeyedArchiveRootObjectKey]; [arch finishDecoding]; return scene; } @end @implementation GameViewController - (void)viewDidLoad { [super viewDidLoad]; // Configure the view. SKView * skView = (SKView *)self.view; // skView.showsFPS = YES; skView.showsNodeCount = YES; /* Sprite Kit applies additional optimizations to improve rendering performance */ skView.ignoresSiblingOrder = YES; // Create and configure the scene. GameScene *scene = [GameScene unarchiveFromFile:@"GameScene"]; scene.scaleMode = SKSceneScaleModeAspectFill; // Present the scene. [skView presentScene:scene]; } - (BOOL)shouldAutorotate { return YES; } - (NSUInteger)supportedInterfaceOrientations { if ([[UIDevice currentDevice] userInterfaceIdiom] == UIUserInterfaceIdiomPhone) { return UIInterfaceOrientationMaskAllButUpsideDown; } else { return UIInterfaceOrientationMaskAll; } } - (void)didReceiveMemoryWarning { [super didReceiveMemoryWarning]; // Release any cached data, images, etc that aren't in use. } @end Swift
import UIKit import SpriteKit extension SKNode { class func unarchiveFromFile(file : NSString) -> SKNode? { let path = NSBundle.mainBundle().pathForResource(file, ofType: "sks") var sceneData = NSData.dataWithContentsOfFile(path, options: .DataReadingMappedIfSafe, error: nil) var archiver = NSKeyedUnarchiver(forReadingWithData: sceneData) archiver.setClass(self.classForKeyedUnarchiver(), forClassName: "SKScene") let scene = archiver.decodeObjectForKey(NSKeyedArchiveRootObjectKey) as GameScene archiver.finishDecoding() return scene } } class GameViewController: UIViewController { override func viewDidLoad() { super.viewDidLoad() if let scene = GameScene.unarchiveFromFile("GameScene") as? GameScene { // Configure the view. let skView = self.view as SKView skView.showsFPS = true skView.showsNodeCount = true /* Sprite Kit applies additional optimizations to improve rendering performance */ skView.ignoresSiblingOrder = true /* Set the scale mode to scale to fit the window */ scene.scaleMode = .AspectFill skView.presentScene(scene) } } override func shouldAutorotate() -> Bool { return true } override func supportedInterfaceOrientations() -> Int { if UIDevice.currentDevice().userInterfaceIdiom == .Phone { return Int(UIInterfaceOrientationMask.AllButUpsideDown.toRaw()) } else { return Int(UIInterfaceOrientationMask.All.toRaw()) } } override func didReceiveMemoryWarning() { super.didReceiveMemoryWarning() // Release any cached data, images, etc that aren't in use. } } Gamescene
Well, after we set up our scene, she is ready to fight, and then my friends begin all the fun!
As you have already noticed, by default we start a scene with some objects already added.
Delete everything in GameScene so that it matches the code below:
Objective c
#import "GameScene.h" @implementation GameScene -(void)didMoveToView:(SKView *)view { } @end Swift
import SpriteKit class GameScene: SKScene { override func didMoveToView(view: SKView) { } } Now we compile our project and we will see:
We see a blank gray screen and nothing more than the number of Node objects and the frequency of scene updates, now let's stop and analyze the code in GameScene .
To understand how our scene works, we first need to understand its main methods or functions, below I will give the main ones, the rest you can see in the .h file for yourself.
Basic properties:
| 1) size - Determines the size of our scene. 2) scaleMode - Determines the display of our scene. 3) backgroundColor - Determines the color of our scene, the default is gray (as we had noticed above). 4) anchorPoint - Defines the starting point of our scene. 5) view - Our source View. 6) physicsWorld - These are very important properties that are responsible for scene physics (Gravity, speed), we will talk about it in detail later. |
Basic methods or functions
| 1) didMoveToView: - Called after our scene has been displayed. 2) willMoveFromView: - Called after our scene has been deleted. 3) didChangeSize: - Called when resizing our scene. 4) convertPointToView: - Used to convert coordinates 5) convertPointFromView: - Used to convert coordinates 6) initWithSize: - Called when our scene is initialized. |
The main events of our scene
| Events are needed to write the main logic of our game, They are called exactly in the order in which I wrote! 1) Update: - The main logic of our game is implemented here. 2) didEvaluateActions - Used to calculate our Action - actions. 3) didSimulatePhysics - Used to calculate physical events. 4) didApplyConstriants - Used to calculate restrictions. 5) didFinishUpdate - Called after all the above listed events have completed. |
So, friends, now when we saw the main methods or functions, Properties and events of our scene, we can change our code a little. Let's try to change the color of our scene, for this we turn to the backgroundColor property and paint our scene orange. As we have already seen above, when initializing the scene, the method or function initWithSize: should be called first, and after our scene has already been displayed, didMoveToView: is called . In our case, the scene is initialized with a call to the unarchiveFromFile method or function and therefore we can no longer re-write the initialization method. And therefore, it remains for us to determine our initial settings in didMoveToView:.
Objective c
#import "GameScene.h" @implementation GameScene -(void)didMoveToView:(SKView *)view { [self SceneSetting]; // SceneSetting } -(void)SceneSetting { self.backgroundColor = [SKColor orangeColor]; // } @end Swift
import SpriteKit class GameScene: SKScene { override func didMoveToView(view: SKView) { SceneSetting() // SceneSetting } func SceneSetting() { self.backgroundColor = SKColor.orangeColor() // } } As you can see from the examples above, the method or the function didMoveToView is first called, then the method or function SceneSetting is called in it (s), and then the color of our scene changes. Please note that when changing colors we don’t refer to the UIColor object as we are used to, we turn to SKColor , in fact it is define UIColor and therefore you can write this way and that, it will not be an error. You probably ask why I made the settings in a separate method or function. I did it for convenience, in large projects it is sometimes very difficult to navigate, and it will be very convenient for us if we do everything neatly at the very beginning.
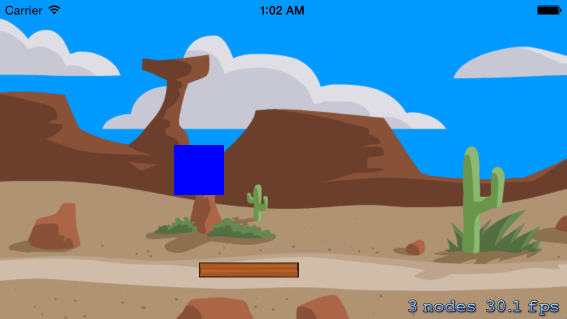
So, what we got you see on the image below.
On our stage, nothing is happening yet, so let's fix it friends!
Otherwise, what are we doing here!
SKNode
Well, friends, as you can see, we changed the color of our scene and you probably wondered, that's all? and for this we went here?
Friends, unfortunately I can not demonstrate to you all the power that our scene has, for this we need to explore another very important point - SKNode .
SKNode is an essential element. In SpriteKit, it is considered the main one, all other elements are inherited from it.
Even our scene is essentially its successor and has all its properties.
Let's look at the Property, Methods or Functions of our SKNode .
Property
| 1) frame - Defines the shape of our Node. 2) position - Determines the position of our Node. 3) zPosition — Determines the position of our Node relative to the Z axis. 4) zRotation - Defines the rotation of our Node in the corners of Euler. 5) xScale - Determines the scale of our Node on the x axis. 6) yScale - Determines the scale of our Node on the y axis. 7) speed - Determines the speed of our Node. 8) alpha - Defines the alpha component of our Node. 9) paused - Returns Yes if our Node does not execute Actions - actions. 10) hidden - Returns Yes if our Node is hidden. 11) isUserInteractionEnabled - Returns Yes if our Node accepts a touch. 12) parent - Returns the parent Node. (If it returns nil, then it is the parent Node itself) 13) children - Returns all descendants of our Node. 14) name - Defines the name of our Node. (Very important property) 15) scene - The scene where our Node is currently located. 16) physicsBody - the Physical Body of Our Node. (A very important property about which we will learn more later) 17) userData - Defines a place where you can record useful information of our Node. 18) reachConstraints - Defines the degree of freedom in IK (Inverse Kinematics) - Action actions. 19) constraints - Defines a list of constraints. |
Methods or Functions
| 1) setScale - Set the scale. (Uniformly in X & Y) 2) addChild - Add a child. (Add one Node to another) 3) insertChild - Remove child. 4) removeChildrenInArray - Remove children by the list. 5) removeAllChildren - Remove all descendants. 6) removeFromParent - Remove the parent Node. 7) childNodeWithName - Returns a child by name. 8) enumerateChildNodesWithName - Recalculate all descendants by a specific name. 9) inParentHierarchy - Returns Yes if our Node is a member of the Hierarchy 10) runAction - Execute Action - action. 11) runAction - completion - Execute Action - action, after completion calls the Completion block. 12) runAction - withKey - Perform an Action - action with a given key. 13) hasAction - Returns Yes if our Node executes an Action action 14) actionForKey - Returns an Action - action, with the given key. 15) removeActionForKey - Remove Action - action with the specified key. 16) removeAllActions - Remove all Action - action of our Node. 17) containsPoint - Returns Yes, if our point lies inside our Node / 18) nodeAtPoint - Returns an object of type SKNode located at this point. 19) nodesAtPoint - Returns a list of SKNode objects located at this point. 20) convertPoint - fromNode - Converts and returns coordinates for our coordinate system. 21) convertPoint - toNode - Converts and returns coordinates for NOT our coordinate system. 22) intersectsNode — Returns Yes if our Node intersects with the boundary of another Node. 23) calculateAccumulatedFrame - Returns the coordinates of boundaries, including descendants. 24) locationInNode - Returns the coordinates of the Node that we touched. 25) previousLocationInNode - Returns the coordinates of the Node that we touched on before. |
So, we’re almost done, be patient a little bit more. As we can see, a little higher, SKNode is not so complicated in its structure!
And in general, SpriteKit itself is not complicated, you just need a little patience and that's it!
Let's continue, several main Objects are inherited from SKNode , let's have a quick look at them:
1) SKSpriteNode - This is a standard Sprite.
2) SKShapeNode - This is a composite Sprite - an object that can take almost any shape.
3) SKFieldNode - These are fields with the effect of physical forces on other bodies.
4) SKEmitterNode - This is a special Node (particle), these are special particles from which you can create cool effects.
5) SKLabelNode - This is a Node that displays text with various options.
6) SKEffectNode - This is a Node that adds special effects to its descendants.
7) SKLightNode - This is a Node that adds light and shadow to our Scene, appeared with the release of iOS 8.
8) SKVideoNode - This is a Node that allows you to display video in our scene.
9) SKCropNode - This is a Node that allows you to change the texture of an object of a certain shape.
10) SK3DNode - As the name implies , this is a Node that allows you to add 3D objects.
All the above elements are the most used objects, they serve as the basis for creating games on SpriteKit .
The time has come when we can look at our Node live. I deliberately began this article with a little theoretical material so that you had a little idea about the engine itself and its enormous capabilities. Now let's take a look at examples of what some of them are doing, let's go in order and start with SKSpriteNode .
Visual Node Review
Before proceeding with the review, we will block the orientation and change the property of our scaleMode scene, what is it for?
For convenience, it will be more convenient for me to show you the whole process on an upturned screen, and you won’t get tired of turning the screen over and over again.
Let's find our ViewController and change this property in it.
Objective c
scene.scaleMode = SKSceneScaleModeResizeFill; - (NSUInteger)supportedInterfaceOrientations { return UIInterfaceOrientationMaskLandscape; } Swift
scene.scaleMode = .ResizeFill override func supportedInterfaceOrientations() -> Int { return Int(UIInterfaceOrientationMask.Landscape.toRaw()) } SKSpriteNode
SKSpriteNode is a standard sprite that displays Textures (Graphics).
Let's look at it closely, in the image below we see three objects (Sprite):
Blue square, Sprite with the image of the plank, and Sprite background.
I specifically created 3 objects of type SKSpriteNode , so that you could see the differences in their creation.
First, open Xcode and create a new folder in our project and name it SpriteKitImage (you can name it as you wish)
Next, download the archive with images from here , then unpack it and add these images to our newly created folder.
All the code describing the creation process is just below, here I will explain some points.
The first sprite is named BackgroundSprite , before creating it, we create an object of type SKTexture , and in it we pass the name of our image as a parameter. Why do you need this object?
Textures are very useful for working with images even before we create sprites ourselves, with their help you can economically manage resources, the same object can be used by several sprites.
Next we set the size and position. A few words about the position, in SKSpriteNode we count it from the middle of our object , that is, when they say we shifted such a sprite by 100px, which means we shifted its center point by 100px.
After we set the size and position, we change the anchorPoint property. It is not necessary to change it, I did it in order to make it more convenient to fit our image under the entire screen. Now you will understand everything!
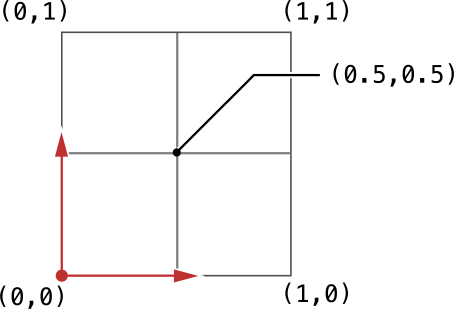
As you already know, anchorPoint is a point of reference, and as I already wrote above, the position of our Sprite is determined by a point in the middle, so an anchorPoint changes it. To better understand, let's look at the picture below:
As can be seen on the image drawn Cartesian coordinates. By default, SKSpriteNode objects have anchorPoint equal to (0.5, 0.5) , that is, in the center. In the example, I changed this property and set it to (0, 0) , if we again look at the image, we will see that this point is in the lowest left corner, which means that now our starting point will not be in the middle, but below left. And now if they say that we have shifted such a sprite by 100px, that means we have shifted its lowest and leftmost point by 100px.
Next, we set the name, this is also a very important property, in this case it was not necessary to write it, since so far we have not taken any action.
Why do you need a name? On it we will find, define and distinguish our objects. Be careful with the choice of name! .
After we set the properties we need, we call our scene and call its method or function:
| addChild - Add a child. (Add one Node to another) , which (th) adds our object to the scene. |
As I wrote above, our scene is also a successor from SKNode and therefore we add one Node to another.
This method or function works the same way if you want to, say, add one sprite to another.
The second Sprite called SimpleSprite , when creating it, we pass two parameters: Color and size.
As a color, we pass an object of type UIColor , as I already wrote above, we can pass on SKColor , it will not be a mistake.
Another point is zPosition , as you already know zPosition - Determines the position of our Node relative to the Z axis.
By default, this property is 0 . When I created our objects, for some reason the object named SimpleSprite is the second object, it was under the others, apparently due to the peculiarities of its initialization, and therefore I assigned the zPosition property to this sprite to 1 .
Another very important note: Node that is not on the same plane cannot interact!
That is, if one zPosition is 0, and the other 1, then they will not contact!
The third Sprite, named ImageSprite , when it was initialized, we gave it the name of our image as a parameter.
This method, of course, differs from the first, where we created an object of type SKTexture , but it is quite suitable for normal initialization.
Objective c
Objective c
#import "GameScene.h" @implementation GameScene -(void)didMoveToView:(SKView *)view { [self SceneSetting]; [self SKSpriteNodeDemo]; // } -(void)SceneSetting { self.backgroundColor = [SKColor orangeColor]; } -(void)SKSpriteNodeDemo { // SKTexture . . SKTexture *Texture = [SKTexture textureWithImageNamed:@"desert_BG"]; // SKSpriteNode . SKTexture, . SKSpriteNode *BackgroundSprite = [SKSpriteNode spriteNodeWithTexture:Texture]; BackgroundSprite.size = CGSizeMake(640, 320); // . BackgroundSprite.position = CGPointMake(0, 0); // . BackgroundSprite.anchorPoint = CGPointMake(0, 0); // . BackgroundSprite.name = @"BackgroundSprite";// . [self addChild:BackgroundSprite];// . // SKSpriteNode . . SKSpriteNode *SimpleSprite = [SKSpriteNode spriteNodeWithColor:[UIColor blueColor] size:CGSizeMake(50, 50)]; SimpleSprite.position = CGPointMake(200, 150);// . SimpleSprite.zPosition = 1;// Z. SimpleSprite.name = @"SimpleSprite";// . [self addChild:SimpleSprite];// . // SKSpriteNode . . SKSpriteNode *ImageSprite = [SKSpriteNode spriteNodeWithImageNamed:@"DerevoOpora"]; ImageSprite.position = CGPointMake(250, 50);// . ImageSprite.size = CGSizeMake(100, 15);// . ImageSprite.name = @"ImageSprite";// . [self addChild:ImageSprite];// . } @end Swift
Swift
import SpriteKit class GameScene: SKScene { override func didMoveToView(view: SKView) { SceneSetting() SKSpriteNodeDemo() // . } func SceneSetting() { self.backgroundColor = SKColor.orangeColor() } func SKSpriteNodeDemo() { // Texture SKTexture. var Texture = SKTexture(imageNamed: "desert_BG") // BackgroundSprite SKSpriteNode. // SKTexture . var BackgroundSprite = SKSpriteNode(texture: Texture) BackgroundSprite.size = CGSizeMake(640, 320) // . BackgroundSprite.position = CGPointMake(0, 0) // . BackgroundSprite.anchorPoint = CGPointMake(0, 0) // . BackgroundSprite.name = "BackgroundSprite" // . self.addChild(BackgroundSprite) // . // SimpleSprite SKSpriteNode. // . var SimpleSprite = SKSpriteNode(color: UIColor.blueColor(), size: CGSizeMake(50, 50)) SimpleSprite.position = CGPointMake(200, 150) // . SimpleSprite.zPosition = 1; // Z. SimpleSprite.name = "SimpleSprite" // . self.addChild(SimpleSprite) // . // ImageSprite SKSpriteNode. // . var ImageSprite = SKSpriteNode(imageNamed: "DerevoOpora") ImageSprite.position = CGPointMake(250, 50) // . ImageSprite.size = CGSizeMake(100, 15) // . ImageSprite.name = "ImageSprite" // . self.addChild(ImageSprite) // . } } , SKSpriteNode , , Node — SKShapeNode .
SKShapeNode
SKShapeNode - This is a composite Sprite - an object that can take almost any shape. That is, it can be almost any geometric figure: Circle, Square, Triangle, Ellipse.
In the structure, it is a bit more complicated than SKSpriteNode, since here the whole form is composite. But it is indispensable in the construction of complex forms, without it is very difficult to cope.
Okay, enough words get to the point!
Let's look at the method or function in which (th) the figures above are implemented, the full code can be found below.
So, for convenience, I commented out the previous method or function, so do not be alarmed if you suddenly see the previous objects.
Objective c
Objective c
-(void)SKShapeNodeDemo { // SKShapeNode . . SKShapeNode *Circle = [SKShapeNode shapeNodeWithCircleOfRadius:20]; Circle.position = CGPointMake(50, 200); // . Circle.lineWidth = 10; // . Circle.strokeColor = [SKColor blueColor]; // . Circle.fillColor = [SKColor redColor]; // . Circle.name = @"Circle"; // . [self addChild:Circle]; // . // SKShapeNode . (CGRectMake). SKShapeNode *Quad = [SKShapeNode shapeNodeWithRect:CGRectMake(0, 0, 50, 50)]; Quad.position = CGPointMake(100, 200); // . Quad.lineWidth = 4; // . Quad.strokeColor = [SKColor whiteColor]; // . Quad.fillColor = [SKColor blackColor]; // . Quad.name = @"Quad"; // . [self addChild:Quad]; // . // SKShapeNode . (CGRectMake). // . SKShapeNode *Ellips = [SKShapeNode shapeNodeWithEllipseInRect:CGRectMake(0, 0, 50, 90)]; Ellips.position = CGPointMake(200, 200); // . Ellips.lineWidth = 2; // . Ellips.strokeColor = [SKColor greenColor]; // . Ellips.fillColor = [SKColor purpleColor]; // . Ellips.glowWidth = 5; // . Ellips.name = @"Ellips"; // . [self addChild:Ellips]; // . // UIBezierPath. (CGRectMake), // . UIBezierPath *RoundedRectPath = [UIBezierPath bezierPathWithRoundedRect:CGRectMake(0, 0, 50, 50) cornerRadius:12]; // SKShapeNode . . // , CGPath. SKShapeNode *RoundedRect = [ SKShapeNode shapeNodeWithPath:RoundedRectPath.CGPath centered:YES]; RoundedRect.position = CGPointMake(50, 100); // . RoundedRect.lineWidth = 2; // . RoundedRect.strokeColor = [SKColor blueColor]; // . RoundedRect.fillColor = [SKColor redColor]; // . RoundedRect.name = @"RoundedRect"; // . [self addChild:RoundedRect]; // . UIBezierPath *TrianglePath = [UIBezierPath bezierPath]; // UIBezierPath. [TrianglePath moveToPoint:CGPointMake(0, 0)]; // . [TrianglePath addLineToPoint:CGPointMake(-25, -50)]; // . [TrianglePath addLineToPoint:CGPointMake(25, -50)]; // . [TrianglePath addLineToPoint:CGPointMake(0, 0)]; // . // SKShapeNode . . // , CGPath. SKShapeNode *Triangle = [SKShapeNode shapeNodeWithPath:TrianglePath.CGPath centered:YES]; Triangle.position = CGPointMake(200, 70); // . Triangle.lineWidth = 2; // . Triangle.strokeColor = [SKColor blackColor]; // . Triangle.fillColor = [SKColor blueColor]; // . Triangle.name = @"Triangle"; // . [self addChild:Triangle]; // . } Swift
Swift
func SKShapeNodeDemo() { // Circle SKShapeNode. . var Circle = SKShapeNode(circleOfRadius: 20) Circle.position = CGPointMake(50, 200) // . Circle.lineWidth = 10 // . Circle.strokeColor = SKColor.blueColor() // . Circle.fillColor = SKColor.redColor() // . Circle.name = "Circle" // . self.addChild(Circle) // . // Quad SKShapeNode. // (CGRectMake). var Quad = SKShapeNode(rect: CGRectMake(0, 0, 50, 50)) Quad.position = CGPointMake(100, 200) // . Quad.lineWidth = 4 // . Quad.strokeColor = SKColor.whiteColor() // . Quad.fillColor = SKColor.blackColor() // . Quad.name = "Quad" // . self.addChild(Quad) // . // Ellips SKShapeNode. // . var Ellips = SKShapeNode(ellipseInRect: CGRectMake(0, 0, 50, 90)) Ellips.position = CGPointMake(200, 200) // . Ellips.lineWidth = 2 // . Ellips.strokeColor = SKColor.greenColor() // . Ellips.fillColor = SKColor.purpleColor() // . Ellips.glowWidth = 5 // . Ellips.name = "Ellips" // . self.addChild(Ellips) // . // RoundedRectPath UIBezierPath. // (CGRectMake), . var RoundedRectPath = UIBezierPath(roundedRect: CGRectMake(0, 0, 50, 50), cornerRadius: 12) // RoundedRect SKShapeNode. // . // , CGPath. var RoundedRect = SKShapeNode(path: RoundedRectPath.CGPath, centered:true) RoundedRect.position = CGPointMake(50, 100) // . RoundedRect.lineWidth = 2 // . RoundedRect.strokeColor = SKColor.blueColor() // . RoundedRect.fillColor = SKColor.redColor() // . RoundedRect.name = "RoundedRect" // . self.addChild(RoundedRect) // . var TrianglePath = UIBezierPath() // UIBezierPath. TrianglePath.moveToPoint(CGPointMake(0, 0)) // . TrianglePath.addLineToPoint(CGPointMake(-25, -50)) // . TrianglePath.addLineToPoint(CGPointMake(25, -50)) // . TrianglePath.addLineToPoint(CGPointMake(0, 0)) // . // Triangle SKShapeNode. // . // , CGPath. var Triangle = SKShapeNode(path: TrianglePath.CGPath, centered: true) Triangle.position = CGPointMake(200, 70) // . Triangle.lineWidth = 2 // . Triangle.strokeColor = SKColor.blackColor() // . Triangle.fillColor = SKColor.blueColor() // . Triangle.name = "Triangle" // . self.addChild(Triangle) // . } In SKShapeNode there are several ways to initialize, they can be divided into two groups:
Standard initialization or initialization using the object UIBezierPath .
Consider them separately!
Standard initialization
• Objects with simple initialization fall into the first group. What does it mean? These are, for example, objects during initialization of which the form has already been created, and you just have to set its parameters. Now you will understand everything!
Circle
| , Circle . , shapeNodeWithCircleOfRadius circleOfRadius (-) . Objective-c Swift , , . , , . lineWidth , (), , . : strokeColor fillColor . • strokeColor — ( ). • fillColor — . , .
, , . |
Quad
Objective-c
Swift
// SKShapeNode . (CGRectMake). SKShapeNode *Quad = [SKShapeNode shapeNodeWithRect:CGRectMake(0, 0, 50, 50)]; Quad.position = CGPointMake(100, 200); // . Quad.lineWidth = 4; // . Quad.strokeColor = [SKColor whiteColor]; // . Quad.fillColor = [SKColor blackColor]; // . Quad.name = @"Quad"; // . [self addChild:Quad]; // . Swift
// Quad SKShapeNode. // (CGRectMake). var Quad = SKShapeNode(rect: CGRectMake(0, 0, 50, 50)) Quad.position = CGPointMake(100, 200) // . Quad.lineWidth = 4 // . Quad.strokeColor = SKColor.whiteColor() // . Quad.fillColor = SKColor.blackColor() // . Quad.name = "Quad" // . self.addChild(Quad) // . Quad , , . , (CGRectMake). , , : . : x — X, y — Y. . |
Ellips
Objective-c
Swift
// SKShapeNode . (CGRectMake). // . SKShapeNode *Ellips = [SKShapeNode shapeNodeWithEllipseInRect:CGRectMake(0, 0, 50, 90)]; Ellips.position = CGPointMake(200, 200); // . Ellips.lineWidth = 2; // . Ellips.strokeColor = [SKColor greenColor]; // . Ellips.fillColor = [SKColor purpleColor]; // . Ellips.glowWidth = 5; // . Ellips.name = @"Ellips"; // . [self addChild:Ellips]; // . Swift
// Ellips SKShapeNode. // . var Ellips = SKShapeNode(ellipseInRect: CGRectMake(0, 0, 50, 90)) Ellips.position = CGPointMake(200, 200) // . Ellips.lineWidth = 2 // . Ellips.strokeColor = SKColor.greenColor() // . Ellips.fillColor = SKColor.purpleColor() // . Ellips.glowWidth = 5 // . Ellips.name = "Ellips" // . self.addChild(Ellips) // . | Ellips , . , . shapeNodeWithEllipseInRect ellipseInRect . (CGRectMake) , . , , glowWidth • glowWidth — , , . |
Well, you saw some methods or functions of simple initialization, from the first group. Of course, I cannot enumerate everything, and I think it will be more interesting for you to sort it out yourself.
Initialization with the UIBezierPath object
• The second group includes objects whose initialization takes place with the help of the UIBezierPath object .
What does it mean?So far, we have considered objects whose forms were known and we only had to pass a parameter, but what if we wanted to create a triangle, for example? There is no such initialization method! For such cases, we need an object of type UIBezierPath .
Using this object, you can create any form, and then pass it to our SKShapeNode, which will then display it.
RoundedRect
Objective-c
Swift
// UIBezierPath. (CGRectMake), // . UIBezierPath *RoundedRectPath = [UIBezierPath bezierPathWithRoundedRect:CGRectMake(0, 0, 50, 50) cornerRadius:12]; // SKShapeNode . . // , CGPath. SKShapeNode *RoundedRect = [ SKShapeNode shapeNodeWithPath:RoundedRectPath.CGPath centered:YES]; RoundedRect.position = CGPointMake(50, 100); // . RoundedRect.lineWidth = 2; // . RoundedRect.strokeColor = [SKColor blueColor]; // . RoundedRect.fillColor = [SKColor redColor]; // . RoundedRect.name = @"RoundedRect"; // . [self addChild:RoundedRect]; // . Swift
// RoundedRectPath UIBezierPath. // (CGRectMake), . var RoundedRectPath = UIBezierPath(roundedRect: CGRectMake(0, 0, 50, 50), cornerRadius: 12) // RoundedRect SKShapeNode. // . // , CGPath. var RoundedRect = SKShapeNode(path: RoundedRectPath.CGPath, centered:true) RoundedRect.position = CGPointMake(50, 100) // . RoundedRect.lineWidth = 2 // . RoundedRect.strokeColor = SKColor.blueColor() // . RoundedRect.fillColor = SKColor.redColor() // . RoundedRect.name = "RoundedRect" // . self.addChild(RoundedRect) // . | , RoundedRect . , UIBezierPath , : (CGRectMake) . , () . UIBezierPath , SKShapeNode , . UIBezierPath , centered . , CGPath , ; , ! , — centered , ! , . , . |
Triangle
Objective-c
Swift
UIBezierPath *TrianglePath = [UIBezierPath bezierPath]; // UIBezierPath. [TrianglePath moveToPoint:CGPointMake(0, 0)]; // . [TrianglePath addLineToPoint:CGPointMake(-25, -50)]; // . [TrianglePath addLineToPoint:CGPointMake(25, -50)]; // . [TrianglePath addLineToPoint:CGPointMake(0, 0)]; // . // SKShapeNode . . // , CGPath. SKShapeNode *Triangle = [SKShapeNode shapeNodeWithPath:TrianglePath.CGPath centered:YES]; Triangle.position = CGPointMake(200, 70); // . Triangle.lineWidth = 2; // . Triangle.strokeColor = [SKColor blackColor]; // . Triangle.fillColor = [SKColor blueColor]; // . Triangle.name = @"Triangle"; // . [self addChild:Triangle]; // . Swift
var TrianglePath = UIBezierPath() // UIBezierPath. TrianglePath.moveToPoint(CGPointMake(0, 0)) // . TrianglePath.addLineToPoint(CGPointMake(-25, -50)) // . TrianglePath.addLineToPoint(CGPointMake(25, -50)) // . TrianglePath.addLineToPoint(CGPointMake(0, 0)) // . // Triangle SKShapeNode. // . // , CGPath. var Triangle = SKShapeNode(path: TrianglePath.CGPath, centered: true) Triangle.position = CGPointMake(200, 70) // . Triangle.lineWidth = 2 // . Triangle.strokeColor = SKColor.blackColor() // . Triangle.fillColor = SKColor.blueColor() // . Triangle.name = "Triangle" // . self.addChild(Triangle) // . | Triangle . UIBezierPath . . , UIBezierPath , TrianglePath . , . ! , , , . moveToPoint UIBezierPath . (), , , addLineToPoint . , , , ( ). . TrianglePath . SKShapeNode Triangle , «» ! |
• The Internet is full of information about an object of type UIBezierPath , I advise you to find and read!
I promised to explain why the centered parameter is needed . I have not done this before, only so that you understand the basic structure of objects of type SKShapeNode . So, the centered parameter , if it takes a Positive value, then the position of an object of type SKShapeNode will be counted from the middle. Remember, when I explained to you about the position of objects of type SKSpriteNode , I told you that their position is counted from the middle. So, if the centered parameter is positive, then the position of this object will be calculated from the middle.
This raises the quite relevant question of how the position of simple objects of the type SKShapeNode is calculated., because not every object is created with the centered initialization parameter ?
Let's take as an example the object we considered earlier with the name Quad . We looked at its initialization, which begins with passing a function with the name (CGRectMake) as a parameter. As I wrote earlier, this function returns the position and size.
CGRectMake(0, 0, 50, 50). In it, the first two parameters define its origin position (x, y), and the remaining width and length, respectively.
If with width and length it is clear, then with origin is a bit dull. The point is that objects of the type SKShapeNode use the position calculus system a little differently than objects of the type SKSpriteNode whose position reading starts from the middle. Let's look at the image above: so, when we initialized our object with the name Quad, we passed the CGRectMake function (0, 0, 50, 50) as a parameter to it . As we see in the image, origin is equal to (0, 0) from the image that the counting of the position starts from the upper left corner.
Now let's change our origin and transfer our former function, but with different coordinates.
CGRectMake(-25, -25, 50, 50). And what do we see? Our square during initialization has a starting point of reference position from the middle.
In other words, our object now has the same reference system as the SKSpriteNode objects , in which the reference position starts from the middle.
• It turns out that origin plays the role of an anchor a bit similar to the one we saw earlier on objects of type SKSpriteNode .
You may ask why I specified the origin coordinates as equal (-25, -25)?
• The fact is that the size of our square is (50, 50), which means that its middle point is (50/2, 50/2), that is, half the width and length!
In the first image, we see that for objects of type SKShapeNodethe starting point is (0, 0), so its position is determined from the upper left corner,
but if we move it to (-25, -25), then its starting point will be in the middle and the position will start in the middle.
• Now, if they say that we have shifted such a sprite by 100px, it means we have shifted its midpoint by 100px.
Well, I think you liked SKShapeNode . As you can see there is nothing difficult in it, but if you don’t understand some moments, then it’s not scary, then you will understand everything during the physics demonstration. A word of advice: to better understand this Sprite object, learn more about the UIBezierPath and practice all the time!
Objective c
Objective c
#import "GameScene.h" @implementation GameScene -(void)didMoveToView:(SKView *)view { [self SceneSetting]; //[self SKSpriteNodeDemo]; [self SKShapeNodeDemo]; } -(void)SceneSetting { self.backgroundColor = [SKColor orangeColor]; } -(void)SKSpriteNodeDemo { SKTexture *Texture = [SKTexture textureWithImageNamed:@"desert_BG"]; SKSpriteNode *BackgroundSprite = [SKSpriteNode spriteNodeWithTexture:Texture]; BackgroundSprite.size = CGSizeMake(640, 320); BackgroundSprite.position = CGPointMake(0, 0); BackgroundSprite.anchorPoint = CGPointMake(0, 0); BackgroundSprite.name = @"BackgroundSprite"; [self addChild:BackgroundSprite]; SKSpriteNode *SimpleSprite = [SKSpriteNode spriteNodeWithColor:[UIColor blueColor] size:CGSizeMake(50, 50)]; SimpleSprite.position = CGPointMake(200, 150); SimpleSprite.zPosition = 1; SimpleSprite.name = @"SimpleSprite"; [self addChild:SimpleSprite]; SKSpriteNode *ImageSprite = [SKSpriteNode spriteNodeWithImageNamed:@"DerevoOpora"]; ImageSprite.position = CGPointMake(250, 50); ImageSprite.size = CGSizeMake(100, 15); ImageSprite.name = @"ImageSprite"; [self addChild:ImageSprite]; } -(void)SKShapeNodeDemo { SKShapeNode *Circle = [SKShapeNode shapeNodeWithCircleOfRadius:20]; Circle.position = CGPointMake(50, 200); Circle.lineWidth = 10; Circle.strokeColor = [SKColor blueColor]; Circle.fillColor = [SKColor redColor]; Circle.name = @"Circle"; [self addChild:Circle]; SKShapeNode *Quad = [SKShapeNode shapeNodeWithRect:CGRectMake(0, 0, 50, 50)]; Quad.position = CGPointMake(100, 200); Quad.lineWidth = 4; Quad.strokeColor = [SKColor whiteColor]; Quad.fillColor = [SKColor blackColor]; Quad.name = @"Quad"; [self addChild:Quad]; SKShapeNode *Ellips = [SKShapeNode shapeNodeWithEllipseInRect:CGRectMake(0, 0, 50, 90)]; Ellips.position = CGPointMake(200, 200); Ellips.lineWidth = 2; Ellips.strokeColor = [SKColor greenColor]; Ellips.fillColor = [SKColor purpleColor]; Ellips.glowWidth = 5; Ellips.name = @"Ellips"; [self addChild:Ellips]; UIBezierPath *RoundedRectPath = [UIBezierPath bezierPathWithRoundedRect:CGRectMake(0, 0, 50, 50) cornerRadius:12]; SKShapeNode *RoundedRect = [ SKShapeNode shapeNodeWithPath:RoundedRectPath.CGPath centered:YES]; RoundedRect.position = CGPointMake(50, 100); RoundedRect.lineWidth = 2; RoundedRect.strokeColor = [SKColor blueColor]; RoundedRect.fillColor = [SKColor redColor]; RoundedRect.name = @"RoundedRect"; [self addChild:RoundedRect]; UIBezierPath *TrianglePath = [UIBezierPath bezierPath]; [TrianglePath moveToPoint:CGPointMake(0, 0)]; [TrianglePath addLineToPoint:CGPointMake(-25, -50)]; [TrianglePath addLineToPoint:CGPointMake(25, -50)]; [TrianglePath addLineToPoint:CGPointMake(0, 0)]; SKShapeNode *Triangle = [SKShapeNode shapeNodeWithPath:TrianglePath.CGPath centered:YES]; Triangle.position = CGPointMake(200, 70); Triangle.lineWidth = 2; Triangle.strokeColor = [SKColor blackColor]; Triangle.fillColor = [SKColor blueColor]; Triangle.name = @"Triangle"; [self addChild:Triangle]; } @end Swift
Swift
import SpriteKit class GameScene: SKScene { override func didMoveToView(view: SKView) { SceneSetting() //SKSpriteNodeDemo() SKShapeNodeDemo() } func SceneSetting() { self.backgroundColor = SKColor.orangeColor() } func SKSpriteNodeDemo() { var Texture = SKTexture(imageNamed: "desert_BG") var BackgroundSprite = SKSpriteNode(texture: Texture) BackgroundSprite.size = CGSizeMake(640, 320) BackgroundSprite.position = CGPointMake(0, 0) BackgroundSprite.anchorPoint = CGPointMake(0, 0) BackgroundSprite.name = "BackgroundSprite" self.addChild(BackgroundSprite) var SimpleSprite = SKSpriteNode(color: UIColor.blueColor(), size: CGSizeMake(50, 50)) SimpleSprite.position = CGPointMake(200, 150) SimpleSprite.zPosition = 1; SimpleSprite.name = "SimpleSprite" self.addChild(SimpleSprite) var ImageSprite = SKSpriteNode(imageNamed: "DerevoOpora") ImageSprite.position = CGPointMake(250, 50) ImageSprite.size = CGSizeMake(100, 15) ImageSprite.name = "ImageSprite" self.addChild(ImageSprite) } func SKShapeNodeDemo() { var Circle = SKShapeNode(circleOfRadius: 20) Circle.position = CGPointMake(50, 200) Circle.lineWidth = 10 Circle.strokeColor = SKColor.blueColor() Circle.fillColor = SKColor.redColor() Circle.name = "Circle" self.addChild(Circle) var Quad = SKShapeNode(rect: CGRectMake(0, 0, 50, 50)) Quad.position = CGPointMake(100, 200) Quad.lineWidth = 4 Quad.strokeColor = SKColor.whiteColor() Quad.fillColor = SKColor.blackColor() Quad.name = "Quad" self.addChild(Quad) var Ellips = SKShapeNode(ellipseInRect: CGRectMake(0, 0, 50, 90)) Ellips.position = CGPointMake(200, 200) Ellips.lineWidth = 2 Ellips.strokeColor = SKColor.greenColor() Ellips.fillColor = SKColor.purpleColor() Ellips.glowWidth = 5 Ellips.name = "Ellips" self.addChild(Ellips) var RoundedRectPath = UIBezierPath(roundedRect: CGRectMake(0, 0, 50, 50), cornerRadius: 12) var RoundedRect = SKShapeNode(path: RoundedRectPath.CGPath, centered:true) RoundedRect.position = CGPointMake(50, 100) RoundedRect.lineWidth = 2 RoundedRect.strokeColor = SKColor.blueColor() RoundedRect.fillColor = SKColor.redColor() RoundedRect.name = "RoundedRect" self.addChild(RoundedRect) var TrianglePath = UIBezierPath() TrianglePath.moveToPoint(CGPointMake(0, 0)) TrianglePath.addLineToPoint(CGPointMake(-25, -50)) TrianglePath.addLineToPoint(CGPointMake(25, -50)) TrianglePath.addLineToPoint(CGPointMake(0, 0)) var Triangle = SKShapeNode(path: TrianglePath.CGPath, centered: true) Triangle.position = CGPointMake(200, 70) Triangle.lineWidth = 2 Triangle.strokeColor = SKColor.blackColor() Triangle.fillColor = SKColor.blueColor() Triangle.name = "Triangle" self.addChild(Triangle) } } SKLabelNode
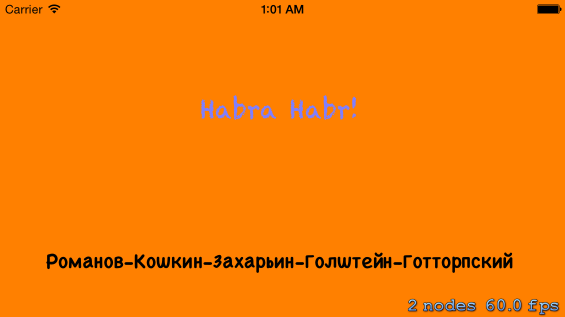
SKLabelNode - This is Sprite, which allows you to display text on our scene. Moreover, the text can be displayed with the parameters:
Font size, font color, font name.
Adjust the font alignment both vertically and horizontally. But now you will see everything yourself.
Objective c
Objective c
-(void)SKLabelNodeDemo { // SKLabelNode . . SKLabelNode *First = [SKLabelNode labelNodeWithFontNamed:@"Chalkduster"]; First.position = CGPointMake(280, 200); // . First.fontSize = 25; // . First.fontColor = [SKColor whiteColor]; // . First.color = [SKColor blueColor]; // ( colorBlendFactor). First.colorBlendFactor = 0.5; // colorBlendFactor (0.0 - 1.0) First.text = @"Habra Habr!"; // . First.horizontalAlignmentMode = SKLabelHorizontalAlignmentModeCenter; // . First.name = @"First"; // [self addChild:First]; // . // SKLabelNode . . SKLabelNode *Second = [SKLabelNode labelNodeWithText:@"----"]; Second.fontName = @"Chalkboard SE Bold"; // . Second.fontColor = [SKColor blackColor]; // . Second.position = CGPointMake(280, 50); // . Second.fontSize = 20; // . Second.name = @"Second"; // [self addChild:Second]; // . } Swift
Swift
func SKLabelNodeDemo() { // First SKLabelNode. . var First = SKLabelNode(fontNamed: "Chalkduster") First.position = CGPointMake(280, 200) // . First.fontSize = 25; // . First.fontColor = SKColor.whiteColor() // . First.color = SKColor.blueColor() // ( colorBlendFactor). First.colorBlendFactor = 0.5 // colorBlendFactor (0.0 - 1.0) First.text = "Habra Habr!" // . First.horizontalAlignmentMode = SKLabelHorizontalAlignmentMode.Center // . First.name = "First" // self.addChild(First) // . // Second SKLabelNode. . var Second = SKLabelNode(text: "----") Second.fontName = "Chalkboard SE Bold" // . Second.fontColor = SKColor.blackColor() // . Second.position = CGPointMake(280, 50) // . Second.fontSize = 20 // . Second.name = "Second" // self.addChild(Second) // . } In the image above, we see 2 sprites. Let's first analyze their ways to create.
First sprite named First . When it is initialized, we pass the name of the Font as a parameter. Sprite type SKLabelNode supports almost all major fonts. In this case, I am passing a font named Chalkduster . Next, we configure all the basic properties:
| • fontSize — . . • fontColor — . • color — ( colorBlendFactor). • colorBlendFactor — . color . (0.0 — 1.0). • text — . • horizontalAlignmentMode — . , . |
After setting these properties, we add our object to our scene. You can see the result in the image above.
The second object is named Second . When it is initialized, we pass the text we want to display as a parameter, and then configure all other properties. You already know its basic properties, since they are almost identical to the previous Sprite, so let's not waste time and move on.
Objective c
Objective c
#import "GameScene.h" @implementation GameScene -(void)didMoveToView:(SKView *)view { [self SceneSetting]; //[self SKSpriteNodeDemo]; //[self SKShapeNodeDemo]; [self SKLabelNodeDemo]; } -(void)SceneSetting { self.backgroundColor = [SKColor orangeColor]; } -(void)SKSpriteNodeDemo { SKTexture *Texture = [SKTexture textureWithImageNamed:@"desert_BG"]; SKSpriteNode *BackgroundSprite = [SKSpriteNode spriteNodeWithTexture:Texture]; BackgroundSprite.size = CGSizeMake(640, 320); BackgroundSprite.position = CGPointMake(0, 0); BackgroundSprite.anchorPoint = CGPointMake(0, 0); BackgroundSprite.name = @"BackgroundSprite"; [self addChild:BackgroundSprite]; SKSpriteNode *SimpleSprite = [SKSpriteNode spriteNodeWithColor:[UIColor blueColor] size:CGSizeMake(50, 50)]; SimpleSprite.position = CGPointMake(200, 150); SimpleSprite.zPosition = 1; SimpleSprite.name = @"SimpleSprite"; [self addChild:SimpleSprite]; SKSpriteNode *ImageSprite = [SKSpriteNode spriteNodeWithImageNamed:@"DerevoOpora"]; ImageSprite.position = CGPointMake(250, 50); ImageSprite.size = CGSizeMake(100, 15); ImageSprite.name = @"ImageSprite"; [self addChild:ImageSprite]; } -(void)SKShapeNodeDemo { SKShapeNode *Circle = [SKShapeNode shapeNodeWithCircleOfRadius:20]; Circle.position = CGPointMake(50, 200); Circle.lineWidth = 10; Circle.strokeColor = [SKColor blueColor]; Circle.fillColor = [SKColor redColor]; Circle.name = @"Circle"; [self addChild:Circle]; SKShapeNode *Quad = [SKShapeNode shapeNodeWithRect:CGRectMake(0, 0, 50, 50)]; Quad.position = CGPointMake(100, 200); Quad.lineWidth = 4; Quad.strokeColor = [SKColor whiteColor]; Quad.fillColor = [SKColor blackColor]; Quad.name = @"Quad"; [self addChild:Quad]; SKShapeNode *Ellips = [SKShapeNode shapeNodeWithEllipseInRect:CGRectMake(0, 0, 50, 90)]; Ellips.position = CGPointMake(200, 200); Ellips.lineWidth = 2; Ellips.strokeColor = [SKColor greenColor]; Ellips.fillColor = [SKColor purpleColor]; Ellips.glowWidth = 5; Ellips.name = @"Ellips"; [self addChild:Ellips]; UIBezierPath *RoundedRectPath = [UIBezierPath bezierPathWithRoundedRect:CGRectMake(0, 0, 50, 50) cornerRadius:12]; SKShapeNode *RoundedRect = [ SKShapeNode shapeNodeWithPath:RoundedRectPath.CGPath centered:YES]; RoundedRect.position = CGPointMake(50, 100); RoundedRect.lineWidth = 2; RoundedRect.strokeColor = [SKColor blueColor]; RoundedRect.fillColor = [SKColor redColor]; RoundedRect.name = @"RoundedRect"; [self addChild:RoundedRect]; UIBezierPath *TrianglePath = [UIBezierPath bezierPath]; [TrianglePath moveToPoint:CGPointMake(0,0)]; [TrianglePath addLineToPoint:CGPointMake(-25, -50)]; [TrianglePath addLineToPoint:CGPointMake(25, -50)]; [TrianglePath addLineToPoint:CGPointMake(0, 0)]; SKShapeNode *Triangle = [SKShapeNode shapeNodeWithPath:TrianglePath.CGPath centered:YES]; Triangle.position = CGPointMake(200, 70); Triangle.lineWidth = 2; Triangle.strokeColor = [SKColor blackColor]; Triangle.fillColor = [SKColor blueColor]; Triangle.name = @"Triangle"; [self addChild:Triangle]; } -(void)SKLabelNodeDemo { SKLabelNode *First = [SKLabelNode labelNodeWithFontNamed:@"Chalkduster"]; First.position = CGPointMake(280, 200); First.fontSize = 25; First.fontColor = [SKColor whiteColor]; First.color = [SKColor blueColor]; First.colorBlendFactor = 0.5; First.text = @"Habra Habr!"; First.horizontalAlignmentMode = SKLabelHorizontalAlignmentModeCenter; [self addChild:First]; SKLabelNode *Second = [SKLabelNode labelNodeWithText:@"----"]; Second.fontName = @"Chalkboard SE Bold"; Second.fontColor = [SKColor blackColor]; Second.position = CGPointMake(280, 50); Second.fontSize = 20; [self addChild:Second]; } @end Swift
Swift
import SpriteKit class GameScene: SKScene { override func didMoveToView(view: SKView) { SceneSetting() //SKSpriteNodeDemo() //SKShapeNodeDemo() SKLabelNodeDemo() } func SceneSetting() { self.backgroundColor = SKColor.orangeColor() } func SKSpriteNodeDemo() { var Texture = SKTexture(imageNamed: "desert_BG") var BackgroundSprite = SKSpriteNode(texture: Texture) BackgroundSprite.size = CGSizeMake(640, 320) BackgroundSprite.position = CGPointMake(0, 0) BackgroundSprite.anchorPoint = CGPointMake(0, 0) BackgroundSprite.name = "BackgroundSprite" self.addChild(BackgroundSprite) var SimpleSprite = SKSpriteNode(color: UIColor.blueColor(), size: CGSizeMake(50, 50)) SimpleSprite.position = CGPointMake(200, 150) SimpleSprite.zPosition = 1; SimpleSprite.name = "SimpleSprite" self.addChild(SimpleSprite) var ImageSprite = SKSpriteNode(imageNamed: "DerevoOpora") ImageSprite.position = CGPointMake(250, 50) ImageSprite.size = CGSizeMake(100, 15) ImageSprite.name = "ImageSprite" self.addChild(ImageSprite) } func SKShapeNodeDemo() { var Circle = SKShapeNode(circleOfRadius: 20) Circle.position = CGPointMake(50, 200) Circle.lineWidth = 10 Circle.strokeColor = SKColor.blueColor() Circle.fillColor = SKColor.redColor() Circle.name = "Circle" self.addChild(Circle) var Quad = SKShapeNode(rect: CGRectMake(0, 0, 50, 50)) Quad.position = CGPointMake(100, 200) Quad.lineWidth = 4 Quad.strokeColor = SKColor.whiteColor() Quad.fillColor = SKColor.blackColor() Quad.name = "Quad" self.addChild(Quad) var Ellips = SKShapeNode(ellipseInRect: CGRectMake(0, 0, 50, 90)) Ellips.position = CGPointMake(200, 200) Ellips.lineWidth = 2 Ellips.strokeColor = SKColor.greenColor() Ellips.fillColor = SKColor.purpleColor() Ellips.glowWidth = 5 Ellips.name = "Ellips" self.addChild(Ellips) var RoundedRectPath = UIBezierPath(roundedRect: CGRectMake(0, 0, 50, 50), cornerRadius: 12) var RoundedRect = SKShapeNode(path: RoundedRectPath.CGPath, centered:true) RoundedRect.position = CGPointMake(50, 100) RoundedRect.lineWidth = 2 RoundedRect.strokeColor = SKColor.blueColor() RoundedRect.fillColor = SKColor.redColor() RoundedRect.name = "RoundedRect" self.addChild(RoundedRect) var TrianglePath = UIBezierPath() TrianglePath.moveToPoint(CGPointMake(0, 0)) TrianglePath.addLineToPoint(CGPointMake(-25, -50)) TrianglePath.addLineToPoint(CGPointMake(25, -50)) TrianglePath.addLineToPoint(CGPointMake(0, 0)) var Triangle = SKShapeNode(path: TrianglePath.CGPath, centered: true) Triangle.position = CGPointMake(200, 70) Triangle.lineWidth = 2 Triangle.strokeColor = SKColor.blackColor() Triangle.fillColor = SKColor.blueColor() Triangle.name = "Triangle" self.addChild(Triangle) } func SKLabelNodeDemo() { var First = SKLabelNode(fontNamed: "Chalkduster") First.position = CGPointMake(280, 200) First.fontSize = 25; First.fontColor = SKColor.whiteColor() First.color = SKColor.blueColor() First.colorBlendFactor = 0.5 First.text = "Habra Habr!" First.horizontalAlignmentMode = SKLabelHorizontalAlignmentMode.Center self.addChild(First) var Second = SKLabelNode(text: "----") Second.fontName = "Chalkboard SE Bold" Second.fontColor = SKColor.blackColor() Second.position = CGPointMake(280, 50) Second.fontSize = 20 self.addChild(Second) } } As you can see, SKLabelNode is very simple to use, I would even say very simple!
| 3 . . , , , : (, , , ). ? |
!
! , — . — . , ! , ! «» . SKPhysicsBody
SKPhysicsBody
SKPhysicsBody - This is essentially the body of our object. It is precisely this that is responsible for all the basic physical characteristics of our objects; it is this that gives them physical form, it is they that are responsible for such characteristics as: Friction, elasticity, resistance, mass, speed, gravity.
Let's take a closer look at it and start of course with its properties, methods or functions.
Property
| 1) dynamic — No, . 2) usesPreciseCollisionDetection — NO. YES, , , , . 3) allowsRotation — NO. YES ! 4) pinned — NO, YES , , . 5) resting — YES, . 6) friction — , . . 7) charge — . . 8) restitution — ( , ) ( 0.1 — 1.0). 0.2. 9) linearDamping — . ( 0.1 — 1.0). 0.1. 10) angularDamping — . ( 0.1 — 1.0). 0.1. 11) density — . 0.1. 12) mass — . 13) area — . 14) affectedByGravity — YES, NO . 15) fieldBitMask — , 16) categoryBitMask — , . 17) collisionBitMask — , . 18) contactTestBitMask — , 19) joints — , . (Joint — , ) 20) node — Node . 21) velocity — . 22) angularVelocity — . |
| 1) bodyWithCircleOfRadius — r — . 2) bodyWithCircleOfRadius — r — center — , . 3) bodyWithRectangleOfSize — s — . 4) bodyWithRectangleOfSize — s — center — , . 5) bodyWithPolygonFromPath — path — . 6) bodyWithEdgeFromPoint — p1 — p2 — , . 7) bodyWithEdgeChainFromPath — path — , — . 8) bodyWithEdgeLoopFromPath — path — , . 9) bodyWithEdgeLoopFromRect — rect — , . 10) bodyWithTexture — texture — size — . 11) bodyWithTexture — texture — alphaThreshold — size — , alphaThreshold. 12) bodyWithBodies — bodies — . |
| 1) applyForce — force — . 2) applyForce — force — point — . ( — ) 3) applyTorque — torque — . 4) applyImpulse — impulse — . 5) applyImpulse — impulse — point — . ( — ) 6) applyAngularImpulse — impulse — . 7) allContactedBodies — Returns an array of physical bodies that are in contact with the given body. |
So, above you can see all the methods or functions and properties of the SKPhysicsBody object . As you can see, he has few of them.
I’ll say at once that some of the points above may seem incomprehensible or difficult to understand . Do not worry if something is not understood. Then we will all look at it and experiment with it a few times!
Okay, let's continue, but before we start implementation, we have to do something!
| Let's find our ViewController and add this property to our SKView : Objective-c Swift , . , ! |
, SceneSetting
| , . . Objective-c Swift |
Physics of bodies can be divided into 3 categories:
1) Dynamic - Bodies that can change their position.
2) Static - Bodies that cannot change their position.
3) EDGE - Peculiar borders.
Dynamic
Dynamic bodies are best used when you want to move something on the stage or push it. These can be: shells, flying objects, all possible animated characters. They have mass and volume, they can be affected by the forces of gravity, they can take on basic physical properties.
Static
Static bodies. They all have the same thing as the dynamic ones, the main difference is that they cannot move! However, other objects can still collide and interact with them. It is best to use them, for example for some kind of supports or walls. All that takes up a lot of space.
EDGE
EDGE is in fact not a physical body, it is certain boundaries with which the whole interaction takes place. They have no mass or volume, and cannot move!
EDGE is used to provide a hollow part inside the object or for any invisible borders.
Let's look at the image above. We see five objects. I specifically chose different types of objects so that you could see the difference between them.
Well, let's look at them in more detail!
Objective c
Objective c
-(void)CreatePhysics { // SKShapeNode . (CGRectMake). SKShapeNode *RectanglePhysics = [SKShapeNode shapeNodeWithRect:CGRectMake(-580/2, -10, 580, 20)]; RectanglePhysics.position = CGPointMake(280, 40); // . RectanglePhysics.fillColor = [SKColor whiteColor]; // . RectanglePhysics.name = @"Rectangle"; // . RectanglePhysics.physicsBody = [SKPhysicsBody bodyWithRectangleOfSize:RectanglePhysics.frame.size]; // . RectanglePhysics.physicsBody.dynamic = NO; // . [self addChild:RectanglePhysics]; // . // SKShapeNode . . SKShapeNode *CirclePhysics = [SKShapeNode shapeNodeWithCircleOfRadius:40]; CirclePhysics.position = CGPointMake(100, 160); // . CirclePhysics.strokeColor = [SKColor greenColor]; // . CirclePhysics.lineWidth = 5; // . CirclePhysics.name = @"Circle"; // . CirclePhysics.physicsBody = [SKPhysicsBody bodyWithCircleOfRadius:40]; // . CirclePhysics.physicsBody.dynamic = YES; // . [self addChild:CirclePhysics]; // . // SKTexture . . SKTexture *Texture = [SKTexture textureWithImageNamed:@"DerevoOpora"]; // SKSpriteNode . SKTexture. SKSpriteNode *TexturePhysics = [SKSpriteNode spriteNodeWithTexture:Texture]; TexturePhysics.position = CGPointMake(200, 180); // . TexturePhysics.size = CGSizeMake(100, 30); // . TexturePhysics.name = @"TexturePhysics"; // . TexturePhysics.physicsBody = [SKPhysicsBody bodyWithRectangleOfSize:TexturePhysics.frame.size]; // . TexturePhysics.physicsBody.dynamic = YES; // // . [self addChild: TexturePhysics]; // . UIBezierPath *TrianglePath = [UIBezierPath bezierPath]; // UIBezierPath. [TrianglePath moveToPoint:CGPointMake(0,0)]; // . [TrianglePath addLineToPoint:CGPointMake(-50, -100)]; // . [TrianglePath addLineToPoint:CGPointMake(50, -100)]; // . [TrianglePath addLineToPoint:CGPointMake(0, 0)]; // . // SKShapeNode . . // , CGPath. SKShapeNode *TrianglePhysics = [SKShapeNode shapeNodeWithPath:TrianglePath.CGPath ]; TrianglePhysics.position = CGPointMake(400, 190); // . TrianglePhysics.lineWidth = 2; // . TrianglePhysics.strokeColor = [SKColor blackColor]; // . TrianglePhysics.fillColor = [SKColor blueColor]; // . TrianglePhysics.name = @"Triangle"; // . TrianglePhysics.physicsBody = [SKPhysicsBody bodyWithPolygonFromPath:TrianglePath.CGPath]; // . TrianglePhysics.physicsBody.dynamic = YES; // . [self addChild:TrianglePhysics]; // . // SKLabelNode . . SKLabelNode *LabelPhysics = [SKLabelNode labelNodeWithText:@"Xcode"]; LabelPhysics.position = CGPointMake(500, 200); // . LabelPhysics.fontSize = 22; // . LabelPhysics.physicsBody = [SKPhysicsBody bodyWithEdgeLoopFromRect:CGRectMake(-25, -25, 50, 50)]; // . LabelPhysics.name = @"Label"; // . [self addChild:LabelPhysics]; // . } Swift
Swift
func CreatePhysics() { // RectanglePhysics SKShapeNode. // (CGRectMake). var RectanglePhysics = SKShapeNode(rect: CGRectMake(-580/2, -10, 580, 20)) RectanglePhysics.position = CGPointMake(280, 40) // . RectanglePhysics.fillColor = SKColor.whiteColor() // . RectanglePhysics.name = "Rectangle" // . RectanglePhysics.physicsBody = SKPhysicsBody(rectangleOfSize: RectanglePhysics.frame.size) // . RectanglePhysics.physicsBody.dynamic = false // . self.addChild(RectanglePhysics) // . // CirclePhysics SKShapeNode. // . var CirclePhysics = SKShapeNode(circleOfRadius: 40) CirclePhysics.position = CGPointMake(100, 160) // . CirclePhysics.strokeColor = SKColor.greenColor() // . CirclePhysics.lineWidth = 5; // . CirclePhysics.name = "Circle" // . CirclePhysics.physicsBody = SKPhysicsBody(circleOfRadius: 40) // . CirclePhysics.physicsBody.dynamic = true // . self.addChild(CirclePhysics) // . // Texture SKTexture. let Texture = SKTexture(imageNamed: "DerevoOpora") // TexturePhysics SKSpriteNode. // SKTexture . var TexturePhysics = SKSpriteNode(texture: Texture) TexturePhysics.position = CGPointMake(200, 180) // . TexturePhysics.size = CGSizeMake(100, 30) // . TexturePhysics.name = "TexturePhysics" // . TexturePhysics.physicsBody = SKPhysicsBody(rectangleOfSize: TexturePhysics.frame.size) // . TexturePhysics.physicsBody.dynamic = true // . self.addChild(TexturePhysics) // . var TrianglePath = UIBezierPath() // UIBezierPath. TrianglePath.moveToPoint(CGPointMake(0, 0)) // . TrianglePath.addLineToPoint(CGPointMake(-50, -100)) // . TrianglePath.addLineToPoint(CGPointMake(50, -100)) // . TrianglePath.addLineToPoint(CGPointMake(0, 0)) // . // TrianglePhysics SKShapeNode. // // , CGPath. var TrianglePhysics = SKShapeNode(path: TrianglePath.CGPath) TrianglePhysics.position = CGPointMake(400, 190) // . TrianglePhysics.lineWidth = 2 // . TrianglePhysics.strokeColor = SKColor.blackColor() // . TrianglePhysics.fillColor = SKColor.blueColor() // . TrianglePhysics.name = "Triangle" // . TrianglePhysics.physicsBody = SKPhysicsBody(polygonFromPath: TrianglePath.CGPath) // . TrianglePhysics.physicsBody.dynamic = true // . self.addChild(TrianglePhysics) // . // LabelPhysics SKLabelNode. . var LabelPhysics = SKLabelNode(text: "Xcode") LabelPhysics.position = CGPointMake(500, 200) // . LabelPhysics.fontSize = 22; // . LabelPhysics.physicsBody = SKPhysicsBody(edgeLoopFromRect: CGRectMake(-25, -25, 50, 50)) // . LabelPhysics.name = "Label" // . self.addChild(LabelPhysics) // . } RectanglePhysics
The first Object is named RectanglePhysics . You already know what its basic properties are doing, so I will not dwell on them and go directly to the new ones. As you can see, at the very beginning we refer to the physicsBody property ofour object and assign it an object of type SKPhysicsBody . This is necessary in order to give the physical body to our Sprite.
If you have carefully studied the methods or functions of SKPhysicsBody , which I wrote about above, then you can see that the object that we pass as a property is initialized by calling the bodyWithRectangleOfSize methodor the rectangleOfSize functionand at its initialization we transfer the size of our Sprite, and our physical body is built on it.
There is one important point that is worth mentioning!
Any contact or contact does not occur with the sprite itself, but with its physical body!
If you specify a body size smaller than the Sprite itself, in this case, if an object touches a part that does not enter the physical body, it will penetrate into another Sprite, and if you specify a body size larger than the Sprite size, then it will seem that the Sprite shell itself does not touch , but some invisible border. In the image below, I gave an example for these cases! |
After installing our physical body, we set another property, this is dynamic .
As I wrote above, it is responsible for the dynamism of objects. Here we assign a negative value to it, which means that now our object will not be able to move, which ideally suits us as a supporting surface!
CirclePhysics
| CirclePhysics . . : SKPhysicsBody bodyWithCircleOfRadius circleOfRadius . dynamic , , . , , ! |
| . , . , : , , ! , , ! |
TexturePhysics
| TexturePhysics . , . , , dynamic , ! |
TrianglePhysics
| , TrianglePhysics . , UIBezierPath . , SKPhysicsBody . polygonFromPath bodyWithPolygonFromPath . (-) ? UIBezierPath TrianglePath . ! |
LabelPhysics
| LabelPhysics . , SKPhysicsBody , bodyWithEdgeLoopFromRect edgeLoopFromRect . ? , (CGRectMake) (EDGE). . , showsPhysics , . , ! EDGE, , . . , . , ; EDGE. |
Comparison of Some Physical Properties
And so friends, we learned how to create physical bodies for our objects and now it's time to look at physical properties. In the video below, we see a comparison of several physical properties. As we see at the very beginning two balls of the same size and from the same height fall. When you drop one of them bounces off, and the other does not. We also see two squares of the same size too. They also fall from the same height, but on an inclined surface. One of them slips and falls, while the other immediately stops. All this is a demonstration of some physical properties. Let's better go directly to the code!
And so let's look at our code!
Objective c
Objective c
-(void)PhysicsProperties { float RotateAngle = 10 * (2 * M_PI)/360; SKShapeNode *Opora1 = [SKShapeNode shapeNodeWithRect:CGRectMake(-150/2, -10, 150, 20)]; Opora1.position = CGPointMake(100, 200); Opora1.strokeColor = [SKColor greenColor]; Opora1.fillColor = [SKColor greenColor]; Opora1.name = @"Opora1"; Opora1.physicsBody = [SKPhysicsBody bodyWithRectangleOfSize:Opora1.frame.size]; Opora1.physicsBody.dynamic = NO; Opora1.zRotation = -RotateAngle; [self addChild:Opora1]; SKShapeNode *Opora2 = [SKShapeNode shapeNodeWithRect:CGRectMake(-150/2, -10, 150, 20)]; Opora2.position = CGPointMake(468, 200); Opora2.strokeColor = [SKColor redColor]; Opora2.fillColor = [SKColor redColor]; Opora2.name = @"Opora2"; Opora2.physicsBody = [SKPhysicsBody bodyWithRectangleOfSize:Opora2.frame.size]; Opora2.physicsBody.dynamic = NO; Opora2.zRotation = RotateAngle; [self addChild:Opora2]; SKShapeNode *Opora3 = [SKShapeNode shapeNodeWithRect:CGRectMake(-568/2, -10, 568, 20)]; Opora3.position = CGPointMake(568/2, 10); Opora3.strokeColor = [SKColor yellowColor]; Opora3.fillColor = [SKColor yellowColor]; Opora3.name = @"Opora3"; Opora3.physicsBody = [SKPhysicsBody bodyWithRectangleOfSize:Opora3.frame.size]; Opora3.physicsBody.dynamic = NO; [self addChild:Opora3]; SKShapeNode *Circle1 = [SKShapeNode shapeNodeWithCircleOfRadius:15]; Circle1.position = CGPointMake(250, 280); Circle1.strokeColor = [SKColor whiteColor]; Circle1.fillColor = [SKColor blackColor]; Circle1.name = @"Circle1"; Circle1.physicsBody = [SKPhysicsBody bodyWithCircleOfRadius:15]; Circle1.physicsBody.restitution = 0; [self addChild:Circle1]; SKShapeNode *Circle2 = [SKShapeNode shapeNodeWithCircleOfRadius:15]; Circle2.position = CGPointMake(310, 280); Circle2.strokeColor = [SKColor whiteColor]; Circle2.fillColor = [SKColor purpleColor]; Circle2.name = @"Circle2"; Circle2.physicsBody = [SKPhysicsBody bodyWithCircleOfRadius:15]; Circle2.physicsBody.restitution = 0.7; [self addChild:Circle2]; SKShapeNode *Quad1 = [SKShapeNode shapeNodeWithRect:CGRectMake(-30/2, -30/2, 30, 30)]; Quad1.position = CGPointMake(50, 320); Quad1.strokeColor = [SKColor whiteColor]; Quad1.fillColor = [SKColor whiteColor]; Quad1.name = @"Quad1"; Quad1.physicsBody = [SKPhysicsBody bodyWithRectangleOfSize:Quad1.frame.size]; Quad1.physicsBody.friction = 1; [self addChild:Quad1]; SKShapeNode *Quad2 = [SKShapeNode shapeNodeWithRect:CGRectMake(-30/2, -30/2, 30, 30)]; Quad2.position = CGPointMake(518, 320); Quad2.strokeColor = [SKColor blackColor]; Quad2.fillColor = [SKColor blackColor]; Quad2.name = @"Quad2"; Quad2.physicsBody = [SKPhysicsBody bodyWithRectangleOfSize:Quad2.frame.size]; Quad2.physicsBody.friction = 0.1; [self addChild:Quad2]; } Swift
Swift
func PhysicsProperties() { let RotateAngle = 10 * (2 * M_PI)/360 var Opora1 = SKShapeNode(rect: CGRectMake(-150/2, -10, 150, 20)) Opora1.position = CGPointMake(100, 200) Opora1.strokeColor = SKColor.greenColor() Opora1.fillColor = SKColor.greenColor() Opora1.name = "Opora1" Opora1.physicsBody = SKPhysicsBody(rectangleOfSize: Opora1.frame.size) Opora1.physicsBody.dynamic = false Opora1.zRotation = Float(-RotateAngle) self.addChild(Opora1) var Opora2 = SKShapeNode(rect: CGRectMake(-150/2, -10, 150, 20)) Opora2.position = CGPointMake(468, 200) Opora2.strokeColor = SKColor.redColor() Opora2.fillColor = SKColor.redColor() Opora2.name = "Opora2" Opora2.physicsBody = SKPhysicsBody(rectangleOfSize: Opora2.frame.size) Opora2.physicsBody.dynamic = false Opora2.zRotation = Float(RotateAngle) self.addChild(Opora2) var Opora3 = SKShapeNode(rect:CGRectMake (-568/2, -10, 568, 20)) Opora3.position = CGPointMake(568/2, 10) Opora3.strokeColor = SKColor.yellowColor() Opora3.fillColor = SKColor.yellowColor() Opora3.name = "Opora3" Opora3.physicsBody = SKPhysicsBody(rectangleOfSize: Opora3.frame.size) Opora3.physicsBody.dynamic = false self.addChild(Opora3) var Circle1 = SKShapeNode(circleOfRadius: 15) Circle1.position = CGPointMake(250, 280) Circle1.strokeColor = SKColor.whiteColor() Circle1.fillColor = SKColor.blackColor() Circle1.name = "Circle1" Circle1.physicsBody = SKPhysicsBody(circleOfRadius: 15) Circle1.physicsBody.restitution = 0 self.addChild(Circle1) var Circle2 = SKShapeNode(circleOfRadius: 15) Circle2.position = CGPointMake(310, 280) Circle2.strokeColor = SKColor.whiteColor() Circle2.fillColor = SKColor.purpleColor() Circle2.name = "Circle2" Circle2.physicsBody = SKPhysicsBody(circleOfRadius: 15) Circle2.physicsBody.restitution = 0.7 self.addChild(Circle2) var Quad1 = SKShapeNode(rect: CGRectMake (-30/2, -30/2, 30, 30)) Quad1.position = CGPointMake(50, 320) Quad1.strokeColor = SKColor.whiteColor() Quad1.fillColor = SKColor.whiteColor() Quad1.name = "Quad1" Quad1.physicsBody = SKPhysicsBody(rectangleOfSize: Quad1.frame.size) Quad1.physicsBody.friction = 1 self.addChild(Quad1) var Quad2 = SKShapeNode(rect: CGRectMake (-30/2, -30/2, 30, 30)) Quad2.position = CGPointMake(518, 320) Quad2.strokeColor = SKColor.blackColor() Quad2.fillColor = SKColor.blackColor() Quad2.name = "Quad2" Quad2.physicsBody = SKPhysicsBody(rectangleOfSize: Quad2.frame.size) Quad2.physicsBody.friction = 0.1 self.addChild(Quad2) } At the very beginning, I create two objects of type SKShapeNode , with the names Opora1 and Opora2 . In the video, these are tilted objects with green and red respectively. There is nothing unusual in their creation except the zRotation property about which I wrote above, but so far we have not used it. As we remember:
| zRotation - Defines the rotation of our Node in the corners of Euler. |
The zRotation property takes its value in radians! And therefore, in order to rotate an object at a certain angle, we must first convert this angle to radians. This is done very simply:
Objective-c
We create a float variable named RotateAngle 10, . 60 , : zRotation : |
Swift
let RotateAngle Objective-c , float |
As you can see, there is nothing difficult in turning objects!
Next, I create another object named Opora3 , it is the one that is yellow in color at the very bottom. There is nothing unusual in its creation either, so we can move on. And further, we have two more objects - circles with the names Circle1 and Circle2 . In their structure, they are very similar to each other, but there are differences in physical properties. Their physical form is absolutely identical, but the property is different:
The property with the name restitution, as we remember, defines:
| restitution - Determines how much energy the body loses in a collision (how much the body rebounds, in a collision) (takes values between 0.1 - 1.0). The default is 0.2. |
So, in the object with the name Circle1 I set its value to “0” , and in another object with the name Circle2 it is set to the value “1” . Changing the value of this property affects the behavior of an object when it collides with other objects. As we can see in the video, one of the two balls as the drop bounces, and the other opposite lies motionless. All this is the result of the action of this property.
We can see another example in two other objects with the names Quad1 and Quad2 . They are square in shape and identical in everything except the physical property named friction .
| friction - Determines the surface roughness. It is used to calculate the friction force in contact with the body. |
For one object, its value is “1” , for another, “0.1” and as a result: one square barely slides along the surface, and the other, on the contrary, slips the entire surface down.
The complete code of our project
Objective-c
Objective c
#import "GameScene.h" @implementation GameScene -(void)didMoveToView:(SKView *)view { [self SceneSetting]; //[self SKSpriteNodeDemo]; //[self SKShapeNodeDemo]; //[self SKLabelNodeDemo]; //[self CreatePhysics]; [self PhysicsProperties]; } -(void)SceneSetting { self.backgroundColor = [SKColor orangeColor]; self.physicsWorld.gravity = CGVectorMake(0, -1); } -(void)PhysicsProperties { float RotateAngle = 10 * (2 * M_PI)/360; SKShapeNode *Opora1 = [SKShapeNode shapeNodeWithRect:CGRectMake(-150/2, -10, 150, 20)]; Opora1.position = CGPointMake(100, 200); Opora1.strokeColor = [SKColor greenColor]; Opora1.fillColor = [SKColor greenColor]; Opora1.name = @"Opora1"; Opora1.physicsBody = [SKPhysicsBody bodyWithRectangleOfSize:Opora1.frame.size]; Opora1.physicsBody.dynamic = NO; Opora1.zRotation = -RotateAngle; [self addChild:Opora1]; SKShapeNode *Opora2 = [SKShapeNode shapeNodeWithRect:CGRectMake(-150/2, -10, 150, 20)]; Opora2.position = CGPointMake(468, 200); Opora2.strokeColor = [SKColor redColor]; Opora2.fillColor = [SKColor redColor]; Opora2.name = @"Opora2"; Opora2.physicsBody = [SKPhysicsBody bodyWithRectangleOfSize:Opora2.frame.size]; Opora2.physicsBody.dynamic = NO; Opora2.zRotation = RotateAngle; [self addChild:Opora2]; SKShapeNode *Opora3 = [SKShapeNode shapeNodeWithRect:CGRectMake(-568/2, -10, 568, 20)]; Opora3.position = CGPointMake(568/2, 10); Opora3.strokeColor = [SKColor yellowColor]; Opora3.fillColor = [SKColor yellowColor]; Opora3.name = @"Opora3"; Opora3.physicsBody = [SKPhysicsBody bodyWithRectangleOfSize:Opora3.frame.size]; Opora3.physicsBody.dynamic = NO; [self addChild:Opora3]; SKShapeNode *Circle1 = [SKShapeNode shapeNodeWithCircleOfRadius:15]; Circle1.position = CGPointMake(250, 280); Circle1.strokeColor = [SKColor whiteColor]; Circle1.fillColor = [SKColor blackColor]; Circle1.name = @"Circle1"; Circle1.physicsBody = [SKPhysicsBody bodyWithCircleOfRadius:15]; Circle1.physicsBody.restitution = 0; [self addChild:Circle1]; SKShapeNode *Circle2 = [SKShapeNode shapeNodeWithCircleOfRadius:15]; Circle2.position = CGPointMake(310, 280); Circle2.strokeColor = [SKColor whiteColor]; Circle2.fillColor = [SKColor purpleColor]; Circle2.name = @"Circle2"; Circle2.physicsBody = [SKPhysicsBody bodyWithCircleOfRadius:15]; Circle2.physicsBody.restitution = 0.7; [self addChild:Circle2]; SKShapeNode *Quad1 = [SKShapeNode shapeNodeWithRect:CGRectMake(-30/2, -30/2, 30, 30)]; Quad1.position = CGPointMake(50, 320); Quad1.strokeColor = [SKColor whiteColor]; Quad1.fillColor = [SKColor whiteColor]; Quad1.name = @"Quad1"; Quad1.physicsBody = [SKPhysicsBody bodyWithRectangleOfSize:Quad1.frame.size]; Quad1.physicsBody.friction = 1; [self addChild:Quad1]; SKShapeNode *Quad2 = [SKShapeNode shapeNodeWithRect:CGRectMake(-30/2, -30/2, 30, 30)]; Quad2.position = CGPointMake(518, 320); Quad2.strokeColor = [SKColor blackColor]; Quad2.fillColor = [SKColor blackColor]; Quad2.name = @"Quad2"; Quad2.physicsBody = [SKPhysicsBody bodyWithRectangleOfSize:Quad2.frame.size]; Quad2.physicsBody.friction = 0.1; [self addChild:Quad2]; } -(void)CreatePhysics { SKShapeNode *RectanglePhysics = [SKShapeNode shapeNodeWithRect:CGRectMake(-580/2, -10, 580, 20)]; RectanglePhysics.position = CGPointMake(280, 40); RectanglePhysics.fillColor = [SKColor whiteColor]; RectanglePhysics.name = @"Rectangle"; RectanglePhysics.physicsBody = [SKPhysicsBody bodyWithRectangleOfSize:RectanglePhysics.frame.size]; RectanglePhysics.physicsBody.dynamic = NO; [self addChild:RectanglePhysics]; SKShapeNode *CirclePhysics = [SKShapeNode shapeNodeWithCircleOfRadius:40]; CirclePhysics.position = CGPointMake(100, 160); CirclePhysics.strokeColor = [SKColor greenColor]; CirclePhysics.lineWidth = 5; CirclePhysics.name = @"Circle"; CirclePhysics.physicsBody = [SKPhysicsBody bodyWithCircleOfRadius:40]; CirclePhysics.physicsBody.dynamic = YES; [self addChild:CirclePhysics]; SKTexture *Texture = [SKTexture textureWithImageNamed:@"DerevoOpora"]; SKSpriteNode *TexturePhysics = [SKSpriteNode spriteNodeWithTexture:Texture]; TexturePhysics.position = CGPointMake(200, 180); TexturePhysics.size = CGSizeMake(100, 30); TexturePhysics.name = @"TexturePhysics"; TexturePhysics.physicsBody = [SKPhysicsBody bodyWithRectangleOfSize:TexturePhysics.frame.size]; TexturePhysics.physicsBody.dynamic = YES; [self addChild: TexturePhysics]; UIBezierPath *TrianglePath = [UIBezierPath bezierPath]; [TrianglePath moveToPoint:CGPointMake(0,0)]; [TrianglePath addLineToPoint:CGPointMake(-50, -100)]; [TrianglePath addLineToPoint:CGPointMake(50, -100)]; [TrianglePath addLineToPoint:CGPointMake(0, 0)]; SKShapeNode *TrianglePhysics = [SKShapeNode shapeNodeWithPath:TrianglePath.CGPath ]; TrianglePhysics.position = CGPointMake(400, 190); TrianglePhysics.lineWidth = 2; TrianglePhysics.strokeColor = [SKColor blackColor]; TrianglePhysics.fillColor = [SKColor blueColor]; TrianglePhysics.name = @"Triangle"; TrianglePhysics.physicsBody = [SKPhysicsBody bodyWithPolygonFromPath:TrianglePath.CGPath]; TrianglePhysics.physicsBody.dynamic = YES; [self addChild:TrianglePhysics]; SKLabelNode *LabelPhysics = [SKLabelNode labelNodeWithText:@"Xcode"]; LabelPhysics.position = CGPointMake(500, 200); LabelPhysics.fontSize = 22; LabelPhysics.physicsBody = [SKPhysicsBody bodyWithEdgeLoopFromRect:CGRectMake(-25, -25, 50, 50)]; LabelPhysics.name = @"Label"; [self addChild:LabelPhysics]; } -(void)SKSpriteNodeDemo { SKTexture *Texture = [SKTexture textureWithImageNamed:@"desert_BG"]; SKSpriteNode *BackgroundSprite = [SKSpriteNode spriteNodeWithTexture:Texture]; BackgroundSprite.size = CGSizeMake(640, 320); BackgroundSprite.position = CGPointMake(0, 0); BackgroundSprite.anchorPoint = CGPointMake(0, 0); BackgroundSprite.name = @"BackgroundSprite"; [self addChild:BackgroundSprite]; SKSpriteNode *SimpleSprite = [SKSpriteNode spriteNodeWithColor:[UIColor blueColor] size:CGSizeMake(50, 50)]; SimpleSprite.position = CGPointMake(200, 150); SimpleSprite.zPosition = 1; SimpleSprite.name = @"SimpleSprite"; [self addChild:SimpleSprite]; SKSpriteNode *ImageSprite = [SKSpriteNode spriteNodeWithImageNamed:@"DerevoOpora"]; ImageSprite.position = CGPointMake(250, 50); ImageSprite.size = CGSizeMake(100, 15); ImageSprite.name = @"ImageSprite"; [self addChild:ImageSprite]; } -(void)SKShapeNodeDemo { SKShapeNode *Circle = [SKShapeNode shapeNodeWithCircleOfRadius:20]; Circle.position = CGPointMake(50, 200); Circle.lineWidth = 10; Circle.strokeColor = [SKColor blueColor]; Circle.fillColor = [SKColor redColor]; Circle.name = @"Circle"; [self addChild:Circle]; SKShapeNode *Quad = [SKShapeNode shapeNodeWithRect:CGRectMake(0, 0, 50, 50)]; Quad.position = CGPointMake(100, 200); Quad.lineWidth = 4; Quad.strokeColor = [SKColor whiteColor]; Quad.fillColor = [SKColor blackColor]; Quad.name = @"Quad"; [self addChild:Quad]; SKShapeNode *Ellips = [SKShapeNode shapeNodeWithEllipseInRect:CGRectMake(0, 0, 50, 90)]; Ellips.position = CGPointMake(200, 200); Ellips.lineWidth = 2; Ellips.strokeColor = [SKColor greenColor]; Ellips.fillColor = [SKColor purpleColor]; Ellips.glowWidth = 5; Ellips.name = @"Ellips"; [self addChild:Ellips]; UIBezierPath *RoundedRectPath = [UIBezierPath bezierPathWithRoundedRect:CGRectMake(0, 0, 50, 50) cornerRadius:12]; SKShapeNode *RoundedRect = [ SKShapeNode shapeNodeWithPath:RoundedRectPath.CGPath centered:YES]; RoundedRect.position = CGPointMake(50, 100); RoundedRect.lineWidth = 2; RoundedRect.strokeColor = [SKColor blueColor]; RoundedRect.fillColor = [SKColor redColor]; RoundedRect.name = @"RoundedRect"; [self addChild:RoundedRect]; UIBezierPath *TrianglePath = [UIBezierPath bezierPath]; [TrianglePath moveToPoint:CGPointMake(0,0)]; [TrianglePath addLineToPoint:CGPointMake(-25, -50)]; [TrianglePath addLineToPoint:CGPointMake(25, -50)]; [TrianglePath addLineToPoint:CGPointMake(0, 0)]; SKShapeNode *Triangle = [SKShapeNode shapeNodeWithPath:TrianglePath.CGPath centered:YES]; Triangle.position = CGPointMake(200, 70); Triangle.lineWidth = 2; Triangle.strokeColor = [SKColor blackColor]; Triangle.fillColor = [SKColor blueColor]; Triangle.name = @"Triangle"; [self addChild:Triangle]; } -(void)SKLabelNodeDemo { SKLabelNode *First = [SKLabelNode labelNodeWithFontNamed:@"Chalkduster"]; First.position = CGPointMake(280, 200); First.fontSize = 25; First.fontColor = [SKColor whiteColor]; First.color = [SKColor blueColor]; First.colorBlendFactor = 0.5; First.text = @"Habra Habr!"; First.horizontalAlignmentMode = SKLabelHorizontalAlignmentModeCenter; [self addChild:First]; SKLabelNode *Second = [SKLabelNode labelNodeWithText:@"----"]; Second.fontName = @"Chalkboard SE Bold"; Second.fontColor = [SKColor blackColor]; Second.position = CGPointMake(280, 50); Second.fontSize = 20; [self addChild:Second]; } @end Swift
Swift
import SpriteKit class GameScene: SKScene { override func didMoveToView(view: SKView) { SceneSetting() //SKSpriteNodeDemo() //SKShapeNodeDemo() //SKLabelNodeDemo() //CreatePhysics() PhysicsProperties() } func SceneSetting() { self.backgroundColor = SKColor.orangeColor() self.physicsWorld.gravity = CGVectorMake(0, -1); } func PhysicsProperties() { let RotateAngle = 10 * (2 * M_PI)/360 var Opora1 = SKShapeNode(rect: CGRectMake(-150/2, -10, 150, 20)) Opora1.position = CGPointMake(100, 200) Opora1.strokeColor = SKColor.greenColor() Opora1.fillColor = SKColor.greenColor() Opora1.name = "Opora1" Opora1.physicsBody = SKPhysicsBody(rectangleOfSize: Opora1.frame.size) Opora1.physicsBody.dynamic = false Opora1.zRotation = Float(-RotateAngle) self.addChild(Opora1) var Opora2 = SKShapeNode(rect: CGRectMake(-150/2, -10, 150, 20)) Opora2.position = CGPointMake(468, 200) Opora2.strokeColor = SKColor.redColor() Opora2.fillColor = SKColor.redColor() Opora2.name = "Opora2" Opora2.physicsBody = SKPhysicsBody(rectangleOfSize: Opora2.frame.size) Opora2.physicsBody.dynamic = false Opora2.zRotation = Float(RotateAngle) self.addChild(Opora2) var Opora3 = SKShapeNode(rect:CGRectMake (-568/2, -10, 568, 20)) Opora3.position = CGPointMake(568/2, 10) Opora3.strokeColor = SKColor.yellowColor() Opora3.fillColor = SKColor.yellowColor() Opora3.name = "Opora3" Opora3.physicsBody = SKPhysicsBody(rectangleOfSize: Opora3.frame.size) Opora3.physicsBody.dynamic = false self.addChild(Opora3) var Circle1 = SKShapeNode(circleOfRadius: 15) Circle1.position = CGPointMake(250, 280) Circle1.strokeColor = SKColor.whiteColor() Circle1.fillColor = SKColor.blackColor() Circle1.name = "Circle1" Circle1.physicsBody = SKPhysicsBody(circleOfRadius: 15) Circle1.physicsBody.restitution = 0 self.addChild(Circle1) var Circle2 = SKShapeNode(circleOfRadius: 15) Circle2.position = CGPointMake(310, 280) Circle2.strokeColor = SKColor.whiteColor() Circle2.fillColor = SKColor.purpleColor() Circle2.name = "Circle2" Circle2.physicsBody = SKPhysicsBody(circleOfRadius: 15) Circle2.physicsBody.restitution = 0.7 self.addChild(Circle2) var Quad1 = SKShapeNode(rect: CGRectMake (-30/2, -30/2, 30, 30)) Quad1.position = CGPointMake(50, 320) Quad1.strokeColor = SKColor.whiteColor() Quad1.fillColor = SKColor.whiteColor() Quad1.name = "Quad1" Quad1.physicsBody = SKPhysicsBody(rectangleOfSize: Quad1.frame.size) Quad1.physicsBody.friction = 1 self.addChild(Quad1) var Quad2 = SKShapeNode(rect: CGRectMake (-30/2, -30/2, 30, 30)) Quad2.position = CGPointMake(518, 320) Quad2.strokeColor = SKColor.blackColor() Quad2.fillColor = SKColor.blackColor() Quad2.name = "Quad2" Quad2.physicsBody = SKPhysicsBody(rectangleOfSize: Quad2.frame.size) Quad2.physicsBody.friction = 0.1 self.addChild(Quad2) } func CreatePhysics() { var RectanglePhysics = SKShapeNode(rect: CGRectMake(-580/2, -10, 580, 20)) RectanglePhysics.position = CGPointMake(280, 40) RectanglePhysics.fillColor = SKColor.whiteColor() RectanglePhysics.name = "Rectangle" RectanglePhysics.physicsBody = SKPhysicsBody(rectangleOfSize: RectanglePhysics.frame.size) RectanglePhysics.physicsBody.dynamic = false self.addChild(RectanglePhysics) var CirclePhysics = SKShapeNode(circleOfRadius: 40) CirclePhysics.position = CGPointMake(100, 160) CirclePhysics.strokeColor = SKColor.greenColor() CirclePhysics.lineWidth = 5; CirclePhysics.name = "Circle" CirclePhysics.physicsBody = SKPhysicsBody(circleOfRadius: 40) CirclePhysics.physicsBody.dynamic = true self.addChild(CirclePhysics) let Texture = SKTexture(imageNamed: "DerevoOpora") var TexturePhysics = SKSpriteNode(texture: Texture) TexturePhysics.position = CGPointMake(200, 180) TexturePhysics.size = CGSizeMake(100, 30) TexturePhysics.name = "TexturePhysics" TexturePhysics.physicsBody = SKPhysicsBody(rectangleOfSize: TexturePhysics.frame.size) TexturePhysics.physicsBody.dynamic = true self.addChild(TexturePhysics) var TrianglePath = UIBezierPath() TrianglePath.moveToPoint(CGPointMake(0, 0)) TrianglePath.addLineToPoint(CGPointMake(-50, -100)) TrianglePath.addLineToPoint(CGPointMake(50, -100)) TrianglePath.addLineToPoint(CGPointMake(0, 0)) var TrianglePhysics = SKShapeNode(path: TrianglePath.CGPath) TrianglePhysics.position = CGPointMake(400, 190) TrianglePhysics.lineWidth = 2 TrianglePhysics.strokeColor = SKColor.blackColor() TrianglePhysics.fillColor = SKColor.blueColor() TrianglePhysics.name = "Triangle" TrianglePhysics.physicsBody = SKPhysicsBody(polygonFromPath: TrianglePath.CGPath) TrianglePhysics.physicsBody.dynamic = true self.addChild(TrianglePhysics) var LabelPhysics = SKLabelNode(text: "Xcode") LabelPhysics.position = CGPointMake(500, 200) LabelPhysics.fontSize = 22; LabelPhysics.physicsBody = SKPhysicsBody(edgeLoopFromRect: CGRectMake(-25, -25, 50, 50)) LabelPhysics.name = "Label" self.addChild(LabelPhysics) } func SKSpriteNodeDemo() { var Texture = SKTexture(imageNamed: "desert_BG") var BackgroundSprite = SKSpriteNode(texture: Texture) BackgroundSprite.size = CGSizeMake(640, 320) BackgroundSprite.position = CGPointMake(0, 0) BackgroundSprite.anchorPoint = CGPointMake(0, 0) BackgroundSprite.name = "BackgroundSprite" self.addChild(BackgroundSprite) var SimpleSprite = SKSpriteNode(color: UIColor.blueColor(), size: CGSizeMake(50, 50)) SimpleSprite.position = CGPointMake(200, 150) SimpleSprite.zPosition = 1; SimpleSprite.name = "SimpleSprite" self.addChild(SimpleSprite) var ImageSprite = SKSpriteNode(imageNamed: "DerevoOpora") ImageSprite.position = CGPointMake(250, 50) ImageSprite.size = CGSizeMake(100, 15) ImageSprite.name = "ImageSprite" self.addChild(ImageSprite) } func SKShapeNodeDemo() { var Circle = SKShapeNode(circleOfRadius: 20) Circle.position = CGPointMake(50, 200) Circle.lineWidth = 10 Circle.strokeColor = SKColor.blueColor() Circle.fillColor = SKColor.redColor() Circle.name = "Circle" self.addChild(Circle) var Quad = SKShapeNode(rect: CGRectMake(0, 0, 50, 50)) Quad.position = CGPointMake(100, 200) Quad.lineWidth = 4 Quad.strokeColor = SKColor.whiteColor() Quad.fillColor = SKColor.blackColor() Quad.name = "Quad" self.addChild(Quad) var Ellips = SKShapeNode(ellipseInRect: CGRectMake(0, 0, 50, 90)) Ellips.position = CGPointMake(200, 200) Ellips.lineWidth = 2 Ellips.strokeColor = SKColor.greenColor() Ellips.fillColor = SKColor.purpleColor() Ellips.glowWidth = 5 Ellips.name = "Ellips" self.addChild(Ellips) var RoundedRectPath = UIBezierPath(roundedRect: CGRectMake(0, 0, 50, 50), cornerRadius: 12) var RoundedRect = SKShapeNode(path: RoundedRectPath.CGPath, centered:true) RoundedRect.position = CGPointMake(50, 100) RoundedRect.lineWidth = 2 RoundedRect.strokeColor = SKColor.blueColor() RoundedRect.fillColor = SKColor.redColor() RoundedRect.name = "RoundedRect" self.addChild(RoundedRect) var TrianglePath = UIBezierPath() TrianglePath.moveToPoint(CGPointMake(0, 0)) TrianglePath.addLineToPoint(CGPointMake(-25, -50)) TrianglePath.addLineToPoint(CGPointMake(25, -50)) TrianglePath.addLineToPoint(CGPointMake(0, 0)) var Triangle = SKShapeNode(path: TrianglePath.CGPath, centered: true) Triangle.position = CGPointMake(200, 70) Triangle.lineWidth = 2 Triangle.strokeColor = SKColor.blackColor() Triangle.fillColor = SKColor.blueColor() Triangle.name = "Triangle" self.addChild(Triangle) } func SKLabelNodeDemo() { var First = SKLabelNode(fontNamed: "Chalkduster") First.position = CGPointMake(280, 200) First.fontSize = 25; First.fontColor = SKColor.whiteColor() First.color = SKColor.blueColor() First.colorBlendFactor = 0.5 First.text = "Habra Habr!" First.horizontalAlignmentMode = SKLabelHorizontalAlignmentMode.Center self.addChild(First) var Second = SKLabelNode(text: "----") Second.fontName = "Chalkboard SE Bold" Second.fontColor = SKColor.blackColor() Second.position = CGPointMake(280, 50) Second.fontSize = 20 self.addChild(Second) } } , . : , . , , . SpriteKit , . , .
Well friends, here I would like to stop and let you understand everything that I wrote above. As you can see, SpriteKit is a very powerful engine. Experts from Apple have tried their best. Of course, there are no features in it that are present in cocos2d , but SpriteKit is still much younger than him and I think he is still ahead!
While writing this article, I created a simple puzzle game to demonstrate some of the features of SpriteKit .
Unfortunately, for some reasons beyond my control, at the moment I cannot change its status to free. But I promise you that with writing a new part, I will post the full code for this game on GitHub .
Some images

The game is called: Soul Shift: Next Generation
For those who are just learning to create applications, there are very good video tutorials on Objective-c and Swift languages . They are created by a guy named Alex . He is on habrahabr: ezeki . In each video, he examines in great detail the main aspects of the language and clearly demonstrates it. These lessons will be very useful for both beginners and those who are already free to program under iOS .
Objective c
Swift
PS Friends! I think you will not judge me strictly for my grammatical errors, for this is my second language, which I diligently study.
PPS In conclusion, I want to thank the user AbyssMoon , who has honored me to be among you!
Source: https://habr.com/ru/post/225517/
All Articles