Wi-Fi networks: penetration and protection. 2) Kali. Hiding SSID. MAC filtering. WPS

The first part of the cycle was very vividly met by the habrasoobshchestvo, which inspired me to accelerate the writing of the next part. Many useful comments were left on the previous article, for which I am sincerely grateful. As they say, you want to find flaws in your knowledge - write an article on Habr.
In this article, we will talk about how you can detect “hidden” networks, bypassing MAC filtering on an access point and why WPS (QSS in TP-LINK terminology) is a “backdoor in every home”. Before that, let’s see how the wireless adapter and antenna work, and how Kali Linux (ex. Backtrack ) will help us in tests for penetrating wireless networks.
')
All this has already been described in one way or another, both here and on other resources, but this cycle is intended to collect the scattered theory and practice together, in simple language, with conclusions that everyone can understand.
Before reading, I strongly advise you to familiarize yourself with the materiel - it is short, but all our further actions and conclusions are based on it.
Table of contents:
1) materiel
2) Kali. Hiding SSID. MAC filtering. WPS
3) WPA. OpenCL / CUDA. Pick statistics
Kali ... Kali Linux
Having learned about the existing mechanisms for protecting wireless networks in the first part, it ’s time to use this knowledge in practice and try to hack something (of course, our own). If it works out - our defense is no good.
All the manipulations will be carried out using Kali Linux - kali.org . This is a Debian- based build that was previously known as Backtrack . If this is your first acquaintance with this system, then I advise you to start right away with Kali , as there is everything that was in Backtrack , but more fresh.
(Readers suggest that there are other similar builds - for example, wifiway.org . However, I didn’t work with them.)
Under Windows, you can also do a lot of the above, but the main problem is the lack of / poor support for the monitor mode of wireless adapters, which makes it difficult to catch packets. Who cares - pay attention to CommView and Elcomsoft utilities. They all require special drivers.
Kali is very convenient to use from a flash drive - does it have a legacy from Debian Wheezy (
But, of course, anyone who wants to install it on a hard disk can easily do this from the bootloader and from an already running shell. The OS (LVM) supports encrypted partitions. In addition, you can make your own assembly Kali - add packages, configure the bootloader, and more. All this is described in detail in the documentation and does not cause problems, although the assembly requires a couple of hours of time.
So, let's say you downloaded the ISO and burn it to a USB flash drive (for * nix -
dd , for Windows - Win32DiskImager ). What's next?Persistence mode
This article is not a guide to Linux, but I myself had problems launching this mode, so I decided to specifically describe its work.
You can also use Kali in the Live CD mode, but if you want to be able to save the system state between reboots (data and settings), you need to create a separate ext2 partition on a flash drive called persistence , for which you can use GParted as part of Kali itself and split USB flash drive while working with it. When the partition is created, mount it and write there a single file named persistence.conf and the following contents:
/ union Next, with each Kali boot, you need to specify in which mode to start the system. To do this, in the bootloader, when the first
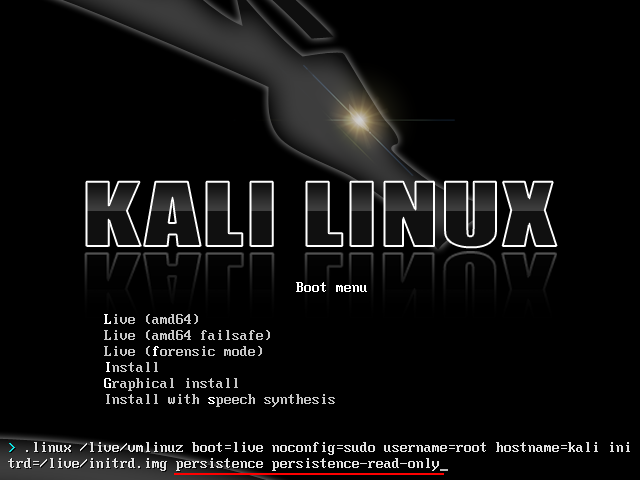
Live (i686-pae) item is highlighted Live (i686-pae) (similarly to x64), press Tab - the kernel boot line appears. We add space and type of load to the end:- persistence , “complete consistency” - loading all data on a partition and saving changed data while it is working
- persistence persistence-read-only , “persistence without saving changes” - note that these are two words and you need to specify both, separated by a space, since without the first this mode will not start (it will be live mode). In this mode, previously saved data to the partition will be loaded, but changes during this session will not be saved and after shutdown the distribution will return to its original state
If you do not specify the type of download, the system will be started in live (vanilla) mode - the persistence section will not be used and after loading it can be mounted and made some changes. All data and settings during live mode will not be saved and are only stored in temporary memory.
In order not to drive in these modes at each boot, you can create your own Kali build (see the instructions on the site ) - there is a boot loader setting where you can enter the necessary modes so that they are initially loaded into
persistence persistence-read-only - in my opinion, this is the convenient, as initially set up everything you need, and then each session begins with a clean slate.Use the tools, Luke
Well, that got to the terminal. Let's see who shines around us with ultra-waves.
Modes of Wi-Fi adapter
But first you need to transfer our wireless adapter (network card) to the “hacker mode” - monitor mode .
The fact is that every Wi-Fi adapter, or rather, an antenna, at the physical level picks up any signals sent by devices in range. An antenna cannot "not receive" extraneous packets. But the driver can work in three modes ( actually 6 , but this is beyond the scope of this article):
- Client mode (also managed mode ) - packets that are not intended for this adapter - are discarded, and the rest are transmitted inside the OS as “received”. In this mode, damaged packets are also discarded. Normal operation "without whistles."
- Monitor mode (also rfmon mode ) - the driver does not filter packets and transmits everything that the antenna catches to the OS. Packets with an incorrect checksum are not discarded and can be seen, for example, in Wireshark .
- Promiscuous mode - “half way” monitor mode. The driver will transfer packets received within the network to which we are currently connected (associated) to the OS, but unlike the normal mode, packets destined for other clients of this network will not be dropped. Packets of other networks will be ignored. It is clear that this only works when you can successfully connect and log in to a network (open or not). Unlike the monitor, this mode is supported by fewer adapters. When working in this mode, as well as in client mode, the driver will remove low-level channel headers from packets sent to the OS.
We need just the monitor mode - in the client mode we are not interested in looking at the packets that we intended ourselves, and for the promiscious mode we need to first connect to a certain network. With the exception of damaged packets and the presence of 802.11 headers, the monitor mode can be the same and more than the random mode, and is supported by the lion's share of adapters. The only problem is that not all adapters can simultaneously transmit data in monitor mode, but I personally had no problems with it.
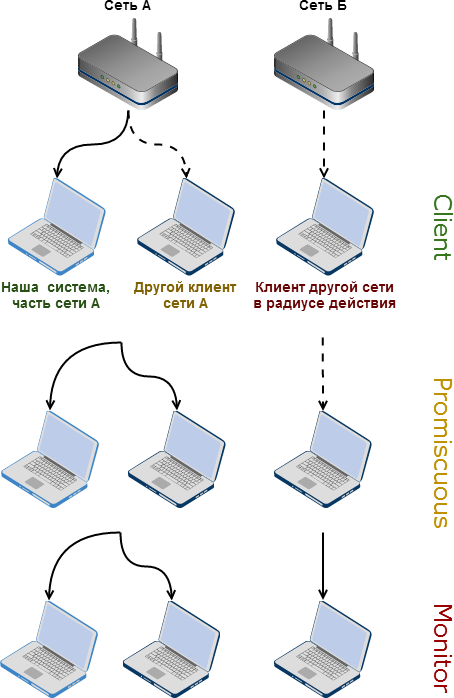
In the picture above, the bold lines show the packets that we intercept in different modes, and the broken lines are the packets caught by our antenna, but discarded by the driver due to the selected mode.
We open the terminal and execute:
airmon-ng start wlan0 wlan0 is the device ID of the adapter. In * nix this is wlan + sequence number ( wlan0, wlan1, wlan2 , etc.). The adapter number can be found by running ifconfig or iwconfig (this one will only display the wireless adapter devices and their specific information).
If airmon-ng displays a message
(monitor mode enabled on mon0) , it means that the adapter has been successfully switched to monitoring mode.Please note that in the commands that we will execute further, the adapter identifier is also indicated, but the virtual one is mon0 (
mon1 , etc.), and not the initial one is wlan0 . mon0 is an adapter created by airmon-ng , designed to work with monitor functions.Now this mode is supported by 80-90% of all adapters (in my experience), the most common of them are Atheros, Intel and TP-LINK. The latter produces external adapters with interchangeable antennas up to $ 30 (I used the TL-WN722NC + TL-ANT2408CL - also, thanks to the USB, they can be connected to VMware). A list of supported adapters is available on the Aircrack-ng wiki .
Wireless channels
Wi-Fi is a technology of data transmission over the air,
There are 13 channels in total, although the last channel, the thirteenth channel, is
In addition, there is the 14th channel (the Japanese, as always, distinguished themselves) and the frequency of 5 GHz with 23 more channels. In general, the 2.4 GHz channels partially overlap, plus their width can be 20 and 40 MHz. This topic is confusing due to the presence of different versions of the standard - anyone interested can read in Wikipedia . We have enough of what has already been said. So far, 5 GHz are used less frequently, but the techniques described below apply to this frequency as well.
Some people use channel 13 to hide their networks, but this method is not even considered here, since it is enough to transfer the adapter to the desired region, as he sees them. For example:
ifconfig wlan0 down iw wlan0 reg set BO ifconfig wlan0 up iwconfig wlan0 channel 13 Any wireless adapter can only receive and transmit data on one channel at a time. However, the current channel can be changed as often as desired - to obtain complete information about wireless broadcasts around airodump-ng (
NetworkManager for GNOME, which shows the list of wireless networks in the upper right corner.If the channel is not fixed, then some packets may be lost - the adapter has switched to the next channel, and at this time a new packet has passed through the previous channel, but its antenna has not caught yet. This is critical when you are trying to intercept handshake, so this command is used to disable all programs that use a wireless adapter and do not allow to fix the channel:
airmon-ng check kill Without kill , a list of all suspicious processes will be displayed, and with kill they will be completed. After that, the adapter will remain entirely at your disposal. The above command is recommended to perform before any action other than a simple network overview, since the wireless adapter is a shared resource; several programs can use it simultaneously (for example, you can catch a list of networks in airodump-ng and select WPS in reaver at the same time), but any of them can switch the channel, so it is important to fix it when it starts (usually the parameter is called -c or - channel ).
Antenna overclock
In addition to manipulating the region, ifconfig may try to force the adapter to operate at a higher power than it does by default. The result strongly depends on the type of adapter and region, with long use it can spoil the device
ifconfig wlan0 down # . iw reg set BO iwconfig wlan0 txpower 500mW # : iwconfig wlan0 txpower 30 ifconfig wlan0 up Typical power is 15–20 dBm. If there is an error, there will be a message of type
Invalid argument , however it may not be - after execution, check the txpower value in iwconfig .They are among us

We carry out:
airodump-ng mon0 airodump-ng - a command to collect packages on the radio. It displays two tables in the console. At the top, the found wireless networks are displayed, at the bottom, the clients connected to them, or not connected, but with an active wireless adapter broadcasting some packets (for example, searching for a network with a specific name).
The latter, by the way, is particularly interesting, since we can kindly provide them with the network we are looking for and see what is fashionable now in Odnoklassniki? On this topic the other day by Comrad KarasikovSergey , an article was published using Karma - but since this is already on the verge of sabotage penetration in this cycle, we will not touch upon this topic. But this is really a problem and you should ensure that your device does not cling to all networks without your permission, including the known ones - the authenticity of access points is not checked and you may well end up on the attacker's network. In all senses.
But we are in XP SP2 ...
It is interesting to recall Windows XP SP2, which, instead of disconnecting the network adapter while inactive to the network, began to request an ESSID consisting of a random set of characters — perhaps in order to save on falling asleep and then warming up the adapter. As a result, if you create a nearby point with such a name that is easy to trace through airodump-ng - XP connects to it, but looking at the connection status the user will never know about it (since it is “inactive”) and in the end it will be very I'm surprised to find a working Skype and lost passwords . Direct communication with space!
But back to our waves. Below is a sample output of airodump-ng :
CH 1 ][ Elapsed: 6 mins ][ 2014-06-06 12:45 BSSID PWR Beacons #Data, #/s CH MB ENC CIPHER AUTH ESSID 00:18:E7:xx:xx:xx -67 108 0 0 11 54e. WPA2 CCMP PSK infolan22451 F8:1A:67:xx:xx:xx -88 132 0 0 1 54e. WPA2 CCMP PSK TP-LINK 48:5B:39:xx:xx:xx -1 0 0 0 5 -1 <length: 0> BSSID STATION PWR Rate Lost Frames Probe (not associated) 4C:B1:99:xx:xx:xx -73 0 - 1 0 66 dlink 48:5B:39:xx:xx:xx 1C:7B:21:xx:xx:xx -81 0 - 1 0 21 Columns of the first table with available wireless networks:
- BSSID is the unique MAC address of the wireless network. By analogy with the MAC address of network cards, these are 6 numbers in hexadecimal format, separated by a colon, for example:
AA:00:BB:12:34:56. It is passed to most other teams. - PWR - signal level. This is a negative number; the closer it is to 0, the stronger the signal. Usually for comfortable work this number is up to -50, for video calls - up to -65, for VoIP - up to -75. Values below -85 and in particular below -90 can be considered an extremely weak level. The number depends on both transmitter power and antenna gain in your adapter (external adapters have a gain of 0-12 dB, external 1-2 meter omnidirectional antennas up to 24 dB)
- Beacons - the number of “beacons” transmitted by this access point — packets that alert nearby devices to the existence of this wireless network, the signal level, its name (BSSID / ESSID), and other information. Used to connect. By default, access points are usually set to transmit beacons every 100 ms (10 times per second), but the interval can be increased to 1 / sec. The absence of a beacon does not indicate the absence of a wireless network - in the hidden (hidden) mode, the access point does not transmit beacons, but you can connect to it if you know the exact name of the network. About the method of detection of such networks - below.
- #Data is the number of data packets that came from this access point. This could be HTTP traffic, ARP requests, authorization requests (handshake), and so on. If no client is connected to the network or if it does not transmit anything, then this value does not change and may be 0.
- # / s is the number of data packets per second. #Data divided by the time of monitoring this network.
- CH - channel number. As already described above, the entire available Wi-Fi spectrum is divided into 14 channels; the access point and, accordingly, the clients transmit data on a specific channel and this column indicates which channel this access point and its clients are tied to
- MB is the transmission rate (channel width) in Mbps. A dot at the end indicates that the access point supports a short preamble. You can see the values 11, 54, 54e. We are usually a little worried
- ENC - type of wireless network - OPN (open), WEP, WPA, WPA2. Based on this parameter, we select the appropriate attack pattern.
- CIPHER - type of data encryption after handshake. Could be TKIP and CCMP (see the review in the first part ).
- AUTH - authentication mechanism for transferring a temporary key. Maybe PSK (common authorization with a single password for WPA (2)), MGT (WPA (2) Enterprise with a separate server with RADIUS keys), OPN (public).
- ESSID is the name of the wireless network. This is what you see in the "Wireless Manager" in Windows and indicate in the settings of the access point. Since this is a custom name, it may not be unique, and for all internal operations, the BSSID is used (that is, the MAC address of the adapter at the access point), and this is simply the display name.
Sometimes you can see -1 in some columns, and
<length: 0> in the last column. These are signs of a wireless network that does not broadcast its data in the clear, but responds only when the client has made an explicit connection request with the correct ESSID and password. In addition, the access point may not transmit any beacons at all and will become active only when a client who knows her name connects to it. If you leave airodump-ng running for a long time and if a new client connects to the hidden network in this period, the line corresponding to the “hidden” network will be automatically opened and the channel number, ESSID and protection data will appear there. In this case, it may be necessary to fix the channel in order not to miss the moment of connection (see below).Columns of the second table with wireless clients:
- BSSID - MAC address of the access point to which the client is connected (see the first table). If not specified, the client is disconnected from all networks, but the adapter is working (it may be looking for available networks).
- STATION - client's MAC address. Once these addresses were sewn into the adapter at the factory and could not be changed, but today it can be configured in the overwhelming majority of cases. In Linux / Mac, there are regular tools for this, in Windows it is more difficult and the support depends on the driver. The MAC address is exactly the same as in wired networks, literally transmitted in every packet from this client, and this is the main reason why MAC filtering is almost useless.
- PWR - signal level from the client. The closer to 0, the closer the client / signal is more powerful (see the first table).
- Rate - when airodump-ng is launched with a channel lock (see below), this column will show the transmission frequency of data packets from the access point to the client (to the left of the hyphen) and from the client back (to the right).
- Lost is the number of lost packets that our system (not the client) did not register. This is easy to calculate, since there is a counter in the transmitted packets.
- Frames or Packets - the number of data packets that we caught from this client (see #Data in the first table).
- Probe - a list of ESSID-names of wireless networks to which the client tried to connect. It may not list those networks that you see around, but those to which the client has connected before, or hidden networks. Based on this, you can organize an attack like Karma , as mentioned earlier.
Startup options airodump-ng (can be combined; in more detail in the following sections):
airodump-ng -c 3 mon0- fix channel number 3 - full packet reception without loss when switching to other channels (due to overlapping frequencies, neighboring channels can be included in the list).airodump-ng -w captures.pcap mon0—captures.pcap— offline- WEP/WPA ( ).airodump-ng --essid " " mon0— (/) . , .airodump-ng --bssid 01:02:03:AA:AA:FF mon0— MAC- (BSSID). --essid .
…

Often in everyday life you can hear that the hidden network is very difficult to detect / connect / hack / carry (underline the necessary). However, as already shown, the “hidden” network is nothing more than a network that does not transmit beacons about its existence 10 times per second, or that transmit them, but with an empty ESSID and other fields. The difference ends there.
As soon as a client connects to such a network, it sends its ESSID and password, and if such a network exists within range, the access point responds to the request and carries out all the usual authorization and data transfer procedures. And if the client has already been connected before - you can see it in the list of active adapters ... and disconnect.
Each connected client communicates with the base station on its BSSID - and this is exactly what we see in both airodump-ng tables. We can “disconnect” the client from the network, after which he will have to connect again - and at this moment airodump-ng will take over the handshake with all identifiers and keys. Or we can just leave the laptop turned on for a couple of hours with airodump-ng on the desired channel and wait. By the way, in case of successful “opening” in the upper right corner there will be a message of the type
[ Decloak: 00:00:11:11:22:22 ]with the BSSID of the access point, the conspiracy of which we opened.Disabling clients is provided in all wireless standards and is done using aireplay-ng (all three utilities already familiar to us are part of the Aircrack-ng project , which contains in its collection all sorts of tools for working with subtle matters):
aireplay-ng wlan0 --deauth 5 -a AP_BSSID -c CLIENT_BSSID Warning: this command is an exception and accepts the identifier of a real wireless adapter, rather than mon0 , created using airmon-ng .
If you get an error about the unfixed channel and / or airodump-ng at the top right corner
[ fixed channel -1 ], it means that some program or service causes the adapter to jump from channel to channel (it may be the same airodump-ng ) and you need to close it with using airmon-ng check kill, as described at the beginning.The command above simulates the situation when the access point informs the client that the old key is invalid (and that it should be updated by repeating the handshake, that is, by transferring the password and network name again). Messages are sent to the client's address, allegedly from the access point, that they should disconnect from the network and update the session data. Since this type of packets is not protected by encryption (that is, the command can be executed even before authentication), it is impossible to counteract it for the simple reason that it is impossible to establish the “identity” of the one who sends it — the MAC addresses in the packets are fake and are set to those values that we passed after -a and -c . You can only monitor for too frequent trips and take some action.
After --deauthThere is a number of deauthorization packets that will be sent both ways. 3-5 is usually enough, you can specify 30 or more. For brevity,
--deauthyou can replace with -0(zero).So, let's say in the second table airodump-ng we see the following line:
BSSID STATION PWR Rate Lost Frames Probe 4F:B1:A4:05:5C:21 5B:23:15:00:C8:57 -54 0 - 1 0 1266 homenet, XCom The first column is the value for -a (base station MAC), the second is for -c (client MAC). Restart airodump-ng and fix it on channel 5 (this is the channel of our attacked station), and then disconnect the client in the next terminal window:
airodump-ng -c5 mon0 aireplay mon0 -0 5 -a 4F:B1:A4:05:5C:21 -c 5B:23:15:00:C8:57 If the signal is strong enough, the number of packets is large and the client / access point heard us - they will disconnect from each other, then they will transmit the network information again when connected, and airodump-ng will show them and the line
[ Decloak ].As you can see, this trick with hiding beacons can be used for home networks, to which someone connects a couple of times a day, and even then not always - but for corporate networks it definitely doesn’t, as it is revealed by literally one team and protection from it not. In my opinion, even for private networks, this is rather an inconvenience than a benefit - you need to enter a name manually, and it is not clear whether the base station is active at all or not.
Also, -c(client MAC) can be omitted - then broadcast packets will be sent on behalf of the access point to disconnect all clients. However, today it rarely works - the drivers ignore such packages, as they legitimately believe that the matter is unclean - the access point always knows who is connected to it, and sends out directed packets for a specific client.
MAC filtering is so easy

Very often I hear recommendations that the first thing after creating a network is to limit the list of its clients to a certain set of MAC addresses, and then the password is completely useless. However, this restriction is as easy as finding hidden networks.
In fact, each client — whether connected to the network or not — reveals its MAC address when transmitting any packet. In the airodump-ng table, these addresses are visible in the STATION column . Accordingly, as soon as we saw the network, where for some reason we couldn’t go (Linux usually reports about it
Unspecified failureat the connection stage, and Windows thinks for a long time, after which it reports an unknown error), and right there we see a client connected to this network - we we can take its MAC address and change it to it. The consequences may be different.In Linux, you can change the MAC of your adapter as follows (works for both wired and wireless networks):
ifconfig wlan0 down ifconfig wlan0 hw ether 00:11:22:AA:AA:AA ifconfig wlan0 up You must first disable any mon- interfaces. Check whether the substitution has earned, you can call
ifconfig wlan0 - in the line Hwaddr should be the above MAC.In addition, in * nix there is macchanger - with its help you can set yourself a random MAC. If you put it in init.d , then the enemy will be completely confused, because every time we boot, our MAC will be different (works for any wired and wireless adapters, like ifconfig ).
# MAC: macchanger -r wlan0 # MAC: macchanger -m 11:22:33:AA:BB:CC wlan0 # MAC: macchanger -s wlan0 In Windows, you need to make some manipulations with the registry, but on this topic it is better to consult with Google. (Readers, represented by alexeywolf, suggest a TMAC tool that does this automatically.)
WhooPS
We did everything right and our access point uses impenetrable WPA2-PSK-CCMP with a 63-digit password from
/dev/urandom. is that enough? No, if we have a WPS router, especially if it is old.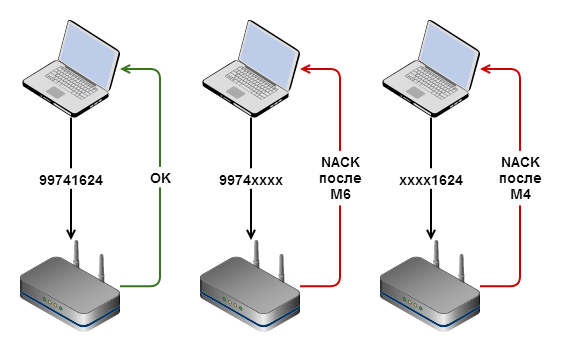
The diagram above describes the process of connecting a client to an access point using a PIN code. PIN - 8 digits, which are usually pasted on the router itself. Clients that support WPS can connect to the network either with a regular WEP / WPA password or with a PIN, and entering the last client receives the network password in its pure form.
By standard, the last digit in the PIN is a checksum, that is, it can be calculated from the remaining digits. Thus, if we wanted to go through all the possible combinations, it would have required 10 7 attempts (at the bottom — the number of possible characters (0-9 - ten), to the extent — the length of the string) —10 million, which is about 116 days, if we try one code per second. Typically, the speed is several times lower, so the selection would take more than a year.

However, the standard is a mistake. The authorization process takes place in several stages. If the PIN transmitted by us is correct, then the access point reports success. If the first four digits of the PIN are correct, and the digits 4-7 are not, then the access point will report this after we send the M6 packet . In the case of an error in the first four digits, we will know about it earlier - after the M4 package . This problem was found at the end of 2011 and is described here . Hot on the heels of the authors of the study was created reaver-wps , then published on Google Code . There you can also find a document describing the original vulnerability.
So, let's say our PIN is 99741624 . We are trying to connect using PIN9974 0000 - we get a denial of authorization after the transfer of the M6 packet (since the first half of the code is correct). If we connect with 0000 1624 - the failure will be after M4 .
As you can see, the main problem is that we can learn about the correctness of one part of the code, even though the second one contains an error . What does this give? Now, instead of 10 million combinations, we need to try only 10 4 + 10 3 = 11 000. This is more than actually done not only in a week - in 15 hours, but usually faster.
Please note: the numbers for the selection are exactly 7, not 8, since the latter is a checksum and we count it ourselves, so it is not necessary to select it. In the examples below, this is # .
Let's look again. We start brute force with 0000000 #. Failure after M4 (error in the first 4 digits). Change to 0001000 #. Failure after M4 . 0002000 #. M4 . We reach up to 9974 000 #. ABOUT!Failure after M6 . The first 4 digits are guessed.
Further - in the same way. Having a half of the code gradually increase the second. 9974 001 #. Renouncement. 9974002 #. Renouncement. <...> 99741624 . Accepted.
This is the essence of

Reaver
And now we will check how conscientiously your access point performs its duties. If you do not have a router with WPS -
To exploit the vulnerability in WPS, Kali has several utilities, but in my opinion the most obvious and flexible one is that reaver . Call syntax:
reaver -i mon0 -c 5 -b AP_BSSID -va In addition, we can specify:
- -m OUR_MAC - if you changed the MAC address of your adapter (see above for MAC filtering), specify this parameter with a new (not factory) MAC.
- -e ESSID - when attacking a hidden network, reaver must know its name, not just the BSSID; if the network sends beacons - the ESSID will be automatically obtained from them, but for hidden networks you must pass it explicitly.
- -p PIN — 8- WPS, ( - ). — .
- -vv — / , M4 M6 . .
reaver sorts through 11,000 combinations until it finds that the access point has accepted one of them. The brute force rate is highly dependent on the signal strength / distance to the base station and can vary from 3 to 30 per second. Usually one network takes up to 10-15 hours.
You can interrupt reaver using Ctrl + C , while it will save the current progress for this network and at restart it will start with an interrupted PIN. If you are working in the live mode (read only), then the session data can be copied from
/etc/reaver/to permanent media and written back on the next boot. Text files with the names of the view AP_MAC.wpcand a list of all numbers for searching inside are stored in this folder (the first line is the number of the line with the PIN from which to start the search when restarting).About WPS two years ago wrote on Habré and not only, so you can easily find more information.
( mailbrush advised also to pay attention to bully , who is also in Kali and performs a similar task.)
What to do?
To date, the only option is to disable WPS. If you or your friends have difficulty in setting up the network (which is hard to believe), turn on WPS only at the time of connecting a new device. True, not all routers / firmwares generally give this opportunity, but if I had not looked like that I would have changed for another.
However, not everything is so bad. Newer firmware limits the rate of selection using rate limiting - after several unsuccessful authorization attempts, WPS is automatically disabled. Some models increase the shutdown time even more, if in a short interval more unsuccessful attempts were made to enter. Nevertheless, it is possible to rely on this only after a thorough check in your particular case - it may turn out that the switch-off time is short or it does not increase enough - remember that 11,000 combinations are very few and even making one attempt per minute for the whole range will go maximum 8 days. And while the PIN changes separately from the network password, so you can update the latter as often as you like, without complicating the PIN search.
By the way, you can find experiments on the Web to bypass the blocking in time using exploits, forcing the router to reboot - while, of course, the WPS timeout is reset and you can continue the selection again. So rely on "protection from WPS" is not worth it.
Network enumeration
Finally a few words
reaver will try to attack any network that you pass to it as a BSSID parameter, but it may not support WPS — in this case, the program will hang up
Waiting for beacon...and after half a minute will report that the network has not been detected.There are several ways to check which networks in the district support WPS.
- airodump-ng WPS , , ( )
- wash -i mon0 WPS-enabled , , Ctrl+C . , , WPS, (. rate limiting )
- iwlist wlan0 scan , WPS
- wifite — ; , , . : WPS
In addition, there is a very beloved by many kismet (and analog for Macintosh - KisMAC ), but in my opinion it is too sophisticated. In both, there is integration with GPS, which can be useful for those who explore networks over a large area (wardriving).
On this with the "cheat" methods of penetration everything. In the third part - about intercepting customers handshakes when connecting to the network and selecting passwords for WPA (2) using the CPU and GPU.
Special thanks to comrade chem_ua for helpful remarks when reading the article.
Charts were drawn on gliffy.com .
As usual, comments on the case are welcome.
Table of contents:
1) materiel
2) Kali. Hiding SSID. MAC filtering. WPS
3) WPA. OpenCL / CUDA. Pick statistics
Source: https://habr.com/ru/post/225483/
All Articles