Creating audio plug-ins, part 3
All posts series:
Part 1. Introduction and setup
Part 2. Learning Code
Part 3. VST and AU
Part 4. Digital Distortion
Part 5. Presets and GUI
Part 6. Signal synthesis
Part 7. Receive MIDI Messages
Part 8. Virtual Keyboard
Part 9. Envelopes
Part 10. Refinement GUI
Part 11. Filter
Part 12. Low-frequency oscillator
Part 13. Redesign
Part 14. Polyphony 1
Part 15. Polyphony 2
Part 16. Antialiasing
In this post we will complete the necessary development of the development environment and prepare an auxiliary environment.
In WDL-OL, it is very easy to turn an application into a VST or AU. To create a VST on a Mac, change the schema: VST2 → My Mac 64-Bit . Click Run . There should be no errors, but nothing has started! Open Finder and go to ~ / Library / Audio / Plug-Ins / VST . There you will see MyFirstPlugin.vst If the Library folder is not visible in your home directory, press Cmd + Shift + G, paste the specified path and press Enter.
')
The next section is related to Mac. Windows version below.
To run the plugin, we need a host. Download the 64-bit version of REAPER, preferably, and drag it into the Applications folder / It can be used without any restrictions for 60 days, after that you will be asked to purchase a license (but it will continue to work). We want to set everything up so that when we hit Run in Xcode, REAPER and the debugger run. We will be able to use breakpoints just as we did with the application.
Go to Product → Scheme → Edit Scheme ... , select Run in the list on the left. In the Executable sub-item, select Other ... :
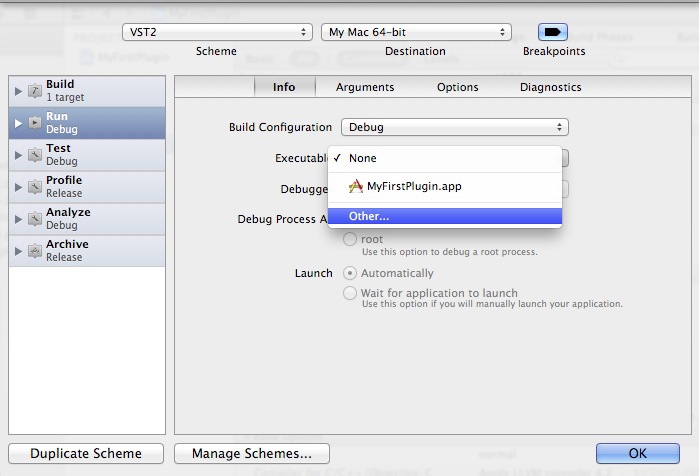
Use the dialog box to find REAPER64.app . It should look like this:

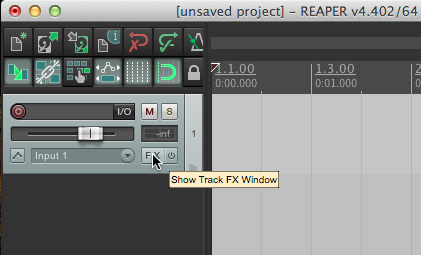
Click OK , and Run again. REAPER starts. To create a new track for the sound in it, press Cmd + T (Ctrl + T in Windows), and on it - the FX button:
In the window that opens, enter myfirstplugin , and our plugin will be found:
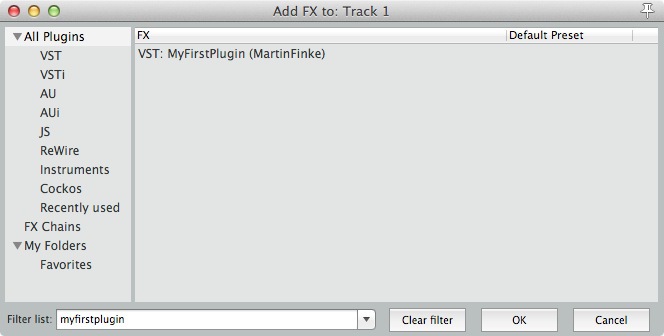
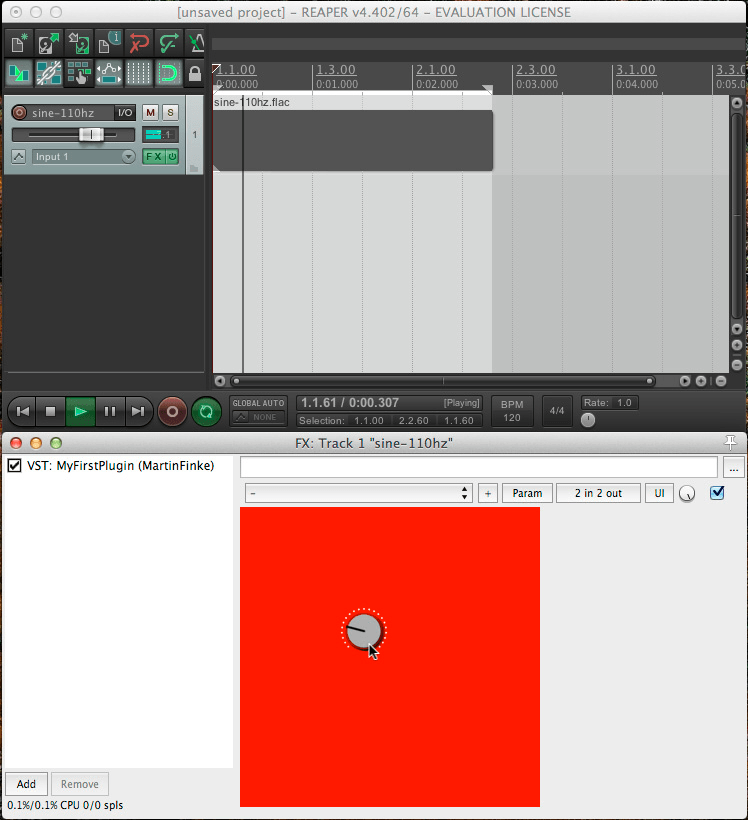
Choose, click OK . It should appear. The advantage of using REAPER is that here we can process any sound file with the plugin and immediately hear the result. This is much more interesting than listening to all the time from the microphone input. In addition, here you can use various other plug-ins, including to analyze the output signal of our plug-in. It is useful, but later.
Download this file and drag it to the track in REAPER. Put it close to the left border of the track. Press space to play. You will hear a low sound:
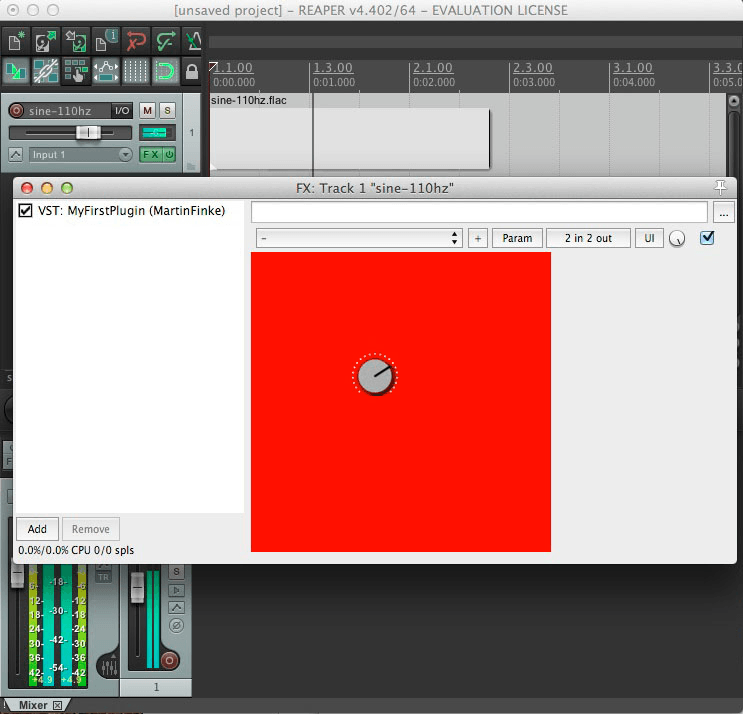
For convenience, it would be good to loop the sound so that it plays endlessly until we press the space bar again. Hold Cmd (Shift on Windows) and double-click the file on the track. The light rectangle highlights the time range. Press R to loop it, and run. Twist the handle of the plugin - the sound volume changes!
Clicks may be heard when the knob is rotated. This is due to the fact that we do not interpolate values and create sharp drops in the signal. Now click in Xcode Stop to close REAPER.
Creating an AU version is simple: change the target to AU. In the previous manner, change the Run schema to start REAPER.app , and click Run . The plugin will compile and its file will appear in ~ / Library / Audio / Plug-Ins / Components . REAPER will start and you will be able to do all the same things as with the VST version.
All these launches, creating tracks and throwing plug-ins on them are constantly repeated. I prefer to optimize such things. When everything is ready in REAPER (the sound is looped and the plugin is already on the track), save the project (Cmd + S on Mac and Ctrl + S in Windows) to the project folder in Xcode ( ~ / plugin-development / wdl-ol / IPlugExamples / MyFirstPlugin / ) and name the reaper-project.RPP .
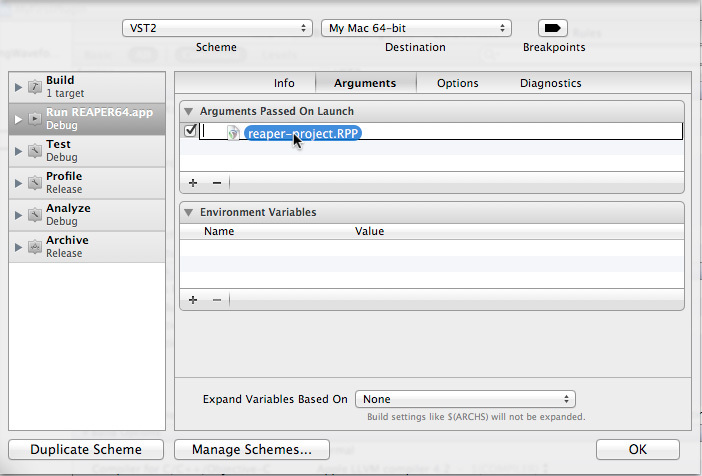
In the Edit Scheme window, select VST2 at the top. Then go to the Arguments tab and click on the plus under the line “Arguments Passed On Launch” . Drag the reaper-project.RPP from the project folder to the new line:
The same must be repeated for AU. If you want, you can generally create a separate project for the AU version. Now every time REAPER will run with all the junk. Great!
If you want, you can play around with breakpoints and keep track of the values of plugin variables, even though it is not running directly in Xcode.
Open Explorer and go to C: \ Program Files . Create a new folder there named vsthost . Download Savihost (we will need savihostx86.zip ), unzip and copy the savihost.exe file to this folder:

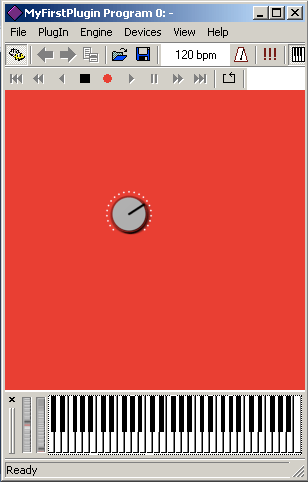
In Visual C ++, right-click on MyFirstPlugin-vst2 and select Set as StartUp Project . Click F5 , the plugin will be launched in Savihost:
If nothing appears, click the windows on the taskbar; it should be there.
One more thing needs to be done: now Savihost catches all exceptions and tries to make the plug-in not fall. It's great if we perform on stage, but now we need to debug it. In Visual C ++, right-click on MyFirstPlugin-vst2 and select Properties . In the window that opens, select Debugging . Add

Now exceptions will be passed to the Visual C ++ debugger.
If you try to run the VST3 version, this message may appear (not in German, probably):
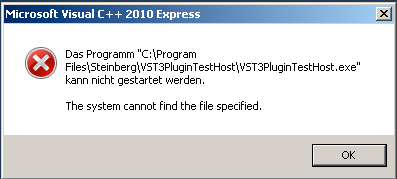
In the VST3 SDK, which we downloaded earlier, in the \ bin subfolder are archives. They contain installers who will create the necessary folders for 32-bit and 64-bit systems ( C: \ Program Files (x86) \ Steinberg \ VST3PluginTestHost \ and C: \ Program Files \ Steinberg \ VST3PluginTestHost \ respectively) and copy the necessary versions of the VST3PluginTestHost file .exe . When installing, no parameters need to be changed.
In Windows, you can also check the functionality of the plugin in real conditions. We will use REAPER again. We need to tell him where our plugin is. In the project folder there is a subfolder \ build-win , in which, among other things, are the .dll and .vst files of the plugin. In the settings REAPER Options → Preferences → Plug-Ins → VST, you can add directories containing these files:
Then in REAPER we will create a project with the necessary build of our plug-in (x86 / x64), configure it as we want (for example, put the handle of the plug-in in certain positions) and save it. In Visual Studio, in the Project → Properties menu , write the full paths to reaper.exe and to the configured .rpp:

In general,
If you use reaper_host32.exe when you use REAPER in Debug mode, try to configure it to load your plugin around this process by selecting Native only in the settings, for example:
reaper_host32.exe may continue to crash, but will stop breaking processing and audio output for plugins loaded around it.
The Windows version will come next.
As you can see, we get a bunch of warnings:

Warnings are very useful, as they draw our attention to possible problems and bugs in the code. In this case, 22 warnings refer to the code of the library we are using, so we cannot just fix them, because if we ever download the latest version of this library, all the corrections will have to be made again. But to leave everything as it is is also not good: you can easily miss the 23rd error, which will already apply to the code of our plugin.
In my opinion, the best solution would be to block these warnings so that when a new warning appears, we know that it relates to our code. We can use the
Repeat the same for VST2, AU and other desired targets.
Build again. We will see three warnings. Validate Project Settings is easy to fix: double click on it, then uncheck all the checkboxes and click Done :
Now there are two warnings left:
You can correct the encoding of InfoPlist.strings by opening the file and converting it to UTF-8 using the Utilities on the right:

The extra tokens warning is removed by the addition of the
Now there are no warnings in the APP and AU targets. When building VST2, a warning about a single parameter pops up in the declaration of the main function. Fix this with the addition of the
Build an assembly and make sure everything is clean!
In general, VS C ++ issues warnings other than GCC / LLVM on a Mac. The list of all warnings VS C ++ 2010 is on this page on the left.
For example, if you see warnings C4101 and C4129 about any file in the WDL library, you can ignore them: add
This applies to the .h files from the library.
If you receive warnings about a specific .cpp , find it in the project explorer, right click on Properties , and in the window on the left, select C / C ++ → Advanced . On the right should be the option Disable certain warnings :
Here you can add a list of numbers of warnings, separated by semicolons. As you can see, the debugger already ignores four warnings for this file. Please note that these changes will only affect this particular .cpp file. So it will be necessary to designate the warning numbers for the remaining files and also add them to the appropriate settings.
When you create a new project, use the duplicate script to not have to make all these adjustments again.
Beautiful! We raked out all the warnings: hid the extras and made it easier to observe the important ones for us. Next time, we’ll get our hands dirty in writing dirty distortion.
Original article:
martin-finke.de/blog/articles/audio-plugins-004-vst-and-au
Part 1. Introduction and setup
Part 2. Learning Code
Part 3. VST and AU
Part 4. Digital Distortion
Part 5. Presets and GUI
Part 6. Signal synthesis
Part 7. Receive MIDI Messages
Part 8. Virtual Keyboard
Part 9. Envelopes
Part 10. Refinement GUI
Part 11. Filter
Part 12. Low-frequency oscillator
Part 13. Redesign
Part 14. Polyphony 1
Part 15. Polyphony 2
Part 16. Antialiasing
In this post we will complete the necessary development of the development environment and prepare an auxiliary environment.
VST and AU
In WDL-OL, it is very easy to turn an application into a VST or AU. To create a VST on a Mac, change the schema: VST2 → My Mac 64-Bit . Click Run . There should be no errors, but nothing has started! Open Finder and go to ~ / Library / Audio / Plug-Ins / VST . There you will see MyFirstPlugin.vst If the Library folder is not visible in your home directory, press Cmd + Shift + G, paste the specified path and press Enter.
')
The next section is related to Mac. Windows version below.
Debugging in Xcode
To run the plugin, we need a host. Download the 64-bit version of REAPER, preferably, and drag it into the Applications folder / It can be used without any restrictions for 60 days, after that you will be asked to purchase a license (but it will continue to work). We want to set everything up so that when we hit Run in Xcode, REAPER and the debugger run. We will be able to use breakpoints just as we did with the application.
Go to Product → Scheme → Edit Scheme ... , select Run in the list on the left. In the Executable sub-item, select Other ... :
Use the dialog box to find REAPER64.app . It should look like this:
Click OK , and Run again. REAPER starts. To create a new track for the sound in it, press Cmd + T (Ctrl + T in Windows), and on it - the FX button:
In the window that opens, enter myfirstplugin , and our plugin will be found:
Choose, click OK . It should appear. The advantage of using REAPER is that here we can process any sound file with the plugin and immediately hear the result. This is much more interesting than listening to all the time from the microphone input. In addition, here you can use various other plug-ins, including to analyze the output signal of our plug-in. It is useful, but later.
Download this file and drag it to the track in REAPER. Put it close to the left border of the track. Press space to play. You will hear a low sound:
For convenience, it would be good to loop the sound so that it plays endlessly until we press the space bar again. Hold Cmd (Shift on Windows) and double-click the file on the track. The light rectangle highlights the time range. Press R to loop it, and run. Twist the handle of the plugin - the sound volume changes!
Clicks may be heard when the knob is rotated. This is due to the fact that we do not interpolate values and create sharp drops in the signal. Now click in Xcode Stop to close REAPER.
Creating an AU version is simple: change the target to AU. In the previous manner, change the Run schema to start REAPER.app , and click Run . The plugin will compile and its file will appear in ~ / Library / Audio / Plug-Ins / Components . REAPER will start and you will be able to do all the same things as with the VST version.
All these launches, creating tracks and throwing plug-ins on them are constantly repeated. I prefer to optimize such things. When everything is ready in REAPER (the sound is looped and the plugin is already on the track), save the project (Cmd + S on Mac and Ctrl + S in Windows) to the project folder in Xcode ( ~ / plugin-development / wdl-ol / IPlugExamples / MyFirstPlugin / ) and name the reaper-project.RPP .
In the Edit Scheme window, select VST2 at the top. Then go to the Arguments tab and click on the plus under the line “Arguments Passed On Launch” . Drag the reaper-project.RPP from the project folder to the new line:
The same must be repeated for AU. If you want, you can generally create a separate project for the AU version. Now every time REAPER will run with all the junk. Great!
If you want, you can play around with breakpoints and keep track of the values of plugin variables, even though it is not running directly in Xcode.
Debugging in Windows
Open Explorer and go to C: \ Program Files . Create a new folder there named vsthost . Download Savihost (we will need savihostx86.zip ), unzip and copy the savihost.exe file to this folder:
In Visual C ++, right-click on MyFirstPlugin-vst2 and select Set as StartUp Project . Click F5 , the plugin will be launched in Savihost:
If nothing appears, click the windows on the taskbar; it should be there.
One more thing needs to be done: now Savihost catches all exceptions and tries to make the plug-in not fall. It's great if we perform on stage, but now we need to debug it. In Visual C ++, right-click on MyFirstPlugin-vst2 and select Properties . In the window that opens, select Debugging . Add
/noexc /noft to the parameters on the /noexc /noft , as in the picture (do not lose spaces):Now exceptions will be passed to the Visual C ++ debugger.
If you try to run the VST3 version, this message may appear (not in German, probably):
In the VST3 SDK, which we downloaded earlier, in the \ bin subfolder are archives. They contain installers who will create the necessary folders for 32-bit and 64-bit systems ( C: \ Program Files (x86) \ Steinberg \ VST3PluginTestHost \ and C: \ Program Files \ Steinberg \ VST3PluginTestHost \ respectively) and copy the necessary versions of the VST3PluginTestHost file .exe . When installing, no parameters need to be changed.
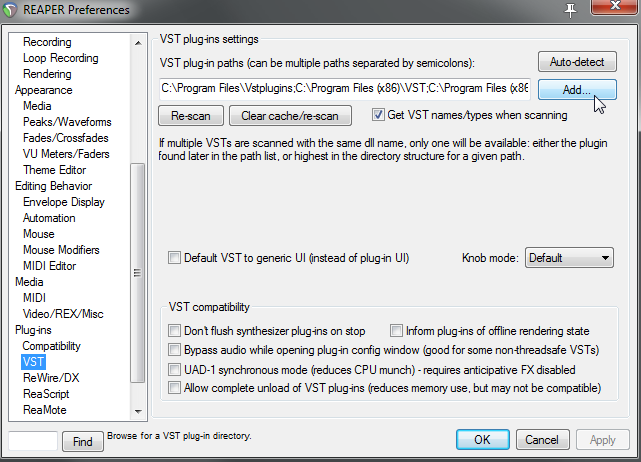
In Windows, you can also check the functionality of the plugin in real conditions. We will use REAPER again. We need to tell him where our plugin is. In the project folder there is a subfolder \ build-win , in which, among other things, are the .dll and .vst files of the plugin. In the settings REAPER Options → Preferences → Plug-Ins → VST, you can add directories containing these files:
Then in REAPER we will create a project with the necessary build of our plug-in (x86 / x64), configure it as we want (for example, put the handle of the plug-in in certain positions) and save it. In Visual Studio, in the Project → Properties menu , write the full paths to reaper.exe and to the configured .rpp:
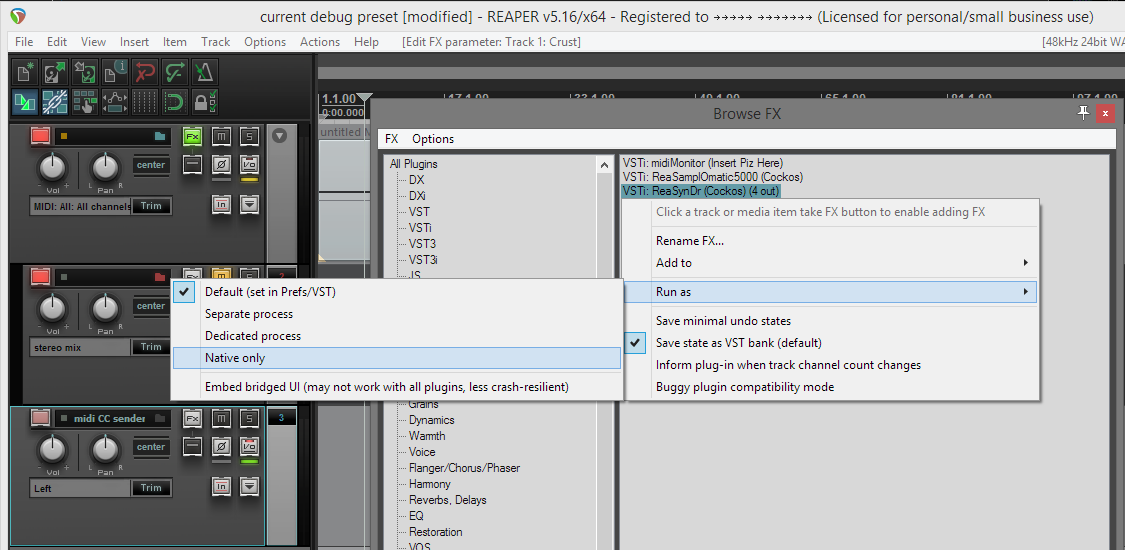
In general,
$(VST2_64_HOST_PATH) and a number of other parameters are registered in the common.props file in the WDL-OL directory. Do not forget to backup before playing with configs.If you use reaper_host32.exe when you use REAPER in Debug mode, try to configure it to load your plugin around this process by selecting Native only in the settings, for example:
reaper_host32.exe may continue to crash, but will stop breaking processing and audio output for plugins loaded around it.
Lock Alerts for Library Code on Mac
The Windows version will come next.
As you can see, we get a bunch of warnings:
Warnings are very useful, as they draw our attention to possible problems and bugs in the code. In this case, 22 warnings refer to the code of the library we are using, so we cannot just fix them, because if we ever download the latest version of this library, all the corrections will have to be made again. But to leave everything as it is is also not good: you can easily miss the 23rd error, which will already apply to the code of our plugin.
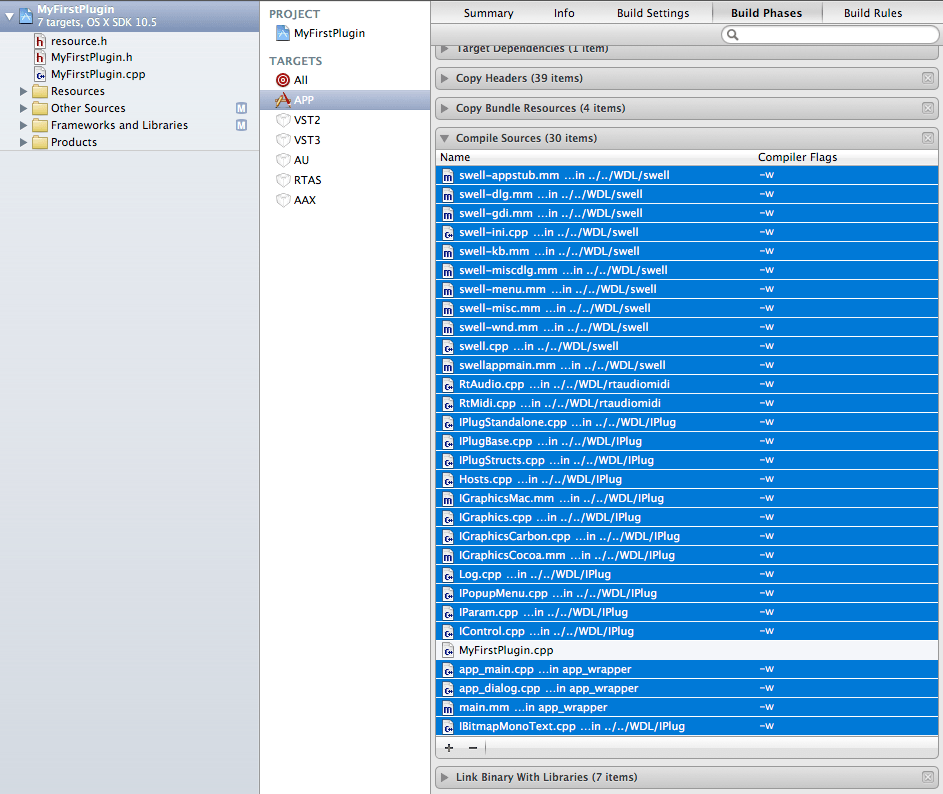
In my opinion, the best solution would be to block these warnings so that when a new warning appears, we know that it relates to our code. We can use the
-w compiler flag to do this. In the navigator, click on the blue project icon, select the target APP , go to Build Phases and open the Compile Sources section. Mark all lines except MyFirstPlugin.cpp , double-click on the Compiler Flags column, type -w and press Enter :Repeat the same for VST2, AU and other desired targets.
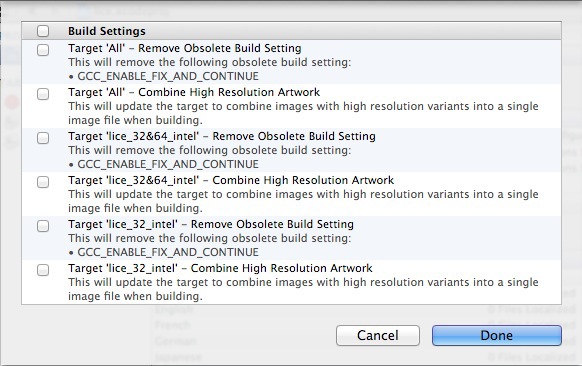
Build again. We will see three warnings. Validate Project Settings is easy to fix: double click on it, then uncheck all the checkboxes and click Done :
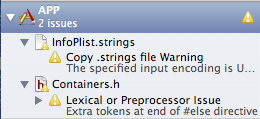
Now there are two warnings left:
You can correct the encoding of InfoPlist.strings by opening the file and converting it to UTF-8 using the Utilities on the right:
The extra tokens warning is removed by the addition of the
#include directive in MyFirstPlugin.h : #pragma clang diagnostic push #pragma clang diagnostic ignored "-Wextra-tokens" #include "IPlug_include_in_plug_hdr.h" #pragma clang diagnostic pop Now there are no warnings in the APP and AU targets. When building VST2, a warning about a single parameter pops up in the declaration of the main function. Fix this with the addition of the
#include directive in MyFirstPlugin.cpp (not in .h!): #include "MyFirstPlugin.h" #pragma clang diagnostic push #pragma clang diagnostic ignored "-Wmain" #include "IPlug_include_in_plug_src.h" #pragma clang diagnostic pop #include "IControl.h" #include "resource.h" Build an assembly and make sure everything is clean!
Block Library Code Alerts on Windows
In general, VS C ++ issues warnings other than GCC / LLVM on a Mac. The list of all warnings VS C ++ 2010 is on this page on the left.
For example, if you see warnings C4101 and C4129 about any file in the WDL library, you can ignore them: add
#pragma before #include in MyFirstPlugin.h : #pragma warning( suppress : 4101 4129 ) #include "IPlug_include_in_plug_hdr.h" Suppress means that warnings will be ignored only for the next line (that is, for #include ). So you will receive warnings concerning the rest of the code in the file, which is good. Please note that you need to write only the warning number, without the "C". The same can be done in MyFirstPlugin.cpp : #pragma warning( suppress : 4101 4129 ) #include "IPlug_include_in_plug_src.h" This applies to the .h files from the library.
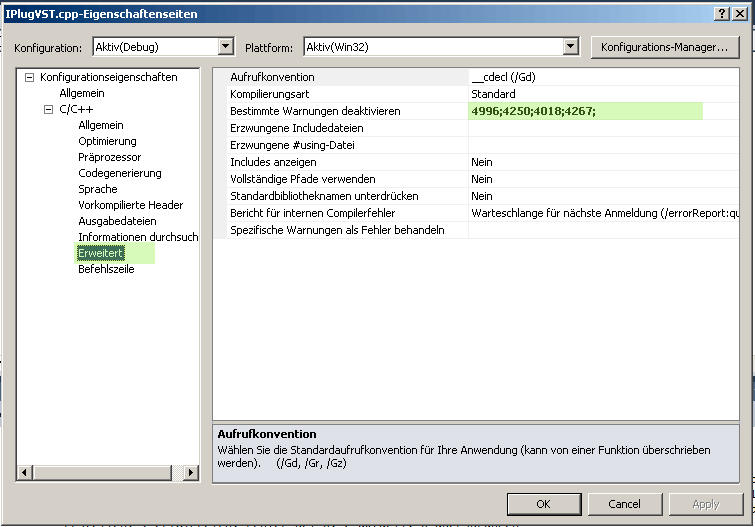
If you receive warnings about a specific .cpp , find it in the project explorer, right click on Properties , and in the window on the left, select C / C ++ → Advanced . On the right should be the option Disable certain warnings :
Here you can add a list of numbers of warnings, separated by semicolons. As you can see, the debugger already ignores four warnings for this file. Please note that these changes will only affect this particular .cpp file. So it will be necessary to designate the warning numbers for the remaining files and also add them to the appropriate settings.
When you create a new project, use the duplicate script to not have to make all these adjustments again.
Beautiful! We raked out all the warnings: hid the extras and made it easier to observe the important ones for us. Next time, we’ll get our hands dirty in writing dirty distortion.
Original article:
martin-finke.de/blog/articles/audio-plugins-004-vst-and-au
Source: https://habr.com/ru/post/225457/
All Articles