Cubietruck. Cozy home server
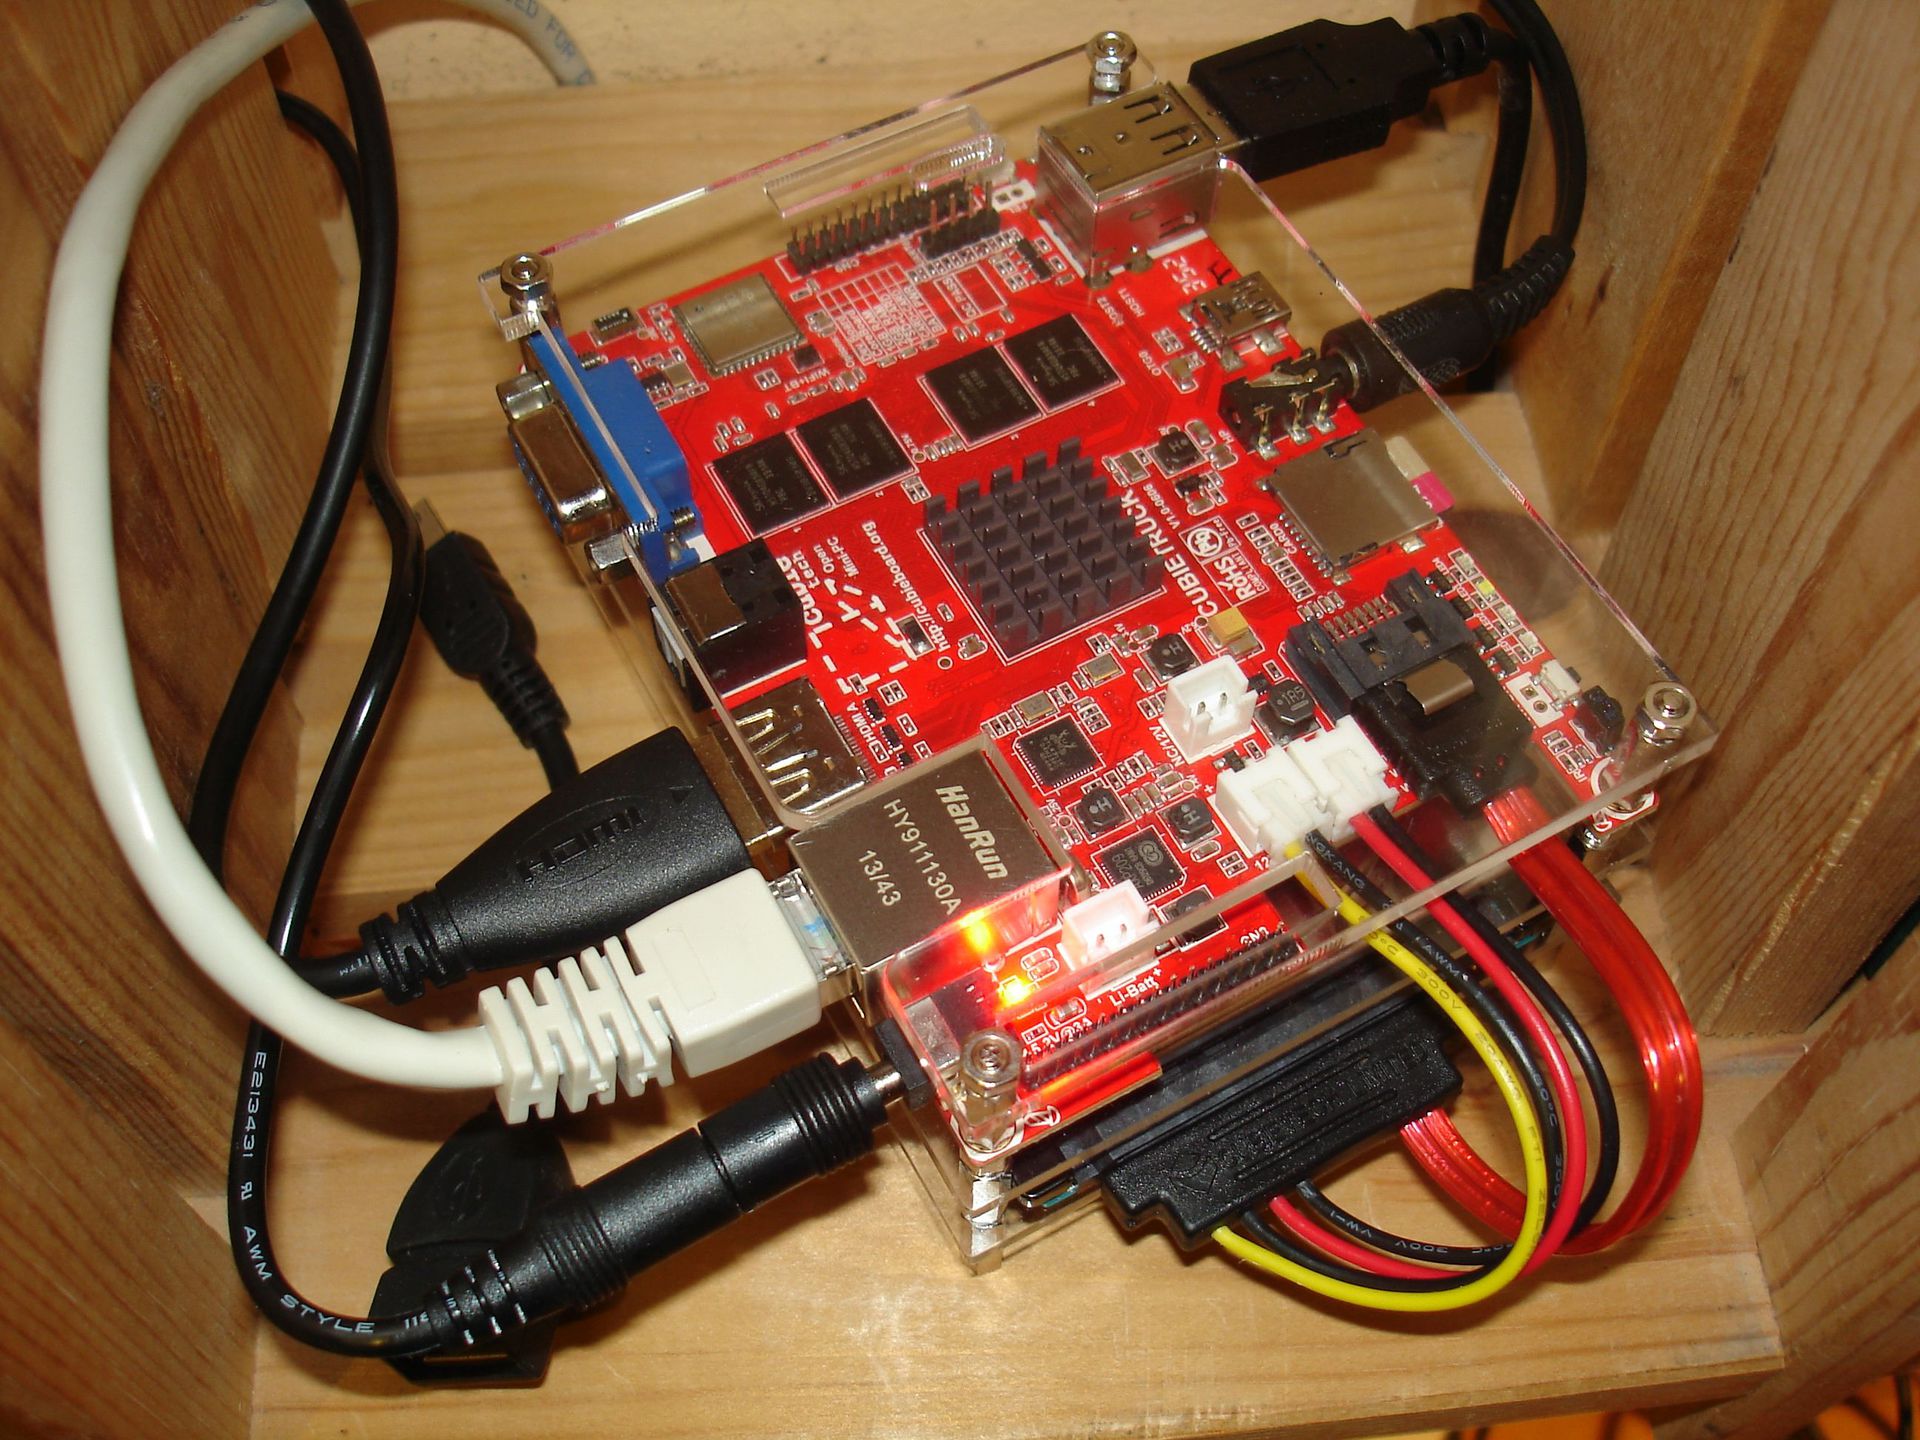
Recently bought just such beauty.
I played with Android on it and decided to make a home server to replace RaspberryPI.
* The picture is not mine ... if I take out the trash - I will make my own.
From the author, i.e. me:
Do not judge strictly, this is my first article.
I will be glad to constructive criticism and help from more skilled users!
Thank you in advance!
Based on - http://www.cubieforums.com/index.php/topic,1650.0.html
Well, let's start perhaps!
- Introduction
- System Installation
- Installing the system in NAND
- Installing the system on SD
- Transferring the system to SATA
- Transferring the system to NAND
- First start
- SSH port change
- Network configuration
- Set time zone
- Auto mount HDD partition
- Server Tuning
- Installing Nginx + php5-fpm + mysql
- Installing the Transmission Client Torrent
- Install samba
- Remote control Ajenti / Webmin
- Installing the system in NAND
- Installing the system on SD
- Transferring the system to SATA
- Transferring the system to NAND
- SSH port change
- Network configuration
- Set time zone
- Auto mount HDD partition
- Installing Nginx + php5-fpm + mysql
- Installing the Transmission Client Torrent
- Install samba
1. Introduction
The main task was to replace the raspberry with something more nimble and with a normal access speed to the hard disk, since The main purpose of this server is file server, media server, torrent.
Stopped at Cubietruck, she is the same Cubieboard3.
Characteristics already slipped on habrahabr.ru/post/186576
In addition, I bought a 1TB SATA HDD Hitachi 7K1000
Since on Habré did not see a complete guide to setting up this device, I decided to make my guide with go and geishas.
2. System installation
For CubieTruck'a there are several different distributions.
Today I will consider installing and configuring Cubian.
Installing the system in NAND
I personally do not like this installation option because NAND has a limited number of write / rewrite cycles, and if you have a SQL server, these cycles will end very quickly. IMHO!
Download the required image here.
If you are a Linux user, then:
Take LinuxSuite from here (there are 32 and 64-bit versions)
Launch Livesuite
$ ~/Bin/LiveSuit/LiveSuit.sh screen
Choose a fill image
screen
')
Put the device in FEL mode
1. Clamp the FEL button
screen
2. Plug the miniusb cable into the board and wait for a request from Livesuite.
ATTENTION: many USB ports will not give the necessary power to the board, so before clicking “Yes” - connect the board to the power supply (5V is recommended at least 3A)
3. Click "Yes"
screen
Wait until the image is completely poured onto your device.
screen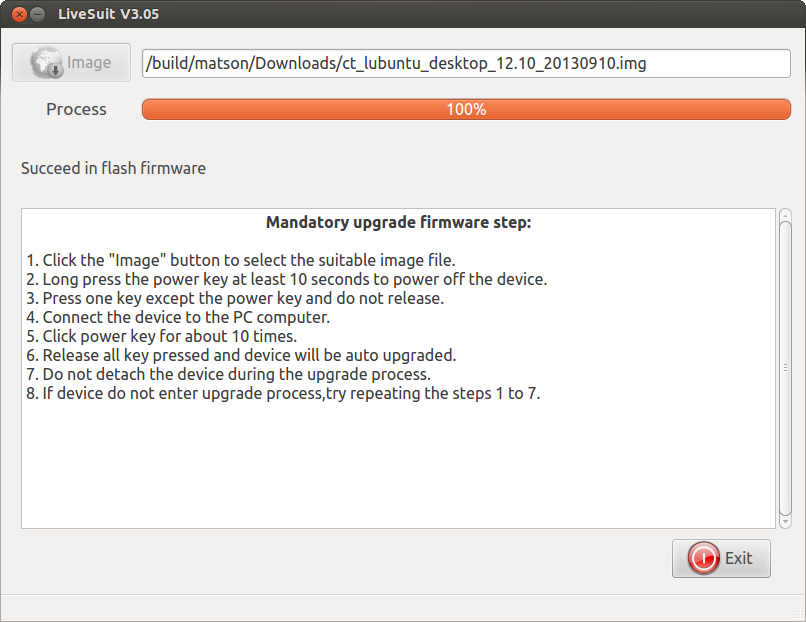
Now you can disconnect the device from the PC and run it separately))
If you are a Windows user, then:
- Take from here PhoenixSuite.
Launch PhoenixSuite:
screen
Choose a fill image
screen
Put the device in EFL mode
1. Clamp the EFL button
screen
screen
2. Plug the miniusb cable into the board and wait for a request from Livesuite.
ATTENTION: many USB ports will not give the necessary power to the board, so before clicking “Yes” - connect the board to the power supply (5V is recommended at least 3A)
3. Click "Yes"
Wait until the image is completely poured onto your device.
Now you can disconnect the device from the PC and run it separately.
Installing the system on an SD card
Download the desired image from here :
I will use the Cubian distribution for example.
If you have Linux:
Unzip the downloaded archive.
Write the image to your SD card
dd if=__ of=/dev/_sd_ bs=4096; sync For example:
dd if=/home/pupkin/Cubian-base-r5-a20-ct.img of=/dev/sdb1 bs=4096; sync When finished, you can pull out the card and install it in your Cubietruck.
If you are a Windows user:
- Download Image writer, github.com/downloads/openSUSE/kiwi/ImageWriter.exe or cubieplayer.imtqy.com/Cubian/tools/;
- Unzip the file;
- Rename the file from img to raw (the program finds only such an extension).
- Write the image to your SD card:
Transferring the system to SATA disk
To transfer the system from the NAND partition to the SATA disk, you need to execute several commands:
log in as root
sudo su - root create folders for mounting partitions
mkdir /tmp/1 /tmp/target mount the NAND partition
mount /dev/nandb /tmp/1 Format SATA partition in ext4
mkfs.ext4 /dev/sda1 we mount SATA section
mount /dev/sda1 /tmp/target Moving the system
(cd /tmp/1; tar --backup -c *) |tar -C /tmp/target -xv Changing download settings
mount /dev/nanda /mnt/ nano /mnt/uEnv.txt (Replace root = / dev / sda1)
As a result, the file should look like this:
cat /mnt/uEnv.txt root=/dev/sda1 extraargs=console=tty0 hdmi.audio=EDID:0 disp.screen0_output_mode=EDID:1280x720p50 rootwait panic=10 rootfstype=ext4 rootflags=discard Sync our changes
sync Unmount the partition
umount /mnt and reboot!
reboot Transferring the system from the SD card to the NAND partition
After copying the image and booting from the SD card, you can transfer your system to the NAND partition using one simple command:
sudo ~/nandinstall/install.sh If there is no such script in your distribution, you can download and install it:
apt-get install cubian-nandinstall && sudo cubian-nandinstall 3. First start
So, going into my home router, I saw that my cube got the address 192.168.0.108
Connect to it. If you connect from a Linux machine, then open the terminal and write
ssh -p 36000 192.168.0.108 -l cubie Where 36000 is the port for an SSH connection. For security reasons, a non-standard port has been selected, how to change it is written here . cubie is a username, password is also cubie
After that, the connection should go through and a message will appear about adding the SSH connection key to the key database. It appears only once, when adding a new key + device combination. We write yes.
If you connect from a Windows machine, then select an SSH client to your taste, in most cases, it is Putty.
Connect and first change the user password:
sudo passwd cubie And we create a root user, which was absent by default for security reasons, but we will need it later, so create it now:
sudo passwd root Change SSH port
If you are not satisfied with the port 36000 for SSH access, you can change it to the standard port 22:
Open the file / etc / ssh / sshd_config
sudo nano /etc/ssh/sshd_config Find the line
Port 36000 Change to
Port 22 Now the cube is available like this:
ssh cubie@192.168.0.108 Network configuration
By default, the settings are stored in the / etc / network / interfaces file.
Let's see what we have:
sudo cat /etc/network/interfaces We see the default network configuration
auto eth0 allow-hotplug eth0 iface eth0 inet dhcp auto eth0 means autoconfiguring the interface when booting
allow-hotplug eth0 and iface eth0 inet dhcp means that when the Linux kernel detects the eth0 physical interface, the allow-hotplug line will raise it, and the iface line will assign it a DHCP address.
Attention! This configuration sets the network address by DHCP if the cable is connected at boot. If the cable was not connected at boot, the download is blocked for one minute to wait for DHCP timeout. Thus, if you don’t need a wired network at all, then comment out or delete the auto eth0 line in / etc / network / interfaces, this will save you some time at boot.
To comment out just add # before auto eth0, it looks like #auto eth0
You can still raise and configure the interface manually by running the command
ifup eth0 If you need to register a permanent address to the cube, here is an example configuration
allow-hotplug eth0 iface eth0 inet static address 192.168.1.110 netmask 255.255.255.0 gateway 192.168.1.1 dns-nameservers 192.168.1.1 Although I am more inclined to automatically assign the address from the router.Wifi setup
Module loading
modprobe bcmdhd In order for the wi-fi autorun to load when the system starts, add the line “bcmdhd” to the end of the / etc / modules file.
Examples of commands for using wi-fi:
iwlist scan iwconfig wlan0 essid "ssid" key xxxx iwconfig wlan0 ifconfig wlan0 up dhclient wlan0 Set time zone
Set the time zone
dpkg-reconfigure tzdata We add servers:
sudo nano /etc/ntp.conf server 0.debian.pool.ntp.org iburst server 1.debian.pool.ntp.org iburst server 0.ru.pool.ntp.org iburst server 1.ru.pool.ntp.org iburst - you can get the nearest servers from here - www.pool.ntp.org
sudo /etc/init.d/ntp start Auto mount HDD partition
There are already a huge number of articles on mounting partitions, but since I also need it, add to complete the picture.
Create a folder where the HDD will be mounted
sudo mkdir /media/files We give read / write access for all users.
sudo chmod 777 /media/files To see which sections we write on hdd
sudo fdisk -l We look at the end and see about the following
fdsik -l
  Disk / dev / sda: 1000.2 GB, 1000204886016 bytes
 255 heads, 63 sectors / track, 121601 cylinders, total 1953525168 sectors
 Units = sectors of 1 * 512 = 512 bytes
 Sector size (logical / physical): 512 bytes / 4096 bytes
 I / O size (minimum / optimal): 4096 bytes / 4096 bytes
 Disk identifier: 0x673511d7

    Device Boot Start End Blocks Id System
 / dev / sda1 2048 33556479 16777216 83 Linux
 / dev / sda2 33556480 1953525167 959984344 5 Extended
 / dev / sda5 33558528 1953525167 959983320 83 Linux
I have three partitions on the HDD, I will mount the third (/ dev / sda5)
Find out the UUID of our section:
sudo blkid Example output:
blkid
 / dev / nanda: SEC_TYPE = "msdos" LABEL = "Volumn" TYPE = "vfat"
 / dev / nandb: UUID = "fc870bf6-cf02-4f17-aab6-a2ee56137668" TYPE = "ext4"
 / dev / sda1: UUID = "df0f786f-4b74-4710-a128-412b81a6bece" TYPE = "ext4"
 / dev / sda5: UUID = "4dc5f707-d7fa-4a48-ad32-efddb23cbf97" TYPE = "ext4"
We need the line / dev / sda5, copy everything in quotes
4dc5f707-d7fa-4a48-ad32-efddb23cbf97
Remember you have this line will be different!
Next, open / etc / fstab:
sudo nano /etc/fstab Add to the very end:
UUID=4dc5f707-d7fa-4a48-ad32-efddb23cbf97 /media/files ext4 defaults,acl,user,user_xattr,errors=remount-ro * exhibit attributes to your liking
Records are separated either by a space or a tab
Reboot:
sudo reboot After reboot check
mount mount
/ dev / root on / type ext4 (rw, relatime, discard, data = ordered)
devtmpfs on / dev type devtmpfs (rw, relatime, size = 934508k, nr_inodes = 137526, mode = 755)
tmpfs on / run type tmpfs (rw, nosuid, noexec, relatime, size = 186924k, mode = 755)
tmpfs on / run / lock type tmpfs (rw, nosuid, nodev, noexec, relatime, size = 5120k)
proc on / proc type proc (rw, nosuid, nodev, noexec, relatime)
sysfs on / sys type sysfs (rw, nosuid, nodev, noexec, relatime)
tmpfs on / run / shm type tmpfs (rw, nosuid, nodev, noexec, relatime, size = 373840k)
devpts on / dev / pts type devpts (rw, nosuid, noexec, relatime, gid = 5, mode = 620, ptmxmode = 000)
tmpfs on / tmp type tmpfs (rw, relatime)
tmpfs on / var / tmp type tmpfs (rw, relatime)
/ dev / sda5 on / media / files type ext4 (rw, nosuid, nodev, noexec, relatime, errors = remount-ro, data = ordered)
We see that the third section is mounted in the desired folder.
4. Setting up the server
Well, since my cube is still a server, we set up samba, nginx, transmission.
You can use the script github.com/igorpecovnik/Debian-micro-home-server
sudo apt-get -y install git cd ~ git clone https://github.com/igorpecovnik/Debian-micro-home-server chmod +x ./Debian-micro-home-server/install.sh cd ./Debian-micro-home-server sudo ./install.sh Or install just what you need
Installing Nginx + php5-fpm + mysql
Install nginx:
sudo apt-get install nginx Run
sudo /etc/init.d/nginx start Open the browser, write the address of the cube.
We see the following inscription
Welcome to nginx!
Server is running
For example, our sites will be stored on an already mounted hard disk.
For this you need to fix the nginx config
sudo nano /etc/nginx/sites-available/default Find the line
root /usr/share/nginx/www Change to
root /media/files/www Save, close the gear
Do not forget to give nginx user access to the folder:
sudo chown www-data -R /media/files/www/ sudo chmod 0755 -R /media/files/www/ Restart nginx
sudo /etc/init.d/nginx restart or
sudo service nginx restart For static sites, this is, in principle, sufficient.
If you need php scripts - continue to edit / etc / nginx / sites-available / default
Find the line in the file:
index index.html index.htm Through the space we add
index.php Now enable php processing .
Find the block
 # pass the PHP scripts to FastCGI server listening on 127.0.0.1:9000
         #
         #location ~ \ .php $ {
         # fastcgi_split_path_info ^ (. + \. php) (/.+) $;
         # # NOTE: You should have "cgi.fix_pathinfo = 0;"  in php.ini
         #
         # # With php5-cgi alone:
         # fastcgi_pass 127.0.0.1:9000;
         # # With php5-fpm:
         # fastcgi_pass unix: /var/run/php5-fpm.sock;
         # fastcgi_index index.php;
         # include fastcgi_params;
         #}
Change to
 # pass the PHP scripts to FastCGI server listening on 127.0.0.1:9000
         #
         location ~ \ .php $ {
                fastcgi_split_path_info ^ (. + \. php) (/.+) $;
         # # NOTE: You should have "cgi.fix_pathinfo = 0;"  in php.ini
         #
         # # With php5-cgi alone:
         # fastcgi_pass 127.0.0.1:9000;
         # # With php5-fpm:
                fastcgi_pass unix: /var/run/php5-fpm.sock;
                fastcgi_index index.php;
                include fastcgi_params;
         }
Install mysql
sudo apt-get -y install mysql-client mysql-server openssl libsasl2-modules Install php5-fpm and modules
sudo apt-get install -y php5-fpm sudo apt-get install -y php5-mysql php5-curl php5-gd php5-intl php-pear php5-imagick php5-imap php5-mcrypt php5-memcache php5-memcached php5-ming php5-ps php5-pspell php5-recode php5-snmp php5-sqlite php5-tidy php5-xmlrpc php5-xsl memcached sudo apt-get install -y php-apc sudo apt-get install -y fcgiwrap Installing the Transmission Client Torrent
Transmission-daemon installation
sudo apt-get install transmission-daemon After the installation is completed, the service automatically starts with the default settings, stop it
sudo /etc/init.d/transmission-daemon stop or
service transmission-daemon stop Now edit the config
sudo nano /etc/transmission-daemon/settings.json All parameters will not be considered, the most basic
"download-dir": "/var/lib/transmission-daemon/downloads" Upload Files Path
Change to your, for example:
"download-dir": "/mnt/hdd" Ps I hope you have a hard drive mounted on this path
We allow forwarding, remembering to enable UPnP in our router
"port-forwarding-enabled": false, Change to
"port-forwarding-enabled": true If you want to log in to the web interface with a password, leave:
"rpc-enabled": true otherwise change to:
"rpc-enabled": false Delete everything in quotes, write the desired password instead. The password when the daemon starts is encrypted.
"rpc-password": "{f40c259f547fb2b99f7faa1e27d6e9b31905e9c1DcVjhWHD" For example:
"rpc-password": "cubietruck" The port on which we hang the web interface
"rpc-port": 9091 Username:
"rpc-username": "transmission" change to your favorite:
"rpc-username": "pupkin" We leave, if we want to access to the web interface only from the local machine:
"rpc-whitelist-enabled": true otherwise we change
"rpc-whitelist-enabled": false Save the config
We start service
sudo /etc/init.d/transmission-daemon start or
service transmission-daemon start Now we’ll check if the service and web interface started, open the address in the browser
http://ip__:9091 If we see an invitation to enter a login and password, then the transmission works.
Install samba
sudo apt-get install samba samba-common-bin Since my cube is in the home network, I decided not to set a password for access to folders, but simply set up a public sharing for the entire network.
To do this, open the smb.conf file:
sudo nano /etc/samba/smb.conf Instead of all the existing content we write:
[global] workgroup = WORKGROUP guest ok = yes netbios name = cubieT security = share browseable = yes [files] path = /media/files writeable = yes browseable = yes <We save. Restart Samba:
sudo /etc/init.d/samba restart From this point on, a new cubieT device has appeared on your network, which has a files folder.
In it, you can create any files that can be viewed on the entire network using a browser.
5. Remote control Ajenti / Webmin
Webmin , the market leader in free server administration software, has many plug-ins for every taste.
Consider installing it.
Add the Webmin repository to the repository list
sudo nano /etc/apt/sources.list Insert at the end of the list the following lines
deb http://download.webmin.com/download/repository sarge contrib deb http://webmin.mirror.somersettechsolutions.co.uk/repository sarge contrib Save, exit the editor.
Add the repository key to the list of keys, for this you need to be under the root.
Turn on the superuser, go to the root home folder, download the key, install.
sudo su cd /root wget http://www.webmin.com/jcameron-key.asc apt-key add jcameron-key.asc Update the list of packages, install webmin
sudo apt-get update && apt-get install webmin All dependencies will be installed automatically.
We open the browser, we write
https://ip__:10000 The browser swears and offers to leave the site, but we add the site to the trusted zone and enter.
We try to first enter the user cubie, if not, then the root.
You can disable encryption (https):
Open webmin configuration file
sudo nano /etc/webmin/miniserv.conf find the line
ssl=1 1 change to 0
Restart webmin
sudo /etc/init.d/webmin restart Now webmin works at
http://ip__:10000 If you are not comfortable with webmin, you can try ajenti. Moreover, no additional movements need to be done, ajenti is already installed in Cubian, you just need to update the system and it will work.
After upgrading the system will be available at
http://ip__:8000 *** Plans to deal with GPIO features, since On Malinka, a small data logger was organized from the DHT22 and DS18B20 sensors.
Source: https://habr.com/ru/post/225371/
All Articles