Accelerate the development process with Vagrant
 How often do you have to develop and launch an application locally and persist in looking for problems, because in production, an application does not behave exactly the way you want it? And how often do they send you tickets to solve a problem in the application, although in fact the problem is in the incompatibility of versions of different applications? And how long do you have to wait for the virtual machine when there are not enough local machine resources to launch the new version of the application? For us, these issues were quite sick, and we broke thousands of copies in disputes, trying to solve them. Practice shows that Vagrant can become one of the options for solving these problems.
 Vagrant is something like a wrapper over a virtualization system or, if you like, DSL. VirtualBox is most often used, but there are drivers for VmWare and even for Amazon EC2. More information, as well as how to install it and get started, can be found on the official website - www.vagrantup.com
Vagrant and environment testing
We have several proprietary applications that communicate with each other via the RabbitMQ bus and use things like MongoDB and MySQL. Testing of individual applications launched in a synthetic environment that is far from the real environment did not show us the behavior of a bundle of applications in a real environment when updating a single element. And the changes in the environment did not show anything at all, because the QA and staging environments were far from real. Of course, this does not save us from the need to conduct unit testing.
')
Let's try to solve this problem with the help of Vagrant.
For clarity, I will show this scheme:
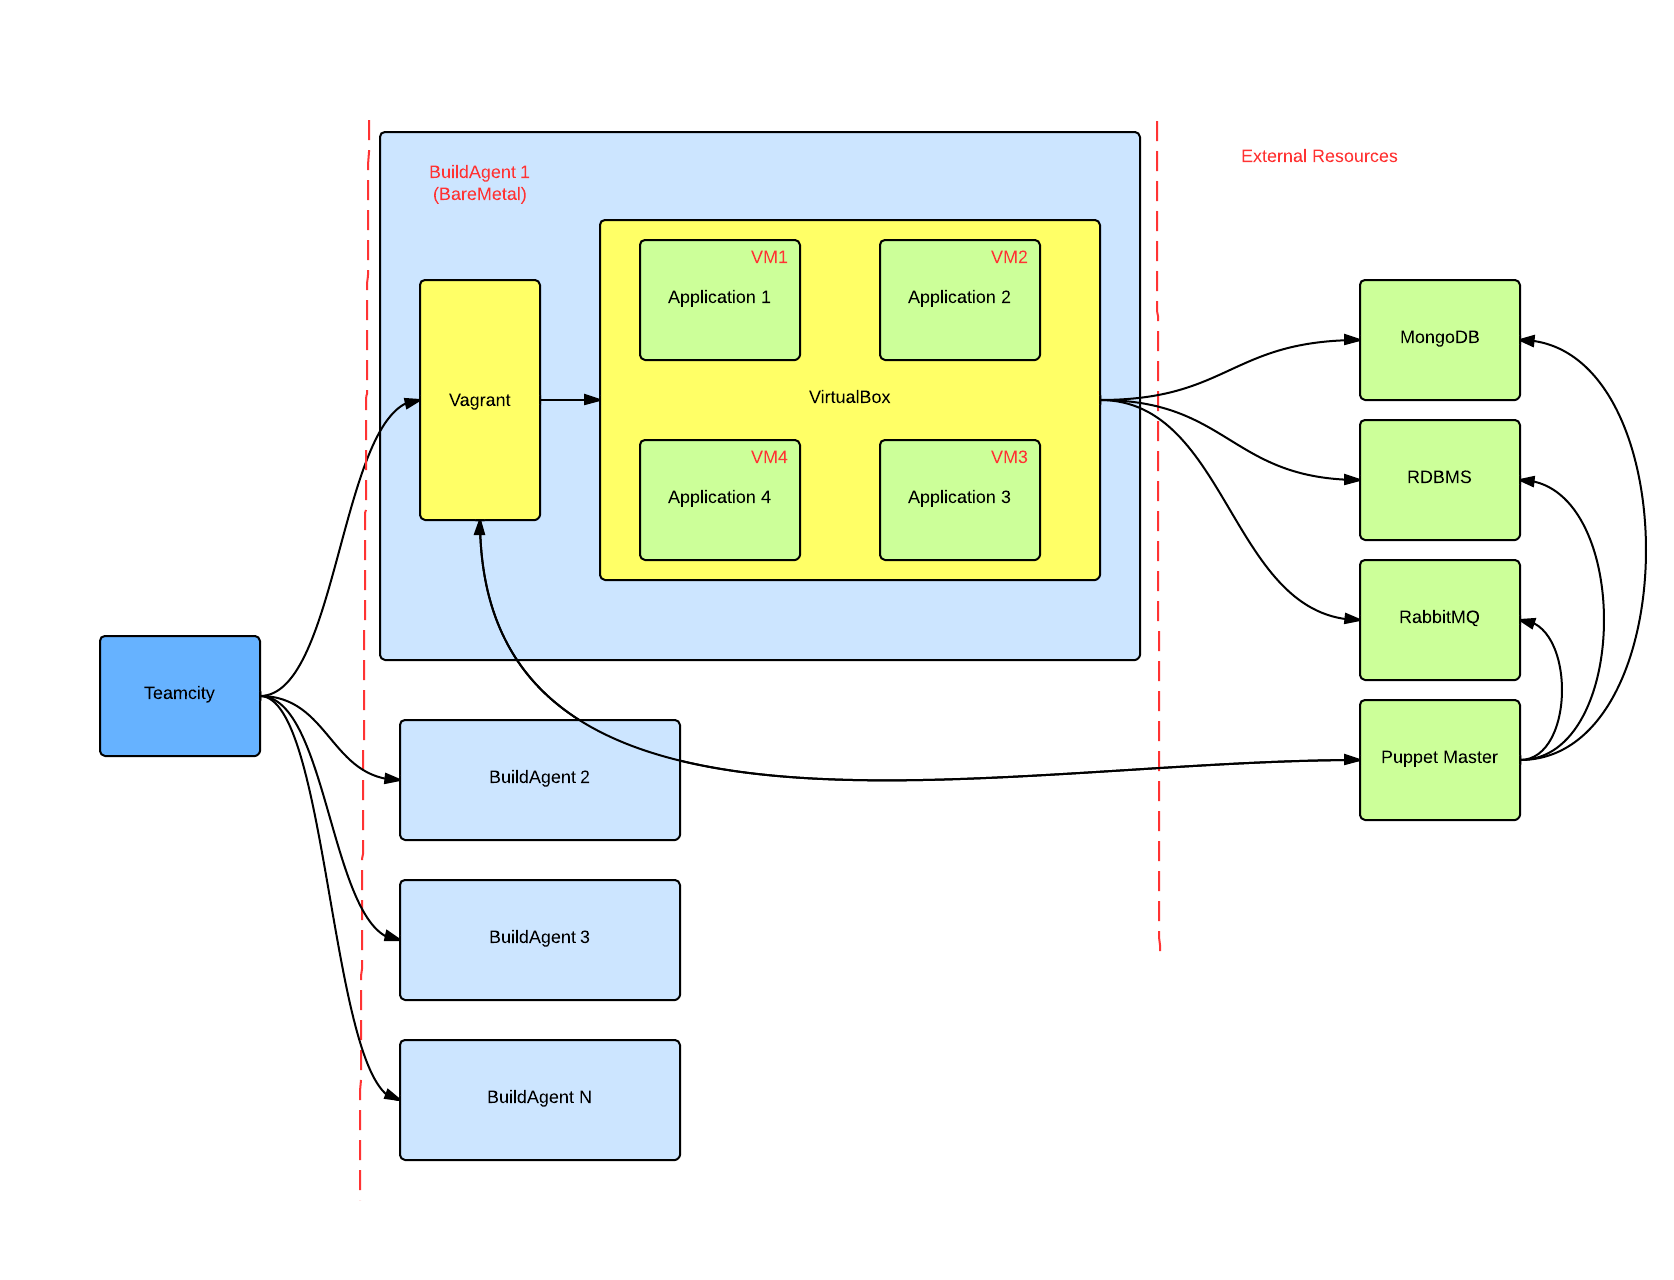
Description of flow:
- The developer makes any changes to the environment in the repository and sends the code for review to other developers;
- TeamCity picks up the changes, runs the unit tests;
- TeamCity runs Vagrant on BuildAgent, which initiates the launch of several virtual machines and the launch of the Puppet agent;
- The modified environment and stable versions of the tested applications rolls onto virtual machines;
- Tests run, or QA checks the operation of the application;
This can help check before sending changes to the Product environment: new versions of third-party applications work, Puppet manifests, custom scripts, loss of application connectivity, service crashes, business process emulation, and so on. And we will definitely not get the situation in the style of “aaa, we forgot to put the package on the server” or “pancake, the API was changed, and now the applications with each other do not work”. Well, you should pay attention that in this scheme Puppet Master is used instead of Puppet Standalone, just to repeat the real environment.
In our case, the complication of the problem is that Amazon EC2, Openstack or even VmWare ESXi can be used, which again does not help to catch the bugs and situations associated with them. The only way out in this situation, I see the use of all this bundle, but with a provider other than VirtualBox. And from this there is a small drawback - forcing Vagrant to work with other providers is not always a trivial task. Well and still, there is not always a machine for the building agent that will pull on itself N virtual locks with applications that need a lot of resources for work.
And the beauty lies in the fact that we have a project in the repository, which has a history of changes, which pass the review and all changes, including the installation of the VIM, are tested before getting into production. Well, no one bothers us in the same way to check and external resources, update the database, bus and all frontends on node.js. It all depends on the imagination and desire.
Further in the article will be described how to use Vagrant to implement the above scheme.
Starting a simple service
Normal usecase for Vagrant: raise the service and the environment and see how my code works in this environment. Especially if you want to see some kind of platform-dependent thing. Well, plus, Vagrant allows not to plant a zoo on a working machine, not to hold simultaneously packs of software and services of different versions for different needs and projects.
One of the most pleasant features for me is Puppet support, both in master and in standalone modes. Of course, Vagrant is able and Chef, but we in our company use Puppet, therefore for me the choice is obvious. I will use Puppet Standalone, or simply puppet apply.
First of all, go to the project directory and do a vagrant init, as a result we get the Vagrantfile file, which contains the description of our virtual locks. I prefer to use the once configured file and copy it from the project to the project, changing the necessary sections and configs. In the file below Vagrantfile one VM. For example, configure RabbitMQ and install Oracle Java.
Vagrantfile:
# -*- mode: ruby -*- # vi: set ft=ruby : # Vagrantfile API/syntax version. Don't touch unless you know what you're doing! VAGRANTFILE_API_VERSION = "2" Vagrant.configure(VAGRANTFILE_API_VERSION) do |config| # All Vagrant configuration is done here. The most common configuration # options are documented and commented below. For a complete reference, # please see the online documentation at vagrantup.com. # Every Vagrant virtual environment requires a box to build off of. config.vm.box = "precise64" # The url from where the 'config.vm.box' box will be fetched if it # doesn't already exist on the user's system. # config.vm.box_url = "http://domain.com/path/to/above.box" config.vm.box_url = "http://files.vagrantup.com/precise64.box" # Create a forwarded port mapping which allows access to a specific port # within the machine from a port on the host machine. In the example below, # accessing "localhost:8080" will access port 80 on the guest machine. # config.vm.network :forwarded_port, guest: 3000, host: 3000 # Create a private network, which allows host-only access to the machine # using a specific IP. # config.vm.network :private_network, ip: "192.168.33.10" # Create a public network, which generally matched to bridged network. # Bridged networks make the machine appear as another physical device on # your network. # config.vm.network :public_network # If true, then any SSH connections made will enable agent forwarding. # Default value: false config.ssh.forward_agent = true ### Define VM for RabbitMQ config.vm.define "rmq", primary: true do |rmq| # Provider-specific configuration so you can fine-tune various # backing providers for Vagrant. These expose provider-specific options. # Example for VirtualBox: # rmq.vm.provider :virtualbox do |vb| # Don't boot with headless mode vb.gui = false # Use VBoxManage to customize the VM. For example to change memory: vb.customize ["modifyvm", :id, "--memory", "1024"] end # Networking options rmq.vm.network :private_network, ip: "192.168.100.5" rmq.vm.hostname = "rmq.example.com" end end This configuration file will be enough to start the machine from the usual Ubuntu 12.04 LTS without any installed services and programs. But I’m a lazy person, and I don’t want to install and configure software on a virtual machine every time, but I don’t want to waste time and immediately start chasing the code or doing any tests.
Add a section to the Vagrantfile description:
rmq.vm.provision :puppet do |puppet| puppet.manifests_path = "./vagrant.d/manifests" puppet.manifest_file = "site-rmq.pp" puppet.module_path = "./vagrant.d/modules" puppet.options = "--fileserver=/vagrant/vagrant.d/fileserver.conf --verbose --debug" end And, accordingly, we need to create ./vagrant.d/modules, ./vagrant.d/manifests, ./vagrant.d/files and ./vagrant.d/manifests/site-rmq.pp "and ./vagrant.d/fileserver.conf.
The modules directory contains module files that we will use; The manifests directory contains the manifest of site-rmq.pp Puppet of our virtual machine; files - directory with files that are controlled by fileserver; fileserver.conf is a file for using fileserver and putting some specific files into our virtual machine.
But if we want to use third-party modules for Puppet, then they need to be installed before running puppet apply. For this, I did not invent anything better than to use the script; if there are craftsmen who will tell me how to put the modules, and then use them in manifests with just one Puppet, I will be grateful. =)
Add a section for virtualka provisioning with a shell script:
# Enable shell provisioning config.vm.provision "shell", path: "./vagrant.d/pre-puppet.sh" And create a script in the directory ./vagrant.d:
pre-puppet.sh:
#!/bin/bash # This script installs modules for puppet standalone echo "[Info] Running pre-puppet.sh for install modules" if [ "x$(dpkg -l | grep -E '^ii\s+git\s')" == "x" ] then echo "[Info] Installing git" apt-get -y install git || (echo "[Error] Cant install git" && exit 0) else echo "[Info] git already is installed, skipping" fi if [ "x$(gem list librarian-puppet|grep -v LOCAL)" == "x" ] then echo "[Info] Installing librarian-puppet" gem install librarian-puppet || (echo "[Error] Cant install librarian-puppet" && exit 0) else echo "[Info] librarian-puppet already is installed, skipping" fi if [ ! -e Puppetfile ] then cat > Puppetfile << EOF #!/usr/bin/env ruby #^syntax detection # Warning! # Do not edit this file, check pre-puppet.sh script! # forge "http://forge.puppetlabs.com" # use dependencies defined in Modulefile #modulefile mod 'puppetlabs/rabbitmq' mod 'saz/timezone' mod 'saz/locales' mod 'jpuppet/java-git', :git => "git://github.com/jpuppet/java.git" mod 'jfryman/nginx' EOF fi mkdir -p /vagrant/vagrant.d/modules echo "[Info] Installing puppet modules" librarian-puppet install --path=/vagrant/vagrant.d/modules/ || (echo "[Error] Cant install modules" && exit) rm Puppetfile* # Ugly hack for java cp -r /vagrant/vagrant.d/modules/java-git/modules/java /vagrant/vagrant.d/modules exit 0 In the script from the repository, git and librarian-puppet are installed and then the modules we need are installed using librarian-puppet. More information about librarian-puppet features can be found on github: github.com/rodjek/librarian-puppet It’s important to install git beforehand, otherwise we won’t be able to use librarian-puppet to install modules from git repositories. And I also had to make a small hack with copying the module for installing Java, just in this repository there is a slightly non-standard location of the module itself. But you can also use the Vagrant plugin for librarian-puppet github.com/mhahn/vagrant-librarian-puppet
The final view of the Vagrantfile:
# -*- mode: ruby -*- # vi: set ft=ruby : # Vagrantfile API/syntax version. Don't touch unless you know what you're doing! VAGRANTFILE_API_VERSION = "2" Vagrant.configure(VAGRANTFILE_API_VERSION) do |config| # All Vagrant configuration is done here. The most common configuration # options are documented and commented below. For a complete reference, # please see the online documentation at vagrantup.com. # Every Vagrant virtual environment requires a box to build off of. config.vm.box = "precise64" # The url from where the 'config.vm.box' box will be fetched if it # doesn't already exist on the user's system. # config.vm.box_url = "http://domain.com/path/to/above.box" config.vm.box_url = "http://files.vagrantup.com/precise64.box" # Create a forwarded port mapping which allows access to a specific port # within the machine from a port on the host machine. In the example below, # accessing "localhost:8080" will access port 80 on the guest machine. # config.vm.network :forwarded_port, guest: 3000, host: 3000 # Create a private network, which allows host-only access to the machine # using a specific IP. # config.vm.network :private_network, ip: "192.168.33.10" # Create a public network, which generally matched to bridged network. # Bridged networks make the machine appear as another physical device on # your network. # config.vm.network :public_network # If true, then any SSH connections made will enable agent forwarding. # Default value: false config.ssh.forward_agent = true # Enable shell provisioning config.vm.provision "shell", path: "./vagrant.d/pre-puppet.sh" ### Define VM for RabbitMQ config.vm.define "rmq", primary: true do |rmq| # Provider-specific configuration so you can fine-tune various # backing providers for Vagrant. These expose provider-specific options. # Example for VirtualBox: # rmq.vm.provider :virtualbox do |vb| # Don't boot with headless mode vb.gui = false # Use VBoxManage to customize the VM. For example to change memory: vb.customize ["modifyvm", :id, "--memory", "1024"] end # Networking options rmq.vm.network :private_network, ip: "192.168.100.5" rmq.vm.hostname = "rmq.example.com" # Enable provisioning with Puppet stand alone. Puppet manifests # are contained in a directory path relative to this Vagrantfile. # You will need to create the manifests directory and a manifest in # the file base.pp in the manifests_path directory. # rmq.vm.provision :puppet do |puppet| puppet.manifests_path = "./vagrant.d/manifests" puppet.manifest_file = "site-rmq.pp" puppet.module_path = "./vagrant.d/modules" puppet.options = "--fileserver=/vagrant/vagrant.d/fileserver.conf --verbose --debug" end end end Now we can describe our node in the manifest:
site-rmq.pp:
# # This manifest describes development environment # RabbitMQ-server # class { 'timezone': timezone => 'Europe/Moscow', } class { 'locales': locales => ['ru_RU.UTF-8 UTF-8'], } # apt-get update # --------------------------------------- class apt_install { exec {'update': command => 'apt-get update', path => '/usr/bin', timeout => 0, } -> package {[ 'vim', ]: ensure => installed, } } # RabbitMQ service class rabbitmq_install { class { '::rabbitmq': service_manage => false, port => '5672', delete_guest_user => true, } rabbitmq_user { 'developer': admin => true, password => 'Password', } rabbitmq_vhost { 'habr': ensure => present, } rabbitmq_user_permissions { 'developer@habr': configure_permission => '.*', read_permission => '.*', write_permission => '.*', } rabbitmq_plugin {'rabbitmq_management': ensure => present, } } class java_install { class { "java": version => "1.7", jdk => true, jre => true, sources => false, javadoc => false, set_as_default => true, export_path => false, vendor => "oracle", } } # Include classes include apt_install include timezone include locales include rabbitmq_install include java_install Now enough in the directory of our project to do:
vagrant up and wait a few minutes, depending on the speed of your internet connection. (The first time you start the Ubuntu image)
Now you can enter our virtual machine:
vagrant ssh and check, for example, the installed java:
> vagrant ssh Welcome to Ubuntu 12.04 LTS (GNU/Linux 3.2.0-23-generic x86_64) * Documentation: https://help.ubuntu.com/ Welcome to your Vagrant-built virtual machine. Last login: Sat May 17 12:28:08 2014 from 10.0.2.2 vagrant@rmq:~$ java -version java version "1.7.0_55" Java(TM) SE Runtime Environment (build 1.7.0_55-b13) Java HotSpot(TM) 64-Bit Server VM (build 24.55-b03, mixed mode) And also you can open the WebUI RabbitMQ service:
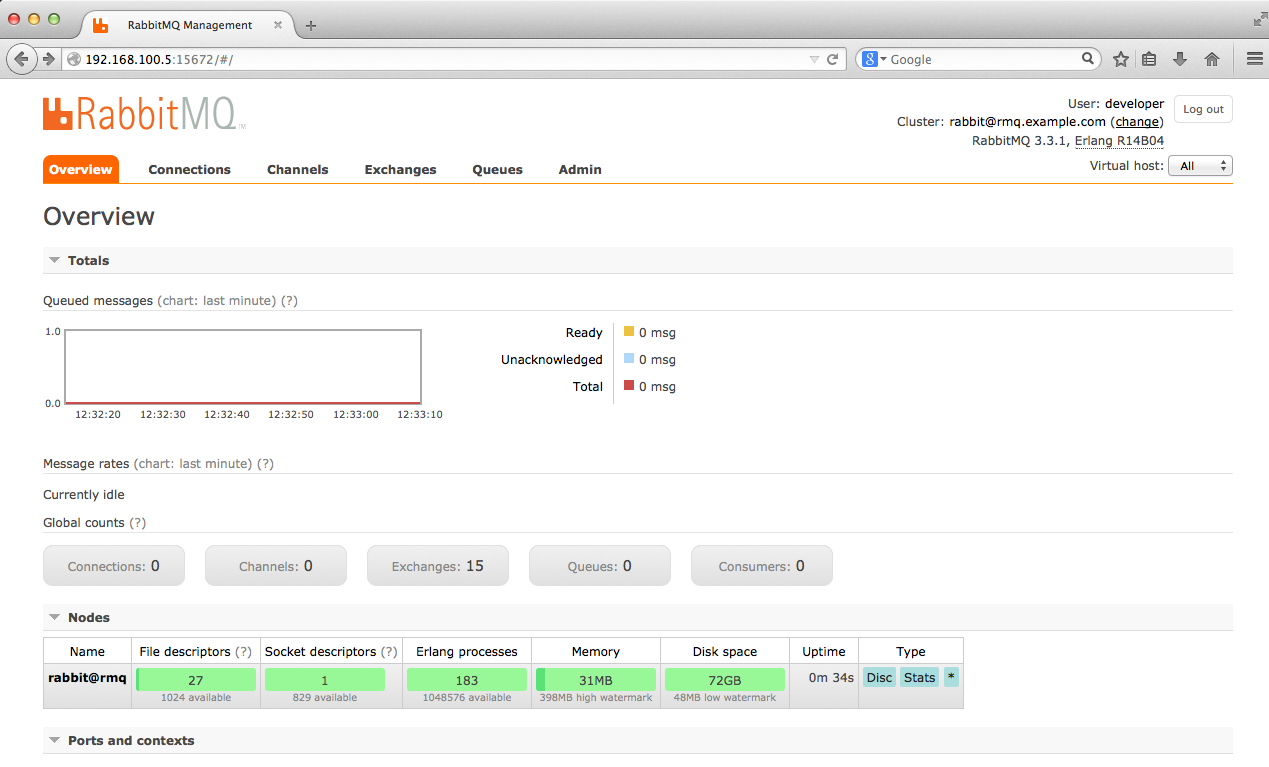
Of course, you can search for the necessary modules and install everything you want with Puppet. The blessing of the Puppet community is quite active and big. You can also write the necessary module yourself and use it. The above is only an example for one service and one machine. There may be an uncountable number of them.
For the lazy as a bonus, the files are laid out on the github: github.com/wl4n/vagrant-skel
I hope this article will help you spend more time changing the code, not setting up the environment for it, and eliminates the need to correct and reproduce the magic bugs of Production-environment.
Link to a similar article, but using Chef Solo (from comments): habrahabr.ru/post/140714
Source: https://habr.com/ru/post/225305/
All Articles