We study Three.js.Glava 2: Work with the main components of whichThree.js-scene
Hello!
In the previous chapter, we introduced the basics of the Three.js library. We saw a few examples and created our first full Three.js scene. In this chapter, we will delve a little deeper into this library and try to explain in more detail the main components that make up the Three.js scene. In this chapter, you will learn about the following:
We begin by looking at how you can create a scene and add objects to it.
In the previous chapter, we already created the THREE.Scene () object, so you are already familiar with this component of the Three.js library. We also saw that for the normal display of the scene we need three components:
The THREE.Scene () object acts as a container for all these components. This object itself does not have too many options and functions.
')
The best way to explore the functionality of the scene is to look at an example. In the source code for this chapter (chapter-02) you can find an example 01-basic-scene.html. I will use this example to explain the features and options that the scene has. If we open this example in the browser, we will see something like the following:

This is a bit like what we saw in the previous chapter. Although the scene looks somewhat empty, it already contains several objects. Looking at the following source code, we see that we used the
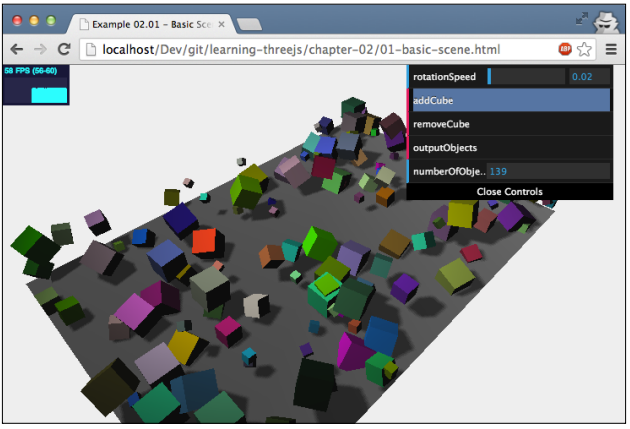
Before we begin to look at the THREE.Scene () object in more detail, I would like to tell you what you can do in the demonstrator, and only then begin to understand the code. Open the example in the browser and look at the controls in the upper right corner, here’s what you can do:
A working example .
Using these controls, you can add a cube to the scene, remove the last added cube from the scene, and display the number of all the elements that the scene contains. You probably noticed that when you run the example, there are already 4 objects in the scene. This is our plane, a source of diffused light, a source of point light and a camera, which we mentioned earlier. Next, we take a closer look at each of the components in the control unit and start with the simplest: with the
This code snippet should be fairly easily understood at this time. Many new concepts are not introduced here. When you click the addCube button, a new instance of
New in this code snippet is that we set the name of the cube using the
The next function that we can call from the control interface is
To add an object to the scene, we will use the
The last button on our GUI is marked as outputObjects . You, probably, have already clicked on it, and, it would seem, nothing happened. What this button does is print all the objects that are currently displayed on our scene and output them to the web browser console, as shown below:

The code for displaying information in the console log uses the built-in
This is great for debugging; especially when you name your objects, it is very convenient when searching for problems of specific objects on the scene. For example, the properties of an object named
So far, we have considered the following features for the scene:
These are the most important scene functions that you will use quite often. However, there are several helper functions that may be useful to you, and I would like to introduce you to them using the example of code that handles the rotation of the cube.
As you saw in the previous chapter, we used a loop inside the
Here we can see that the
Before diving into the details of the
The

A working example .
Enabling the fog feature happens in the Three.js library is very easy. Just add the following line of code after you have defined your scene:
Here we defined the fog color as white (0xffffff). The last two arguments can be changed after the fog appears. A value of 0.015 is set for the property
This time we did not indicate the properties
The last property we are going to look at is the
The result is shown below:
In this screenshot, you can clearly see that all instances of the cube object are rendered using the same material and color. In this example, we used the
In this section, we looked at the first of the basic concepts of the Three.js library: the scene. The most important thing to remember is that this is basically a container for all the objects, lights and cameras that you want to display. Recall the most important functions and attributes of the
In the following sections, we will carefully consider the objects that can be added to the scene.
In each of the examples we saw, geometry and
We determined the shape of the object, its geometry, how this object should look like, the property of its material, then it was all connected and added to the scene. In this section, we will take a closer look at geometrical and connecting objects, starting with geometrical.
The Three.js library comes with a large collection of pre-defined geometric objects that can be added to a 3D scene. Just add material, create a variable
Geometric objects in Three.js, as in most other 3D libraries, are basically a collection of points in space, as well as a series of faces connecting all these points together. Take, for example, a cube:
When using Thee.js library, when you create a geometric object, you do not need to define all the vertices and faces yourself. For a cube, you only need to determine its height, width, and depth. Thee.js library uses this information and creates the correct geometric object with eight vertices in the desired position. Despite the fact that, when creating geometric objects, the standard objects proposed by the library are usually used, you can still create objects manually by defining vertices and faces, as shown below:
This code shows how to create a simple cube. We defined the points that make up the cube in an array of vertices. These points are connected to form triangular faces, which are stored in an array of faces. For example, the element
The following screenshot shows an example with which you can play with the vertex positions:
A working example .
This example, like all the examples discussed earlier, uses a loop inside the
In the first line of this code fragment, we update the array of displayed vertices in the
The last
If you click on this button, a clone will appear, which will have the same geometry as the old object at the moment, and a new object will be created from another material and added to the scene. The code for this is rather trivial, but made a little more complicated because of the materials we use. To get started, let's step by step analyze the code that was used to create materials for the cube:
As you can see, we used not one material, but an array of two materials. The reason is that besides showing the transparent cube, I also wanted to show you the skeleton, as it clearly shows where the vertices and faces are located. The Three.js library of course also supports the use of several materials when creating a
In this function, the Three.js library does what it does not create one instance of
Now back to the clone () function, which we discussed earlier:
This piece of code is called when you click on the clone button. Here we clone the geometry of the first child of the cube. Remember that the
We have already figured out that we need geometry and one or more materials to create a mesh. Once we got the grid, we can add it to the scene and render it. There are several properties you can use to influence where this grid appears on the scene. In the first example, we will consider the following set of properties and functions:
As always, we will look at a ready-made example that allows you to play with all these properties, it is shown in the following screenshot:
A working example .
Let me tell you about them; I'll start with the
But we can also do it with one command:
There is also a third option. The
,
,
, , :
. , , , , , . ,
Three.js : . . – .
. , , .
, Three.js, , :
.
; . 2D-, SimCity 4 , :
, . . , , switchCamera :
, ,
, :
, . , , . . , . ,
:
, . , - . , :
, , , :
.
08-cameras-lookat.html, , . . , . . , .
, , . Three.js. , :
, Three.js. , , .
GitHub
PS .
In the previous chapter, we introduced the basics of the Three.js library. We saw a few examples and created our first full Three.js scene. In this chapter, we will delve a little deeper into this library and try to explain in more detail the main components that make up the Three.js scene. In this chapter, you will learn about the following:
- what components are used in the Three.js scene
- what can you do with the THREE.Scene () object
- what is the difference between orthogonal and perspective cameras
We begin by looking at how you can create a scene and add objects to it.
Scene creation
In the previous chapter, we already created the THREE.Scene () object, so you are already familiar with this component of the Three.js library. We also saw that for the normal display of the scene we need three components:
- light: it affects materials and is used to create a shadow effect
- camera: this component determines what will be displayed on the stage
- motor objects: these are the main objects that are displayed in the camera perspective: cubes, spheres, etc.
The THREE.Scene () object acts as a container for all these components. This object itself does not have too many options and functions.
')
Basic scene functionality
The best way to explore the functionality of the scene is to look at an example. In the source code for this chapter (chapter-02) you can find an example 01-basic-scene.html. I will use this example to explain the features and options that the scene has. If we open this example in the browser, we will see something like the following:
This is a bit like what we saw in the previous chapter. Although the scene looks somewhat empty, it already contains several objects. Looking at the following source code, we see that we used the
Scene.add(object) function for the Scene.add(object) object, adding objects such as THREE.Mesh (this is the plane you see), THREE.SpotLight and THREE.AmbientLight . The THREE.Camera object is automatically added by the Three.js library itself when you render a scene, but it can also be added manually if you want. var scene = new THREE.Scene(); var camera = new THREE.PerspectiveCamera(45, window.innerWidth / window.innerHeight, 0.1, 1000); ... var planeGeometry = new THREE.PlaneGeometry(60,40,1,1); var planeMaterial = new THREE.MeshLambertMaterial({color: 0xffffff}); var plane = new THREE.Mesh(planeGeometry,planeMaterial); ... scene.add(plane); var ambientLight = new THREE.AmbientLight(0x0c0c0c); scene.add(ambientLight); ... var spotLight = new THREE.SpotLight( 0xffffff ); ... scene.add( spotLight ); Before we begin to look at the THREE.Scene () object in more detail, I would like to tell you what you can do in the demonstrator, and only then begin to understand the code. Open the example in the browser and look at the controls in the upper right corner, here’s what you can do:
A working example .
Using these controls, you can add a cube to the scene, remove the last added cube from the scene, and display the number of all the elements that the scene contains. You probably noticed that when you run the example, there are already 4 objects in the scene. This is our plane, a source of diffused light, a source of point light and a camera, which we mentioned earlier. Next, we take a closer look at each of the components in the control unit and start with the simplest: with the
addCube () function: this.addCube = function() { var cubeSize = Math.ceil((Math.random() * 3)); var cubeGeometry = new THREE.CubeGeometry(cubeSize,cubeSize,cubeSize); var cubeMaterial = new THREE.MeshLambertMaterial( {color: Math.random() * 0xffffff }); var cube = new THREE.Mesh(cubeGeometry, cubeMaterial); cube.castShadow = true; cube.name = "cube-" + scene.children.length; cube.position.x=-30 + Math.round((Math.random() * planeGeometry.width)); cube.position.y= Math.round((Math.random() * 5)); cube.position.z=-20 + Math.round((Math.random() * planeGeometry.height)); scene.add(cube); this.numberOfObjects = scene.children.length; }; This code snippet should be fairly easily understood at this time. Many new concepts are not introduced here. When you click the addCube button, a new instance of
THREE.CubeGeometry with a random size from zero to three. In addition to an arbitrary size, the cube also gets a random position on the stage and a color.New in this code snippet is that we set the name of the cube using the
name attribute. Its name is set as cube - and the number of cubes already on the scene (shown using the scene.children.length attribute). Thus, the names obtained are cube-1, cube-2, cube-3 and so on. The name can be useful for debugging, but can also be used to directly search for an object on your scene. If you use the Scene.getChildByName(name) function, then you can directly get the object and, for example, change its location. The variable numberOfObjects used by our controlling interface as the size of the list of the number of elements on the stage. Therefore, when we add or remove an object, we set this variable to a value equal to the new number of elements in the scene.The next function that we can call from the control interface is
removeCube , and, as the name implies, by pressing this button, the last added cube is removed from the scene. The following shows how this function is implemented: this.removeCube = function() { var allChildren = scene.children; var lastObject = allChildren[allChildren.length-1]; if (lastObjectinstanceofTHREE.Mesh) { scene.remove(lastObject); this.numberOfObjects = scene.children.length; } } To add an object to the scene, we will use the
add () function. And to remove an object from the scene, as it is not surprising, the function remove (). In this code snippet, we used the THREE.Scene() object's children property to get the last object that was added. We also need to check that the object is a Mesh object to avoid removing the camera and the light. After we delete an object, we must once again update the control interface element that displays the number of objects on the scene.The last button on our GUI is marked as outputObjects . You, probably, have already clicked on it, and, it would seem, nothing happened. What this button does is print all the objects that are currently displayed on our scene and output them to the web browser console, as shown below:
The code for displaying information in the console log uses the built-in
console object, as shown below: this.outputObjects = function() { console.log(scene.children); } This is great for debugging; especially when you name your objects, it is very convenient when searching for problems of specific objects on the scene. For example, the properties of an object named
cube-17 will look like this: __webglActive: true __webglInit: true _modelViewMatrix: THREE.Matrix4 _normalMatrix: THREE.Matrix3 _vector: THREE.Vector3 castShadow: true children: Array[0] eulerOrder: "XYZ" frustumCulled: true geometry: THREE.CubeGeometry id: 20 material: THREE.MeshLambertMaterial matrix: THREE.Matrix4 matrixAutoUpdate: true matrixRotationWorld: THREE.Matrix4 matrixWorld: THREE.Matrix4 matrixWorldNeedsUpdate: false name: "cube-17" parent: THREE.Scene position: THREE.Vector3 properties: Object quaternion: THREE.Quaternion receiveShadow: false renderDepth: null rotation: THREE.Vector3 rotationAutoUpdate: true scale: THREE.Vector3 up: THREE.Vector3 useQuaternion: false visible: true __proto__: Object So far, we have considered the following features for the scene:
Scene.Add(): this method adds an object to the sceneScene.Remove(): this method removes the object from the sceneScene.children(): this method gets a list of all the children in the scene.Scene.getChildByName(): this method gets a specific object from the scene by its name attribute
These are the most important scene functions that you will use quite often. However, there are several helper functions that may be useful to you, and I would like to introduce you to them using the example of code that handles the rotation of the cube.
As you saw in the previous chapter, we used a loop inside the
render function to render the scene. Let's take a look at the same code snippet for this example: function render() { stats.update(); scene.traverse(function(e) { if (e instanceofTHREE.Mesh&& e != plane ) { e.rotation.x+=controls.rotationSpeed; e.rotation.y+=controls.rotationSpeed; e.rotation.z+=controls.rotationSpeed; } }); requestAnimationFrame(render); renderer.render(scene, camera); } Here we can see that the
THREE.Scene.traverse() function is used. We can pass a function as a function argument. This will be passed to the function and invoked in each child of the scene. In the render () function, we will use the traverse () function to update the rotation for each cube instance (we explicitly ignore our main plane). We could do this by iterating over all the elements of the array by the children property in the for loop.Before diving into the details of the
Mesh and Geometry objects, I would like to show you two interesting properties that can be set on the scene object: fog and overrideMaterial .Add a fog effect to the plane
The
fog property allows you to add a fog effect to our scene. The farther the object, the more it will be hidden from view. The following screenshot shows what it looks like:A working example .
Enabling the fog feature happens in the Three.js library is very easy. Just add the following line of code after you have defined your scene:
scene.fog=new THREE.Fog( 0xffffff, 0.015, 100 ); Here we defined the fog color as white (0xffffff). The last two arguments can be changed after the fog appears. A value of 0.015 is set for the property
near , and 100 for the property far . Using these two properties, you can determine where the fog will start and how quickly it will become more dense. There is also another way to set the fog for the scene: for this we need the following: scene.fog=new THREE.FogExp2( 0xffffff, 0.015 ); This time we did not indicate the properties
near and far , but only the color and density of the fog. In general, it's better to play around yourself to deal with these properties, and you will get the effect you want.Using the overrideMaterial property
The last property we are going to look at is the
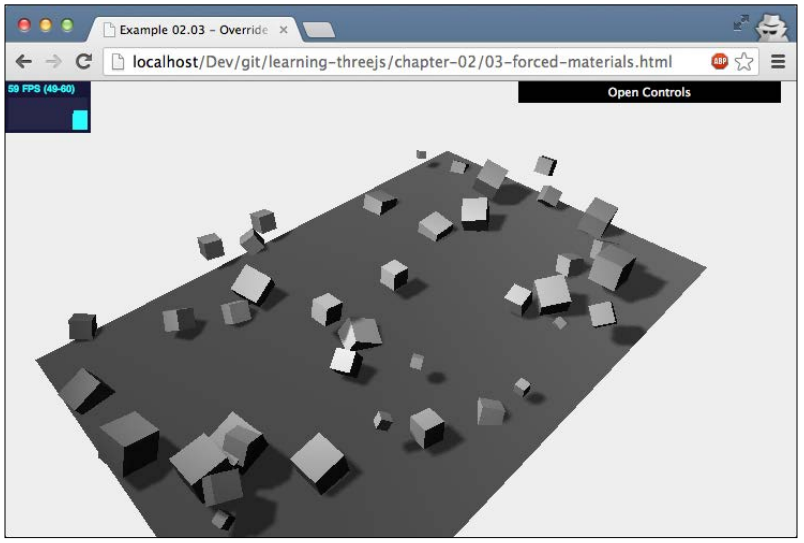
overrideMaterial property, it is used to set the material of all the objects on the scene. If you use this property, then, as shown below, all objects that you add to the scene will have the same material: scene.overrideMaterial = new THREE.MeshLambertMaterial({color: 0xffffff}); The result is shown below:
In this screenshot, you can clearly see that all instances of the cube object are rendered using the same material and color. In this example, we used the
MeshLambertMaterial object as the base material.In this section, we looked at the first of the basic concepts of the Three.js library: the scene. The most important thing to remember is that this is basically a container for all the objects, lights and cameras that you want to display. Recall the most important functions and attributes of the
Scene object.add(object): adds an object to the scene, you can also use this function to create a group of objects.hildren: returns a list of all the objects that were added to the scene, including the camera and the light.getChildByName(name): when you create an object, you can give it a name using thenameattribute. TheSceneobject has a function that can be used to directly return an object with a specific name.remove(object): if you have references to an object in the scene, then you can remove it from the scene using this functiontraverse(function): the attributechildrenreturns a list of all objects on the scene. Using thetraversefunction, you can access these objects by passing the callback function as an argument.overrideMaterial: using this property, you can make sure that all objects on the scene use the same material.
In the following sections, we will carefully consider the objects that can be added to the scene.
Working with geometry and mesh objects
In each of the examples we saw, geometry and
Mesh objects were used. For example, to add a sphere object to the scene, we did the following: var sphereGeometry = new THREE.SphereGeometry(4,20,20); var sphereMaterial = new THREE.MeshBasicMaterial({color: 0x7777ff); var sphere = new THREE.Mesh(sphereGeometry,sphereMaterial); We determined the shape of the object, its geometry, how this object should look like, the property of its material, then it was all connected and added to the scene. In this section, we will take a closer look at geometrical and connecting objects, starting with geometrical.
Properties and Functions of Object Geometry
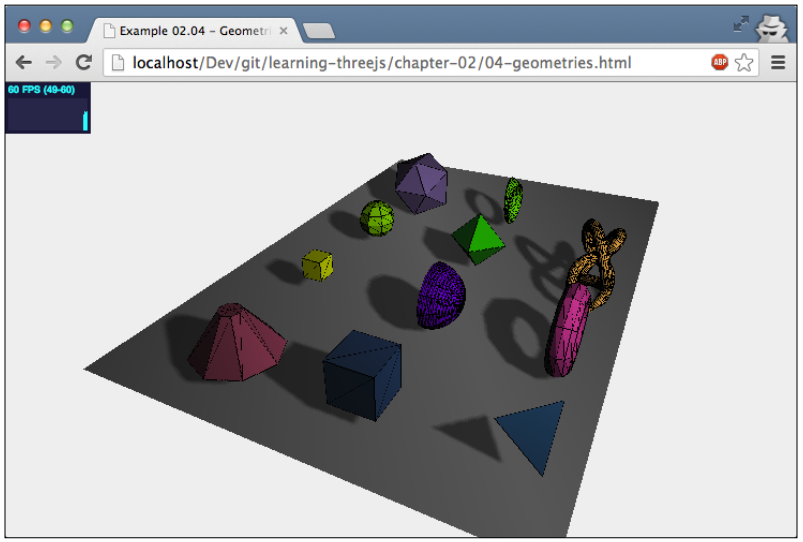
The Three.js library comes with a large collection of pre-defined geometric objects that can be added to a 3D scene. Just add material, create a variable
mesh and everything is basically done. Let's give a small example:Geometric objects in Three.js, as in most other 3D libraries, are basically a collection of points in space, as well as a series of faces connecting all these points together. Take, for example, a cube:
- the cube has eight vertices. Each of these vertices can be defined as a combination of x, y, and z coordinates. So, each cube has eight points in space. In the Three.js library, these points are called vertices.
- the cube has six sides with one vertex in each of the corners. In Thee.js library, each of these sides is called a face.
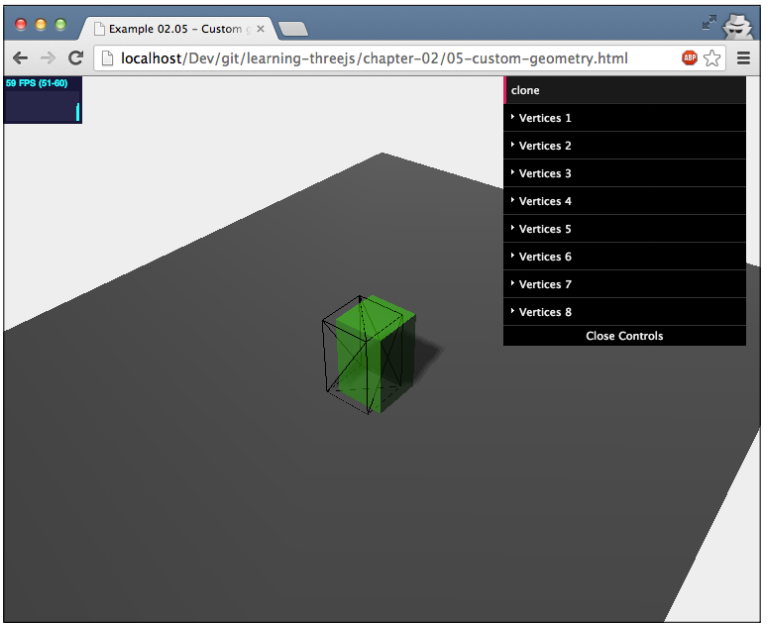
When using Thee.js library, when you create a geometric object, you do not need to define all the vertices and faces yourself. For a cube, you only need to determine its height, width, and depth. Thee.js library uses this information and creates the correct geometric object with eight vertices in the desired position. Despite the fact that, when creating geometric objects, the standard objects proposed by the library are usually used, you can still create objects manually by defining vertices and faces, as shown below:
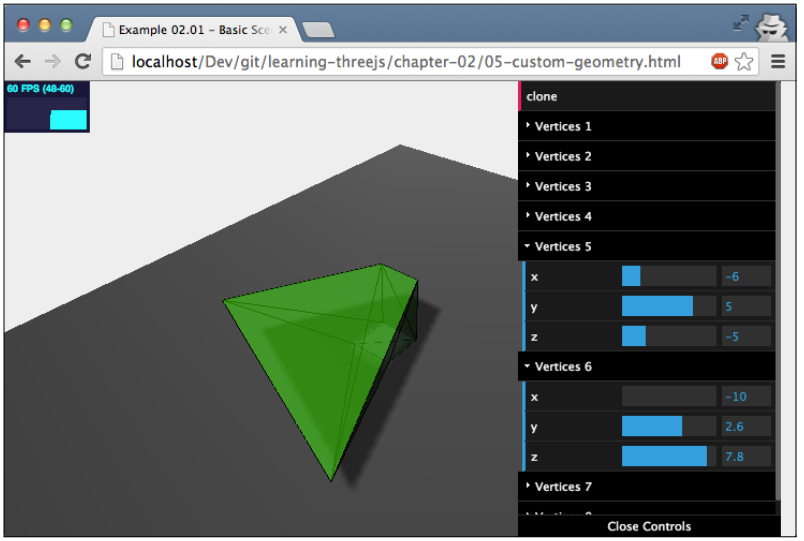
var vertices = [ new THREE.Vector3(1,3,1), new THREE.Vector3(1,3,-1), new THREE.Vector3(1,-1,1), new THREE.Vector3(1,-1,-1), new THREE.Vector3(-1,3,-1), new THREE.Vector3(-1,3,1), new THREE.Vector3(-1,-1,-1), new THREE.Vector3(-1,-1,1) ]; var faces = [ new THREE.Face3(0,2,1), new THREE.Face3(2,3,1), new THREE.Face3(4,6,5), new THREE.Face3(6,7,5), new THREE.Face3(4,5,1), new THREE.Face3(5,0,1), new THREE.Face3(7,6,2), new THREE.Face3(6,3,2), new THREE.Face3(5,7,0), new THREE.Face3(7,2,0), new THREE.Face3(1,3,4), new THREE.Face3(3,6,4), ]; var geom = new THREE.Geometry(); geom.vertices = vertices; geom.faces = faces; geom.computeCentroids(); geom.mergeVertices(); This code shows how to create a simple cube. We defined the points that make up the cube in an array of vertices. These points are connected to form triangular faces, which are stored in an array of faces. For example, the element
newTHREE.Face3(0,2,1) creates a triangular face with the help of points 0, 2 and 1 from the array of vertices.The following screenshot shows an example with which you can play with the vertex positions:
A working example .
This example, like all the examples discussed earlier, uses a loop inside the
render function. Whenever you change something in the drop-down control box, the cube is displayed correctly, based on the position changes of one of its vertices. To improve performance, the Three.js library assumes that the geometry of the grid will not change over time. To make sure that our example works, you need to add the following lines of code inside the loop of the render function: mesh.geometry.vertices=vertices; mesh.geometry.verticesNeedUpdate=true; mesh.geometry.computeFaceNormals(); In the first line of this code fragment, we update the array of displayed vertices in the
mesh object. We do not need to reconfigure the faces, as they are still limited to the same points as before. After we update the array of vertices, we must explicitly say that the array of vertices needs to be updated. We can do this by setting the verticesNeedUpdategeometry property to true . Finally, we recalculate the faces of a fully updated model using the computeFaceNormals () function.The last
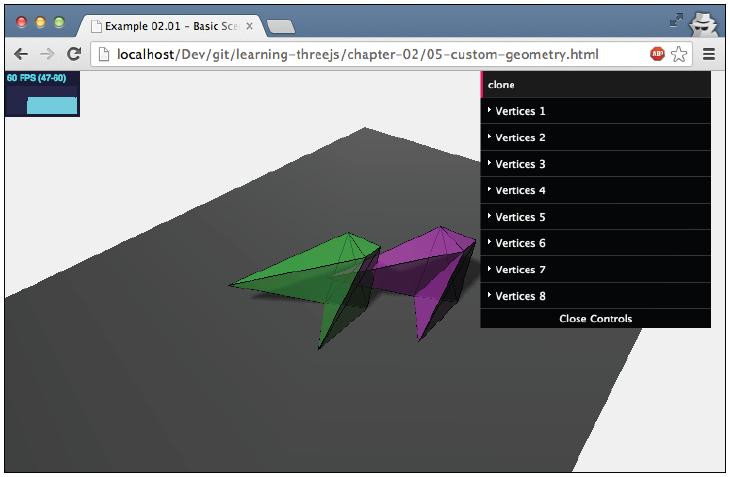
geometry functionality that we will consider is the clone () function. We mentioned that geometry determines the shape of an object, and in combination with the material we can create an object that can be added to the scene, and then drawn by the Three.js library. Using the clone () function, as the name implies, we can make a copy of the geometry and use it to create another mesh object with a different material. In the previous example, you can see the clone button at the top of the control interface, as shown in the following screenshot:If you click on this button, a clone will appear, which will have the same geometry as the old object at the moment, and a new object will be created from another material and added to the scene. The code for this is rather trivial, but made a little more complicated because of the materials we use. To get started, let's step by step analyze the code that was used to create materials for the cube:
var materials = [ new THREE.MeshLambertMaterial( { opacity:0.6, color: 0x44ff44,transparent:true } ), new THREE.MeshBasicMaterial( { color: 0x000000, wireframe: true } ) ]; As you can see, we used not one material, but an array of two materials. The reason is that besides showing the transparent cube, I also wanted to show you the skeleton, as it clearly shows where the vertices and faces are located. The Three.js library of course also supports the use of several materials when creating a
mesh object. To do this, you can use the SceneUtils.createMultiMaterialObject() function as shown below: var mesh = THREE.SceneUtils.createMultiMaterialObject(geom,materials); In this function, the Three.js library does what it does not create one instance of
THREE.Mesh , but creates one instance for each material you specify, and puts all these objects in a group. This group can be used as well as other objects on the scene. You can add grids, get grids by name, and so on. For example, to add shadows for all children in this group, we do the following: mesh.children.forEach(function(e) {e.castShadow=true}); Now back to the clone () function, which we discussed earlier:
this.clone = function() { var cloned = mesh.children[0].geometry.clone(); var materials = [ new THREE.MeshLambertMaterial( { opacity:0.6, color: 0xff44ff, transparent:true } ), new THREE.MeshBasicMaterial({ color: 0x000000, wireframe: true } ) ]; var mesh2 = THREE.SceneUtils.createMultiMaterialObject(cloned,materials); mesh2.children.forEach(function(e) {e.castShadow=true}); mesh2.translateX(5); mesh2.translateZ(5); mesh2.name="clone"; scene.remove(scene.getChildByName("clone")); scene.add(mesh2); } This piece of code is called when you click on the clone button. Here we clone the geometry of the first child of the cube. Remember that the
mesh variable consists of two children: a mesh that uses MeshLambertMaterial and a mesh that uses MeshBasicMaterial . Based on this cloned geometry, we created a new mesh and called it mesh2 .Grid Functions and Attributes
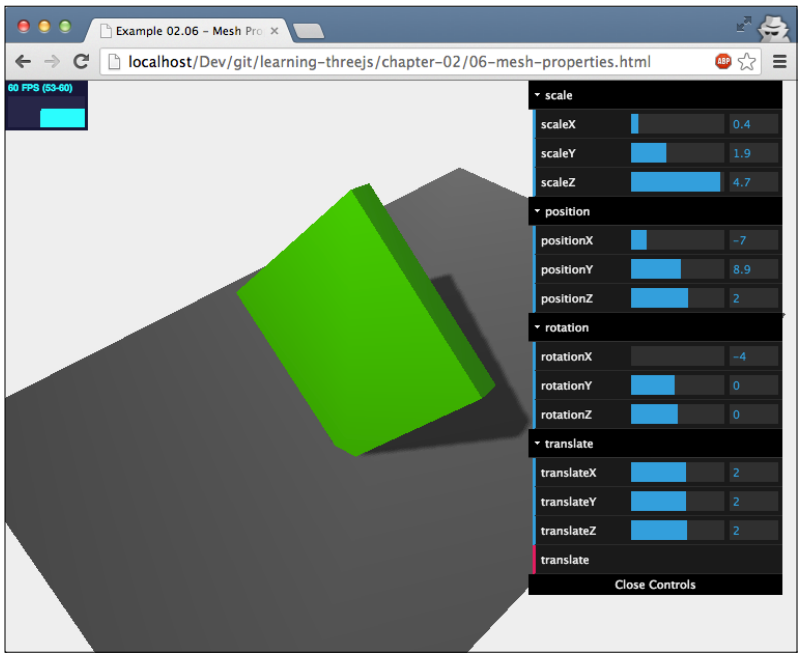
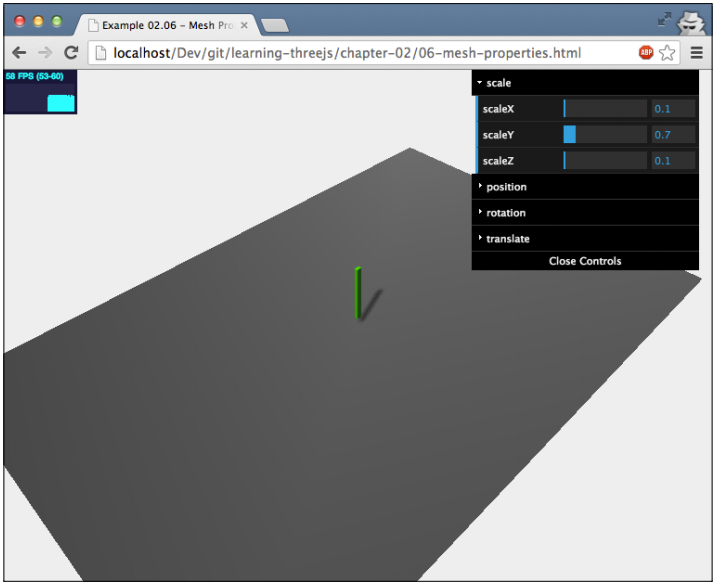
We have already figured out that we need geometry and one or more materials to create a mesh. Once we got the grid, we can add it to the scene and render it. There are several properties you can use to influence where this grid appears on the scene. In the first example, we will consider the following set of properties and functions:
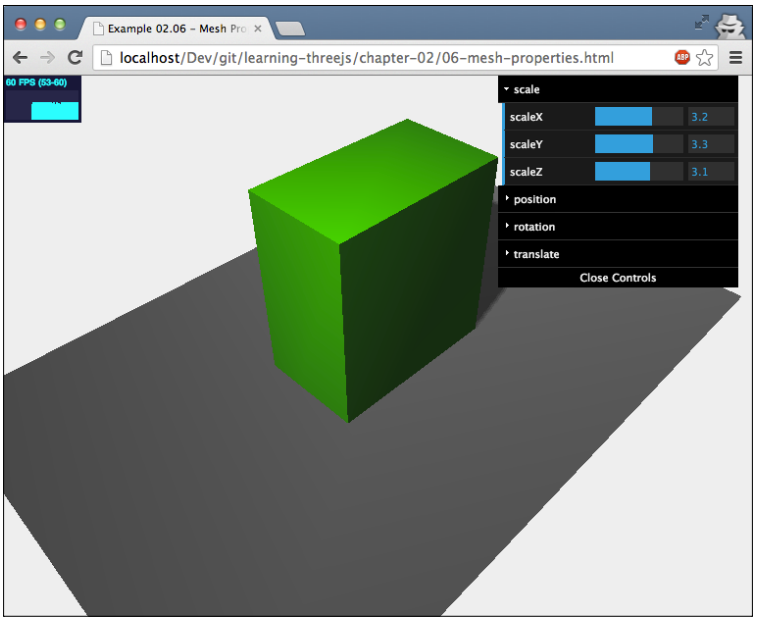
position: determines the position of this object in relation to the position of its parent. Most often, the parent of an object is anTHREE.Scene()objectTHREE.Scene()rotation: using this property, you can set the rotation of the object around one of its axes.scale: this property allows you to scale the object along the x, y and z axestranslateX(amount): moves an object a specified value along the x axistranslateY(amount): moves the object to the specified value along the y axistranslateZ(amount): moves an object a specified value along the z axis
As always, we will look at a ready-made example that allows you to play with all these properties, it is shown in the following screenshot:
A working example .
Let me tell you about them; I'll start with the
position property. We have already seen this property a couple of times, so let's quickly fix it. Using this property, you can set the x, y, and z coordinates of the object. The position of an object depends on its parent object, which is usually the scene. We can set the position property of an object in three different ways; each of the coordinates can be directly set as follows: cube.position.x=10; cube.position.y=3; cube.position.z=1; But we can also do it with one command:
cube.position.set(10,3,1); There is also a third option. The
position property is essentially an THREE.Vector. object THREE.Vector. , , : cube.postion=new THREE.Vector3(10,3,1) ,
mesh . , . , THREE.Geometry THREE.SceneUtils.createMultiMaterialObject . , , , , . . , , , . , , . :,
rotation . , , . . , position . , 2pi. , : cube.rotation.x=0.5*Math.PI; cube.rotation.set(0.5*Math.PI,0,0); cube.rotation = new THREE.Vector3(0.5*Math.PI,0,0); scale . . . , , :, , :
. , , , , , . ,
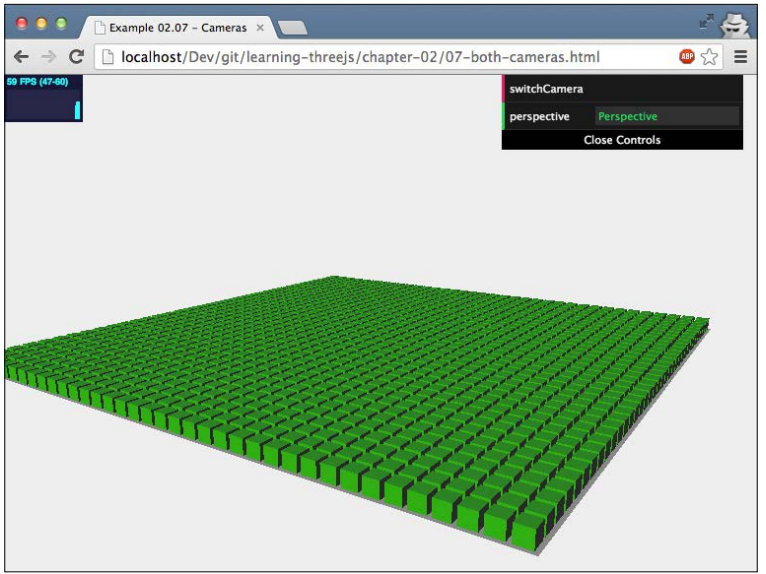
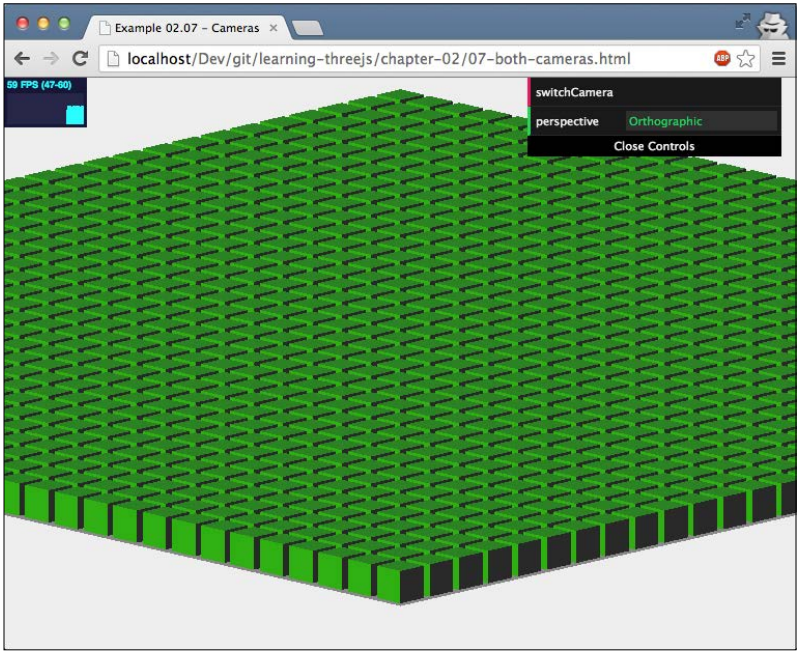
sphere , (1,2,3). translateX (4). (5,2,3). , , translateX (-4). , .Three.js : . . – .
07-both-cameras.html . , - :. , , .
, Three.js, , :
.
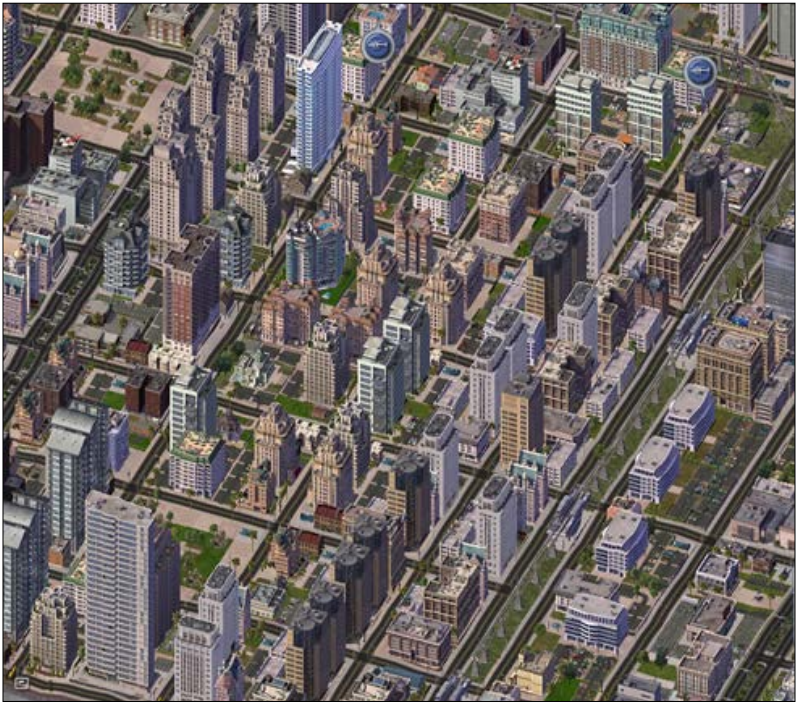
; . 2D-, SimCity 4 , :
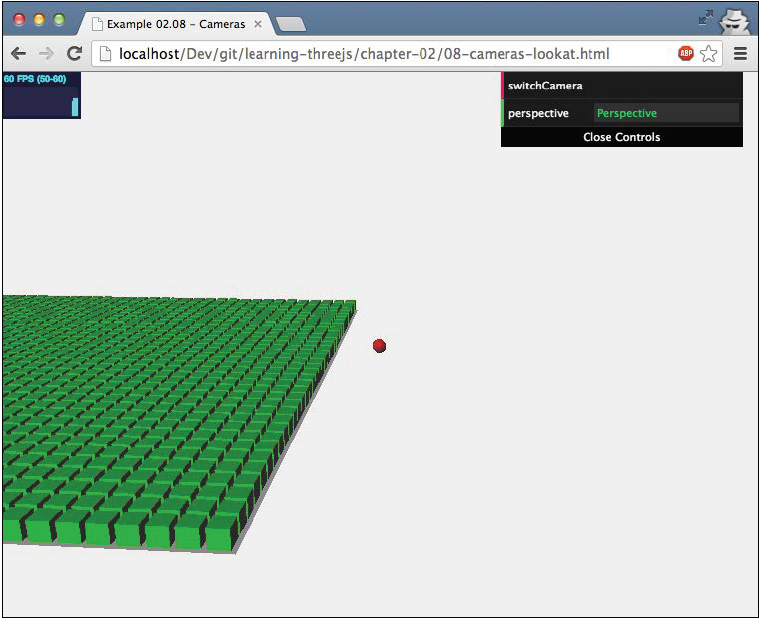
, . . , , switchCamera :
this.switchCamera = function() { if (camera instanceof THREE.PerspectiveCamera) { camera = new THREE.OrthographicCamera( window.innerWidth / - 16, window.innerWidth / 16, window.innerHeight / 16, window.innerHeight / - 16, -200, 500 ); camera.position.x = 2; camera.position.y = 1; camera.position.z = 3; camera.lookAt(scene.position); this.perspective = "Orthographic"; } else { camera = new THREE.PerspectiveCamera(45, window.innerWidth / window.innerHeight, 0.1, 1000); camera.position.x = 120; camera.position.y = 60; camera.position.z = 180; camera.lookAt(scene.position); this.perspective = "Perspective"; } }; , ,
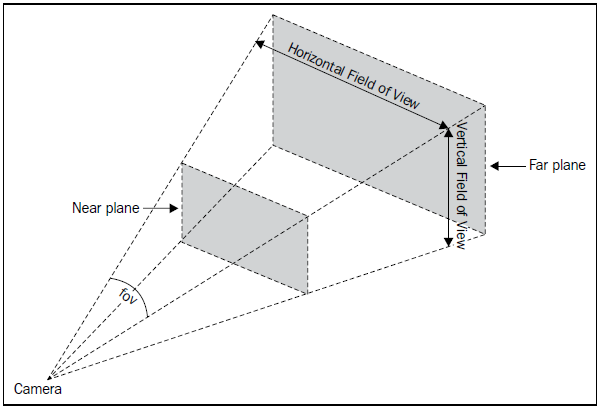
THREE.PerspectiveCamera THREE.OrthographicCamera . THREE.PerspectiveCamera . :fov: . , . , 180 , 360 . , , , . , , 60 90 . 45 .aspect: , . , . :window.innerWidth/window.innerHeight.near: , Three.js . , , . 0,1far: . , , , . : 1000.
, :
, . , , . . , . ,
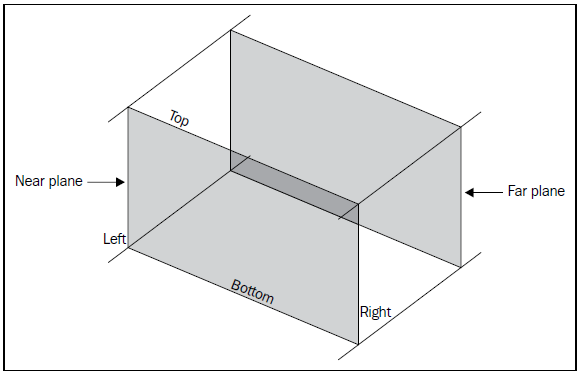
OrthographicCamera :left: Three.js . . , -100, , .right: ,left, . , .top:bottom:near: , ,far: , , .
:
, . , - . , :
position (0,0,0) . , , : camera.lookAt(new THREE.Vector3(x,y,z)); , , , :
.
08-cameras-lookat.html, , . . , . . , .
Conclusion
, , . Three.js. , :
- – Three.js. .
- . ,
children. - .
- . , , .
- Three.js . , , , .
- , .
translate.- , . Three.js : .
- .
- .
, Three.js. , , .
GitHub
PS .
Source: https://habr.com/ru/post/225199/
All Articles