Zetes: Java with a multi-platform GUI, but without an Oracle JVM
annotation
This article describes a framework that allows you to create graphical cross-platform applications written in the Java language, but completely independent of Oracle JRE or OpenJDK. The main ideology of the framework is, if possible, to remove from the developer the concerns about providing a “native” look and feel for the application under each operating system.
In fact, at the output you will receive an executable file that relies only on system APIs, which will not be labeled "written in Java" anywhere.
')
All components of the framework have liberal licenses (BSD or Apache), which allows them to be used in any (including commercial) developments.
The framework is in the public alpha version stage, which means some of its working capacity, but unverified. Use is encouraged (I will try to listen to complaints about problems and help solve them), but performance is not guaranteed.
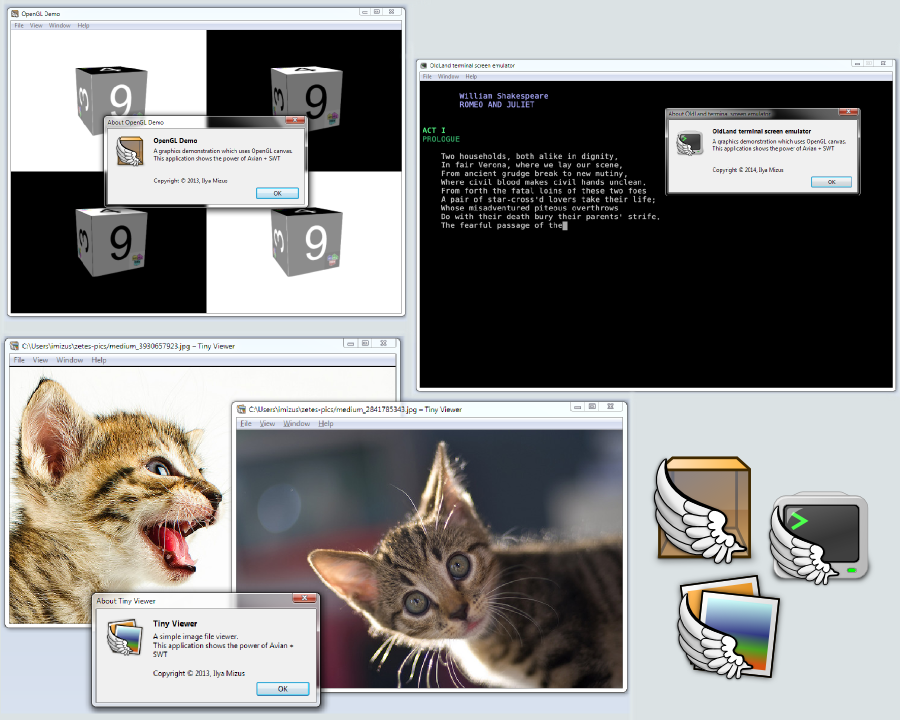
A ready-made, assembled version of applications that demonstrate the framework's work under all platforms is here .
All interested in the details of mercy please under the cat.
1. Introduction
There will be a small lyrical introduction. You can safely skip this section if you are not interested in why this project was born and how it developed. The technical side of the question begins with section 2.
1.1. About the name
Zetes (in Russian translation - Zet) is one of the "invisible" Olympic gods - the Boread brothers who participated in the Argonauts' campaign. Pretty charismatic character with wings on his feet and head.
1.2. The first steps
Just over a year ago I wrote my first article on Habr . The material was new to me, but it immediately seemed very interesting to me. It was about an alternative implementation of the Java virtual machine, called Avian . This project allows you to embed a virtual machine directly into the executable file and is distributed under the BSD license, which allows the user to use the resulting solution with impunity for any purpose. Finally, as a Java developer, I felt complete freedom. And he did not fail to share this joy, for which he received thanks and an invite. In the comments there were people who dreamily expressed in the sense that it would be nice to bring some cross-platform GUI here and, I must admit, I myself also had such thoughts, as well as Avian developers ...
I wanted to simplify the process of GUI-applications development as much as possible without loss in quality. I started thinking. Before me were examples of projects written in Java and running on Windows, Linux and OS X. For example, Eclipse. Or SmartGIT. They all had a good (though not perfect) UI, and also all used the SWT graphic library. This library was fully supported by Avian. It remains only to put it all together, slightly “undercut” some details, and can be used for small but ambitious projects.
Alas, in the process of work inevitable difficulties appeared. Most of them were due to the imperfections of the standard class library, which is part of Avian. A project being developed by a small group of people cannot yet boast full compatibility. Sometimes the most basic things are missing there ... For example, I personally added sockets. Having tried to start some more or less complex programs and frameworks with the “native” classpath and failed, I realized that very few Java developers would want to delve into finishing the classes of the standard library, and my passion was pretty bad.
It took quite some time before I returned to this topic. The solution to the problem was to find some alternative Java Core class library. Unfortunately, the only library I know at the time is the GNU Classpath. But her license did not suit me. Perhaps my research will seem to people who are knowledgeable to be the result of naivety. But, alas, naivety did take place, because it took me about another month (not active, but periodic searches) to come across the now defunct Apache Harmony project. This project contained all the necessary classes and had to work under all the axes that interested me, but, alas, it was dead. Add it to Avian was a very time consuming task for one person. I approached Avian developers with an idea, they pointed out to me that they would not add classes from there directly to Avian, since the BSD license is more relaxed than Apache. However, it is possible to build Avian with the necessary components taken from the Android Classpath . This knowledge struck like a bolt from the blue. Surely! Android contains the implementation of the Java Classpath, not only the licensing-free Orale, but also suffered in litigation between companies (although in the light of recent events, I think we should all be more careful with such statements). And the Apache license allows you to use this library. Added to this is that the Android Classpath is a descendant of the Apache Harmony itself. So there are no options left.
Being in a state of euphoria, I pumped out everything I needed and assembled at home on an Apple machine. After a little finishing, it all worked. The executable file was significantly “stouter”, and the build took 15 minutes, but as a result I got a working full-fledged autonomous Java. At that moment I started to write this article in my mind, but the joy disappeared as soon as I tried to put it all together under Windows. Alas…
1.3. Finishing Android Classpath
Of course, Android is based on Linux. And of course, the entire native part of the Classpath is rooted in Posix. I faced a serious task - to port Android Classpath to Win32. It was about 3 months ago. Since the entire assembly is based on MinGW, some basic Posix functions were present (those that are exactly repeated in Windows). But, alas, some of them work a little differently (for example, WinSock, although it tends to coincide with the BSD Sockets, but, alas, in some places it is quite different from them, especially in the part related to input-output). The other part is completely absent in Windows in the form in which it is needed. For example, unnamed pipes in Windows are very limited and do not allow the use of non-blocking I / O, which is necessary for some Java API functions.
Fortunately, Comrade JustAMan helped me in my research, without him I would, at best, still wander around the Posix-docks. We wrote and tested something ourselves using simple applications, as well as a small Simple Framework . We borrowed other things from open sources, carefully avoiding the GPL code. Thank God, we are not the only ones in the world who are engaged in such things ...
Our goal, of course, was not to recreate the Posix API emulation (Cygwin, which, however, does not have the most liberal license, does a wonderful job of this). We just wanted LUNI to work (abbreviation from Android. Means Lang Utils Net IO - the four main packages that make up the java core).
At the moment, this work in its main part is completed and is in the bugfix stage. There are still some troubles with the ways, but these are all trivialities.
What we have as a result, we bring to your attention.
2. Why is all this necessary
The question I’m probably most afraid of. An honest answer is this: I do this because I'm interested. And I hope that it will be useful to someone else. But, despite the fact that only its users can justify the usefulness of a library (which so far is very small), I will try, at least, to explain its main ideology.
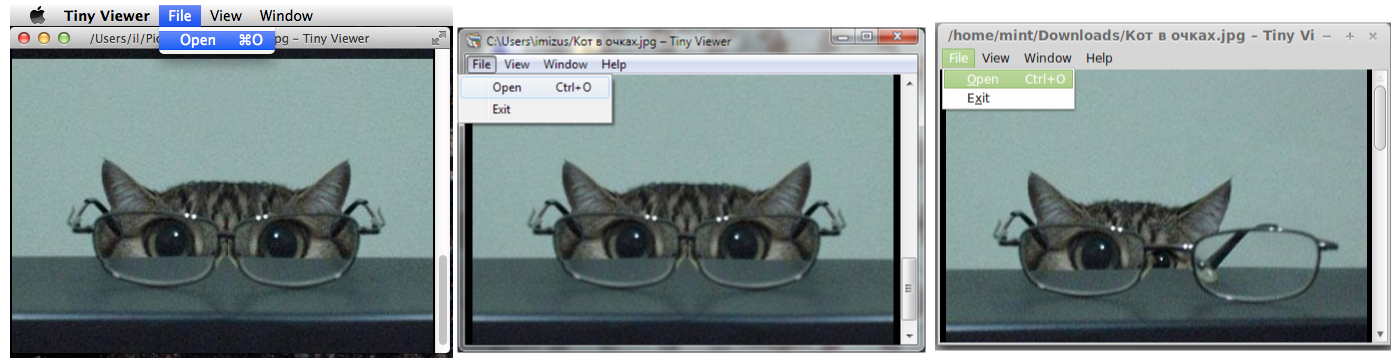
Zetes' task is to continue Java in the direction of desktop development. Despite the fact that the language itself is cross-platform (and even, in some way, portable in compiled form), when developing multisystem applications on it, if the developer wants his application to look at least some kind of "native", he has to take into account "cultural differences". Examples of darkness. On Windows (and on Linux + X + GTK), an application must create at least one window to draw a menu bar. In OS X, the menu is separate from the windows and it perfectly exists in their absence. In Windows, the Exit item is usually placed in the File, and the About item - in the Help. In OS X, both are located in the system menu. But it is - little things. There is a difference and more serious. For example, in OS X, a GUI application cannot run in duplicate — each program must support either the Multi Document Interface or the Single Document Interface. That is, when opening a new document, the shell simply transfers its name to an already running application. This behavior is convenient (if implemented), but on Windows and Linux, it needs to be simulated using other system mechanisms.
These (and, in the future, all such discrepancies) should be assumed by Zetes. Next in line, for example, is the development of a universal cross-platform API that allows an application to store its settings in the Windows system registry, and in the corresponding Library folders on OS X, and in GConf on Linux.
In other words, the task of the framework is to bring the API of popular systems “to a common denominator”, adding useful functions of some to useful functions of some.
And, anticipating the questions that will inevitably arise, I will say: no, this library will not cover mobile OS, at least for now. They are too different from the desktop as an ideology, and approaches to programming.
3. So what is Zetes?
The framework allows you to take a created java-application and build / package it into a native executable file that depends only on the system libraries (in the case of using SWT, only a few SWT libraries are attached to the application). You only need the build utility. The only thing that you have to write besides the program itself is the simplest makefile, which defines such things as the name of the final executable file, as well as the name of the java class containing the entry point (the main function).
With more advanced use, the build system will allow you to add source files to C ++, as well as include external libraries, both dynamic and static. So, in the end, the content should be both clean Java developers who don’t even know what JNI is and wise wolves that use JNI everywhere.
4. What is Zetes made of?
In order to cover as large a class of tasks as possible, the framework was divided into three parts:
4.1. ZetesFeet
At the core is the ZetesFeet library. It contains Avian, as well as one of two class library options - Avian Classpath or Android Classpath.
The pros and cons of each library are shown in the table:
| Comparison criterion | Avian Classpath | Android Classpath |
| Completeness and Compliance | It contains only the very minimum, although it expands. However, it is not possible to launch any serious ready project on this platform. | Contains the implementation of all core Java Core classes. Theoretically, it should support any not too confused application. In practice, there may be complications associated with the transfer of the library on Win32. Of course, all such errors will be corrected as soon as possible. |
| Executable file size | An executable file that does not contain SWT classes is slightly larger than a megabyte. | The executable file is blown up to 25 megabytes. This is mainly not due to the Android classes themselves (which take up about 5MB), but because of the encoding tables, part of ICU4C, the language support library of the Android Classpath |
| License | BSD (Compatible with GPL) | Apache (also open, but incompatible with the GPL) |
In other words, if you just want running Java without problems and writing your “bikes”, use the Android Classpath.
In addition, ZetesFeet should include all Zetes classes that are not specific to any type of application, but are useful when creating any.
Over ZetesFeet built two libraries, alternative to each other.
4.2. ZetesHands
The first of them - ZetesHands - allows you to create console applications. If you want to make a new system utility, or, for example, any DSL interpreter, go here. Non-graphical applications use ZetesHands. On Windows, this application receives a console window. On OS X, it is compiled into an executable file, but the bundle is not created for it.
4.3. Zeteswings
The second library, ZetesWings, is used to create GUI applications. The assembly process involves adding icons, the framework itself contains the base classes that the developer must override in order to create his application. On Windows, the console does not allocate such an application; in OS X, it is built into the bundle when building. "Cultural differences" when working with GUIs (examples of which were given above) are taken into account here. The main ideology of the API is common for user interface tasks. This is a document-view architecture.
In order to build an application using Zetes, in its makefile you need to add a link to either ZetesHands.mk or ZetesWings.mk, depending on which of the add-ons you have chosen.
5. How to use it? Let's look at an example - the Tiny Viewer image viewer

Here I will describe the simplest use case. First of all, we need an assembled version of Zetes. You can take it from the release page on GitHub . Create a folder for our experiments with Zetes. Let's call it, say,
zetes-works . Go into it and inside create a folder zetes , into which we unpack the folder target-** from the downloaded archive. Now let's go back to zetes-works and create a folder called tinyviewer . The application we are going to create will be called TinyViewer. It demonstrates the main features of ZetesWings. The application is a simple image viewer. It allows you to simultaneously download multiple files, showing each in a separate window. The finished version of this program is among the examples presented by me in the zetes-examples repository. For the impatient at the end of the article there is a link to the compiled release version of the sample applications.5.1. makefile
Let's start with the makefile. As I promised, it will be simple and short.
ZETES_PATH = ../zetes APPLICATION_NAME = Tiny\ Viewer BINARY_NAME = tinyview ENTRY_CLASS = tinyviewer/TinyViewerApplication include $(ZETES_PATH)/common-scripts/globals.mk include $(ZETES_WINGS_PATH)/ZetesWings.mk all: package Disassemble line by line. First of all, the
ZETES_PATH variable is ZETES_PATH , which sets the path to the Zetes library relative to the project directory. Next comes APPLICATION_NAME , the human-readable name of the application Then - BINARY_NAME - the name of the executable file and ENTRY_CLASS - the name of the class containing the entry point - the function public static void main(String... args); . The class name is given by slashes (/), and not by periods, as is customary for Java developers. That is, in fact, the class will be called tinyviewer.TinyViewerApplication .The next two lines are the connection, in fact, of the “meat” - an assembly engine included in Zetes and allowing us to write a short makefile. The first of the connected files -
globals.mk - contains general definitions, constants and rules, the ZetesWings.mk file is specifically for ZetesWings. In the case of using ZetesHands, we would include, respectively, its makefile.Next comes the definition of the main rule. Since building a complex user project may contain some advanced steps, you must define the basic rule all by yourself. In this case, we simply execute the package - a rule that will assemble the application and pack it into the archive (or, on OS X, into the dmg image). If you do not want to pack it, and you only want to get a working application, write
all: app .5.2. Main classes
Since ZetesWings is designed to write cross-platform applications, it takes over some of the architecture of your application. In particular, the model of document-views (Document-View) is determined by him. Therefore, in order to make applications, you need to create a class inherited from the following abstractions:
ApplicationBaseis the main class of the application that defines the global parameters of its behavior. In fact, it is created in one instance (although it is not a singleton in the strict sense). It is also advisable to put an entry point into it (mainfunction)ViewWindowsManagerBaseis a class that manages windows-View. Creates windows for documents, stores links to them. Communication between the windows through it.MenuConstructorBase- the class that controls the menu - both global (in OS X) and the window menu. Responsible for the appearance / disappearance / deactivation of menu items, for the correct definition of hot keys. Working with the main menu of the application to bypass this class is extremely undesirable. All requests for improvement are accepted. The main task is to ensure the “cultural independence” of the menu from the platformViewWindowBase- a window showing the contents of a document. This implementation is closely related to the notion ofShellfrom SWTDocument- document. The most abstract of all the entities described. Must be able to report its title (to form the window title and menu item) with thegetTitle()function, and also forcefully clean its resources using thedispose()function
All the listed classes (except for the simple
Document interface) are templates that have a connection between them. And now we need to make the heir from each of them and tie these heirs together.
Associated templates are very convenient - they set up an application skeleton, as it were, a kind of “shape” into which ready-made classes can be expanded, and they will work together. I hope you enjoy this approach as much as I do.
5.2.1. ImageDocument
Construction will lead to dependencies "from the bottom up." Let's start with the document class. In our case, this is an image that must be loaded using SWT and stored in memory. Our class will look like this:
ImageDocument.java
package tinyviewer; import java.io.FileInputStream; import java.io.IOException; import java.io.InputStream; import org.eclipse.swt.graphics.Image; import org.eclipse.swt.graphics.ImageData; import org.eclipse.swt.widgets.Display; import zetes.wings.abstracts.Document; public class ImageDocument implements Document { private Image image; private String fileName; private static Image loadImage(InputStream stream) throws IOException { try { Display display = Display.getDefault(); ImageData data = new ImageData(stream); if (data.transparentPixel > 0) { return new Image(display, data, data.getTransparencyMask()); } return new Image(display, data); } finally { stream.close(); } } private static Image loadImage(String fileName) throws IOException { return loadImage(new FileInputStream(fileName)); } public ImageDocument(String fileName) throws IOException { this.fileName = fileName; this.image = loadImage(fileName); } public String getTitle() { return fileName; } public Image getImage() { return image; } public void dispose() { if (image != null && !image.isDisposed()) image.dispose(); } @Override protected void finalize() throws Throwable { dispose(); super.finalize(); } } Everything here is almost obvious. The
loadImage function loadImage responsible for loading the image and is called in the constructor. The getTitle() function returns the file name, and dispose() frees the image resources. Just in case, finalize() also redefined to dispose() to be called.Since we deal only with viewing the image, we do not create any modifying methods.
5.2.2. ImageView
This class is not directly related to Zetes, but, nevertheless, our application cannot do without it. This is a specially written SWT component that displays a picture on the screen.
ImageView.java
package tinyviewer; import org.eclipse.swt.events.PaintEvent; import org.eclipse.swt.events.PaintListener; import org.eclipse.swt.graphics.GC; import org.eclipse.swt.graphics.Image; import org.eclipse.swt.graphics.Point; import org.eclipse.swt.graphics.Rectangle; import org.eclipse.swt.widgets.Canvas; import org.eclipse.swt.widgets.Composite; public class ImageView extends Canvas { Image image = null; Image zoomedImage = null; double zoom = 1.0; public ImageView(Composite arg0, int arg1) { super(arg0, arg1); addPaintListener(new PaintListener() { @Override public void paintControl(PaintEvent e) { draw(e.gc); } }); } protected void draw(GC gc) { if (image != null) { checkZoomedImage(); Point viewSize = getSize(); Point imageSize = new Point(zoomedImage.getBounds().width, zoomedImage.getBounds().height); int xpos = viewSize.x > imageSize.x ? viewSize.x / 2 - imageSize.x / 2 : 0; int ypos = viewSize.y > imageSize.y ? viewSize.y / 2 - imageSize.y / 2 : 0; gc.drawImage(zoomedImage, xpos, ypos); } } public Point desiredSize() { if (image == null) return new Point(1, 1); else return new Point((int)(image.getImageData().width * zoom), (int)(image.getImageData().height * zoom)); } protected void checkZoomedImage() { if (zoomedImage == null || zoomedImage.isDisposed()) { Rectangle bounds = image.getBounds(); zoomedImage = new Image(image.getDevice(), (int)(bounds.width * zoom), (int)(bounds.height * zoom)); GC gc = new GC(zoomedImage); gc.drawImage(image, 0, 0, bounds.width, bounds.height, 0, 0, (int)(bounds.width * zoom), (int)(bounds.height * zoom)); gc.dispose(); } } public void setImage(Image image) { this.image = image; if (zoomedImage != null) zoomedImage.dispose(); this.redraw(); } public Image getImage() { return image; } public void setZoom(double zoom) { this.zoom = zoom; if (zoomedImage != null) zoomedImage.dispose(); this.redraw(); } public double getZoom() { return zoom; } } All its complexity consists in several linear expressions, positioning the image in the center of the window in case it is smaller than this window. Everything related to zoom - the ability to zoom in / out the image - is not currently used. If dear readers find in this class any nonsense, I beg you to explain in detail to me in the comments where I am wrong. Alas, SWT is very poorly documented, so many things had to be found out literally by the “scientific point”.
5.2.3. ImageViewWindow
Let's move on to the next class - the window-View class that displays the image. This class uses the
ImageView class. In essence, the window will simply be a frame around this very ImageView .ImageViewWindow.java
package tinyviewer; import java.util.HashSet; import org.eclipse.swt.SWT; import org.eclipse.swt.custom.ScrolledComposite; import org.eclipse.swt.dnd.DND; import org.eclipse.swt.dnd.DropTarget; import org.eclipse.swt.dnd.DropTargetAdapter; import org.eclipse.swt.dnd.FileTransfer; import org.eclipse.swt.dnd.Transfer; import org.eclipse.swt.events.ControlEvent; import org.eclipse.swt.events.ControlListener; import org.eclipse.swt.graphics.Image; import org.eclipse.swt.graphics.Point; import org.eclipse.swt.layout.FillLayout; import org.eclipse.swt.widgets.Shell; import org.eclipse.wb.swt.SWTResourceManager; import zetes.wings.base.ViewWindowBase; public class ImageViewWindow extends ViewWindowBase<ImageDocument> { private ScrolledComposite scrolledComposite; private DropTarget scrolledCompositeDropTarget, imageViewDropTarget; private ImageView imageView; private HashSet<DropTargetAdapter> dropTargetAdapters = new HashSet<DropTargetAdapter>(); public void addDropTargetListener(DropTargetAdapter dropTargetAdapter) { dropTargetAdapters.add(dropTargetAdapter); if (imageViewDropTarget != null && !imageViewDropTarget.isDisposed()) { scrolledCompositeDropTarget.addDropListener(dropTargetAdapter); imageViewDropTarget.addDropListener(dropTargetAdapter); } } public void removeDropTargetListener(DropTargetAdapter dropTargetAdapter) { dropTargetAdapters.remove(dropTargetAdapter); if (imageViewDropTarget != null && !imageViewDropTarget.isDisposed()) { scrolledCompositeDropTarget.removeDropListener(dropTargetAdapter); imageViewDropTarget.removeDropListener(dropTargetAdapter); } } /** * Create contents of the window. * * @wbp.parser.entryPoint */ @Override protected Shell constructShell() { Shell shell = new Shell(SWT.TITLE | SWT.CLOSE | SWT.MIN | SWT.MAX | SWT.RESIZE | SWT.BORDER | SWT.DOUBLE_BUFFERED); shell.setBackground(SWTResourceManager.getColor(SWT.COLOR_BLACK)); shell.setMinimumSize(new Point(150, 200)); shell.setImages(new Image[] { SWTResourceManager.getImage(ImageViewWindow.class, "/tinyviewer/wingphotos16.png"), // Necessary in Windows (for taskbar) SWTResourceManager.getImage(ImageViewWindow.class, "/tinyviewer/wingphotos64.png"), // Necessary in Windows (for Alt-Tab) SWTResourceManager.getImage(ImageViewWindow.class, "/tinyviewer/wingphotos512.png") // Necessary in OS X }); shell.setLayout(new FillLayout(SWT.HORIZONTAL)); scrolledComposite = new ScrolledComposite(shell, SWT.H_SCROLL | SWT.V_SCROLL | SWT.NO_BACKGROUND); scrolledComposite.setExpandHorizontal(true); scrolledComposite.setExpandVertical(true); imageView = new ImageView(scrolledComposite, SWT.NONE); imageView.setBounds(0, 0, 200, 127); imageView.setVisible(false); imageView.setBackground(shell.getDisplay().getSystemColor(SWT.COLOR_BLACK)); // Drop targets scrolledCompositeDropTarget = new DropTarget(scrolledComposite, DND.DROP_MOVE); scrolledCompositeDropTarget.setTransfer(new Transfer[] { FileTransfer.getInstance() }); imageViewDropTarget = new DropTarget(imageView, DND.DROP_MOVE); imageViewDropTarget.setTransfer(new Transfer[] { FileTransfer.getInstance() }); for (DropTargetAdapter adapter : dropTargetAdapters) { scrolledCompositeDropTarget.addDropListener(adapter); imageViewDropTarget.addDropListener(adapter); } scrolledComposite.setContent(imageView); scrolledComposite.setMinSize(imageView.desiredSize()); scrolledComposite.setBackground(shell.getDisplay().getSystemColor(SWT.COLOR_BLACK)); scrolledComposite.addControlListener(new ControlListener() { @Override public void controlResized(ControlEvent arg0) { updateImageViewSize(); } @Override public void controlMoved(ControlEvent arg0) { } }); return shell; } private void updateImageViewSize() { Point desired = imageView.desiredSize(); Point clientAreaSize = new Point(scrolledComposite.getClientArea().width, scrolledComposite.getClientArea().height); int width = Math.max(clientAreaSize.x, desired.x); int height = Math.max(clientAreaSize.y, desired.y); Point newSize = new Point(width, height); Point oldSize = imageView.getSize(); if (!oldSize.equals(newSize)) { imageView.setSize(newSize); } } @Override public void setDocument(ImageDocument document) { super.setDocument(document); imageView.setImage(getDocument().getImage()); scrolledComposite.setMinSize(imageView.desiredSize()); updateImageViewSize(); imageView.setVisible(true); getShell().forceActive(); } @Override public boolean supportsFullscreen() { return true; } @Override public boolean supportsMaximizing() { return true; } } First of all, you should pay attention to the fact that the class is inherited from the
ViewWindowBase template, to which our document class is passed as a parameter. That is, the window is associated with a document of this type. Clearly shows the relationship between classes.The window tasks are extremely simple: show the loaded image (this is done in the overloaded
setDocument function). Then just please the user with his appearance, until he closes it. In addition, as the DropTarget objects indicate to us, the window responds to the event of “throwing” a file of the specified type into it. In the same window, the file will not open (it would be just not interesting), it will be loaded as a new document and a separate window will be created for it. Note that this class is not responsible for opening new windows, so it brings the listener to the outside with the methods addDropTargetListener and removeDropTargetListener . The use of these methods will be shown below.I will not focus your attention on a specific implementation, especially since it is far from perfect. I can only say what the main redefined methods are for:
constructShell() is called when creating a window to form a Shell object from SWT. This object is our window. Annotation @wbp.parser.entryPoint above method - an instruction for the visual painter of SWF windows in Eclipse to edit this particular method when modifying a window through its graphical representation in design-time. So, theoretically, you will be able to draw a window and buttons with the mouse;) (although I myself prefer to write with code — this is better). This is where internal events are assigned. About setDocument() I have already said. And the supportsFullscreen() and supportsMaximizing() methods manage the corresponding features in Zetes. For example, a window that returns false on supportsFullscreen() will not have a deployment button with arrows on OS X, and will also not create a menu item "Fullscreen" on any platform.5.2.4. ImageViewWindowsManager

This class deals with window management. He creates and destroys them.
ImageViewWindowsManager.java
package tinyviewer; import java.io.IOException; import org.eclipse.swt.dnd.DropTargetAdapter; import org.eclipse.swt.dnd.DropTargetEvent; import org.eclipse.swt.dnd.FileTransfer; import zetes.wings.base.ViewWindowsManagerBase; public class ImageViewWindowsManager extends ViewWindowsManagerBase<ImageDocument, ImageViewWindow> { private DropTargetAdapter viewWindowDropTargetAdapter = new DropTargetAdapter() { public void drop(DropTargetEvent event) { String fileList[] = null; FileTransfer ft = FileTransfer.getInstance(); if (ft.isSupportedType(event.currentDataType)) { fileList = (String[]) event.data; for (int i = 0; i < fileList.length; i++) { ImageDocument document; try { document = new ImageDocument(fileList[i]); openWindowForDocument(document); } catch (IOException e) { e.printStackTrace(); } } } } }; @Override protected ImageViewWindow createViewWindow() { ImageViewWindow vw = new ImageViewWindow(); vw.addDropTargetListener(viewWindowDropTargetAdapter); return vw; } public DropTargetAdapter getViewWindowDropTargetAdapter() { return viewWindowDropTargetAdapter; } } It inherits from the
ViewWindowsManagerBase generic class, which is associated with both the ImageViewWindow window class and the ImageDocument document ImageDocument .In our case, windows are managed in a completely standard way. The only thing we added was the assignment of a listener for
DropTarget in the picture window (remember, did we refer to this in the last section?). Here we have defined the createViewWindow() factory createViewWindow() in such a way that when creating a new window, a Drag-n-drop handler is immediately attached to it.5.2.5. TinyViewerMenuConstructor
This class manages the main menu of the application. All responsibility for the menu (both global in OS X, and window in other platforms) lies on it. Therefore, when using Zetes, direct management of menu classes via SWT is highly undesirable . Of course, here, alas, there is a leaky abstraction, but since it is impossible to completely encapsulate SWT for a number of obvious reasons, at least at this stage in the development of our library, we have to put up with it.
TinyViewerMenuConstructor.java
package tinyviewer; import zetes.wings.HotKey; import zetes.wings.base.MenuConstructorBase; import zetes.wings.actions.Action; import zetes.wings.actions.Handler; public class TinyViewerMenuConstructor extends MenuConstructorBase<ImageViewWindow> { private Handler<ImageViewWindow> fileOpenHandler; private Action<ImageViewWindow> openAction; public TinyViewerMenuConstructor(ImageViewWindowsManager viewWindowsManager) { super(viewWindowsManager); openAction = new Action<>("&Open"); openAction.setHotKey(new HotKey(HotKey.MOD1, 'O')); getFileActionCategory().addFirstItem(openAction); } public Handler<ImageViewWindow> getFileOpenHandler() { return fileOpenHandler; } public void setFileOpenHandler(Handler<ImageViewWindow> fileOpenHandler) { this.fileOpenHandler = fileOpenHandler; if (openAction.getHandlers().get(null) == null) { openAction.getHandlers().put(null, fileOpenHandler); } } } This class is associated only with the window and with the window manager (with the second through the constructor). Since, in fact, the view in our ideology is the window itself, and the menu is only an auxiliary interface element, completely controlled by the active view, it is the view that must perform any manipulations on the data (that is, the document). That is, if we need to add, say, the “Copy” command, then our window should have, for example, the
actionCopy function, which the menu handler should call. That is, once again: the menu itself does nothing, it always asks for it either a window or a window manager (in our case, ImageViewWindowsManager ) .Read more about the menu structure in ZetesWings
Here you need to say a few words about how the menus are organized in ZetesWings. The main pillar is the
The priority is this. When the user selects a menu item, the handler for the window is first searched. If not, then the global handler is searched.
If there are no both handlers, then the menu item is simply hidden (for example, in a window that does not contain editing elements, the Copy command is meaningless, just as it is meaningless when there are no windows, unlike, say, Open). In this case, the "handler" (that is, the object of the
Action class. This class implements the menu item. It consists of a title (“title”), a hot key combination (“hotKey”) and handlers (“handlers”), the latter being assigned as Map , where the keys are ViewWindow . The bottom line is simple. When a window is created, it adds its handlers to those actions that interest it. In addition, there is one handler that is not associated with any window (with the null key). This handler is called when there is no active window (in OS X it is possible that there is a menu and no windows).The priority is this. When the user selects a menu item, the handler for the window is first searched. If not, then the global handler is searched.
If there are no both handlers, then the menu item is simply hidden (for example, in a window that does not contain editing elements, the Copy command is meaningless, just as it is meaningless when there are no windows, unlike, say, Open). In this case, the "handler" (that is, the object of the
Handler class) is not just a listener. It contains options such as isEnabled() , isVisible() , isChecked() . In addition, it is able to overlap the action header with its own (for the case of a context-sensitive header). In this case, it has its own getTitle() .When creating a
TinyViewerMenuConstructor creates Action objects for the main menu. In our case, there is only one non-standard element - “Open”. We create it and assign it a HotKey(HotKey.MOD1, 'O') hot key HotKey(HotKey.MOD1, 'O') . MOD1 is such a modifier, which under OS X corresponds to the Command key, and under other platforms, Control. Users of both traditions know that most hotkeys with Ctrl in Windows are pressed in Cmd in OS X.5.2.6. TinyViewerApplication

The last (and main) in our hierarchy is the
TinyViewerApplication application TinyViewerApplication . It is associated with all the classes listed above. Plus, it is associated with the heir of AboutBox (in our case, DefaultAboutBox ), which implements the “About Application” window.TinyViewerApplication.java
package tinyviewer; import java.io.IOException; import java.util.ArrayList; import org.eclipse.swt.SWT; import org.eclipse.swt.graphics.Point; import org.eclipse.swt.widgets.Display; import org.eclipse.swt.widgets.FileDialog; import org.eclipse.swt.widgets.Shell; import zetes.wings.base.ApplicationBase; import zetes.wings.DefaultAboutBox; import zetes.wings.actions.Handler; public class TinyViewerApplication extends ApplicationBase<DefaultAboutBox, ImageDocument, ImageViewWindow, TinyViewerMenuConstructor, ImageViewWindowsManager> { @Override public String getTitle() { return "Tiny Viewer"; } @Override public DefaultAboutBox createAboutBox(ImageViewWindow window) { DefaultAboutBox res = new DefaultAboutBox(window); res.setApplicationName(getTitle()); res.setIconResourceName("/tinyviewer/wingphotos64.png"); res.setDescriptionText("A simple image file viewer.\nThis application shows the power of Avian + SWT"); res.setCopyrightText("Copyright \u00a9 2013, Ilya Mizus"); res.setWindowSize(new Point(370, 180)); return res; } @Override public ImageDocument loadFromFile(String fileName) { try { return new ImageDocument(fileName); } catch (IOException e) { e.printStackTrace(); return null; } } private Handler<ImageViewWindow> fileOpenHandler = new Handler<ImageViewWindow>() { @Override public void execute(ImageViewWindow window) { Shell dummyShell = new Shell(Display.getDefault()); FileDialog fileDialog = new FileDialog(dummyShell, SWT.OPEN | SWT.MULTI); fileDialog.setText("Open image"); fileDialog.setFilterNames(new String[] { "Image (*.png; *.bmp; *.jpg; *.jpeg)", "All files" }); fileDialog.setFilterExtensions(new String[] { "*.png; *.bmp; *.jpg; *.jpeg", "*.*" }); String firstFile = fileDialog.open(); if (firstFile != null) { String[] names = fileDialog.getFileNames(); ArrayList<ImageDocument> documents = new ArrayList<ImageDocument>(); // Creating documents for files for (int i = 0; i < names.length; i++) { String fileName = fileDialog.getFilterPath() + "/" + names[i]; try { documents.add(new ImageDocument(fileName)); } catch (IOException e) { // TODO Show a message box here e.printStackTrace(); } } getViewWindowsManager().openWindowsForDocuments(documents.toArray(new ImageDocument[] {})); } dummyShell.dispose(); } }; public TinyViewerApplication() { } @Override public ImageViewWindowsManager createViewWindowsManager() { return new ImageViewWindowsManager(); } @Override public TinyViewerMenuConstructor createMenuConstructor(ImageViewWindowsManager viewWindowsManager) { TinyViewerMenuConstructor menuConstructor = new TinyViewerMenuConstructor(viewWindowsManager); menuConstructor.setFileOpenHandler(fileOpenHandler); return menuConstructor; } @Override public boolean needsAtLeastOneView() { return false; } public static void main(String... args) { new TinyViewerApplication().run(args); } } This class is responsible for loading documents. In our application, it is this object
fileOpenHandlerthat contains the object , which is the global handler of the “Open” menu item. In addition, it contains several factory methods for our “global” objects (menu constructor, window manager and “about program” window). It also announced an interesting method needsAtLeastOneView(), which can be a little different.Read more about needsAtLeastOneView ()
, Windows Linux . — , , . OS X — , . — . , .
ZetesWings.
OS X , / (, ).
ZetesWings.
needsAtLeastOneView() false , OS X .OS X , / (, ).
needsAtLeastOneView() , true . , . , OS X , .At this point, our review of the source code of this project can be considered complete.
5.3. Auxiliary files and resources
We are left with only some additional files, without which the project can not do. These files - resource files - are located in 4 folders:
src/res—src/java— Java Java-. 3 SWT :shell.setImages(new Image[] { SWTResourceManager.getImage(ImageViewWindow.class, "/tinyviewer/wingphotos16.png"), SWTResourceManager.getImage(ImageViewWindow.class, "/tinyviewer/wingphotos64.png"), SWTResourceManager.getImage(ImageViewWindow.class, "/tinyviewer/wingphotos512.png") });win-res— , Windows EXE. , ,win.rcwin.rcMainIcon ICON "win-res/wingphotos.ico" 1 VERSIONINFO FILEVERSION 0,1,0,0 PRODUCTVERSION 0,1,0,0 BEGIN BLOCK "StringFileInfo" BEGIN BLOCK "040904E4" BEGIN VALUE "CompanyName", "bigfatbrowncat\0" VALUE "FileDescription", "A tiny multi document photo viewer app" VALUE "FileVersion", "0.1\0" VALUE "InternalName", "TinyViewer\0" VALUE "LegalCopyright", "Ilya Mizus\0" VALUE "OriginalFilename", "tinyviewer.exe\0" VALUE "ProductName", "TinyViewer\0" VALUE "ProductVersion", "0.1\0" END END BLOCK "VarFileInfo" BEGIN VALUE "Translation", 0x409, 1251 END ENDosx-bundle— .app, OS X «application bundle» . bundleresources- files placed in this folder under all systems, except OS X, will be copied to the application folder. Under OS X, they will be placed in the Resources folder located inside the bundle. These files are available from the application as resources through the classWinLinMacApi. In this project, this folder is missing, but it is present in other projects from among zetes-examples .
5.4. Build and Run
This application can be compiled with both the Android classpath and the Avian classpath. The assembly instructions are located in the same place as the source code, in the zetes-examples project . If someone has problems - ask questions, I will answer with pleasure.
6. Conclusion
First of all, I want to sincerely thank all those who have had the patience (and who have enough interest) to finish reading this place. I am very glad that this topic is interesting not only for me. The more of you, the more I have of enthusiasm.
In addition, I, of course, can not fail to note that, although this version of the framework is very stable and, probably, can even be used with some caution to create simple applications, much of it will be processed and changed. I myself will try in the near future to create on its basis something more useful than a few example projects.
Any suggestions / advice / critical comments are accepted and will definitely be considered.
7. References
- Zetes library page on github
- Page with the collected release of zetes 0.1
- Zetes-examples demo projects page on GitHub
- Page with the collected release of zetes-examples 0.1
Finally, I would like to thank once again my friend and colleague JustAMan , without the help and moral support of which neither this work nor this article, I think, would never have been completed. In addition, I want to say a huge thank you to my beloved wife, who not only allows me to do any nonsense at my computer in the evenings, but even checks my articles and puts commas correctly forgotten by me.
Anyone who is not indifferent to this topic and who is interested in its development, please put asterisks to my githage projects zetes and zetes-examplesso I can see the interest of the community. Since the project is non-commercial and develops exclusively on my enthusiasm, I like vitally. Of course, if anyone has a desire to make a contribution to the code, I will be glad!
Thanks for attention!
Source: https://habr.com/ru/post/225187/
All Articles