We start doing RESTful web services on WCF and Nelibur
WCF is a really powerful thing, but time after time for new projects we have to create new, similar to each other web services. In this article (translation) we will see how to create a reusable RESTful message based web service using Nelibur . Nelibur is a pure WCF Message based web service framework. Let's take a look at how to start creating web services on WCF using Nelibur.
For simplicity, the WCF service will be hosted by the console application. So just add a new console project.

The easiest way to install Nelibur is to use the NuGet package manager .
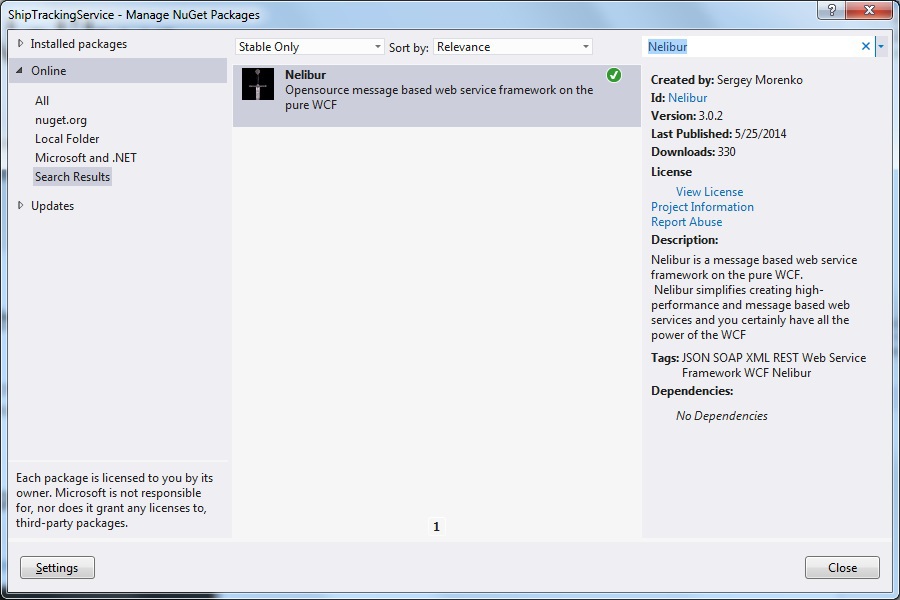
You can do the same with the Package Manager Console

')
Now we are ready to create a RESTful WCF message based service.
For example, let's take the following requirements for the WCF service:
Nelibur already contains the implementation we need: JsonServicePerCall .
So, we add the launch code of our service.
Registering configuration
Our service should be able to:
Create an
The result of the command should be the
Add the
Now we need to make a command and request handler.
We connect command and request with the processor
That's all, the service is over. As you noticed, you can add any operations without changing the WCF service ...
As a client you can use:
Adding a new ship (using a POST request):
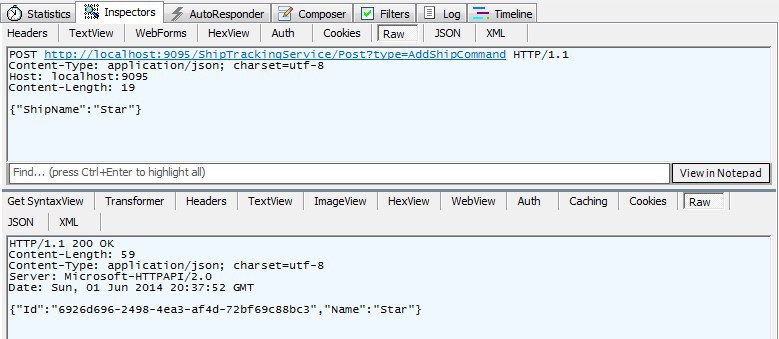
Ship receipt by ShipId (using GET request):

To create your client, add another console application.
Here is the client code:
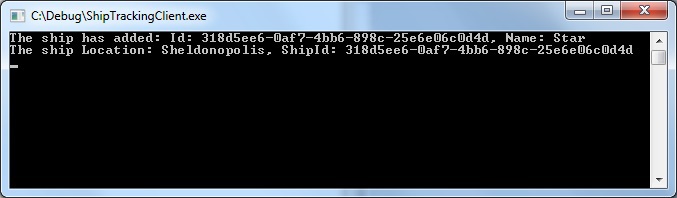
We start our client and see the result of the execution:
On the service side

Client side
I hope you enjoyed it. Thanks for reading the article (translation).
Sources can be downloaded from the original .
While reading the article I recommend to pay attention to the code of the bundle of requests and handlers:
Adding a new functional to the service will be reduced to creating a request class \ command, a handler class, and their bindings. Easily and naturally organized and used dear to the heart CQRS. Nelibur allows you to organize this miracle with minimal labor costs. And if you show a little wit, then a bunch of requests \ commands and handlers can be done automatically and then the magic will be complete :)
Step 1. Create an application
For simplicity, the WCF service will be hosted by the console application. So just add a new console project.
Step 2. Install Nelibur
The easiest way to install Nelibur is to use the NuGet package manager .
You can do the same with the Package Manager Console
')
Now we are ready to create a RESTful WCF message based service.
Step 3. Create a WCF service
For example, let's take the following requirements for the WCF service:
- InstanceContextMode must be
PerCall ResponseFormatmust beJson
Nelibur already contains the implementation we need: JsonServicePerCall .
So, we add the launch code of our service.
internal class Program { private static WebServiceHost _service; private static void Main() { _service = new WebServiceHost(typeof(JsonServicePerCall)); _service.Open(); Console.WriteLine("ShipTrackingService is running"); Console.WriteLine("Press any key to exit\n"); Console.ReadKey(); _service.Close(); } } Registering configuration
<system.serviceModel> <services> <service name="Nelibur.ServiceModel.Services.Default.JsonServicePerCall"> <host> <baseAddresses> <add baseAddress="http://localhost:9095/ShipTrackingService" /> </baseAddresses> </host> <endpoint binding="webHttpBinding" contract="Nelibur.ServiceModel.Contracts.IJsonService" /> </service> </services> </system.serviceModel> We implement business logic
Our service should be able to:
- Add ship
- Receive ship by
ShipId
Create an
AddShipCommand public sealed class AddShipCommand { public string ShipName { get; set; } } The result of the command should be the
ShipInfo object ShipInfo public sealed class ShipInfo { public Guid Id { get; set; } public string Name { get; set; } } Add the
ShipLocationQuery query, the result of which should be the ShipLocation object public sealed class ShipLocationQuery { public Guid ShipId { get; set; } } public sealed class ShipLocation { public string Location { get; set; } public Guid ShipId { get; set; } } Now we need to make a command and request handler.
public sealed class ShipProcessor : IPost<AddShipCommand>, IGet<ShipLocationQuery> { private static readonly Dictionary<Guid, Ship> _ships = new Dictionary<Guid, Ship>(); public object Get(ShipLocationQuery request) { if (_ships.ContainsKey(request.ShipId)) { return new ShipLocation { Location = "Sheldonopolis", ShipId = request.ShipId }; } throw new WebFaultException(HttpStatusCode.BadRequest); } public object Post(AddShipCommand request) { var ship = new Ship(request.ShipName, Guid.NewGuid()); _ships[ship.Id] = ship; return new ShipInfo { Id = ship.Id, Name = ship.Name }; } } We connect command and request with the processor
internal class Program { private static WebServiceHost _service; private static void ConfigureService() { NeliburRestService.Configure(x => { x.Bind<AddShipCommand, ShipProcessor>(); x.Bind<ShipLocationQuery, ShipProcessor>(); }); } private static void Main() { ConfigureService(); _service = new WebServiceHost(typeof(JsonServicePerCall)); _service.Open(); Console.WriteLine("ShipTrackingService is running"); Console.WriteLine("Press any key to exit\n"); Console.ReadKey(); _service.Close(); } } That's all, the service is over. As you noticed, you can add any operations without changing the WCF service ...
Client using our WCF service
As a client you can use:
- Feeddler
- Rest Console - Google chrome extension
- JsonServiceClient - client built into Nelibur
Feeddler
Adding a new ship (using a POST request):
Ship receipt by ShipId (using GET request):
JsonServiceClient
To create your client, add another console application.
Here is the client code:
internal class Program { private static void Main() { var client = new JsonServiceClient(Settings.Default.ServiceAddress); var shipInfo = client.Post<ShipInfo>(new AddShipCommand { ShipName = "Star" }); Console.WriteLine("The ship has added: {0}", shipInfo); var shipLocation = client.Get<ShipLocation>(new ShipLocationQuery { ShipId = shipInfo.Id }); Console.WriteLine("The ship {0}", shipLocation); Console.ReadKey(); } } We start our client and see the result of the execution:
On the service side
Client side
additional literature
- What is a message based web service?
- Advantages of message based web services
- Building RESTful Message Based Web Services on WCF
That's all
I hope you enjoyed it. Thanks for reading the article (translation).
Sources can be downloaded from the original .
From translator
While reading the article I recommend to pay attention to the code of the bundle of requests and handlers:
private static void ConfigureService() { NeliburRestService.Configure(x => { x.Bind<AddShipCommand, ShipProcessor>(); x.Bind<ShipLocationQuery, ShipProcessor>(); }); } Adding a new functional to the service will be reduced to creating a request class \ command, a handler class, and their bindings. Easily and naturally organized and used dear to the heart CQRS. Nelibur allows you to organize this miracle with minimal labor costs. And if you show a little wit, then a bunch of requests \ commands and handlers can be done automatically and then the magic will be complete :)
Source: https://habr.com/ru/post/225117/
All Articles