How to build WhatsApp for the day. Part 1
Hello, dear readers of Habrahabr!
In this series of articles, I'll tell you how to quickly and almost painlessly raise your own WhatsApp for iOS. I divide the article into two parts for your convenience:
')
- Creating a project, a simple UI, linking to an instant messaging service
- Make a beautiful UI, add video and audio calls, transfer photos and documents
Unfortunately, the manual on how to dial 400 million users and sell the service for 19 Instagram cards was lost somewhere on the bookshelf. I will try to find it if anyone is interested.
Interested please under the cat.
Project creation
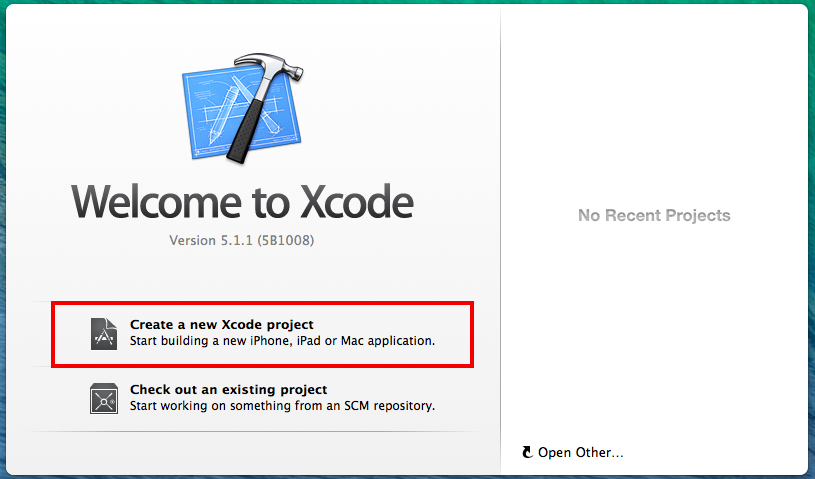
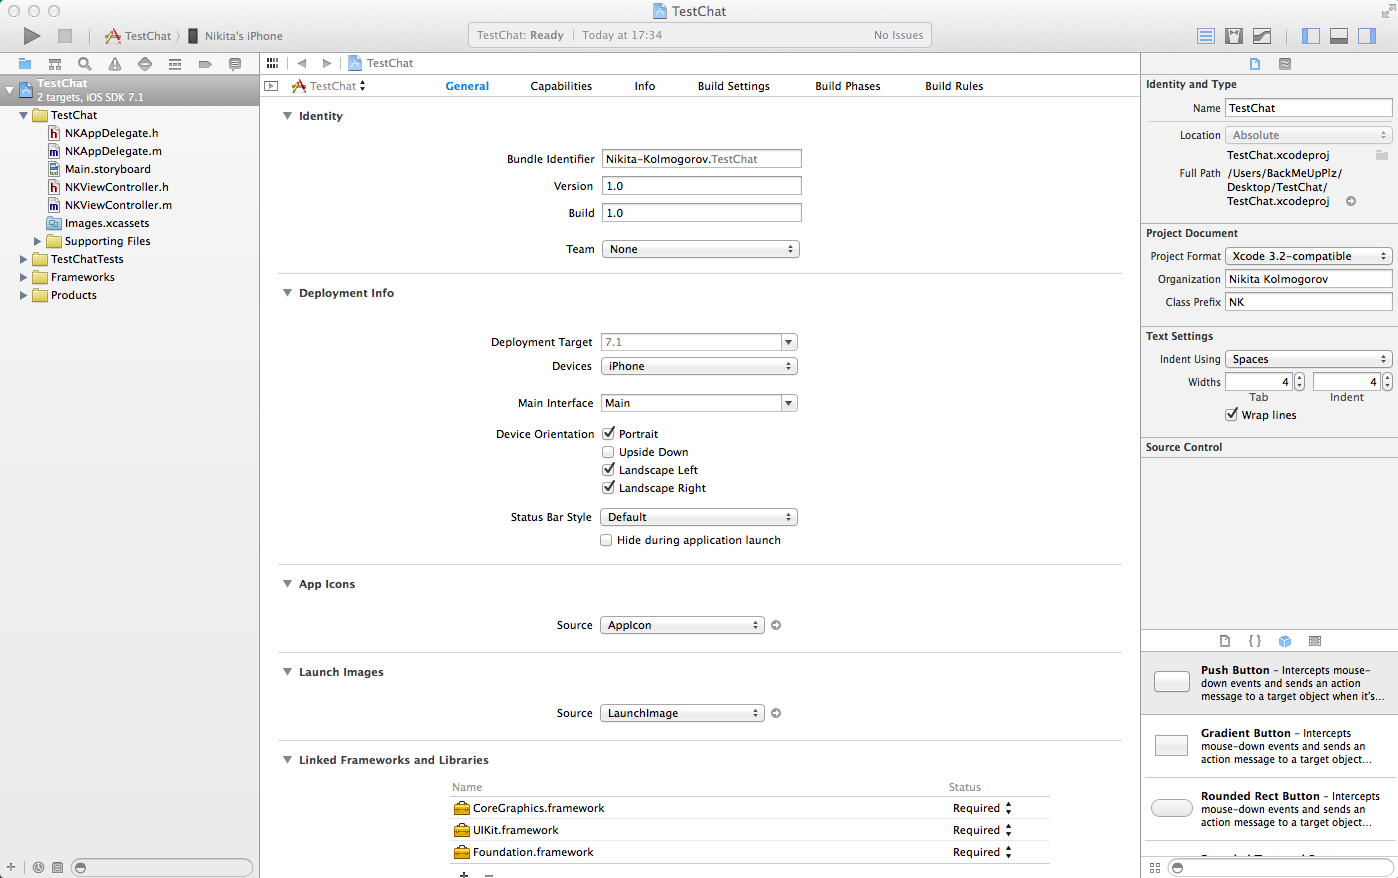
Open Xcode and create a new project.
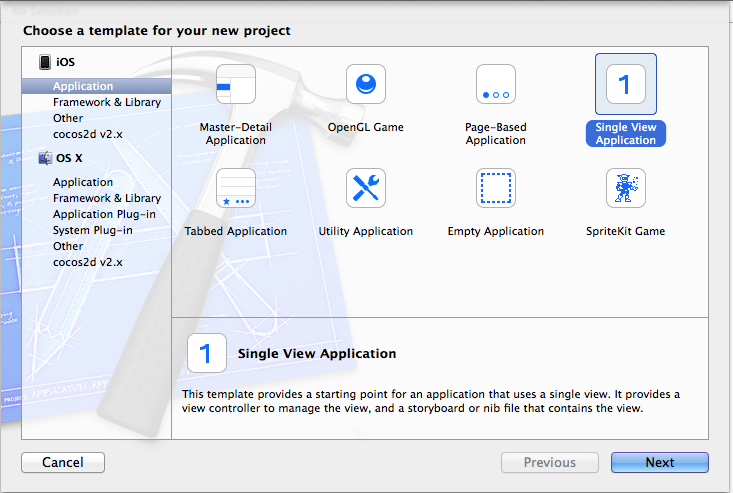
We take Single View Application for a basis.
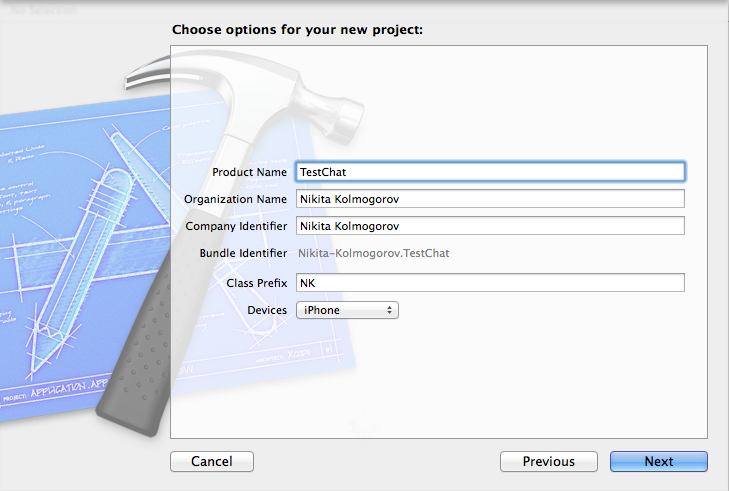
Enter all the data for the application and click "Next". I chose the least pretentious regalia.
And the project is ready.
But what is it? What a terrible sorting of files into groups! Let's fix it.
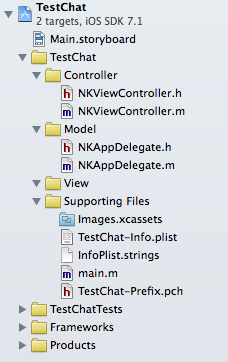
That's better! You can use your way of sorting files, but in this guide I will stick to the model above. By the way, the key combination for creating a new group is Command + Alt + N.
Simple UI
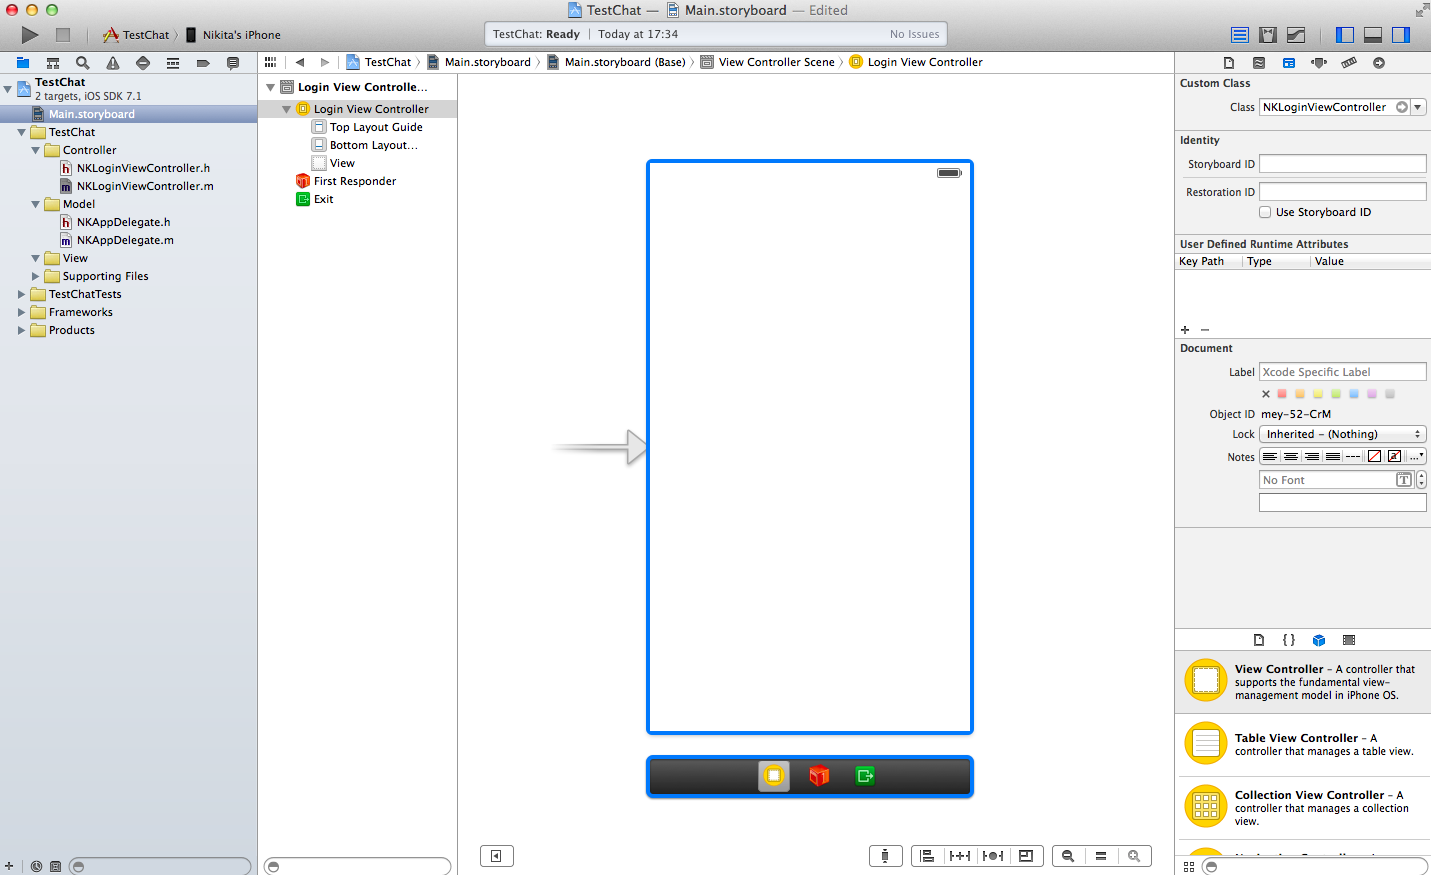
In the meantime, I allowed myself to create a new NKLoginViewController class and bind it to a UIViewController object in Interface Builder. This View Controller will be the first thing the user sees. This is logical - no chat without registration!
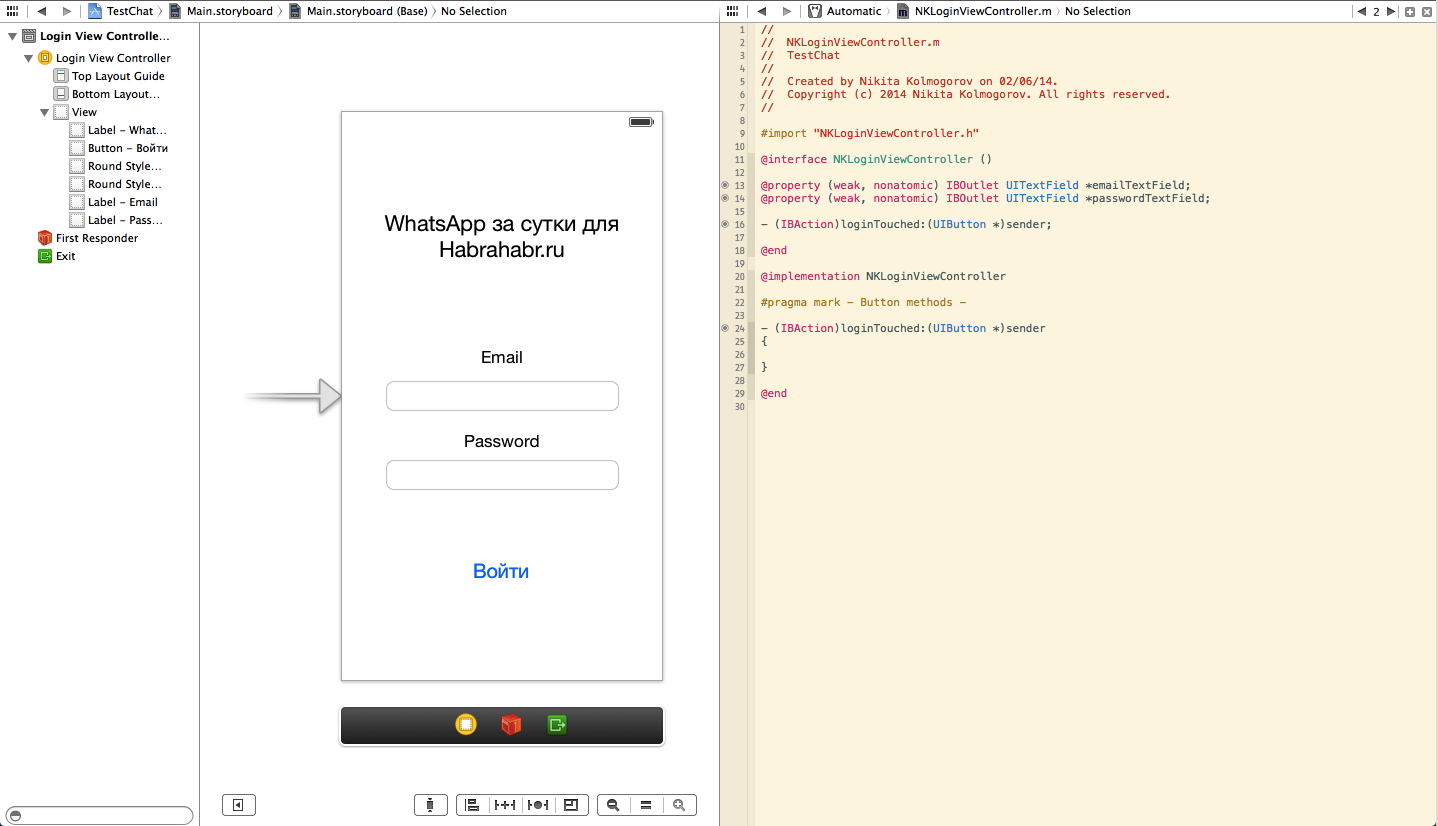
Continuing to have fun, I screwed the text fields, like Outlet, and the Action of the "Login" button to our NKLoginViewController. I think this is a good way to screw IB objects in .m files so that they are inaccessible from the outside. Moreover, I like when the code is divided into "Pragmas".
We create one more controller (both representation in IB, and a new class) - the list of chats. We use the standard code UITableViewController - we don’t need any supernatural functionality here, for now.
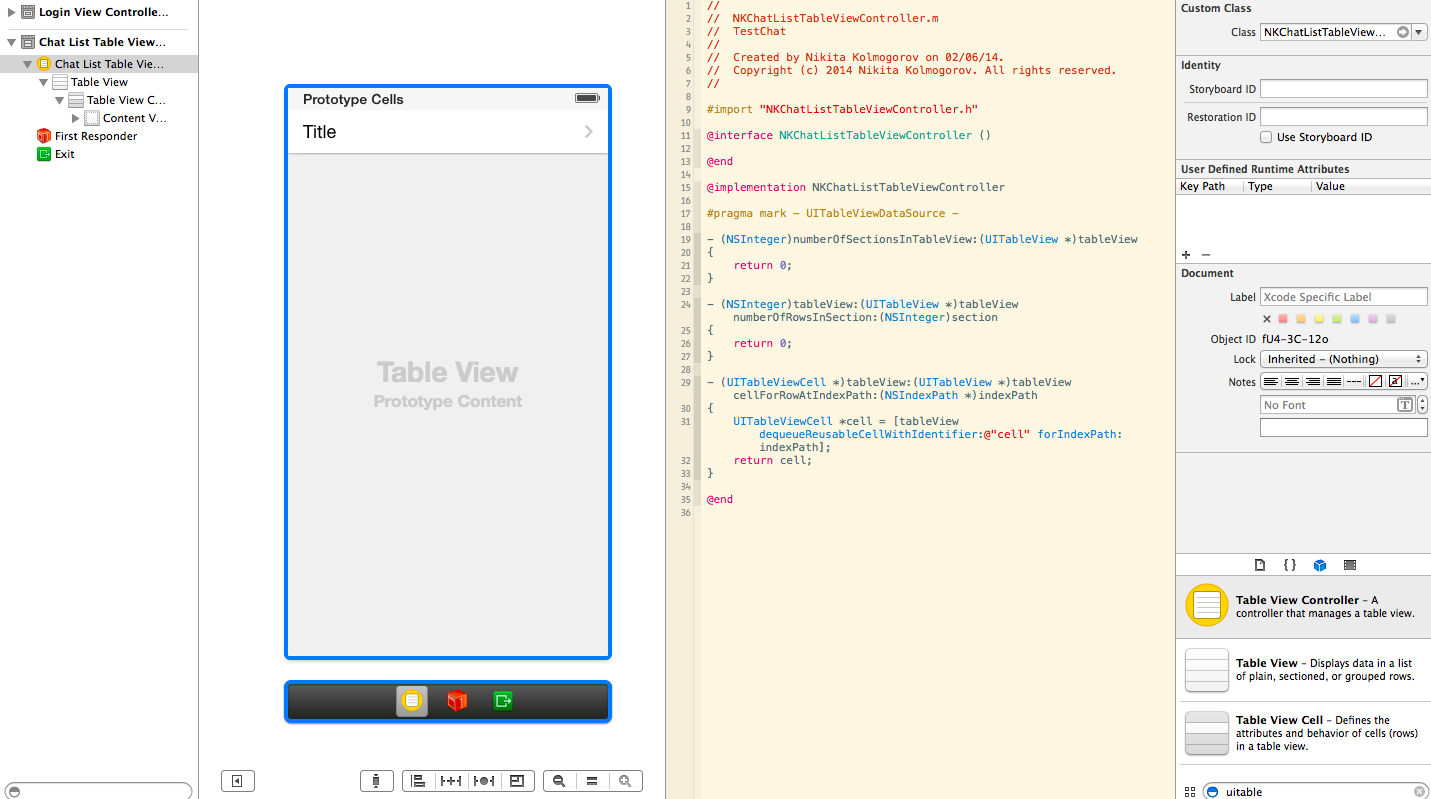
Slightly change the NKChatListTableViewController.m code so that at least something is displayed in the table:
Push me!
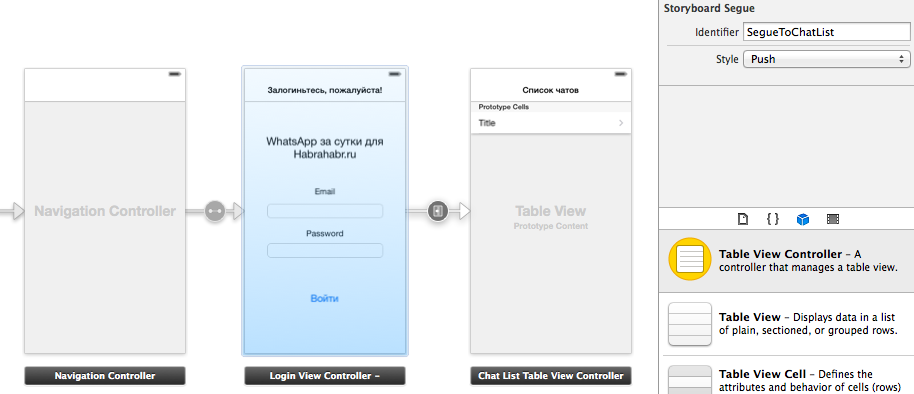
- (NSInteger)tableView:(UITableView *)tableView numberOfRowsInSection:(NSInteger)section { return 20; } - (UITableViewCell *)tableView:(UITableView *)tableView cellForRowAtIndexPath:(NSIndexPath *)indexPath { UITableViewCell *cell = [tableView dequeueReusableCellWithIdentifier:@"cell" forIndexPath:indexPath]; cell.textLabel.text = @"Vasiliy Pupkin"; return cell; } Now we will think over navigation. The whole application will be built into one UINavigationController and the controllers will be “push” and “hit” depending on the situation. Let's build the same application in UINavigationController! Let the magic time begin!

Add controller names and Segue from Login View Controller to Chat List Table View Controller. Let's call it "SegueToChatList". This is what our application looks like now.
Slightly work on the Login View Controller code. We give the user the opportunity to remove the keyboard. To do this, we will make the controller a delegate of text fields.
And we correct the controller code as follows:
NKLoginViewController.h
#import <UIKit/UIKit.h> // @interface NKLoginViewController : UIViewController <UITextFieldDelegate> @end NKLoginViewController.m
#import "NKLoginViewController.h" @interface NKLoginViewController () @property (weak, nonatomic) IBOutlet UITextField *emailTextField; @property (weak, nonatomic) IBOutlet UITextField *passwordTextField; - (IBAction)loginTouched:(UIButton *)sender; @end @implementation NKLoginViewController #pragma mark - UITextFieldDelegate - // , "Done" - (BOOL)textFieldShouldReturn:(UITextField *)textField { [textField resignFirstResponder]; return YES; } #pragma mark - Button methods - // "". - (IBAction)loginTouched:(UIButton *)sender { [self performSegueWithIdentifier:@"SegueToChatList" sender:self]; } For the time being, we will move all elements on the login controller up - this is a simple UI. How interactively to move elements of the interface up at emergence of the keyboard, I will tell in the following part.
Our application can already poke!

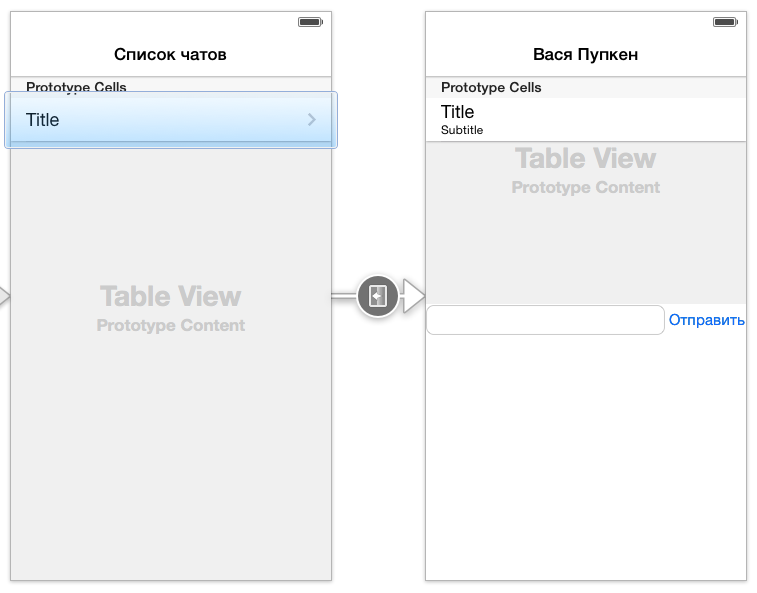
Create a third - and last - controller. We will get into it by clicking on the cell of the previous controller. The controller itself consists of a UITableView, the data source of which is assigned to the controller, the text field and the "Send" button. I guess this screen is intuitive.
The NKChatViewController.m code is below:
Push me!
#import "NKChatViewController.h" @interface NKChatViewController () @property (weak, nonatomic) IBOutlet UITableView *tableView; @property (weak, nonatomic) IBOutlet UITextField *messageTextField; - (IBAction)sendTouched:(UIButton *)sender; @end @implementation NKChatViewController #pragma mark - View Controller life cycle - - (void)viewDidAppear:(BOOL)animated { [super viewDidAppear:animated]; // , [_messageTextField becomeFirstResponder]; } #pragma mark - UITableViewDataSource - - (NSInteger)tableView:(UITableView *)tableView numberOfRowsInSection:(NSInteger)section { return 20; } - (UITableViewCell *)tableView:(UITableView *)tableView cellForRowAtIndexPath:(NSIndexPath *)indexPath { UITableViewCell *cell = [tableView dequeueReusableCellWithIdentifier:@"cell"]; cell.textLabel.text = @" "; cell.detailTextLabel.text = @", ?"; return cell; } #pragma mark - Button methods - - (IBAction)sendTouched:(UIButton *)sender { } @end A simple UI for our messenger is ready. Getting to the most interesting - filling the application!
Binding to an instant messaging service
C2Call will be our instant messaging service. Of course, no one bothers you to write your server part, but it may take a little more than 24 hours.
All you need to do is register on c2call.com and buy a account for $ 100. Unfortunately, in the free version, registration via the low-language API does not work. Perhaps something will change at the time you read this article. However, instead of a monthly payment, C2Call charged me $ 100 and seemed to have forgotten about me. More money is not written off. I do not urge you to either buy a product or try your luck with a monthly subscription. I guess I was just lucky.
After registering, purchasing the account and registering the application on the service, this is a rather trivial task - download the SDK. The archive has a couple of examples of how to build applications. We will need the following two objects:
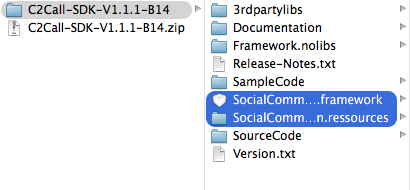
We transfer them to our project.

Add the following frameworks and libraries to the project:
Horrific list of frameworks and libraries
AVFoundation.framework
Accounts.framework
AdSupport.framework
AddressBook.framework
AddressBookUI.framework
AssetsLibrary.framework
AudioToolbox.framework
CFNetwork.framework
CoreAudio.framework
CoreData.framework
CoreFoundation.framework
CoreLocation.framework
CoreMedia.framework
CoreTelephony.framework
CoreText.framework
CoreVideo.framework
MapKit.framework
MediaPlayer.framework
MessageUI.framework
MobileCoreServices.framework
OpenGLES.framework
QuartzCore.framework
QuickLook.framework
Security.framework
StoreKit.framework
SystemConfiguration.framework
iAd.framework
libsqlite3.dylib
libz.dylib
And write the following in Build Settings:
HEADER_SEARCH_PATHS = / usr / include / libxml2
OTHER_LDFLAGS = -lxml2 -lstdc ++
ARCHS = armv7
VALID_ARCHS = armv7
Now let's change the App Delegate a bit:
NKAppDelegate.h
#import <UIKit/UIKit.h> #import <SocialCommunication/SocialCommunication.h> @interface NKAppDelegate : C2CallAppDelegate <UIApplicationDelegate> @property (strong, nonatomic) UIWindow *window; @end NKAppDelegate.m
@implementation NKAppDelegate - (BOOL)application:(UIApplication *)application didFinishLaunchingWithOptions:(NSDictionary *)launchOptions { self.affiliateid = @"6B9DF5671444320162B"; self.secret = @"2fd9cd18aa4d957a4030c0455101646d"; return [super application:application didFinishLaunchingWithOptions:launchOptions]; } @end We added the element from C2Call and told him about our data. You can view your Affiliate ID and Secret in the admin panel of the service.
Finished with setting up the framework, it's time to use it.
Create a subclass of NSObject called NKChat, in which we encapsulate all the chat logic. I think it would be right to give you a rough listing of the NKChat.m code, and then explain it.
NKChat.m
#import "NKChat.h" #import <SocialCommunication/SocialCommunication.h> @implementation NKChat #pragma mark - Singleton pattern - // 1 + (instancetype)sharedManager { static NKChat *sharedChat = nil; static dispatch_once_t onceToken; dispatch_once(&onceToken, ^{ sharedChat = [self new]; }); return sharedChat; } #pragma mark - Accessors - // 2 - (NSArray *)chatHistory { return [self fetchChatHistory]; } #pragma mark - General methods - // 3 - (void)login:(NSString *)email password:(NSString *)password success:(void(^)())successBlock failure:(void(^)())failureBlock { NSDictionary *dictionary = @{@"EMail":email, @"Password":password}; [[C2CallPhone currentPhone] registerUser:dictionary withCompletionHandler:^(BOOL success, NSString *result) { if (success) { [[C2CallPhone currentPhone] startC2CallPhone]; successBlock(); } else { failureBlock(); } }]; } // 4 - (void)logout { [(C2CallAppDelegate *)[UIApplication sharedApplication].delegate logoutUser]; } // 5 - (void)sendMessage:(NSString *)message toUser:(NSString *)userId { [[C2CallPhone currentPhone] submitMessage:message toUser:userId]; } // 6 - (NSArray *)fetchChatHistory { // Managed Object NSFetchRequest *request = [[SCDataManager instance] fetchRequestForChatHistory:YES]; NSFetchedResultsController *controller = [[SCDataManager instance] fetchedResultsControllerWithFetchRequest:request sectionNameKeyPath:nil cacheName:nil]; NSError *error; [controller performFetch:&error]; // NSMutableArray *result = [NSMutableArray array]; for (NSManagedObject *chat in controller.fetchedObjects) { // NSArray *chatKeys = @[@"contact", @"lastTimestamp", @"missedEvents"]; NSMutableDictionary *inChat = [[chat dictionaryWithValuesForKeys:chatKeys] mutableCopy]; // NSMutableDictionary *dublicate = nil; for (NSMutableDictionary *dict in result) { if ([dict[@"contact"] isEqualToString:inChat[@"contact"]]) { dublicate = dict; break; } } // NSMutableArray *messages = (dublicate) ? dublicate[@"messages"] : [NSMutableArray array]; for (NSManagedObject *chatEvent in [chat valueForKey:@"chatHistory"]) { NSArray *chatEventKeys = [[[chatEvent entity] attributesByName] allKeys]; NSMutableDictionary *inChatEvent = [[chatEvent dictionaryWithValuesForKeys:chatEventKeys] mutableCopy]; // NSLog(@"%@",inChatEvent); inChatEvent[@"ManagedObject"] = chatEvent; [messages addObject:inChatEvent]; } [messages sortUsingDescriptors:@[[NSSortDescriptor sortDescriptorWithKey:@"timevalue" ascending:YES]]]; if (dublicate) { dublicate[@"messages"] = messages; [dublicate[@"ManagedObjects"] addObject:chat]; dublicate[@"missedEvents"] = @([dublicate[@"missedEvents"] intValue] + [inChat[@"missedEvents"] intValue]); if (!dublicate[@"name"]) dublicate[@"name"] = inChat[@"name"]; } else { inChat[@"messages"] = messages; inChat[@"ManagedObjects"] = [NSMutableArray arrayWithObject:chat]; } // if (!dublicate) [result addObject:inChat]; } // [result sortUsingDescriptors:@[[NSSortDescriptor sortDescriptorWithKey:@"lastTimestamp" ascending:NO]]]; // return [result copy]; } @end Let's go in order:
- Standard template - Singleton. Nothing unusual for you should be here. We have one object that is responsible for the chat - no longer needed.
- An accessor method that returns an array of chat history in the form we need.
- Method for registration and login. The C2Call feature is that when you log in with the same data for the first time, you register. When you log in with the same data a second time, you simply log in. This method is once again unavailable for free subscribers, unfortunately. You can bypass this method by adding a native registration window from C2Call, in order to save.
- Method for logout. Cheap and angry.
- The method for sending a message is also quite simple.
- Terrible and monstrous method-tablecloth, which returns the chat history in the right format. Here are all the stones that can be encountered using C2Call. First, data is stored in Core Data. Secondly, the names of contacts are always different - then the id will come, then the name and surname. Thirdly, forget about this method for now. It works for this tutorial too :)
Well, when everything is ready for work, it's time to use the magic of the code!
Add to NKAppDelegate.m the initialization of NKChat, if you have not already done so.
NKAppDelegate.m
#import "NKAppDelegate.h" @implementation NKAppDelegate - (BOOL)application:(UIApplication *)application didFinishLaunchingWithOptions:(NSDictionary *)launchOptions { self.affiliateid = @"6B9DF5671444320162B"; self.secret = @"2fd9cd18aa4d957a4030c0455101646d"; [NKChat sharedManager]; return [super application:application didFinishLaunchingWithOptions:launchOptions]; } @end Now let's slightly change the loginTouched method of the NKLoginViewController class. Do not forget to import NKChat!
Push me!
- (IBAction)loginTouched:(UIButton *)sender { sender.enabled = NO; [[NKChat sharedManager] login:_emailTextField.text password:_passwordTextField.text success:^{ [self performSegueWithIdentifier:@"SegueToChatList" sender:self]; sender.enabled = YES; } failure:^{ sender.enabled = YES; }]; } Here we turned off the button until the response from the server is loaded, sent a request to the server, go to the new controller if successful, turn on the button, regardless of the result.
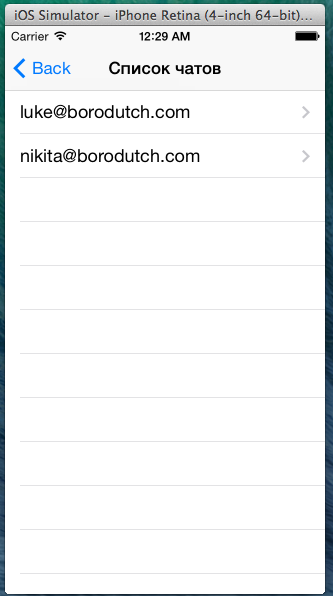
In this part of the tutorial, we will work with two accounts: nikita@borodutch.com and luke@borodutch.com. We will simply be able to send messages to these two contacts, temporarily.
Slightly modify NKChatListTableViewController.m so that you can only send messages to these two contacts.
Push me!
#import "NKChatListTableViewController.h" @interface NKChatListTableViewController () @end @implementation NKChatListTableViewController #pragma mark - UITableViewDataSource - - (NSInteger)tableView:(UITableView *)tableView numberOfRowsInSection:(NSInteger)section { return 2; } - (UITableViewCell *)tableView:(UITableView *)tableView cellForRowAtIndexPath:(NSIndexPath *)indexPath { UITableViewCell *cell = [tableView dequeueReusableCellWithIdentifier:@"cell" forIndexPath:indexPath]; cell.textLabel.text = (indexPath.row) ? @"nikita@borodutch.com" : @"luke@borodutch.com"; return cell; } @end The result of the manipulation:
Add a method to send information to the next controller in NKChatListTableViewController.m.
Push me!
- (void)prepareForSegue:(UIStoryboardSegue *)segue sender:(UITableViewCell *)sender { UIViewController *dest = segue.destinationViewController; dest.title = sender.textLabel.text; } It remains for us to only receive the desired chat history and send messages to the right contacts! Case in the hat, sir.
As in the good old days, I will give the listing of NKChatViewController.m along with explanations a little below.
Push me!
#import "NKChatViewController.h" #import <SocialCommunication/SocialCommunication.h> #import "NKChat.h" @interface NKChatViewController () @property (weak, nonatomic) IBOutlet UITableView *tableView; @property (weak, nonatomic) IBOutlet UITextField *messageTextField; - (IBAction)sendTouched:(UIButton *)sender; @end @implementation NKChatViewController { NSArray *tableData; } #pragma mark - View Controller life cycle - - (void)viewDidLoad { [super viewDidLoad]; // 1 tableData = [self getTableData]; } - (void)viewDidAppear:(BOOL)animated { [super viewDidAppear:animated]; // , [_messageTextField becomeFirstResponder]; // 2 [[NSNotificationCenter defaultCenter] addObserver:self selector:@selector(receivedMessage) name:@"kC2CallPhoneReceivedMessage" object:nil]; } #pragma mark - UITableViewDataSource - - (NSInteger)tableView:(UITableView *)tableView numberOfRowsInSection:(NSInteger)section { // 3 return tableData.count; } - (UITableViewCell *)tableView:(UITableView *)tableView cellForRowAtIndexPath:(NSIndexPath *)indexPath { // 4 UITableViewCell *cell = [tableView dequeueReusableCellWithIdentifier:@"cell"]; cell.textLabel.text = ([tableData[indexPath.row][@"eventType"] isEqualToString:@"MessageIn"]) ? self.title : @""; cell.detailTextLabel.text = tableData[indexPath.row][@"text"]; return cell; } #pragma mark - Button methods - - (IBAction)sendTouched:(UIButton *)sender { // 5 [[NKChat sharedManager] sendMessage:_messageTextField.text toUser:@"c45645f71465dcff18e"]; [self addMessage:_messageTextField.text]; _messageTextField.text = @""; } #pragma mark - General Methods - - (void)addMessage:(NSString *)message { // 6 NSMutableArray *mTableData = [tableData mutableCopy]; [mTableData addObject:@{@"text":message, @"eventType":@"MessageOut"}]; tableData = mTableData; [_tableView reloadData]; } - (void)receivedMessage { // 7 tableData = [self getTableData]; [_tableView reloadData]; } - (NSArray *)getTableData { // 8 for (NSDictionary *chat in [NKChat sharedManager].chatHistory) if ([chat[@"contact"] isEqualToString:self.title]) return chat[@"messages"]; return nil; } @end In order:
- As soon as the controller is loaded, we fill it with the necessary data.
- kC2CallPhoneReceivedMessage is the definition of the name of the notification that a new message has arrived; subscribe to this event
- We need as many cells as there are total messages in the history of this chat.
- Each cell is given the desired contact name and message
- Send a message using the method from NKChat; add a message to the controller's local data, because the message takes time to add to the C2Call history; clear the send field
- The method of adding a message to the controller's local data. I guess it is intuitive
- When you receive a message, you need to reload the history in the controller and force the table to update its data
- Just go through the entire history and return the history of the contact we need.
Here's what we got (big gif):
Conclusion
Thank you so much for reaching the end of the first part of this guide. Soon, as a couple of free days will appear, I will write the second part. The source code of the first part is here .
In the second part, we will solve some scrupulous questions on the UI, we will go around a couple of C2Call bugs (for example, the one that is visible on the last gif with receiving messages), add functionality to the application and add a couple of seals.
If you have any questions on the tutorial, feel free to ask them in the comments - I will answer all.
If you find any typos or inaccuracies in the article, please contact my haborcenter.
See you soon.
Source: https://habr.com/ru/post/225079/
All Articles