Practical application of Master Data Services in MS SQL Server 2012
In this article, I would like to share my first professional experience of using Master Data Services (MDS) in MS SQL Server 2012. Until recently, I was familiar with this product, which is part of MS SQL Server 2012 (Business Intelligence and Enterprise editions), only in theory, and was waiting for a successful case to test it in practice, and now such a case presented itself.

My client uses a BI solution based on Microsoft SQL Server 2012 Business Intelligence Edition. The center of this BI system is the Data Warehouse , which is filled with SSIS packages from transactional systems ( OLTP ). The data warehouse, in turn, serves as a source for the multidimensional data model. Based on the multidimensional data model, customer analysts form reports in Excel using Pivot Tables . Since there are a lot of data sources, and users of transactional systems manage reference books randomly, the customer identified the need for a solution that would allow creating hierarchies for certain dimensions in the data warehouse that would be convenient for analytical analysis purposes. So, for example, information about the organizational structure of a company stored in the “Divisions” dimension (table dbo.dimDivisions) imported from OLTP systems is convenient for operational reports generated in OLTP systems, but not suitable for analysis in the BI system. .
')
The formal requirements of a business customer can be briefly described as follows:
Based on the input data and business requirements, the customer was offered the following solution:
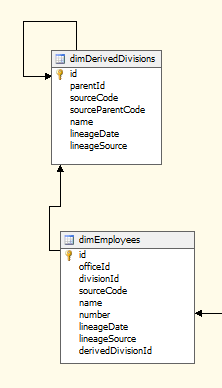
So, let's go in order. First, create a new dimension “Arbitrary divisions” (dbo.dimDerivedDivisions) in the data warehouse and link it to the dimension “Employees” (dbo.dimEmploees). The SQL script for this task looks like this:
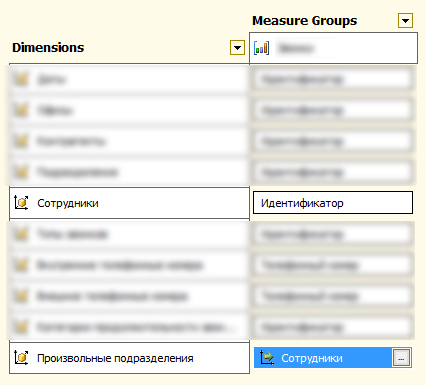
Now add a new dimension to the multidimensional data model. To do this, open the multidimensional data model project in SQL Server Data Tools and add a new dbo.dimDerivedDivisions table to the Data Source View. The result is as follows:
In order not to go far from the topic, I will briefly describe the process of finalizing the multidimensional model. In the multidimensional data model, we create a new dimension “Arbitrary Divisions”, set up a connection between the new dimension and the existing fact tables through the “Employees” dimension, deploy and process the cube:
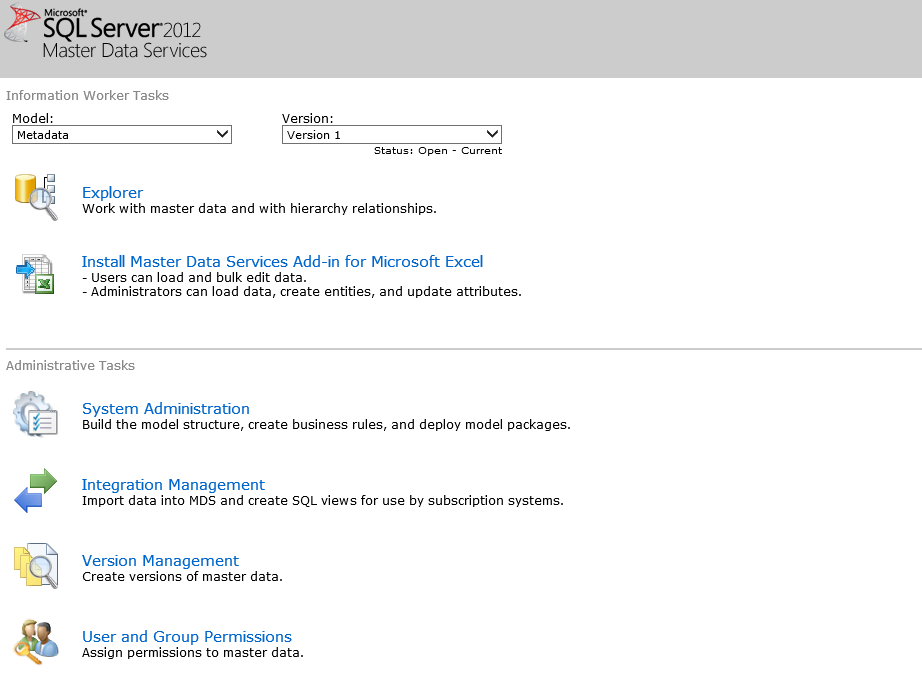
Now all the data structures for the preparation of analytical reports in the context of the new measurement “Arbitrary Measurements” are ready, we proceed to the most important thing - to configure Master Data Services. To do this, in the browser, click on the link that the SQL Server Administrator gave us and get into the MDS web interface, which looks like this:
I will not describe here the installation of Master Data Services, as this routine task is described in detail at msdn.microsoft.com . Focusing better on the actual practice of using MDS.
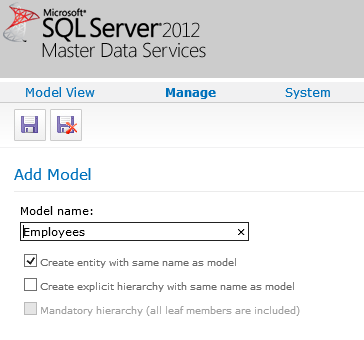
So the first thing we need to do is create a model. A model in MDS is a logical container that contains the essence of a particular business area. In our case, it is appropriate to create a model “Employees” containing the entities “Employees” and “Divisions”. To create a model, go to the Master Data Services web interface in Administrative Tasks by clicking on System Administration. In the window that opens, enter the model name Employees and click the Save model button:
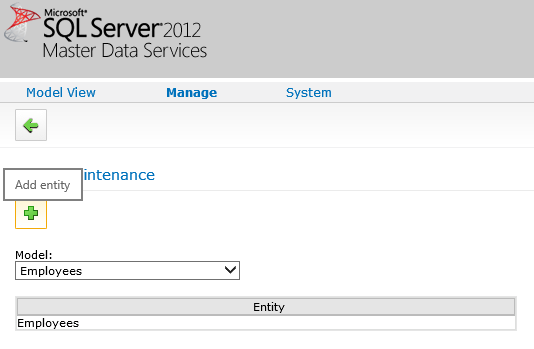
If the Create entity with the same name as model check box is selected, the Employees entity of the same name will be automatically created together with the model. Next, create another entity "Divisions" (Divisions), to do this, select the model Employees and go to the menu Manage - Entities:

Click on the Add entity button:
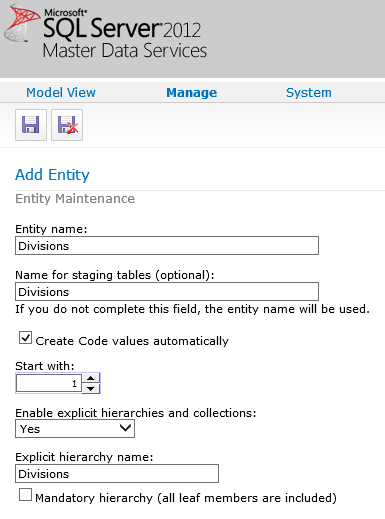
In the dialog that opens, fill in the parameters of the new entity and click the Save entity button. Notice that when creating the “Divisions” entity, the Enable explicit hierarchies and collections checkbox was selected (this means that the entity will be able to create a hierarchy), and below we specify the name of the Divisions hierarchy. Explicit Hierarchy is a hierarchy whose members can be organized in any way, i.e. at each hierarchy level there can be any any number of members and the following levels of nesting:
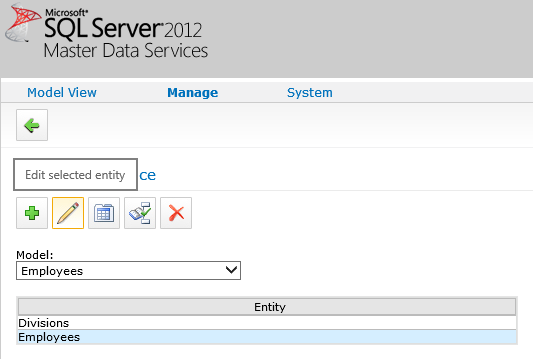
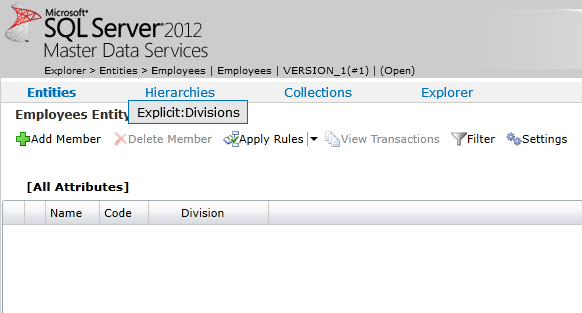
After the entities are created, you need to configure the attributes of the entities. For the entity “Employees” (Employees) add the attribute “Division” (Division). Select the Employees entity and click the Edit selected entity button:
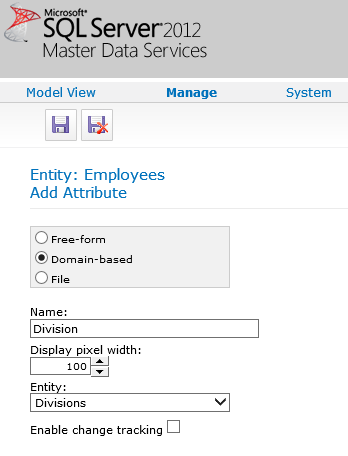
In the entity editing form that opens, click on the Add leaf attribute button in order to add the “Division” attribute of the final element of the “Employees” entity:

In the opened attribute addition form, fill in the attribute name and set the attribute type switch to the Domain-based position. This means that the values of this attribute will belong to a specific entity, and below we will indicate which one, in our case, this is the “Divisions” entity. At the end, click the Save attribute button:
So, the model “Employees” (Employees) and the entities “Employees” (Employees) and “Divisions” (Divisions) are ready, now you need to fill them with data. The essence of the "Divisions" (Divisions) users will fill out manually. To demonstrate this process, let's go to the home page of the Master Data Services web interface, in the Information Worker Tasks subsection, select the Employees model and follow the Explorer link:

Select the “Divisions” hierarchy:
Choose the type of items we want to manage. First, create several group elements (Consolidated Member):
Press the Add button, enter the name of the subdivision-group “Sales Department” and press the OK button:
Similarly, we will add other divisions and, thus, create a division structure, shown in the following figure:
Please note that bold units are group-units, and low-fat are finite elements. At one level of hierarchy can be both those and other types of elements.
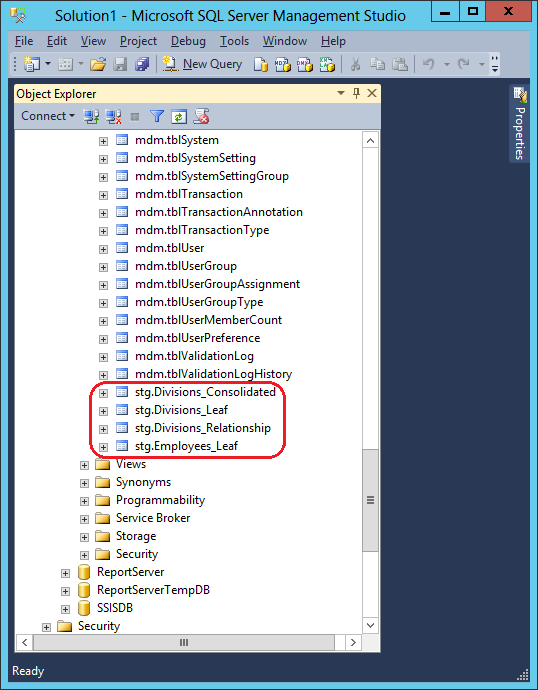
Now you need to import employee data into Master Data Servises from the existing data warehouse (for further comparison of employees and departments, and export this data back to the warehouse). There are special intermediate tables (Staging Tables) in which we can insert data with a SQL query or create a special SSIS package that will import new employee records from the repository to load data into MDS in the SQL database that provides Master Data Services. data into temporary tables for further processing in Master Data Servises. Open SSMS and find temporary tables in the Master Data Services database. Here they are:
As an example, import arbitrary 10 employee records from the data warehouse to the Master Data Services database staging table. To do this, run the following SQL query:
Let's return to the Master Data Services web-interface and on the main page we will follow the Intergation Management link:

In the window that opens, we see the Employe_Leaf_Batch00001 package, which was just created by a SQL query. Launch it by clicking on the Start Batches button:
After the package has been processed, we’ll see the following information about the status, start and end time, errors:
Now let's go into data management mode and see how the employee records are loaded from the staging table. To do this, go to the home page of the Master Data Services web interface, in the Information Worker Tasks subsection, select the Employees model and follow the Explorer link. In the window that opens, we see that new employee data has been added to Master Data Services and is in the Waiting to be validated state:
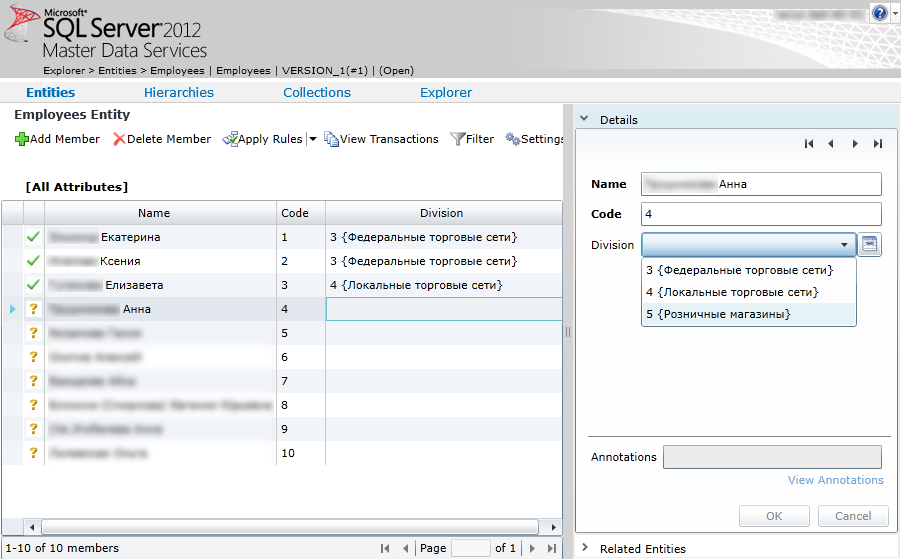
Please note that the information about the division (Division) of the staff is not filled. We need for each employee to select the unit in which he works and click on the OK button:
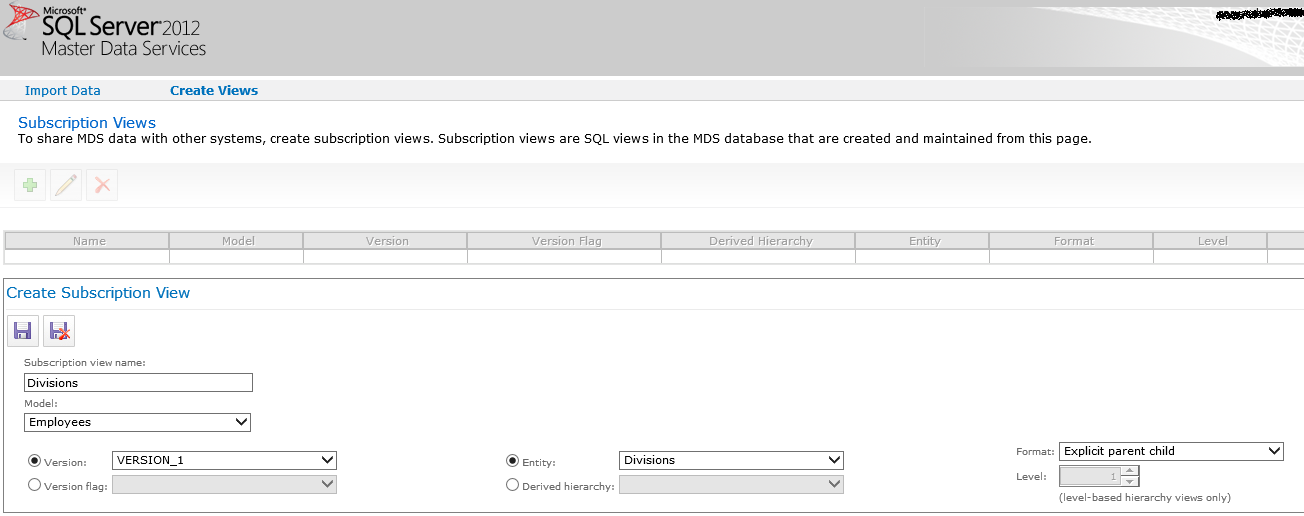
After the data about the departments and the belonging of the employees to the departments have been entered, it is necessary to import them back into the data warehouse. To do this, you need to create special views (Subscription Views) in MDS. Let's go to the main page of the Master Data Services web-interface, in the subsection Administrative Tasks we will follow the link Intergation Management:

In the window that opens, go to the Create Views menu and click the Add subscription view button:

Fill in the presentation parameters for the “Divisions” entity and click the Save button:
Similarly, create a view for the Employees entity (Employees):

Now let's see what these ideas are and how you can use them. In fact, everything is quite simple, the views in MDS are nothing but our usual views (Views) in the SQL database. Let's open SSMS, and we will be convinced of it:

And the last thing that remains to be done to accomplish the task is to develop a SQL script or SSIS package that exports information from MDS views to the data warehouse.
About eight man-hours were spent on the implementation of this decision, which, I think, is quite adequate time for such a task. In the described solution, I did not use all the capabilities of Master Data Services, for example, were overlooked by the Business Rules , which can be used to clear data when imported into MDS. However, I consider the fact that the customer has a new, fairly simple, but at the same time flexible tool, Master Data Services, with which the tasks related to the processing and storage of the reference master data can be solved in the future.
Input data
My client uses a BI solution based on Microsoft SQL Server 2012 Business Intelligence Edition. The center of this BI system is the Data Warehouse , which is filled with SSIS packages from transactional systems ( OLTP ). The data warehouse, in turn, serves as a source for the multidimensional data model. Based on the multidimensional data model, customer analysts form reports in Excel using Pivot Tables . Since there are a lot of data sources, and users of transactional systems manage reference books randomly, the customer identified the need for a solution that would allow creating hierarchies for certain dimensions in the data warehouse that would be convenient for analytical analysis purposes. So, for example, information about the organizational structure of a company stored in the “Divisions” dimension (table dbo.dimDivisions) imported from OLTP systems is convenient for operational reports generated in OLTP systems, but not suitable for analysis in the BI system. .
')
Business requirements
The formal requirements of a business customer can be briefly described as follows:
- Develop a tool to manage data on company departments for analytical reporting purposes.
- Use new data on business units in existing BI solutions.
- Changes should not affect the operation of OLTP systems.
Preliminary assessment and decision selection
Based on the input data and business requirements, the customer was offered the following solution:
- Add an extra dimension to the data warehouse to store org data. structure for analytical reporting.
- Provide a link between the records of the new dimension and the dimension "Employees".
- Modify the multidimensional data model to reflect changes in the data warehouse structure.
- Configure Master Data Services. The setting refers to the creation of the ability to manually enter and edit data on employees and departments, as well as the setting required to import / export data to / from MSD.
- Provide automatic import of data about new employees from the data warehouse to Master Data Services.
- Ensure automatic export of data about departments and employees belonging to departments by employees from Master Data Services to the data warehouse.
Solution implementation
Data warehouse refinement
So, let's go in order. First, create a new dimension “Arbitrary divisions” (dbo.dimDerivedDivisions) in the data warehouse and link it to the dimension “Employees” (dbo.dimEmploees). The SQL script for this task looks like this:
-- " " CREATE TABLE dbo.dimDerivedDivisions ( id int NOT NULL primary key identity(1, 1), parentId int NULL, sourceCode int NOT NULL, sourceParentCode int NULL, name nvarchar(100) NOT NULL DEFAULT ('N/A'), lineageDate datetime DEFAULT GETDATE(), lineageSource nvarchar(255) NOT NULL DEFAULT ('') ); -- parentId, dbo.dimDerivedDivisions(id) - ALTER TABLE dbo.dimDerivedDivisions ADD CONSTRAINT fk_dbo_dimDerivedDivisions_dbo_dimDerivedDivisions FOREIGN KEY (parentId) REFERENCES dbo.dimDerivedDivisions(id); -- , SET IDENTITY_INSERT dbo.dimDerivedDivisions ON; INSERT INTO dbo.dimDerivedDivisions (id, parentId, sourceCode, sourceParentCode, name, lineageDate, lineageSource) SELECT 0, NULL, 0, NULL, 'N/A', GETDATE(), ' ' WHERE NOT EXISTS (SELECT id FROM dbo.dimDerivedDivisions WHERE id = 0); SET IDENTITY_INSERT dbo.dimDerivedDivisions OFF; -- "" ALTER TABLE dbo.dimEmployees ADD derivedDivisionId int NOT NULL DEFAULT(0); -- , dbo.dimDerivedDivisions(id) ALTER TABLE dbo.dimEmployees ADD CONSTRAINT fk_dbo_dimEmployees_dbo_dimDerivedDivisions FOREIGN KEY (derivedDivisionId) REFERENCES dbo.dimDerivedDivisions(id); Refinement of the multidimensional data model
Now add a new dimension to the multidimensional data model. To do this, open the multidimensional data model project in SQL Server Data Tools and add a new dbo.dimDerivedDivisions table to the Data Source View. The result is as follows:
In order not to go far from the topic, I will briefly describe the process of finalizing the multidimensional model. In the multidimensional data model, we create a new dimension “Arbitrary Divisions”, set up a connection between the new dimension and the existing fact tables through the “Employees” dimension, deploy and process the cube:
Configure Master Data Services
Now all the data structures for the preparation of analytical reports in the context of the new measurement “Arbitrary Measurements” are ready, we proceed to the most important thing - to configure Master Data Services. To do this, in the browser, click on the link that the SQL Server Administrator gave us and get into the MDS web interface, which looks like this:
I will not describe here the installation of Master Data Services, as this routine task is described in detail at msdn.microsoft.com . Focusing better on the actual practice of using MDS.
So the first thing we need to do is create a model. A model in MDS is a logical container that contains the essence of a particular business area. In our case, it is appropriate to create a model “Employees” containing the entities “Employees” and “Divisions”. To create a model, go to the Master Data Services web interface in Administrative Tasks by clicking on System Administration. In the window that opens, enter the model name Employees and click the Save model button:
If the Create entity with the same name as model check box is selected, the Employees entity of the same name will be automatically created together with the model. Next, create another entity "Divisions" (Divisions), to do this, select the model Employees and go to the menu Manage - Entities:
Click on the Add entity button:
In the dialog that opens, fill in the parameters of the new entity and click the Save entity button. Notice that when creating the “Divisions” entity, the Enable explicit hierarchies and collections checkbox was selected (this means that the entity will be able to create a hierarchy), and below we specify the name of the Divisions hierarchy. Explicit Hierarchy is a hierarchy whose members can be organized in any way, i.e. at each hierarchy level there can be any any number of members and the following levels of nesting:
After the entities are created, you need to configure the attributes of the entities. For the entity “Employees” (Employees) add the attribute “Division” (Division). Select the Employees entity and click the Edit selected entity button:
In the entity editing form that opens, click on the Add leaf attribute button in order to add the “Division” attribute of the final element of the “Employees” entity:
In the opened attribute addition form, fill in the attribute name and set the attribute type switch to the Domain-based position. This means that the values of this attribute will belong to a specific entity, and below we will indicate which one, in our case, this is the “Divisions” entity. At the end, click the Save attribute button:
Manual data entry in Master Data Services
So, the model “Employees” (Employees) and the entities “Employees” (Employees) and “Divisions” (Divisions) are ready, now you need to fill them with data. The essence of the "Divisions" (Divisions) users will fill out manually. To demonstrate this process, let's go to the home page of the Master Data Services web interface, in the Information Worker Tasks subsection, select the Employees model and follow the Explorer link:
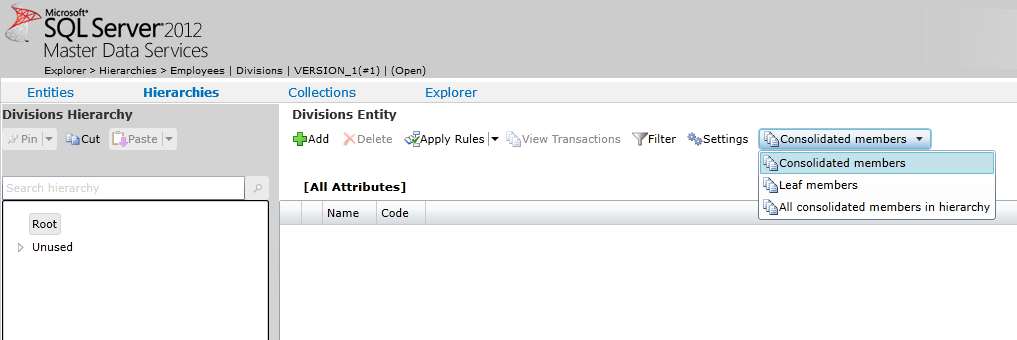
Select the “Divisions” hierarchy:
Choose the type of items we want to manage. First, create several group elements (Consolidated Member):
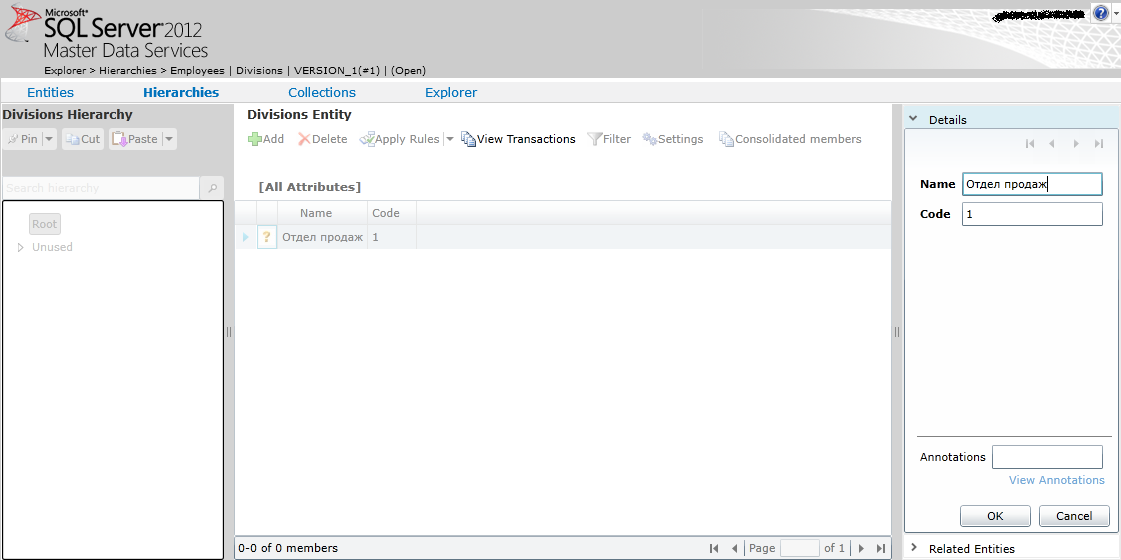
Press the Add button, enter the name of the subdivision-group “Sales Department” and press the OK button:
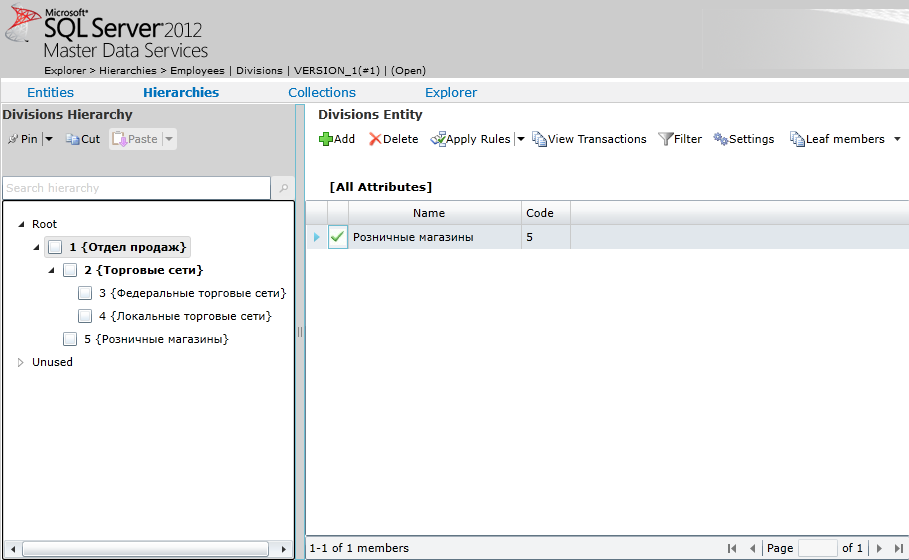
Similarly, we will add other divisions and, thus, create a division structure, shown in the following figure:
Please note that bold units are group-units, and low-fat are finite elements. At one level of hierarchy can be both those and other types of elements.
Import data to Master Data Services
Now you need to import employee data into Master Data Servises from the existing data warehouse (for further comparison of employees and departments, and export this data back to the warehouse). There are special intermediate tables (Staging Tables) in which we can insert data with a SQL query or create a special SSIS package that will import new employee records from the repository to load data into MDS in the SQL database that provides Master Data Services. data into temporary tables for further processing in Master Data Servises. Open SSMS and find temporary tables in the Master Data Services database. Here they are:
As an example, import arbitrary 10 employee records from the data warehouse to the Master Data Services database staging table. To do this, run the following SQL query:
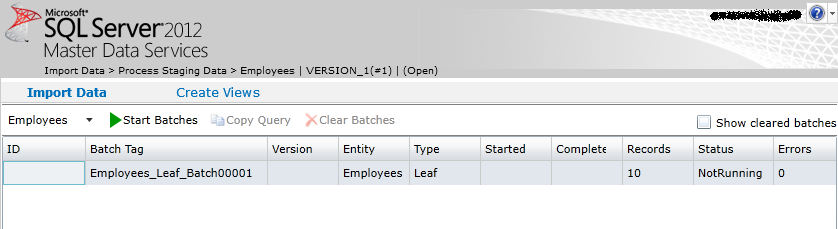
INSERT INTO [stg].[Employees_Leaf] ([ImportType], [ImportStatus_ID], [BatchTag], [Code], [Name]) SELECT TOP 10 1, 0, N'Employees_Leaf_Batch00001', E.id, E.name FROM [DW].[dbo].[dimEmployees] E; Let's return to the Master Data Services web-interface and on the main page we will follow the Intergation Management link:
In the window that opens, we see the Employe_Leaf_Batch00001 package, which was just created by a SQL query. Launch it by clicking on the Start Batches button:
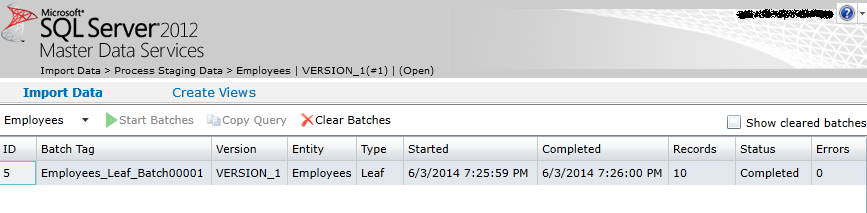
After the package has been processed, we’ll see the following information about the status, start and end time, errors:
Data Management in Master Data Services
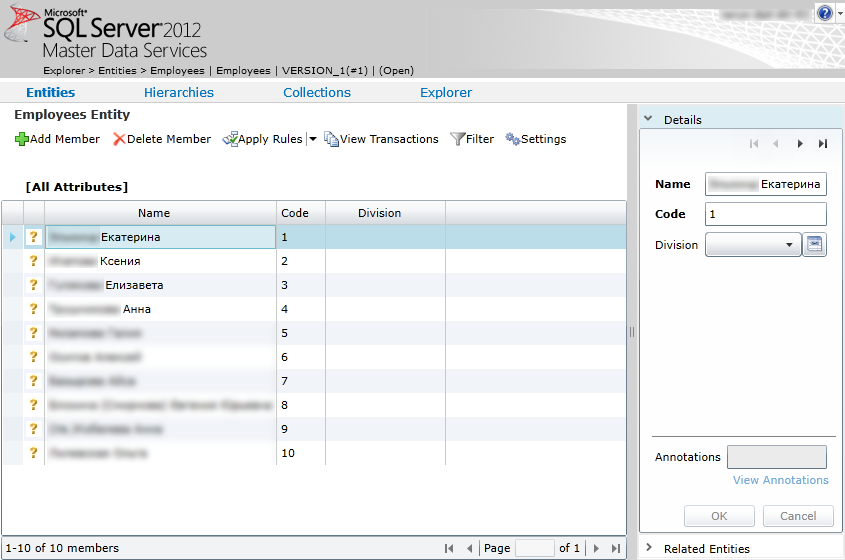
Now let's go into data management mode and see how the employee records are loaded from the staging table. To do this, go to the home page of the Master Data Services web interface, in the Information Worker Tasks subsection, select the Employees model and follow the Explorer link. In the window that opens, we see that new employee data has been added to Master Data Services and is in the Waiting to be validated state:
Please note that the information about the division (Division) of the staff is not filled. We need for each employee to select the unit in which he works and click on the OK button:
Export data from Master Data Services
After the data about the departments and the belonging of the employees to the departments have been entered, it is necessary to import them back into the data warehouse. To do this, you need to create special views (Subscription Views) in MDS. Let's go to the main page of the Master Data Services web-interface, in the subsection Administrative Tasks we will follow the link Intergation Management:
In the window that opens, go to the Create Views menu and click the Add subscription view button:
Fill in the presentation parameters for the “Divisions” entity and click the Save button:
Similarly, create a view for the Employees entity (Employees):
Now let's see what these ideas are and how you can use them. In fact, everything is quite simple, the views in MDS are nothing but our usual views (Views) in the SQL database. Let's open SSMS, and we will be convinced of it:
And the last thing that remains to be done to accomplish the task is to develop a SQL script or SSIS package that exports information from MDS views to the data warehouse.
findings
About eight man-hours were spent on the implementation of this decision, which, I think, is quite adequate time for such a task. In the described solution, I did not use all the capabilities of Master Data Services, for example, were overlooked by the Business Rules , which can be used to clear data when imported into MDS. However, I consider the fact that the customer has a new, fairly simple, but at the same time flexible tool, Master Data Services, with which the tasks related to the processing and storage of the reference master data can be solved in the future.
Source: https://habr.com/ru/post/224981/
All Articles