VIM as an IDE for Python development

This article will be devoted to configuring vim, in which I will share my “modest” understanding of what a text editor should be, so that it is convenient / pleasant / easy (to underline) to write code as well as it is possible in all kinds of PyCharm IDEs , SublimeText, etc.
I will try to describe the whole process in as much detail as possible so that there are as few questions as possible for beginners to learn vim.
Prehistory
I myself am familiar with vim for a not very long time, however, it has resulted in its study and desire to use:- sufficient number of articles on vim
- a large number of existing plugins
- Mostly, Python developers write code for Linux (although vim is cross-platform)
- own curiosity
Currently, I use vim quite often as the main tool for developing in Python and I don’t regret it at all. If something is lacking, the problem is solved by Google for a couple of minutes. Believe me, vim is really worth the effort spent on studying it. It rather quickly "pays off" itself. It would be just a desire and a little patience.
Preparatory stage
So. Let's proceed directly to the preparatory stage. We will need:- Vim version 7.4 (you can get the right one either by downloading from the repositories or manually building it)
- Python 2.7 (with pip installed)
- Git client
After the above, we have, you can proceed directly to the setting and "customization".
Customization
The very first problem for any newbie who decides to curb vim is vimscript. Vimscript is a scripting language designed for vim. On it we will describe the used plugins, hotkeys, and all that, in order to ensure simple and easy work in vim. For familiarization I advise you to visit this and this sites. It describes quite well what, where, how, and why.
')
The first step is to tell you that the vim configuration file is located in the user's home directory (~ /) and is called .vimrc. In it, the moments will be signed as to what fonts, color scheme, hot keys, etc. will be used.
Secondly, when setting up a text editor, it will sometimes be necessary to enter the .vim directory (this is a hidden directory, and it is also located in the user's home directory), which will contain a number of necessary files, sorted into directories.
Which subdirectories include the original .vim directory? Some such:
.vim
| ____ after
| ____ autoload
| ____ colors
| ____ doc
| ____ ftplugin
| ____ indent
| ____ plugin
| ____ scripts
| ____ syntax
However, of all the above directories, we need only a few:
- colors - for color schemes / themes
- indent - files will be dropped here to work with HTML / XML tags, etc.
- scripts - for scripts
- syntax - syntax files
In these directories we place the appropriate files, taking them, for example, from me .
Before starting the installation and working with the package manager we will write in the console:
pip install pyflakes pep8 pylint ipython In the future, these libraries will be useful to us in order to track the quality of our code: errors, its PEP8 compliance, etc. The last library / package in this list, ipython, will be convenient for us to set up our debugger.
We also need to install Exuberant ctags. You can download it from here or search and install through the package manager apt-get / aptitude / rmp / pacman / etc.
Plugin Manager
To make it easier for us to install and use the plugin, we will use Vundle. Vundle is a package manager for Vim, capable of:
- configure and install the plugins specified in. vimrc
- update plugins as needed
- remove unused plugins
However, before proceeding to the description of the required set of plug-ins in the configuration file, you must first install Vundle itself. To do this, do the following:
git clone https://github.com/gmarik/Vundle.vim.git ~/.vim/bundle/Vundle.vim After executing this command, Vundle will be installed in ~ / .vim / bundle / Vundle.vim
Now add the following part to your newly created .vimrc if it does not already exist:
set nocompatible " be iMproved, required filetype off " required "===================================================== " Vundle settings "===================================================== " set the runtime path to include Vundle and initialize set rtp+=~/.vim/bundle/Vundle.vim call vundle#begin() Plugin 'gmarik/Vundle.vim' " let Vundle manage Vundle, required "---------=== Code/project navigation ===------------- Plugin 'scrooloose/nerdtree' " Project and file navigation Plugin 'majutsushi/tagbar' " Class/module browser "------------------=== Other ===---------------------- Plugin 'bling/vim-airline' " Lean & mean status/tabline for vim Plugin 'fisadev/FixedTaskList.vim' " Pending tasks list Plugin 'rosenfeld/conque-term' " Consoles as buffers Plugin 'tpope/vim-surround' " Parentheses, brackets, quotes, XML tags, and more "--------------=== Snippets support ===--------------- Plugin 'garbas/vim-snipmate' " Snippets manager Plugin 'MarcWeber/vim-addon-mw-utils' " dependencies #1 Plugin 'tomtom/tlib_vim' " dependencies #2 Plugin 'honza/vim-snippets' " snippets repo "---------------=== Languages support ===------------- " --- Python --- Plugin 'klen/python-mode' " Python mode (docs, refactor, lints, highlighting, run and ipdb and more) Plugin 'davidhalter/jedi-vim' " Jedi-vim autocomplete plugin Plugin 'mitsuhiko/vim-jinja' " Jinja support for vim Plugin 'mitsuhiko/vim-python-combined' " Combined Python 2/3 for Vim call vundle#end() " required filetype on filetype plugin on filetype plugin indent on As you can see, the places where
Plugin '__' is indicated are the links on the Internet for these plug-ins that Vundle will download and install later. For myself, I have broken these plugins into "categories", but this is a matter of taste. The plugins themselves:- NERDTree - file / directory navigation
- TagBar - navigation through classes / functions / variables
- vim-airline - status / status bar
- FixedTaskList - search in the file FIXME, TODO, etc.
- conque-term - use to call debugger
- vim-surround - auto-closing tags HML / XML /, etc.
- vim-snipmate - snippets
- python-mode - refactoring, documentation, Python debugger, etc.
- jedi-vim auto-complete for Python
- vim-jinja - Jinja template syntax support
As a guide / guide on using Vundle you can go here . However, for our purposes there will be enough of one:
:PluginInstall This command scans the .vimrc file for a list of plugins written as
Plugin '__' .In order to start the installation of a set of plug-ins, go to vim / gvim and write
:PluginInstall . We'll have to wait a bit, since every plug-in specified above in the config will be downloaded from githuba or from somewhere else and configured to the default settings, wait a couple of minutes. Each deflated and customized plugin is marked as "+". As soon as you see that everything from the list is highlighted with "+", then everything is ready. And for further use, you will need to restart vim. However, this is still not the end of the article - everything needs to be “tweaked” in order to work comfortably in vim.Vim's general settings
These settings are basic for me. Here I indicate my preferences regarding a couple of plug-ins, font size, color scheme, displayed elements, etc.Add these lines to the end of your .vimrc file:
"===================================================== " General settings "===================================================== set backspace=indent,eol,start aunmenu Help. aunmenu Window. let no_buffers_menu=1 set mousemodel=popup set ruler set completeopt-=preview set gcr=a:blinkon0 if has("gui_running") set cursorline endif set ttyfast " syntax on if has("gui_running") " GUI? set lines=50 columns=125 colorscheme molokai " , , NERDTree/TagBar vim " autocmd vimenter * TagbarToggle " autocmd vimenter * NERDTree " autocmd vimenter * if !argc() | NERDTree | endif " vim? if has("mac") set guifont=Consolas:h13 set fuoptions=maxvert,maxhorz else " GUI set guifont=Ubuntu\ Mono\ derivative\ Powerline\ 10 endif else " ? colorscheme myterm endif tab sball set switchbuf=useopen " set visualbell t_vb= set novisualbell set enc=utf-8 " utf-8 set ls=2 " set incsearch " set hlsearch " set nu " set scrolloff=5 " 5 " - set nobackup " no backup files set nowritebackup " only in case you don't want a backup file while editing set noswapfile " no swap files " "set guioptions-=m " set guioptions-=T " "set guioptions-=r " " Tab set smarttab set tabstop=8 " 80 Ruby/Python/js/C/C++ augroup vimrc_autocmds autocmd! autocmd FileType ruby,python,javascript,c,cpp highlight Excess ctermbg=DarkGrey guibg=Black autocmd FileType ruby,python,javascript,c,cpp match Excess /\%80v.*/ autocmd FileType ruby,python,javascript,c,cpp set nowrap augroup END " SnipMate let g:snippets_dir = "~/.vim/vim-snippets/snippets" " Vim-Airline set laststatus=2 let g:airline_theme='badwolf' let g:airline_powerline_fonts = 1 let g:airline#extensions#tabline#enabled = 1 let g:airline#extensions#tabline#formatter = 'unique_tail' " TagBar map <F4> :TagbarToggle<CR> let g:tagbar_autofocus = 0 " Tagbar " NerdTree " NERDTree F3 map <F3> :NERDTreeToggle<CR> " let NERDTreeIgnore=['\~$', '\.pyc$', '\.pyo$', '\.class$', 'pip-log\.txt$', '\.o$'] " TaskList map <F2> :TaskList<CR> " F2 " map <Cq> :bd<CR> " CTRL+Q - Python-mode
I really like this plugin, which by the way is made by klen . Provides a lot of opportunities when working with code:- refactoring
- autocompletion
- working with debugger
- autofix PEP8 errors
- and many many others...
Add these lines to the end of your .vimrc file:
"===================================================== " Python-mode settings "===================================================== " ( jedi-vim) let g:pymode_rope = 0 let g:pymode_rope_completion = 0 let g:pymode_rope_complete_on_dot = 0 " let g:pymode_doc = 0 let g:pymode_doc_key = 'K' " let g:pymode_lint = 1 let g:pymode_lint_checker = "pyflakes,pep8" let g:pymode_lint_ignore="E501,W601,C0110" " let g:pymode_lint_write = 1 " virtualenv let g:pymode_virtualenv = 1 " breakpoints let g:pymode_breakpoint = 1 let g:pymode_breakpoint_key = '<leader>b' " let g:pymode_syntax = 1 let g:pymode_syntax_all = 1 let g:pymode_syntax_indent_errors = g:pymode_syntax_all let g:pymode_syntax_space_errors = g:pymode_syntax_all " autofold let g:pymode_folding = 0 " let g:pymode_run = 0 Jedi-vim
A very useful plugin that provides excellent autocomplex capabilities, go to definition, etc.In your config, add this fragment to the end:
" Disable choose first function/method at autocomplete let g:jedi#popup_select_first = 0 With this line, I cut off in autocomplete the selection of the first line from the selection list of the method / library / class of autocomplex. This is due to the fact that quite often I choose not the first line of it, but the automatic selection is annoying.
After setting up jedi-vim, we get a display of the documentation for the function
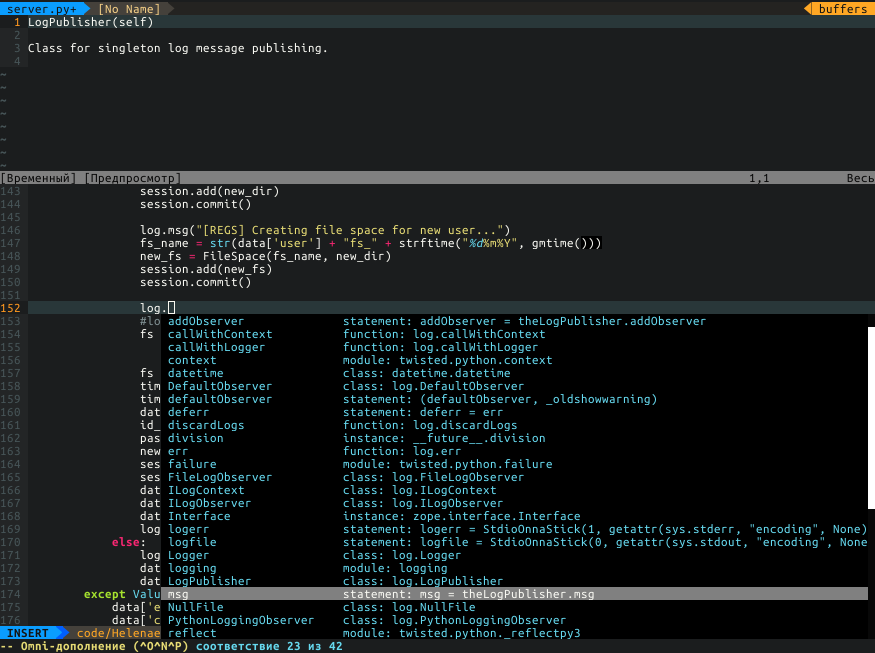
and a good autocomplit on function arguments

Hotkeys
It is difficult to advise anything. Everyone has a different understanding of what hotkeys are needed and which are not. I can only say that for those who want to find / write the necessary pieces of vimscript, redefining the behavior of standard hot keys - a lot.Add this fragment to the end of the config:
"===================================================== " User hotkeys "===================================================== " ConqueTerm " F5 nnoremap <F5> :ConqueTermSplit ipython<CR> " debug-mode <F6> nnoremap <F6> :exe "ConqueTermSplit ipython " . expand("%")<CR> let g:ConqueTerm_StartMessages = 0 let g:ConqueTerm_CloseOnEnd = 0 " PEP8 <leader>8 autocmd FileType python map <buffer> <leader>8 :PymodeLint<CR> " <Ctrl+Space> inoremap <C-space> <Cx><Co> " nnoremap <leader>Th :set ft=htmljinja<CR> nnoremap <leader>Tp :set ft=python<CR> nnoremap <leader>Tj :set ft=javascript<CR> nnoremap <leader>Tc :set ft=css<CR> nnoremap <leader>Td :set ft=django<CR> Indents, tabs, spaces for different languages
This is due to the fact that in the same Python tabs are not recommended for use. Therefore, we will replace them with spaces. One tab = 4 spaces. Plus, you need to remember that you always need to make the transition to the next line + indent, so that it corresponds to the operators for / if / while /, etc.For other languages, it is enough to specify the size of the Taba, and replace them with spaces.
Add this fragment to the end of your config:
"===================================================== " Languages support "===================================================== " --- Python --- "autocmd FileType python set completeopt-=preview " , , , jedi-vim / autocmd FileType python setlocal expandtab shiftwidth=4 tabstop=8 \ formatoptions+=croq softtabstop=4 smartindent \ cinwords=if,elif,else,for,while,try,except,finally,def,class,with autocmd FileType pyrex setlocal expandtab shiftwidth=4 tabstop=8 softtabstop=4 smartindent cinwords=if,elif,else,for,while,try,except,finally,def,class,with " --- JavaScript --- let javascript_enable_domhtmlcss=1 autocmd FileType javascript set omnifunc=javascriptcomplete#CompleteJS autocmd BufNewFile,BufRead *.json setlocal ft=javascript " --- HTML --- autocmd FileType html set omnifunc=htmlcomplete#CompleteTags " --- template language support (SGML / XML too) --- autocmd FileType html,xhtml,xml,htmldjango,htmljinja,eruby,mako setlocal expandtab shiftwidth=2 tabstop=2 softtabstop=2 autocmd bufnewfile,bufread *.rhtml setlocal ft=eruby autocmd BufNewFile,BufRead *.mako setlocal ft=mako autocmd BufNewFile,BufRead *.tmpl setlocal ft=htmljinja autocmd BufNewFile,BufRead *.py_tmpl setlocal ft=python let html_no_rendering=1 let g:closetag_default_xml=1 let g:sparkupNextMapping='<cl>' autocmd FileType html,htmldjango,htmljinja,eruby,mako let b:closetag_html_style=1 autocmd FileType html,xhtml,xml,htmldjango,htmljinja,eruby,mako source ~/.vim/scripts/closetag.vim " --- CSS --- autocmd FileType css set omnifunc=csscomplete#CompleteCSS autocmd FileType css setlocal expandtab shiftwidth=4 tabstop=4 softtabstop=4 Summarizing
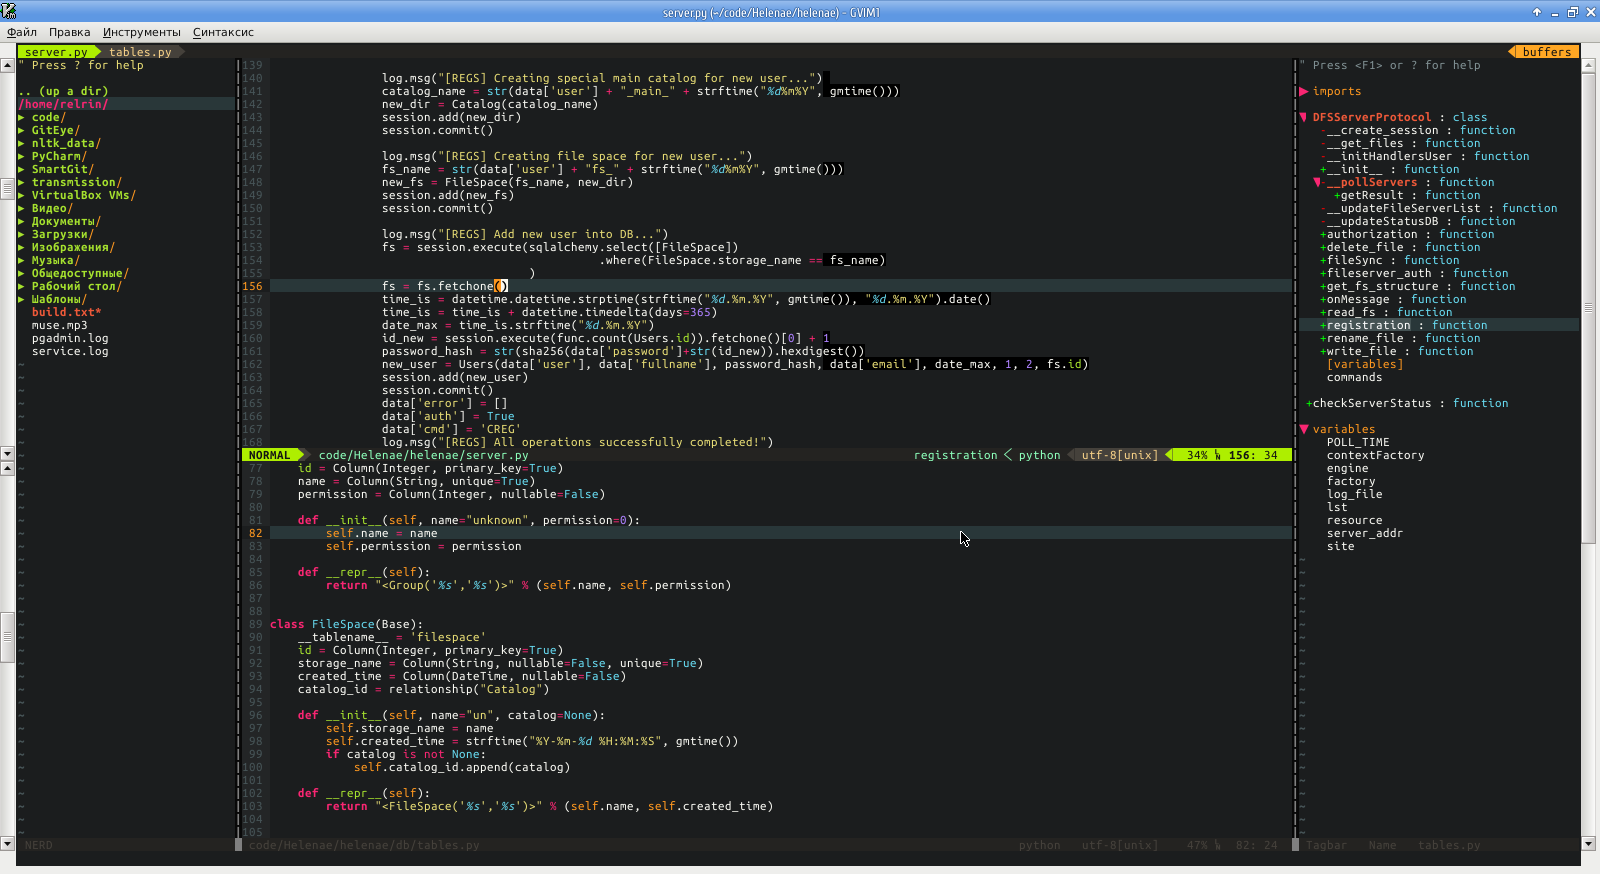
After going through such a long setup process, we have a fairly flexible tool to work with Python. At the same time, the subsequent installation on other PCs will only provide the additional installation of the necessary libraries, the transfer of the corresponding config and the installation of plug-ins.After setup we will get something like vim:
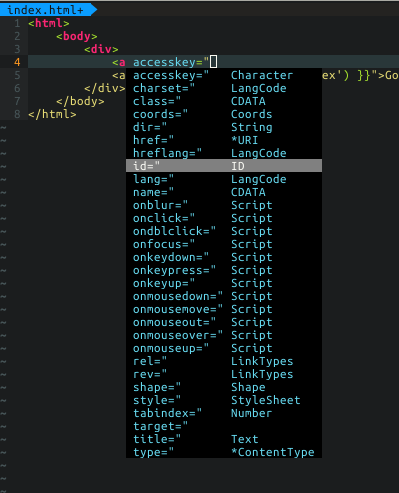
In the mode of working with HTML / JavaScript / XML, everything will look like this:
If someone needs more functionality (for example, autocomplete support for any other languages), then I can only advise you to search for the necessary plugins on GitHub or on the official site of the vim site.
Useful links:
Script section of the site vim.org - herewikia by vim'u - here
OpenVim: lessons on the basics in vim - here
Fonts for vim-airline - here
My config for vim on github
Source: https://habr.com/ru/post/224979/
All Articles