Creating audio plugin, part 1
All posts series:
Part 1. Introduction and setup
Part 2. Learning Code
Part 3. VST and AU
Part 4. Digital Distortion
Part 5. Presets and GUI
Part 6. Signal synthesis
Part 7. Receive MIDI Messages
Part 8. Virtual Keyboard
Part 9. Envelopes
Part 10. Refinement GUI
Part 11. Filter
Part 12. Low-frequency oscillator
Part 13. Redesign
Part 14. Polyphony 1
Part 15. Polyphony 2
Part 16. Antialiasing
This post is the first of a series of translations of the Martin Finke manual on writing your own audio plug-ins.
A distinctive feature of this material is the lack of dependence on the format of the plug-in and the platform for its use. Attention is focused on the general structure of the audio plugin. Then the algorithms are wrapped in an abstraction layer for assembly into VST , VST3 , AU , RTAS , AAX formats or in a separate application.
Martin himself works more on Mac, but the guide contains all the necessary steps for developing on Windows.
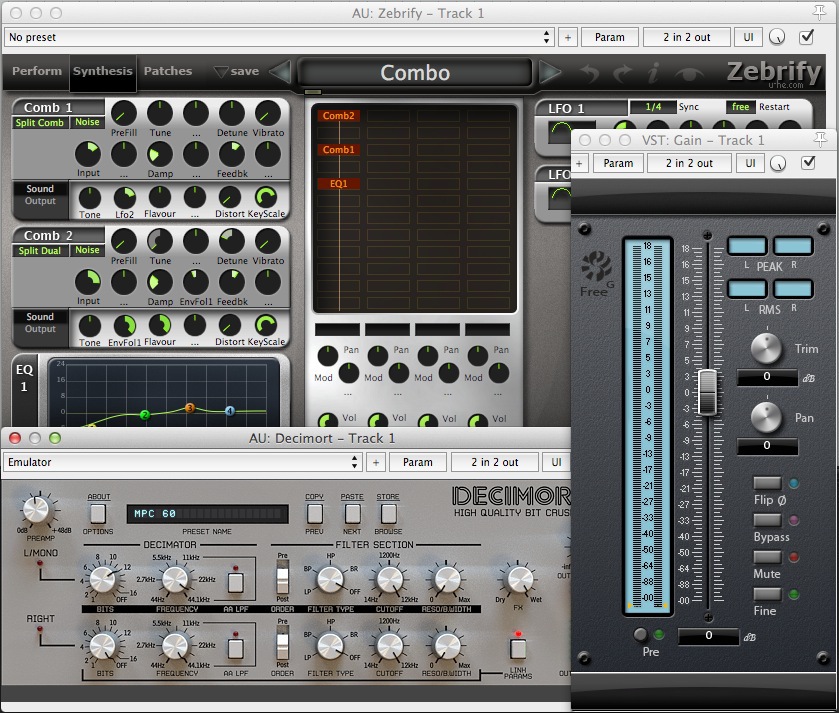
Audio plug-ins are programs that are downloaded to the host (for example, Ableton Live , Logic, or REAPER ). They process audio and / or MIDI data. They usually have a GUI (graphical user interface). Here are three examples ( U-He Zebra , Sonalksis FreeG and D16 Decimort ):
')
As you can see, there are controls in the GUI (most often these are some kind of pens) that change how the plugin processes incoming data. There is also a set of presets (presets - in the screenshots they are called Combo and Emulator), in which the positions of the handles and other parameters are stored.
We start with distortion - this is a fairly simple plugin. After that we will do this substractive synthesizer, step by step:
We will use C ++ and the WDL-OL library. It is based on the Cockos WDL library (pronounced “whittle”). She does a lot of work for us, here are the most important points:
Also in this library there are some commonly used algorithms, for example, resampling. Here in this thread of the forum there are many screenshots of plug-ins written with the help of WDL.
Different plug-in formats do more or less the same thing. Consequently, the code is usually a lot of copy-paste. As a programmer, you should try not to repeat , so sooner or later you would write your own layer of abstraction over different formats. But it already exists in the form of the IPlug framework, which is part of the WDL. This is the most annoying part of the development process, so now we can focus on such interesting things as:
Another great thing about WDL is the permissive license. The library can be freely used even in commercial products (see detailed information on the links above).
In programming, the result itself is a reward, but it is along the way to the result that we learn. This guide will not have long listings with perfect solutions. We will start with what works and we will gradually develop it, meeting with various problems. The downside is that you will write code that you later replace with the best. But programmers are not used to this. The first plus: there will be no overflowing joy, since we will approach the solution gradually instead of doing everything in one fell swoop. The second is that we gain some valuable knowledge in programming.
This series of posts is not about solving problems of matan without a calculator on a piece of paper. It’s about how to create good software that you can give to a friend of the producer, so that he can make the bass fatter.
A couple of links that may be useful to us:
Now it's time to set everything up and prepare.
Now we will install the WDL-OL library and its dependencies. Then run the example, just to make sure everything works as it should.
Most of this material is in the video of Oli Larkin:
The material in the next section is mainly for setting up on a Mac. Windows will be slightly lower.
Before we begin, you need to download and install a couple of new things. This is a bit of a chore, but will have to be done only once.
Preliminary preparation
Open Terminal and type the following lines to create a new folder in your home directory and move there:
Let's load WDL-OL:
These lines can be copied and pasted. The main thing - do not forget the point at the end! Then you will surely use the same version of WDL-OL as in this guide. At this point, the wdl-ol subfolder should appear.
Go to ASIO_SDK and copy here the .cpp and .h files from the include folder from RtAudio.
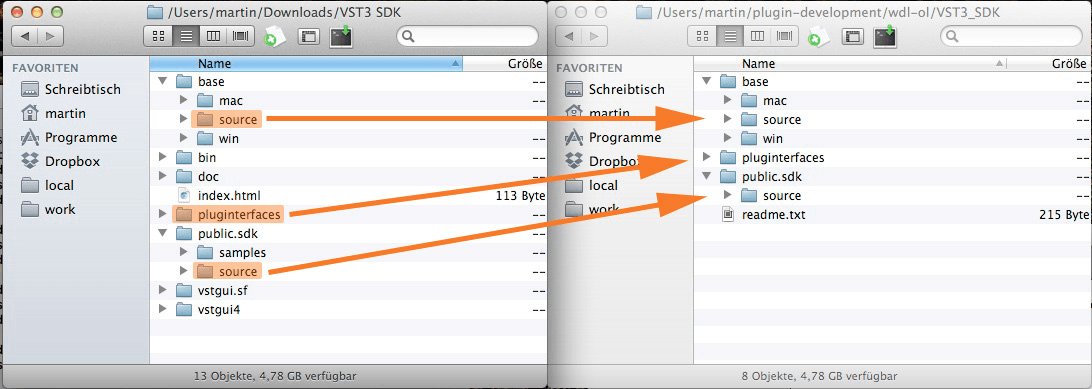
Extract the VST3 SDK and copy the aeffect.h and aeffectx.h files from the pluginterfaces / vst2.x folder to the wdl-ol / VST_SDK subfolder (they may already be included in the VST3 SDK in the pluginterfaces / vst2.x subfolder ). In addition, for VST3 you will need base / source , pluginterfaces and public.sdk / source . Copy out as follows:
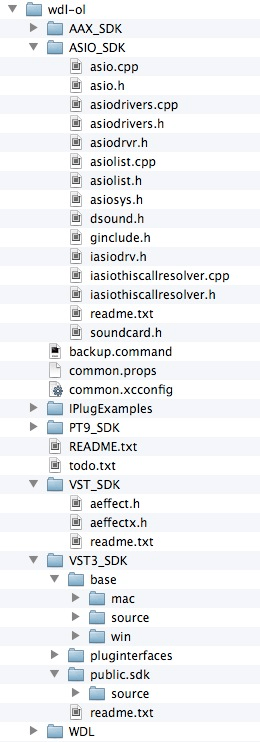
Please note that the public.sdk folder must be created manually. So your folder tree should look like this:
Now open common.xcconfig (it should open in Xcode) and make the following changes:
We will also use Mac OS X 10.5 for the
In fact, the deployment target contains information about the version that users will need, but I prefer to prescribe the same version for the main SDK.
SDK 10.5 is not included in Xcode 4. If you already have one, go to the “Run a test project” item. If not, read on:
To install it, you need to download Xcode 3.2.6 . When you download it, mount the .dmg file, open Terminal.app and enter
A search engine window will open and there will be a file named MacOSX10.5.pkg . Click on it twice. If you have OS X version 10.8 or higher, a message will appear that a program from an unknown developer cannot be installed. In this case, right-click on the file, in the menu, click Open and confirm that you really want to install the software. During installation, select change install location , click on the disk on which you want to install, so that you can select a directory on it. Install, for example, in the Downloads folder in the user folder. After the installation is completed, the new folder MacOSX10.5.sdk will appear in the selected location. Type the following in Terminal.app:
The search engine window will appear again. Drag the folder MacOSX10.5.sdk into it. After restarting Xcode, the old SDK should be available in Xcode 4. Make sure you back up MacOSX10.5.sdk somewhere: if you update Xcode to a later version, you may have to repeat these steps.
In the Terminal, go to the folder with examples:
Run the dublicate script to create your first plugin (replace YourName with something your own):
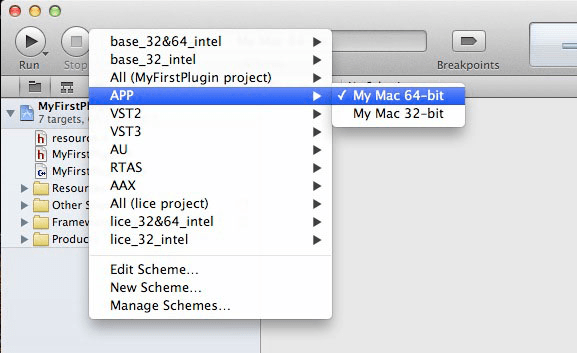
Now there is a new folder MyFirstPlugin . Go to it and open MyFirstPlugin.xcodeproj . Select APP Target :
There is a small bug in WDL-OL: a standalone application will not output sound if you do not select another audio input. But it is easy to fix. In the Xcode project navigator, open Other Sources → OSX App Wrapper → app_main.h . Change the contents of the 34th line (in which
Click Run . Several linker errors will pop up:
They are easy to fix. Return to your project’s build settings (make sure that you chose your project, and not some other target) and change the Implicitly Link Objective-C Runtime Support parameter to No :
Click Run again. After a couple of seconds, the plugin will appear as a standalone application:

If you do not have Logic, you can use the free
It should produce something like this:
If Logic or auval does not find the AU (and other hosts like REAPER see it), go to the build settings and make sure that the target AU is highlighted at the top left. In the search drive in the “active arch”. The results should contain only one line of the Build Active Architecture Only parameter whose value is . Change it to No. Thus, 32-bit and 64-bit versions will be compiled even in Debug mode. After that, go to Product → Clean (Cmd + Shift + K) and run the build again. Now should earn.
To get started, install Visual C ++ 2010 Express .VS 2012 also fits, but I personally didn’t check.
To create 64-bit versions of plug-ins, you need to update the compiler, which, in turn, may require the Windows SDK v 7.1. Correct installation of Windows SDK v 7.1 after installing the update VisualStudio 2010 SP1 is very difficult. At installation
To fix this, rerun the Windows SDK v 7.1 installer and uncheck the Visual C ++ Compilers and libraries.
For sure to have the correct configuration, remove the following products and install them in this order:
A post describing other possible problems and their solutions is here .
Then install Git for Windows using the default settings. I used version 1.8.4. Run Start → Program Files → Git → Git Bash . A terminal window will open. In this window enter several commands:
To insert lines into the window, right-click on its title and select Edit → Paste :
Now copy all the VST2 / VST3 / ASIO SDK files into the necessary folders, just as described above. Install Python using the default settings. I used 2.7.5.
To create VST3 format plugins, you need to create a VST3 folder. Run this command in the terminal:
Now go to the terminal in the subfolder IPlugExamples :
Run the duplicate script using Python:
A new folder, MyFirstPlugin, will appear. Go to it and open MyFirstPlugin.sln . Do not pay attention to the warnings, they say that we can not collect formats AAX and TDM. In the project explorer window on the left, make sure that the MyFirstPlugin-app is bold:
If not, click on it and select Set as StartUp Project. Press F5, this window should appear:

Nice, huh?
If you see the
If the problem persists, try installing Visual Studio 2010 SP1 if you have not already installed it. It may also be useful to update the compiler to create 64-bit versions of plug-ins.
If the warning
Warning
Next time we will study the project code.
Original articles:
martin-finke.de/blog/articles/audio-plugins-001-introduction
martin-finke.de/blog/articles/audio-plugins-002-setting-up-wdl-ol
Part 1. Introduction and setup
Part 2. Learning Code
Part 3. VST and AU
Part 4. Digital Distortion
Part 5. Presets and GUI
Part 6. Signal synthesis
Part 7. Receive MIDI Messages
Part 8. Virtual Keyboard
Part 9. Envelopes
Part 10. Refinement GUI
Part 11. Filter
Part 12. Low-frequency oscillator
Part 13. Redesign
Part 14. Polyphony 1
Part 15. Polyphony 2
Part 16. Antialiasing
This post is the first of a series of translations of the Martin Finke manual on writing your own audio plug-ins.
A distinctive feature of this material is the lack of dependence on the format of the plug-in and the platform for its use. Attention is focused on the general structure of the audio plugin. Then the algorithms are wrapped in an abstraction layer for assembly into VST , VST3 , AU , RTAS , AAX formats or in a separate application.
Martin himself works more on Mac, but the guide contains all the necessary steps for developing on Windows.
Introduction
Audio plug-ins are programs that are downloaded to the host (for example, Ableton Live , Logic, or REAPER ). They process audio and / or MIDI data. They usually have a GUI (graphical user interface). Here are three examples ( U-He Zebra , Sonalksis FreeG and D16 Decimort ):
')
As you can see, there are controls in the GUI (most often these are some kind of pens) that change how the plugin processes incoming data. There is also a set of presets (presets - in the screenshots they are called Combo and Emulator), in which the positions of the handles and other parameters are stored.
We start with distortion - this is a fairly simple plugin. After that we will do this substractive synthesizer, step by step:
We will use C ++ and the WDL-OL library. It is based on the Cockos WDL library (pronounced “whittle”). She does a lot of work for us, here are the most important points:
- Contains ready-made Xcode / Visual Studio projects
- Creates plug-ins in VST, AudioUnit, VST3 and RTAS formats from our code. Just choose the format and click run!
- Creates 32 \ 64-bit versions
- Runs your plugin as a standalone application on Windows or MacOS
- Contains many different GUI elements that are used in audio plugin
Also in this library there are some commonly used algorithms, for example, resampling. Here in this thread of the forum there are many screenshots of plug-ins written with the help of WDL.
Different plug-in formats do more or less the same thing. Consequently, the code is usually a lot of copy-paste. As a programmer, you should try not to repeat , so sooner or later you would write your own layer of abstraction over different formats. But it already exists in the form of the IPlug framework, which is part of the WDL. This is the most annoying part of the development process, so now we can focus on such interesting things as:
- Audio and MIDI processing
- The appearance of the plugin
- Integration with the host (automation, presets, etc.)
Another great thing about WDL is the permissive license. The library can be freely used even in commercial products (see detailed information on the links above).
How do we do that
“Chasing is better than mining” - HP Baxter
In programming, the result itself is a reward, but it is along the way to the result that we learn. This guide will not have long listings with perfect solutions. We will start with what works and we will gradually develop it, meeting with various problems. The downside is that you will write code that you later replace with the best. But programmers are not used to this. The first plus: there will be no overflowing joy, since we will approach the solution gradually instead of doing everything in one fell swoop. The second is that we gain some valuable knowledge in programming.
This series of posts is not about solving problems of matan without a calculator on a piece of paper. It’s about how to create good software that you can give to a friend of the producer, so that he can make the bass fatter.
What we need
- Mac with Xcode 4 or higher, or Windows with Visual Studio C ++ 2010 or higher
- Some understanding of C ++ (syntax, pointers, OOP fundamentals, memory mechanisms). You may have heard that C ++ is a heavy language, but we will not use too complex techniques.
- Some general knowledge of [digital] sound: what the amplitude and frequency are, what the filter does, how the audio is presented with a certain sample rate and bit depth. If you made music before, then, most likely, you already know all this.
- Interest in digital signal processing and GUI development: these are the two main topics of this manual. If you do not have any knowledge of digital signal processing, then as you develop, you will have to read additional materials to fill in the gaps. I will try to give links to additional reading.
Useful resources
A couple of links that may be useful to us:
- Stack Overflow : here you can find out, for example, what incomprehensible warnings you will receive from the compiler mean.
- DSP Guide : a very good free book (in English), covers more material than we need. If you do not understand any concept of signal processing, read this topic in it.
Now it's time to set everything up and prepare.
Installing and configuring WDL-OL
Now we will install the WDL-OL library and its dependencies. Then run the example, just to make sure everything works as it should.
Most of this material is in the video of Oli Larkin:
The material in the next section is mainly for setting up on a Mac. Windows will be slightly lower.
Setup on Mac OS X using Xcode 4
Before we begin, you need to download and install a couple of new things. This is a bit of a chore, but will have to be done only once.
Preliminary preparation
- If Xcode is not installed, download and install.
- Download the latest version of VST3 SDK . To download you need to register an account.
- Download Audio Tools for Xcode . On the Xcode menu, click Open Developer Tool → More Developer Tools ... (or click here ). Find Audio Tools for Xcode in the list, download and install. For different OS X there are different versions, so choose carefully.
- Download RtAudio (the package includes some necessary files from the ASIO SDK).
- If you don’t have git , you should install it .
Download WDL-OL
Open Terminal and type the following lines to create a new folder in your home directory and move there:
mkdir ~/plugin-development
cd !$
Let's load WDL-OL:
git clone github.com/olilarkin/wdl-olcd wdl-olgit checkout 0a360c90b3460717210eeaee7464bc7009c9a5ba .These lines can be copied and pasted. The main thing - do not forget the point at the end! Then you will surely use the same version of WDL-OL as in this guide. At this point, the wdl-ol subfolder should appear.
Add dependencies
Go to ASIO_SDK and copy here the .cpp and .h files from the include folder from RtAudio.
Extract the VST3 SDK and copy the aeffect.h and aeffectx.h files from the pluginterfaces / vst2.x folder to the wdl-ol / VST_SDK subfolder (they may already be included in the VST3 SDK in the pluginterfaces / vst2.x subfolder ). In addition, for VST3 you will need base / source , pluginterfaces and public.sdk / source . Copy out as follows:
Please note that the public.sdk folder must be created manually. So your folder tree should look like this:
Now open common.xcconfig (it should open in Xcode) and make the following changes:
CERTIFICATE_ID = Your Name// Comment this line out:// COMPILER = com.apple.compilers.gcc.4_2// Uncomment this line:COMPILER = com.apple.compilers.llvm.clang.1_0// Add these lines:VST_FOLDER = ~/Library/Audio/Plug-Ins/VSTVST3_FOLDER = ~/Library/Audio/Plug-Ins/VST3AU_FOLDER = ~/Library/Audio/Plug-Ins/Components// Comment these out://VST_FOLDER = /Library/Audio/Plug-Ins/VST//VST3_FOLDER = /Library/Audio/Plug-Ins/VST3//AU_FOLDER = /Library/Audio/Plug-Ins/ComponentsWe will also use Mac OS X 10.5 for the
BASE_SDK and MACOSX_DEPLOYMENT_TARGET . Producers, and especially studio owners, are often too lazy to update their OS. They do not need new chips, but a few days of downtime due to problems with updating the software can result in large financial losses.In fact, the deployment target contains information about the version that users will need, but I prefer to prescribe the same version for the main SDK.
SDK 10.5 is not included in Xcode 4. If you already have one, go to the “Run a test project” item. If not, read on:
Install SDK 10.5
To install it, you need to download Xcode 3.2.6 . When you download it, mount the .dmg file, open Terminal.app and enter
open /Volumes/Xcode\ and\ iOS\ SDK/Packages/A search engine window will open and there will be a file named MacOSX10.5.pkg . Click on it twice. If you have OS X version 10.8 or higher, a message will appear that a program from an unknown developer cannot be installed. In this case, right-click on the file, in the menu, click Open and confirm that you really want to install the software. During installation, select change install location , click on the disk on which you want to install, so that you can select a directory on it. Install, for example, in the Downloads folder in the user folder. After the installation is completed, the new folder MacOSX10.5.sdk will appear in the selected location. Type the following in Terminal.app:
open /Applications/Xcode.app/Contents/Developer/Platforms/MacOSX.platform/Developer/SDKsThe search engine window will appear again. Drag the folder MacOSX10.5.sdk into it. After restarting Xcode, the old SDK should be available in Xcode 4. Make sure you back up MacOSX10.5.sdk somewhere: if you update Xcode to a later version, you may have to repeat these steps.
Running a test project
In the Terminal, go to the folder with examples:
cd IPlugExamplesRun the dublicate script to create your first plugin (replace YourName with something your own):
./duplicate.py IPlugEffect/ MyFirstPlugin YourNameNow there is a new folder MyFirstPlugin . Go to it and open MyFirstPlugin.xcodeproj . Select APP Target :
There is a small bug in WDL-OL: a standalone application will not output sound if you do not select another audio input. But it is easy to fix. In the Xcode project navigator, open Other Sources → OSX App Wrapper → app_main.h . Change the contents of the 34th line (in which
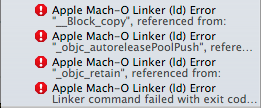
#define DEFAULT_INPUT_DEV ) to the following:#define DEFAULT_INPUT_DEV "Built-in Microphone"Click Run . Several linker errors will pop up:
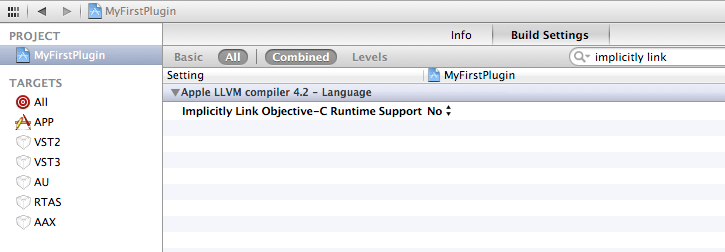
They are easy to fix. Return to your project’s build settings (make sure that you chose your project, and not some other target) and change the Implicitly Link Objective-C Runtime Support parameter to No :
Click Run again. After a couple of seconds, the plugin will appear as a standalone application:
Checking AudioUnit Version with Logic
If you do not have Logic, you can use the free
auval tool to check. Verify that the AU Target build was successful, open Terminal and enter:auval -a 2> /dev/null | grep MyFirstPluginIt should produce something like this:
aumu Abcd Efgh - YourName: MyFirstPluginIf Logic or auval does not find the AU (and other hosts like REAPER see it), go to the build settings and make sure that the target AU is highlighted at the top left. In the search drive in the “active arch”. The results should contain only one line of the Build Active Architecture Only parameter whose value is . Change it to No. Thus, 32-bit and 64-bit versions will be compiled even in Debug mode. After that, go to Product → Clean (Cmd + Shift + K) and run the build again. Now should earn.
Installing on Windows using Visual C ++ 2010 Express
To get started, install Visual C ++ 2010 Express .VS 2012 also fits, but I personally didn’t check.
To create 64-bit versions of plug-ins, you need to update the compiler, which, in turn, may require the Windows SDK v 7.1. Correct installation of Windows SDK v 7.1 after installing the update VisualStudio 2010 SP1 is very difficult. At installation
fatal error can jump out.To fix this, rerun the Windows SDK v 7.1 installer and uncheck the Visual C ++ Compilers and libraries.
For sure to have the correct configuration, remove the following products and install them in this order:
- Visual studio 2010
- Windows SDK 7.1
- Visual Studio 2010 SP1
- Visual C ++ 2010 SP1 Compiler Update for the Windows SDK 7.1
A post describing other possible problems and their solutions is here .
Then install Git for Windows using the default settings. I used version 1.8.4. Run Start → Program Files → Git → Git Bash . A terminal window will open. In this window enter several commands:
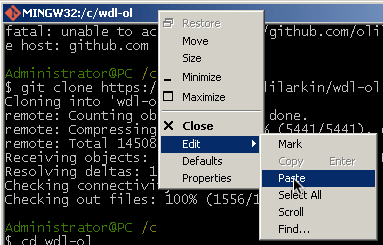
cd c:git clone github.com/olilarkin/wdl-olcd wdl-olgit checkout 0a360c90b3460717210eeaee7464bc7009c9a5ba .To insert lines into the window, right-click on its title and select Edit → Paste :
Now copy all the VST2 / VST3 / ASIO SDK files into the necessary folders, just as described above. Install Python using the default settings. I used 2.7.5.
To create VST3 format plugins, you need to create a VST3 folder. Run this command in the terminal:
mkdir -p "C:\Program Files\Common Files\VST3"Now go to the terminal in the subfolder IPlugExamples :
cd IPlugExamples/Run the duplicate script using Python:
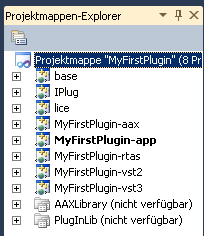
c:\Python27\python.exe duplicate.py IPlugEffect MyFirstPlugin YourNameA new folder, MyFirstPlugin, will appear. Go to it and open MyFirstPlugin.sln . Do not pay attention to the warnings, they say that we can not collect formats AAX and TDM. In the project explorer window on the left, make sure that the MyFirstPlugin-app is bold:
If not, click on it and select Set as StartUp Project. Press F5, this window should appear:
Nice, huh?
Possible problems
If you see the
fatal error LNK1123 during the build process, you need to disable incremental linking : right click on the MyFirstPlugin-app project, click Properties and go to Configuration Properties → Linker (General) → Enable Incremental Linking → “No (/ INCREMENTAL: NO ) ” .If the problem persists, try installing Visual Studio 2010 SP1 if you have not already installed it. It may also be useful to update the compiler to create 64-bit versions of plug-ins.
If the warning
CreatePackage.bat […] exited with code 1 appears, you do not have to worry, unless you want to create AAX plug-ins. The error simply means that the AAX SDK is not installed.Warning
Cannot open include file: 'ForcedInclude.h': No such file or directory means that the RTAS SDK was not found. Again, if RTAS is not needed, you can ignore this.Next time we will study the project code.
Original articles:
martin-finke.de/blog/articles/audio-plugins-001-introduction
martin-finke.de/blog/articles/audio-plugins-002-setting-up-wdl-ol
Source: https://habr.com/ru/post/224911/
All Articles