(May 25, Kiev) Fighters of the invisible front or the story of how to protect themselves from DDoS-attacks in a short time using Radware

In a previous article, I reviewed the main development of DDoS attacks and reviewed Radware solutions. The review is a review, but the effectiveness of the solution is known in combat conditions.
Not so long ago (around May 25 in Kiev), by the will of fate, the mission had just over two days to organize the protection of a state web site from expected DDoS attacks.
This article consists of two parts. In the first one, I will describe how to configure the selected solution to protect against DDoS attacks, and in the second, how it protected the state website.
')
So my article will be useful as engineers who are going to test the described solution, as well as those who are just following the news and wondering how protection from first-hand DDoS attacks occurred.
DDoS protection solution
The choice of equipment against protection fell on the manufacturer Radware, as it has proved itself quite well earlier.
The day before the expected attacks, I was allowed to the provider's site, where there was a mirror of the state web-site, so that I set up the system.
Having screwed the piece of iron into a rack, I assigned management protocols and an IP address and proceeded with setting it up.
But before starting to describe the setting, I will describe the deployment of the system itself.
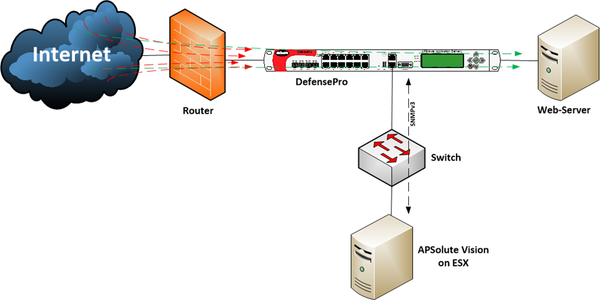
The system consisted of a protected web server, the Radware DefensePro device and the Radware APSolute Vision control system, which was deployed on an ESX virtual machine.
The device ports operate in bridge mode and are completely transparent, which allows it to be easily integrated into the existing network without changing the addressing in the infrastructure.
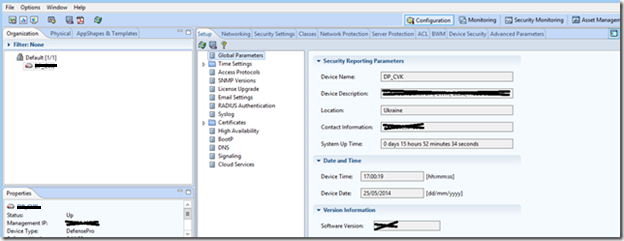
It’s very inconvenient to set up the piece of hardware directly by accessing its web interface, and the big disadvantage is that you cannot view statistics of current attacks in real time and also build reports on the attacks that occurred (reports are made by a separate feature - Security Reporter). Vision itself is managed by a piece of iron and collects statistics using the SNMP protocol. I have installed SNMP version 3 for secure traffic management.
Installing Vision Client for PC
To do this, go through the Web to the IP address of the installed APSolute Vision, download the client itself and install it.

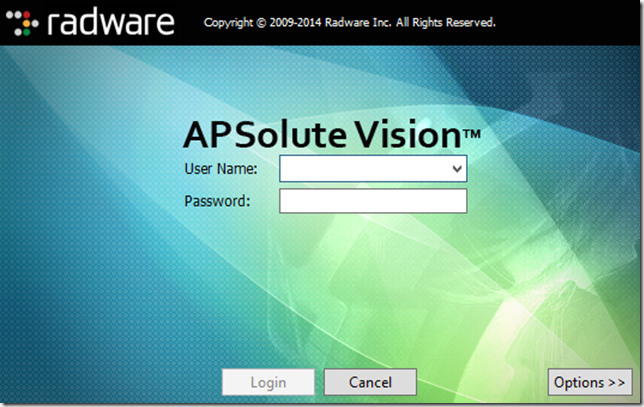
Now we run the installed client and see in front of us such a window.
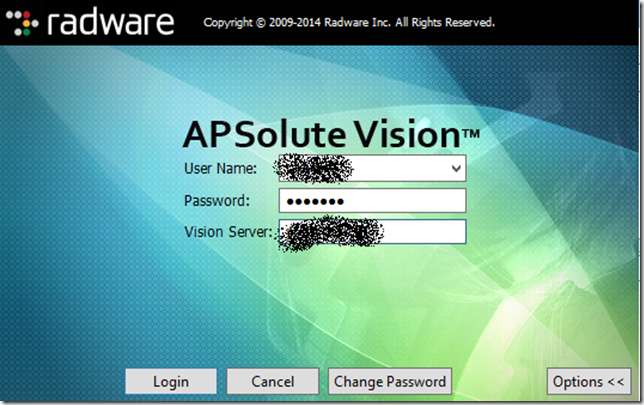
Enter the login, password and IP address of the APSolute Vision server and get to its interface.
Let's see how the Radware device is added to manage it through APSolute Vision.

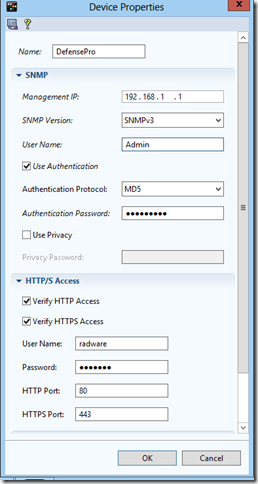
Now that DefensePro is added, you need to configure it.
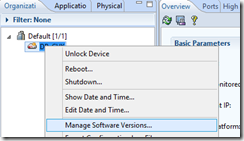
To enter the device configuration mode, you must first lock it. It is done this way.

Now you can customize the hardware itself.
Customization
1. First, you need to update the software glands:
• Firmware
• Attack description file
• Attack Signatures
Firmware:
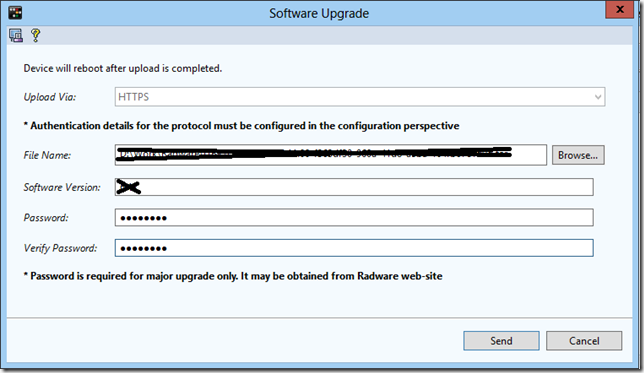
First, download the firmware on the model of our hardware from the partner portal on your PC. But do not rush to leave the portal. In order for the firmware to be successfully started by the device, you must also generate a password. On the same portal, we look for the “Password Generator”, go to it and, setting the platform of our piece of iron from the drop-down list, the version of the firmware we want to install and the MAC address, generate the password and save it (for example, in a notebook).
Next, go to the tab “Monitoring” -> “Manage Software Versions”
Here we needed a password.
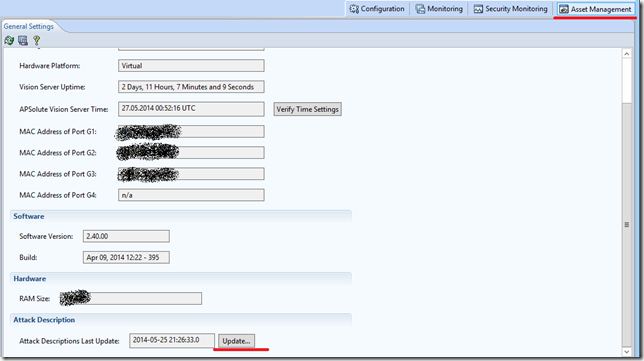
Attack Description File
Now update the attack description file that the hardware will use. We ship it from the same partner site. And I took the file for all Radware devices.
Go to “Asset Management” and at the bottom we find the button for updating the attack description file.
Signatures
Again, download the file with signatures from the partner site. On the home page there is a link to it.
After downloading, go to the tab “Monitoring” and update the signatures of attacks on DefensePro.

Security policies
1. You must first enable the necessary functions that we want to use for protection.
To ensure effective opposition to attacks on the state website, I turn on features to the maximum:
• Signature Protection
• DoS Shield
• BDoS Protection (Behavioral DoS)
• BDoS Early Blocking
• Anti-Scanning
• SYN Flood Protection
• HTTP Flood Protection
• Packet Anomaly
This will be enough to protect the web server.
I have no desire to describe in detail every tick. All this can be found in the DefensePro User Guide. But I will explain the protection functions themselves.
Signature Protection
Signatures protect against already known application vulnerabilities, common viruses, trojans, spyware, worms and DoS.
By default, this type of protection is enabled. And it should be included. But all the same, for complete confidence, it is necessary to double-check, because, as they say, “it is better to outrun than to win”
DoS Shield
This feature protects against zero-day floods, including SYN floods, TCP floods, UDP floods, ICMP and IGMP floods.
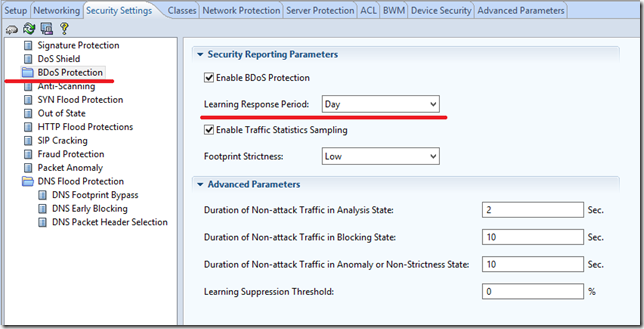
BDoS Protection
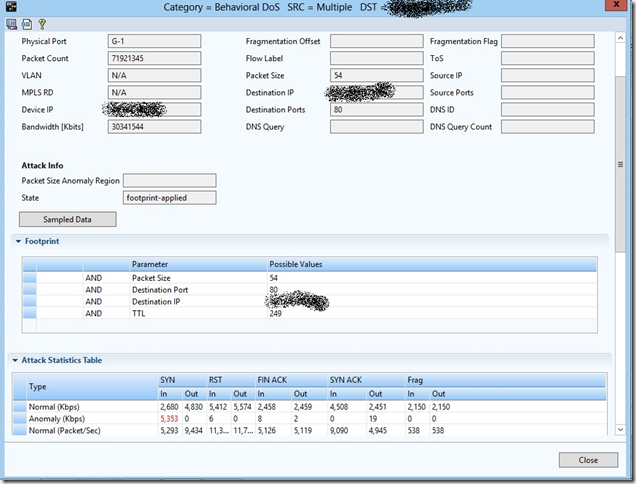
A very important feature. She is responsible for learning the hardware itself and shaping the normal behavior of traffic.
The chip DefensePro is that, after training, when launching a DDoS attack (this is not known to anyone, for which there is no signature, no ordinary SYN Flood and HTTP Flood), the piece of hardware tracks an abnormal increase in traffic and when the specified limits are exceeded - begins to analyze the presence of an attack. Regulated detection of suspicious traffic - 10 ms. Next, the device begins to analyze suspicious traffic and, when a verdict about the presence of an attack is made, it forms a signature in real time blocking such traffic. The regulated signature generation and blocking time is 8 ms. Thus, blocking a new type of DDoS attack occurs in 18 ms.
By default, the DefensePro training time is a week. But, in terms of the urgency of the task, I set for 1 day.
BDoS Early Blocking
This function, as part of the BDoS function, is a very good addition to the solution. She is responsible for the early blocking of attack traffic, even before he is marked with a device as suspicious. The blocking of the attack in this case will occur in the interval of up to 10 ms (that is why it is called Early Blocking).
The essence of this function is that it checks packets for normal formatting. And if she sees that the headers are incorrectly placed in this or that protocol, she starts blocking such traffic. In more detail about this function it is possible to learn everything in the same User Guide.
Anti-scanning
This feature protects against self-propagating worms, horizontal and vertical TCP and UDP scans and pings.
SYN Flood Protection
There is nothing difficult. From SYN flooding saves Connection Limit.
HTTP Flood Protection
Prevents a new, yet unknown HTTP flood to the site.
Packet anomaly
Protects against abnormally formatted packages.
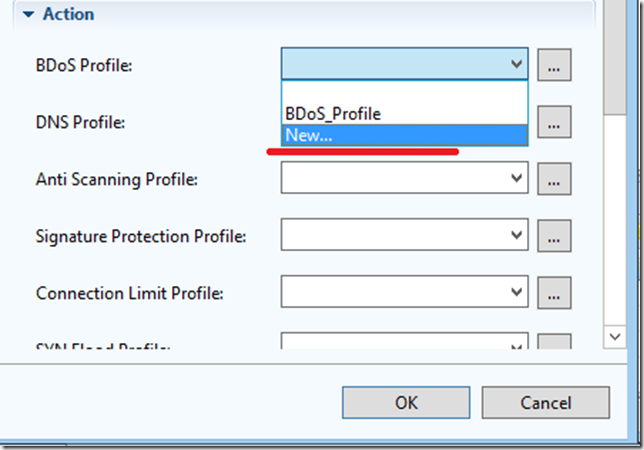
2. After the necessary protection features have been activated, it's time to start declaring a secure server and writing security policies.
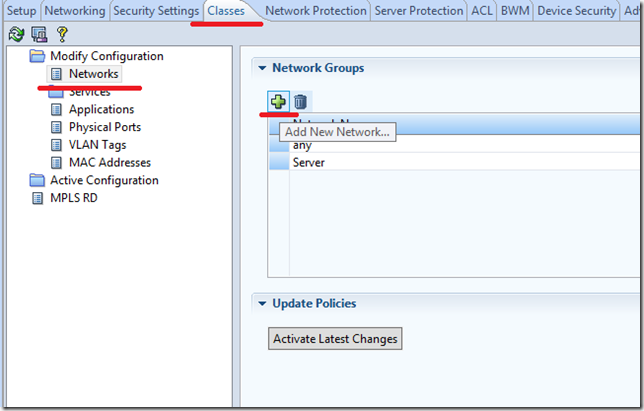
2.1. The declaration of the protection object (server) occurs in the section “Classes” -> “Networks”
2.2. Security policy is announced in the Network Protection section.
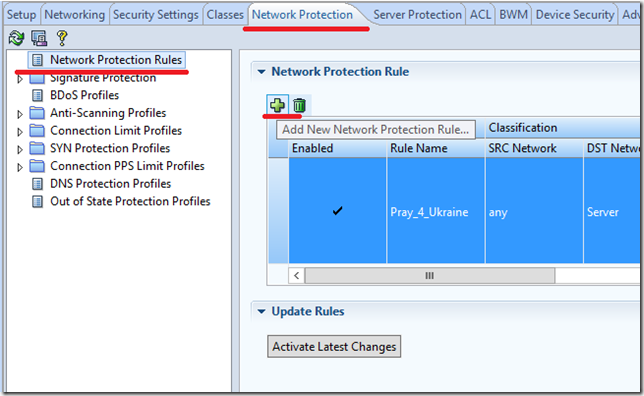
And then we begin to fill our policy
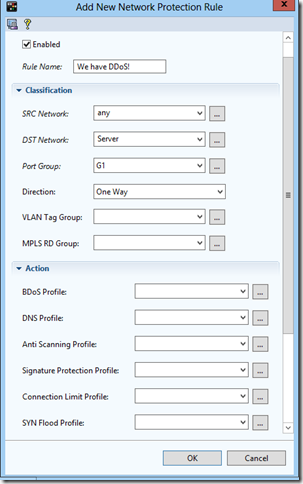
We set the name of the policy, the source network is any, the destination network is our previously announced server.
Port group - here we create a new port group, in which we specify our interface, which looks to the Internet.
I have this G1 interface.
Direction, that is, direction, means in which direction traffic will be inspected by a given policy. Choices are One Way and Two Way.
One Way - only incoming traffic.
Two Way - both incoming and outgoing. In Radware terminology, this is called “smart line”.
Now let's proceed directly to filling the policy.
A policy in DefensePro consists of profiles of security features previously activated by us.
Profiles are made up of rules.
In the article, I will not describe the whole process completely, as I filled out the security policy, since it will take quite a lot of time and space for the reader. Therefore, I will simply show an example on the task of the profile of one protection function and the final policy formed.
For example, take BDoS, as one of the most important.

For the first installation is recommended to put all the checkboxes.
It is also mandatory to set the incoming and outgoing speeds of the channel, which is connected to the DefensePro interfaces.
And also an obligatory parameter is to set the percentage of protocols in the declared incoming and outgoing speeds. Since we can only assume these percentages, not knowing exactly, we can set a default quota, which is determined by the device itself.
I also recommend checking the Packet Trace checkbox so that, during and after the attack, the device remembers the IP addresses of the attackers.

Click “OK”.
For BDoS, only the security profile is set. But other protection functions consist of profiles that are made up of rules.
For example, take the Connection Limit security feature.
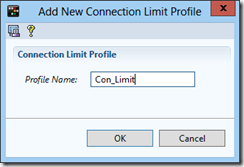
Now you need to fill the profile with the rules of protection.
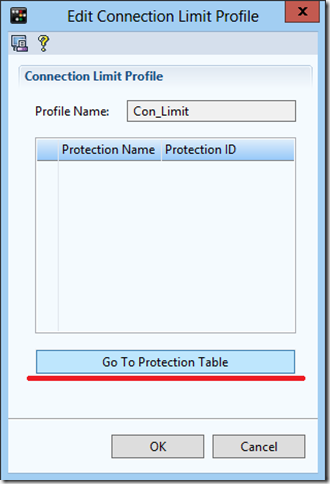
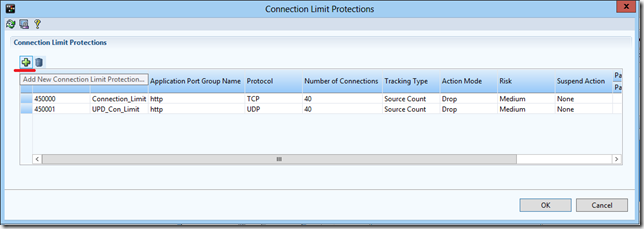

Thus, several rules can be combined in one profile and apply the last one in the security policy.
Similarly, we fill our policy with other protection profiles.
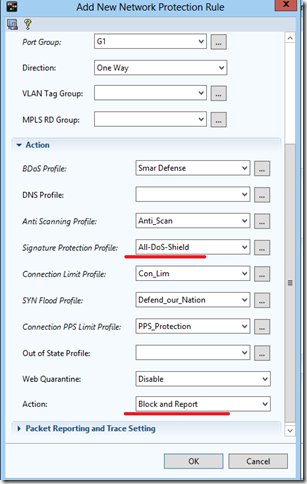
Separately, I would like to stop at the protection function by signatures. I chose All-DoS-Shield here, i.e. Incoming traffic is compared with all signatures in the database, thus protecting it as much as possible. But this has its minus - more CPU load. If you know which application to protect, all you need to do is select the required set of signatures to compare the incoming traffic with them.
Action I had to choose Block and Report.
It is generally recommended to initially install Forward, in order not to block legitimate traffic. But, since I had little time, I immediately took blocking.
After the policy is ready, you need to apply it on the device.
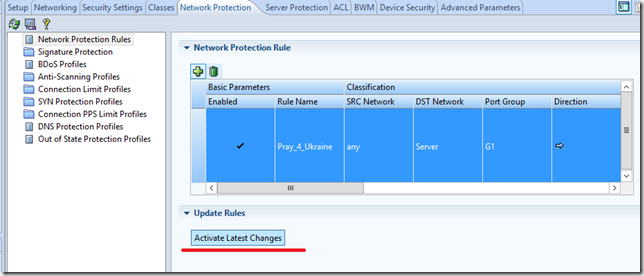
Everything, our server is protected from network attacks.
3. Now you need to protect it from attacks aimed at vulnerability level 7
To do this, go to the tab “Server Protection” and in the same way create a security policy against attacks of the 7th level


Everything. We activate the policy and our server is protected.
Attack protection
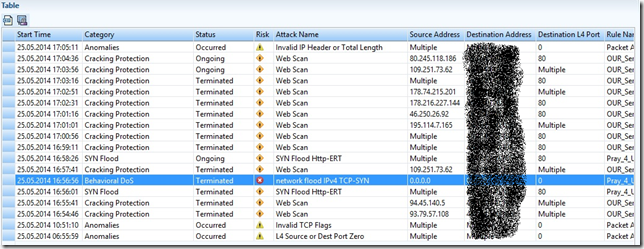
So the day came when the attacks were expected. Around 00:30 at night, the first scans for server vulnerabilities began. In the middle of the night, small HTTP floods were observed.
These attacks successfully repulsed the server protection policy against attacks of the 7th level.
At 9:00, an intensive TCP SYN and HTTP flood began, along with scanning for vulnerabilities.
Here are the attacks that went to the state website.
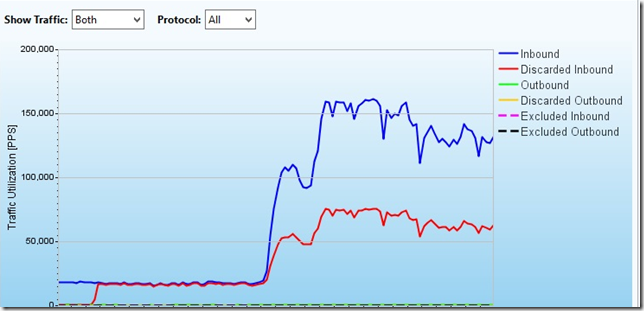
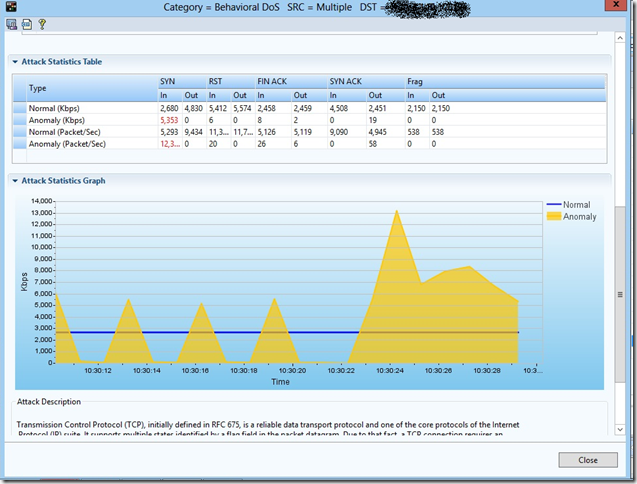
How it looks in graphics mode APSolute Vision

Flood lasted until 15:00 and then everything calmed down. In the period before 19:30, jokes started from colleagues, that the attackers received the first part of the fee for the attack and had already drunk.
But at 7:30 pm, the same TCP SYN and HTTP floods began, along with scanning the server for vulnerabilities and DDoS for application vulnerabilities.

In megabits

And in kilopackets per second
The graph shows from which IP addresses the attacks came:

Spoiler with a personal comment, which was asked to hide in the comments
Well, actually, who would doubt. Personally, I'm not even surprised that the most massive attacks came from Russian IP addresses.
On the second wave of the attack, the DefensePro device itself has already built a signature based on an analysis of anomalous increase in traffic.
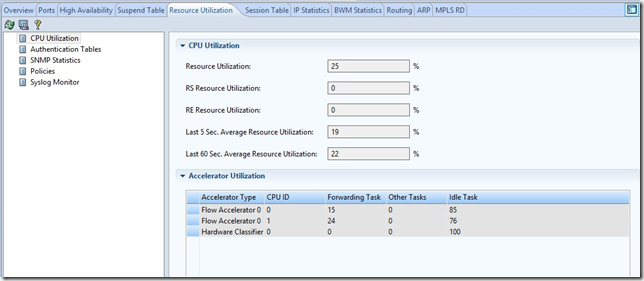
CPU load with this attack:
Somewhere from 20:30, the attack fell to this level:
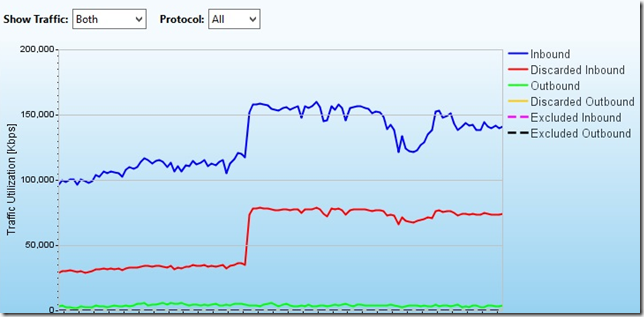
And at this level, the attack remained until 23:30.
At 23:30 we clearly see how the paid off time of the attack ended:


And the hamsters went to bed.
Subsequently, after 11:30 pm and throughout the next day, constant and small scans of the state web site for vulnerabilities were blocked that were blocked on DefensePro.
Thus, having drawn a line at the end of the article, I want to characterize the day of the expected attacks by two relatively average and not so long DDoSs that Radware DefensePro successfully beat off. By loading the processor, we see that it could withstand significantly more attacks. But we did not organize DDoS to check how long the glands would be.
MUK-Service - all types of IT repair: warranty, non-warranty repair, sale of spare parts, contract service
Source: https://habr.com/ru/post/224891/
All Articles