Google maps clustering
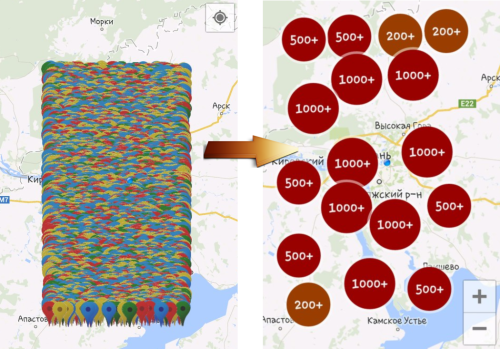
If you are developing applications using Google Maps, then you may well encounter the situation shown in the picture on the left. And, if you think that the picture on the right looks better, then you are here.
So, what problems arise when working with a large number of markers:
What is the solution to this problem? The answer is clustering. Cluster - the union of several homogeneous elements, which can be considered as an independent unit with certain properties. Accordingly, we must combine markers on a territorial basis and replace them with one marker. And, fortunately, all this has already been implemented.
In addition to the standard library for working with maps, Google provides a great library of Google Maps Android Marker Clustering Utility. This library is supplied separately and allows you to assemble markers.
')
Consider the most difficult example when you have several types of markers, each with its own icon and the necessary actions to click (for example, output InfoWindow with text).
Let the following task be set before us: a trading network is given, it has a certain number of points and a large number of trucks carrying goods that are able to report on their location. It is necessary to establish monitoring of the position of trucks and outlets. Truck markers should have a driver-face icon. The customer is severe, he saw the picture with the clusters and said that everything was so and not otherwise.
The first step is very logical - you need to describe an abstract class of the marker, from which all the others will be inherited. To be able to use clustering, this marker class must be able to return its location. To do this, you must implement the ClusterItem interface. Then the possible code of the abstract class:
Next is the not very important code of classes of markers of outlets and trucks, but suddenly someone is interested.
Well, the preparation is completed, now it's time to set up clustering. The most important thing here is the ClusterManager class, which allows you to flexibly customize clustering. The ClusterManager class is generalized; the class that implements the ClusterItem interface is passed as a parameter. As parameters during initialization, it is served with the application context and the GoogleMap object.
Thus, for our code, it will look something like this:
And now it remains only to add markers to this object using the clusterManager.addItem method (AbstractMarker marker); .
Using the cluster method of the ClusterManager class object, you can call reclustering (for example, after adding elements). To automatically call this method when the camera position changes (when the approximation changes), you must assign an OnCameraChangeListener handler to the map.
Well, now our map is almost beautiful. Why almost? Because instead of the photos of drivers, you will see only the default markers,it is possible that this would be better , and nothing will happen when you click on the marker, even if you wrote the InfoWindowAdapter. Now we will improve the appearance, using the means provided.
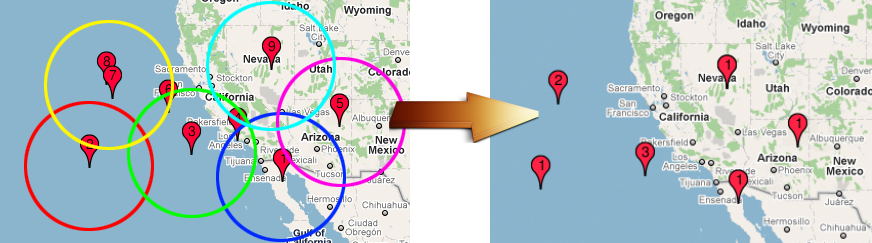
Consider the clustering algorithms. There are various algorithms, we can distinguish 2 main ones:
Grid-based clustering - the visible area of the map is divided into squares; one cluster is placed in the center of the square.
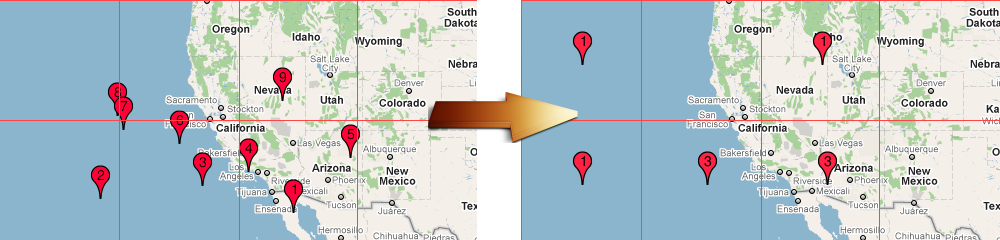
Distance-based clustering is the default algorithm. Based on the calculation of the centers of the highest concentration of markers; Clusters do not have fixed boundaries.
I hope Google will not be offended at me for the pictures taken from the documentation.
It is unlikely that there will be a significant need to write your own algorithm, but if you really want to, then you will have to implement the Algorithm interface.
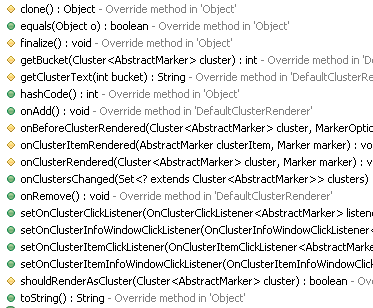
As I said, the photos of our drivers have changed to standard markers. Not order. Fortunately, this is easy to fix (and not only that). The clusterManager object has a setRenderer method that allows you to set a class that will manage clusters / markers before mapping and more. By default, the DefaultClusterRenderer class is used, in which many of the chips are already implemented correctly. Therefore, the best approach would be to inherit from this class and override the necessary methods:
And assign this class to our clusterManager:
I only need to change the icon for the markers, so I only redefined the onBeforeClusterItemRendered method, which allows you to configure cluster elements before outputting to the map. But the choice of methods for redefining is large enough:
Just as a separate fact, in the clustering process, an important role is played by the MarkerManager class, which essentially provides an interface for working with a collection of markers and clusters.
And let's make the final touch: by clicking on the marker, we will standardly display information about the current marker using the toString method (we redefine it), and by clicking on the cluster we will display how many outlets and trucks are in this region.
First, we need the objects of the selected marker and cluster:
You must add listeners to the clusterManager:
You also need to make the clusterManager listener for the OnMarkerClickListener event:
Now you need to assign the InfoWindowAdapter to all markers and all clusters. To do this, you can use the methods of obtaining collections of clusters of markers with the object clusterManager. Also, do not forget to assign InfoWindowAdapter to the map:
Well, for an example, the class ClusterInfoWindow might look like:
Thus, we have created a beautiful and quite functional map.
I hope this article was helpful to you. It is only the result of studying the library and personal research, so I will not leave links to resources. Thank you for reading to the end!
PS Join the world's largest community of Android developers in Slack.
So, what problems arise when working with a large number of markers:
- With the number of markers> 5000-10000, the card begins to severely slow down.
- The appearance of the map, filled with markers, does not please the eye at all.
What is the solution to this problem? The answer is clustering. Cluster - the union of several homogeneous elements, which can be considered as an independent unit with certain properties. Accordingly, we must combine markers on a territorial basis and replace them with one marker. And, fortunately, all this has already been implemented.
In addition to the standard library for working with maps, Google provides a great library of Google Maps Android Marker Clustering Utility. This library is supplied separately and allows you to assemble markers.
')
Consider the most difficult example when you have several types of markers, each with its own icon and the necessary actions to click (for example, output InfoWindow with text).
Who is more interesting to read the documentation
Task
Let the following task be set before us: a trading network is given, it has a certain number of points and a large number of trucks carrying goods that are able to report on their location. It is necessary to establish monitoring of the position of trucks and outlets. Truck markers should have a driver-face icon. The customer is severe, he saw the picture with the clusters and said that everything was so and not otherwise.
Step 1. Preparation
The first step is very logical - you need to describe an abstract class of the marker, from which all the others will be inherited. To be able to use clustering, this marker class must be able to return its location. To do this, you must implement the ClusterItem interface. Then the possible code of the abstract class:
public abstract class AbstractMarker implements ClusterItem { protected double latitude; protected double longitude; protected MarkerOptions marker; @Override public LatLng getPosition() { return new LatLng(latitude, longitude); } protected AbstractMarker(double latitude, double longitude) { setLatitude(latitude); setLongitude(longitude); } @Override public abstract String toString(); public abstract MarkerOptions getMarker() { return marker; } public void setMarker(MarkerOptions marker) { this.marker = marker; } //others getters & setters } Next is the not very important code of classes of markers of outlets and trucks, but suddenly someone is interested.
TradeMarker, TruckMarker
public class TradeMarker extends AbstractMarker { private static BitmapDescriptor shopIcon = null; private String description; public TradeMarker(String description, double latitude, double longitude) { super(latitude, longitude); setDescription(description); setBitmapDescriptor(); setMarker(new MarkerOptions() .position(new LatLng(getLatitude(), getLongitude())) .title("") .icon(shopIcon)); } public static void setBitmapDescriptor() { if (shopIcon == null) shopIcon = BitmapDescriptorFactory. fromResource(R.drawable.trademarker); } public String toString() { return "Trade place: " + getDescription(); } public String getDescription() { return description; } public void setDescription(String description) { this.description = description; } } public class TruckMarker extends AbstractMarker { private String name; private String aim; public TruckMarker(String name, String aim, double latitude, double longitude, BitmapDescriptor photo) { super(latitude, longitude); setName(name); setAim(aim); setMarker(new MarkerOptions() .position(new LatLng(getLatitude(), getLongitude())) .title("") .icon(photo)); } public String toString() { return "Name: " + getName() + "\n" + "Aim: " + getAim(); } public String getName() { return name; } public void setName(String name) { this.name = name; } public String getAim() { return aim; } public void setAim(String aim) { this.aim = aim; } } Step 2. The simplest clustering
Well, the preparation is completed, now it's time to set up clustering. The most important thing here is the ClusterManager class, which allows you to flexibly customize clustering. The ClusterManager class is generalized; the class that implements the ClusterItem interface is passed as a parameter. As parameters during initialization, it is served with the application context and the GoogleMap object.
Thus, for our code, it will look something like this:
private ClusterManager<AbstractMarker> clusterManager; //... clusterManager = new ClusterManager<AbstractMarker>(this.getApplicationContext(), getMap()); And now it remains only to add markers to this object using the clusterManager.addItem method (AbstractMarker marker); .
Using the cluster method of the ClusterManager class object, you can call reclustering (for example, after adding elements). To automatically call this method when the camera position changes (when the approximation changes), you must assign an OnCameraChangeListener handler to the map.
map.setOnCameraChangeListener(clusterManager); Well, now our map is almost beautiful. Why almost? Because instead of the photos of drivers, you will see only the default markers,
Step 3. Algorithm
Consider the clustering algorithms. There are various algorithms, we can distinguish 2 main ones:
Grid-based clustering - the visible area of the map is divided into squares; one cluster is placed in the center of the square.
- Supports removal of items.
- It works quite quickly.
- It does not look very nice, but if the markers are evenly distributed, then there is nothing wrong with this algorithm.
Distance-based clustering is the default algorithm. Based on the calculation of the centers of the highest concentration of markers; Clusters do not have fixed boundaries.
- Does not support deleting items.
- It works slower (more complex calculations).
- Beautifully arranged markers in accordance with the position on the map.
I hope Google will not be offended at me for the pictures taken from the documentation.
It is unlikely that there will be a significant need to write your own algorithm, but if you really want to, then you will have to implement the Algorithm interface.
Step 4. Modifying the properties of the clusterManager object
As I said, the photos of our drivers have changed to standard markers. Not order. Fortunately, this is easy to fix (and not only that). The clusterManager object has a setRenderer method that allows you to set a class that will manage clusters / markers before mapping and more. By default, the DefaultClusterRenderer class is used, in which many of the chips are already implemented correctly. Therefore, the best approach would be to inherit from this class and override the necessary methods:
public class OwnIconRendered extends DefaultClusterRenderer<AbstractMarker> { public OwnIconRendered(Context context, GoogleMap map, ClusterManager<AbstractMarker> clusterManager) { super(context, map, clusterManager); } @Override protected void onBeforeClusterItemRendered(AbstractMarker item, MarkerOptions markerOptions) { markerOptions.icon(item.getMarker().getIcon()); } } And assign this class to our clusterManager:
clusterManager.setRenderer(new OwnIconRendered( getApplicationContext(), getMap(), clusterManager)); I only need to change the icon for the markers, so I only redefined the onBeforeClusterItemRendered method, which allows you to configure cluster elements before outputting to the map. But the choice of methods for redefining is large enough:
Just as a separate fact, in the clustering process, an important role is played by the MarkerManager class, which essentially provides an interface for working with a collection of markers and clusters.
And let's make the final touch: by clicking on the marker, we will standardly display information about the current marker using the toString method (we redefine it), and by clicking on the cluster we will display how many outlets and trucks are in this region.
First, we need the objects of the selected marker and cluster:
private AbstractMarker chosenMarker; private Cluster<AbstractMarker> chosenCluster; You must add listeners to the clusterManager:
clusterManager.setOnClusterItemClickListener(new ClusterManager.OnClusterItemClickListener<AbstractMarker>() { @Override public boolean onClusterItemClick(AbstractMarker item) { chosenMarker = item; return false; } }); clusterManager.setOnClusterClickListener(new ClusterManager.OnClusterClickListener<AbstractMarker>() { @Override public boolean onClusterClick(Cluster<AbstractMarker> cluster) { chosenCluster = cluster; return false; } }); You also need to make the clusterManager listener for the OnMarkerClickListener event:
map.setOnMarkerClickListener(clusterManager); Now you need to assign the InfoWindowAdapter to all markers and all clusters. To do this, you can use the methods of obtaining collections of clusters of markers with the object clusterManager. Also, do not forget to assign InfoWindowAdapter to the map:
clusterManager.getMarkerCollection().setOnInfoWindowAdapter(new MarkerInfoWindowAdapter()); clusterManager.getClusterMarkerCollection().setOnInfoWindowAdapter(new ClusterInfoWindow()); map.setInfoWindowAdapter(clusterManager.getMarkerManager()); Well, for an example, the class ClusterInfoWindow might look like:
private class ClusterInfoWindow implements InfoWindowAdapter { @Override public View getInfoContents(Marker arg0) { return null; } @Override public View getInfoWindow(Marker marker) { if (chosenCluster != null) { View v = getLayoutInflater().inflate(R.layout.cluster_window, null); TextView info = (TextView) v.findViewById(R.id.clusterTitle); int[] markerTypesCount = new int[2]; Arrays.fill(markerTypesCount, 0); for (AbstractMarker abstractMarker : chosenCluster.getItems()) { if (abstractMarker instanceof TradeMarker) markerTypesCount[0] += 1; else if (abstractMarker instanceof TruckMarker) markerTypesCount[1] += 1; } info.setText("Trade places: " + markerTypesCount[0] + "\n" + "Truck: " + markerTypesCount[1] + "\n"); return v; } return null; } } Thus, we have created a beautiful and quite functional map.
I hope this article was helpful to you. It is only the result of studying the library and personal research, so I will not leave links to resources. Thank you for reading to the end!
PS Join the world's largest community of Android developers in Slack.
Source: https://habr.com/ru/post/224889/
All Articles