Kerio Control for Windows to Kerio Control Appliance Migration Guide
A few introductory words.
Fifteen years ago, a company of four enthusiasts in a small Czech town developed and released the first version of a revolutionary solution, which marked the beginning of Kerio Technologies. WinRoute Pro was an advanced software router and NAT firewall running on the Windows operating system used on standard user PCs, it was the combination of these features that led to the huge popularity of the product among IT professionals.
Let's move forward to 2009. The past decade was marked by increased attention to security, in connection with this version of Kerio Winroute Firewall 6.7.1. enjoyed particular success. In this version, the first version of the software module (Software Appliance) was released. This module was built on the basis of a proprietary Linux-like OS using a proprietary web-based administration interface to perform system management functions. Simultaneously with the software module, a virtual module (Virtual Appliance) was prepared for the VMware virtualization environment. However, both Appliance modules were less functional than the main Windows version of the application. A year later there was a significant change in the name of the product, it became known as Kerio Control. This was due to the inclusion of the Intrusion Prevention System (IPS) into the product’s functionality and its transformation into a fully-fledged Unified Threat Management (UTM) solution.
With the growing popularity of the product among users, the goal of Kerio Control development has been to increase productivity and expand opportunities for organizing and maintaining security. In version Kerio Control 7.4, this is reflected in the form of adding support for virtual local area networks (VLANs). However, this function, like some others added over the last two years, were no longer available for the Kerio Control Windows application.
')
It was the fact of the release of a weighty VLAN feature that marked the end of the Kerio Control “era” for Windows. Version of Kerio Control 7.4 is the latest "Windows-version" of Kerio Control.
Support for this version (both user and application code support) is provided by Kerio until the end of 2014. We urge all our users, if possible, to make the transition from the current Windows versions of the Kerio Control application to the Kerio software or virtual modules.
To simplify the transition, we have added support for virtualization from Microsoft - Hyper-V. User authentication through the Microsoft Active Directory directory service is preserved in full and familiar to our users. Administration and access to the user statistics interface can still be performed using standard web browsers installed on any modern OS. VPN server Kerio and IPsec VPN allow you to connect from a variety of stationary operating systems, including Windows, Linux, MacOS, and using the built-in VPN clients of Android and Apple mobile devices.
Yes, Windows is an excellent platform, but everything passes, and Kerio OS comes to replace - Linux-like OS, which is a universal platform for all Appliance assemblies of the Kerio Control application. And just to help our current users make the transition from the Windows version of our KControl / KWF application, we decided to publish a special guide on switching from Windows to the Appliance platform, which can also be downloaded from a special page in our Samepage.io cloud as pdf- file for review in "offline" mode.
And he said, "Let's go !!"
So, I suggest to start in order. First of all, I would like to consider some of the most common misconceptions that stop UTM Kerio Control administrators from such a migration:
- The difficulty of the transition.
- The inability to save the configuration, application logs, user statistics data when switching to an Appliance assembly.
- Mandatory knowledge of open source.
- The inability to perform more than one role on one physical server.
- The complexity of backing up Linux solutions.
- “It works — don't touch it” (“If there is a possibility that some kind of trouble may happen, then it will happen” (“Murphy's law”).
In a refutation of these "myths", I propose to briefly review the real picture of what is happening during the migration process from the Windows version to the Appliance version of Kerio Control:
- The transition with the implementation of additional steps of updating the version in cases where it is needed, takes no more than two hours of “dirty” time.
- Configuration, log data and user statistics database are transferred completely. This will be discussed separately in this Guide.
- Knowledge and experience with OpenSource in general and with the Linux operating system in particular are not needed. The installation of the application and the configuration of the basic parameters (IP-addresses, time and language of the system interface) is carried out through a graphic user interface in Russian. All other actions to administer your Kerio Control UTM Gateway are performed through the usual Russian-language web-based administration interface. There is no need to access the Linux console, although this is possible and we will take a closer look at when it may be necessary.
- Using the “virtual module” of Kerio Control, you can fulfill as many IT roles as you need within a single virtualization server. Virtualization as a whole allows for better utilization of server hardware resources and expanding boundaries in IT infrastructure planning.
- Another advantage of the transition is a simplified backup method for the configuration of the Kerio Control “software module” using automatic backup of the configuration to the Kerio company's cloud — Samepage.io, or to any FTP server convenient for you.
- The requirement for a version upgrade can come not only from the IT department, but also be a consequence of the business requirements for expanding the capabilities of the UTM solution. Do not forget that "everything achieved to ensure flight safety is the result of overcoming the" Murphy's Law. "
Now I propose to get acquainted with what the software (Software Appliance) and virtual (Virtual Appliance) Kerio Control modules represent.
Kerio Control Software Appliance


Features of the Kerio Control Software Appliance
Kerio Control combined with a secure OS
32-bit Debian OS on Linux Kernel 3.12 with the ability to use up to 64GB of OP (support for PAE)
Available in image (ISO)
Burns to CD / DVD or USB-Flash for installation on bare hardware.
The main advantages of the platform
- Lack of software and hardware conflicts
- No virus threats
- The familiar-easy administration interface of Kerio Control
- No need for knowledge of * nix systems.
Kerio Control Virtual Appliance
Kerio Control Hypervisors from
Software Appliance VMware and Microsoft

Supported Virtualization Tools:
VMware (workstation, player, server, ESX)
Hyper-V (2008 r2, 2012, 2012 r2)
The main advantages of the platform
- Execution of several isolated roles on the same physical
server - Transferring UTM to another server is possible in minutes
- The ability to add a network adapter without changing the hardware
funds - Increased network security without having to purchase a new one.
equipment
After we got acquainted with the possible distributions, it's time to contact the users of the “bearded” versions of Kerio Winroute. Below is information on updating old Windows versions of KWF to Kerio Control 7.4 (the final version of the application for the Windows platform) as well as a few nuances that must be taken into account when performing the procedure for updating the version of the Kerio Control / KWF application as a whole.
Upgrades from version 6.X.X to version 7.X.X should be carried out in stages in accordance with the following scheme:
- Step-by-step transition from KWF 6.5.x to KControl 7.4.x (Windows)
- 6.5.X> 6.6.0 >> 6.7.1> 7.0.X> 7.1.X >> 7.4.X
Direct migration to 7.4.X is possible only from version 7.1.X and later versions.
- Upgrade from version 7.0.X to version 8.XX (Appliance)
- 7.0.X> 7.1.X >> 8.0.X (Software Appliance)
When updating, it is important to consider the following points:
- Exporting the configuration of the Windows version of KControl / KWF can be used to apply only on a similar version of the Applaince assembly, to guarantee 100% of all settings to be transferred
- It is possible to transfer the database of user statistics of visits to the Internet and the contents of the logs of the Kerio Control application.
- The transfer of the user statistics database of Internet visits and the contents of the Kerio Control application logs must be performed within version 7.4.2 (the final version of the Kerio Control application for Windows OS)
This is all about the introductory part.
Now, for familiarization directly with the order of the administrator to update the version of KControl / KWF in use.
Below we list the steps that, for everyone, for someone, for only a part, will be done by the administrators
- Update Version Used
- Switch to Appliance Platform
- Install Software Appliance
- Install VMware Virtual Appliance
- Install Hyper-V Virtual Appliance
- Configuring Network Interfaces
- Save and migrate user configuration and data
- Migrating database of application logs and database of user statistics of Internet visits
- Check the integrity of transferred data
- Update to the current version of the Kerio Control Appliance
Updating the version of the Kerio Control application (KWF) in use
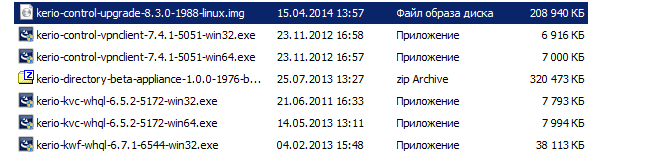
The first thing we need is to get those versions of the KControl / KWF distributions that you need to complete the transition, according to the order of transition described a little above. To download the necessary distributions, use only the official source - the Kerio company website: www.kerio.ru or directly the site of our archive of releases: download.kerio.com/archive
The path to the archive is shown in the following images:


Suppose you are migrating from the latest version of KWF 6.7.1, your goal is a working version of Kerio Control Appliance 8.3 (the current version of the application is for April 2014)
The main “difficulty” of the transition in this case is the need to perform not a direct update from the version of KWF 6.7.1 to Kerio Control 8.3, but a sequential transition to some “major” versions. This need is due to the inclusion in the configuration files of these "major" versions of some features that require post-processing after installing the application.
To upgrade from KWF 6.7.1 to Kerio Control 8.3, you will need to complete the following upgrade steps:
1. Upgrade to Kerio Control 7.0.0
2. Update to Kerio Control version 7.1.0
3. Update to Kerio Control version 7.4.2 (final version for Windows)
You can download the necessary distributions from our archive of releases .
The process of updating from version to version is the usual installation of the new version "on top" of the old one. The installation program will automatically shut down the Kerio Control system service (Kerio Winroute Firewall), determine the installation directory of the current version of Kerio Control (Kerio Win-route Firewall) and replace the application files that need to be updated; protocol files of the application and user configuration are saved unchanged. Configuration files will be saved in a special directory “UpgradeBackups” located in the root of the% programmfiles% \ Kerio \ directory.
Video clip of the regular update process:
Switching to the latest Windows version of Kerio Control 7.4.2 will be the final upgrade step for this platform. The next steps in the transition are to prepare the Appliance platform, migrate the configuration, database of logs and user statistics.
Switch to the Appliance Platform.
In this section, we will look at options for deploying various Kerio Control Appliance distributions.
Install Software Appliance
This version of the installation package can be deployed in the following ways:
- An ISO image can be burned onto a physical CD or DVD media, which you will need to use later to install Kerio Control on a physical or virtual host.
- In the case of virtual PCs, the ISO image can be connected as a virtual CD / DVD-ROM to install from it, without the need to write to physical media.
- An ISO image can be written to a USB flash drive and installed from it. For instructions, refer to the relevant article ( kb.kerio.com/928 ) in our knowledge base.
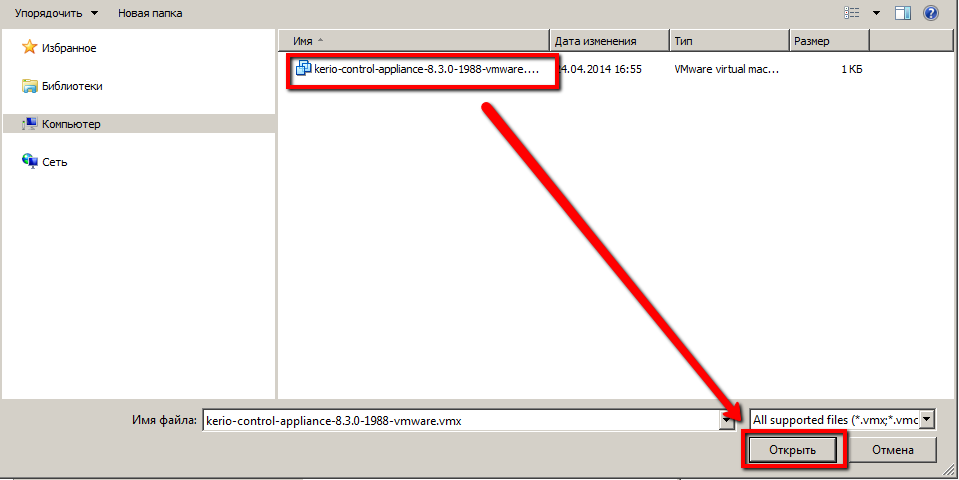
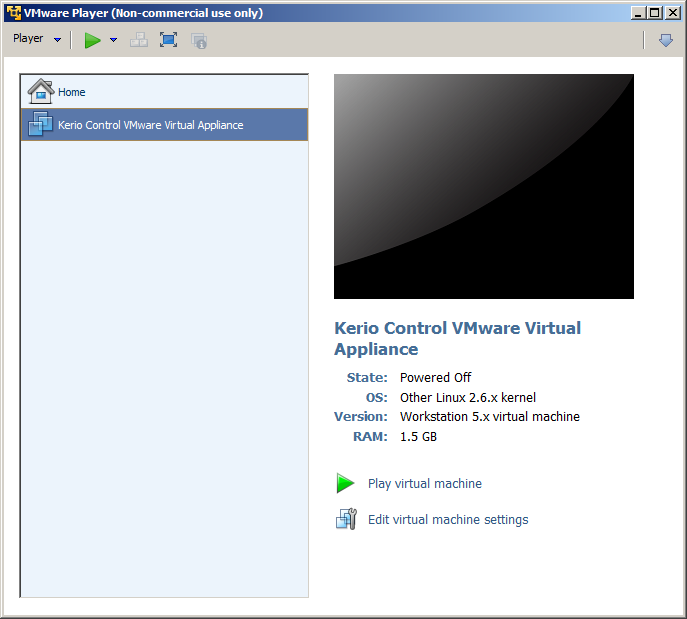
Install VMware Virtual Appliance
To install the Kerio Control VMware Virtual Appliance on various virtualization tools from VMware, use the appropriate version of the Kerio Control VMware Virtual Appliance distribution kit:
For VMware Server, Workstation, Player, Fusion, use the archived (*. Zip) VMX file:
Installing a virtual module in a VMware player

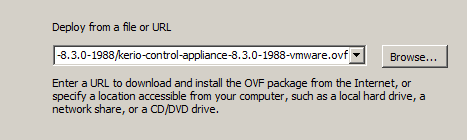
- For VMware ESX / ESXi / vSphere Hypervisor, use a special OVF link to import a virtual module that looks like this:
http://download.kerio.com/en/dwn/control/kerio-control-appliance-1.2.3-4567-linux.ovfVMware ESX / ESXi will automatically download the OVF configuration file and the corresponding virtual hard disk image (.vmdk)
When using the OVF format, the following aspects should be considered:
- In the virtual Kerio Control module, time synchronization with the virtualization server is disabled. However, Kerio Control has built-in time synchronization tools with public network time sources on the Internet. Thus, the use of synchronization between the virtual machine and the virtualization server is optional.
- The “shutdown” and “restart” tasks of the virtual machine will be set to the “default” values. The ability to set these values to “forced” shutdown and “forced” restart modes is retained, however, these shutdown and restart options can cause data loss in the virtual Kerio Control module. Virtual module Kerio Control supports the so-called. “Soft” shutdown and “soft” reboot, allowing you to shut down or restart the guest OS correctly, so it is recommended to use the default values.
Installing a virtual module (ovf) in VMware vSphere

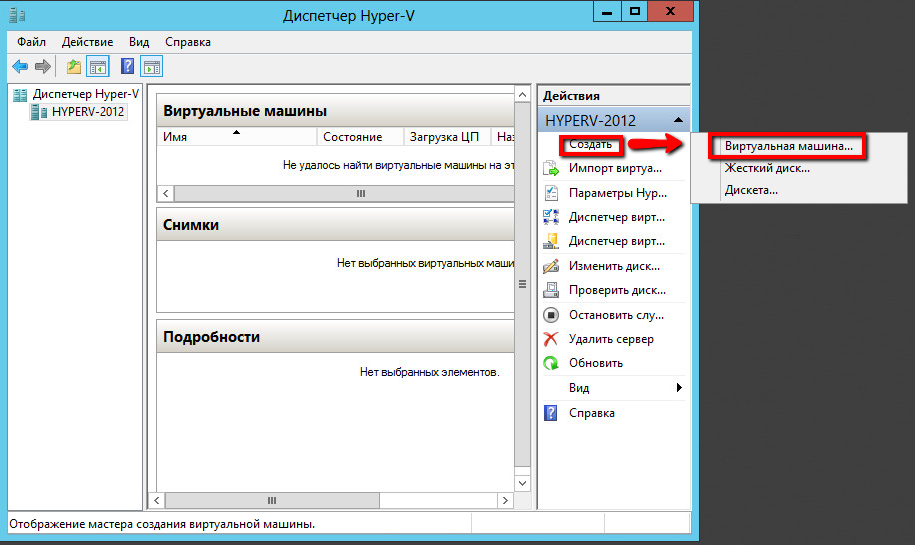
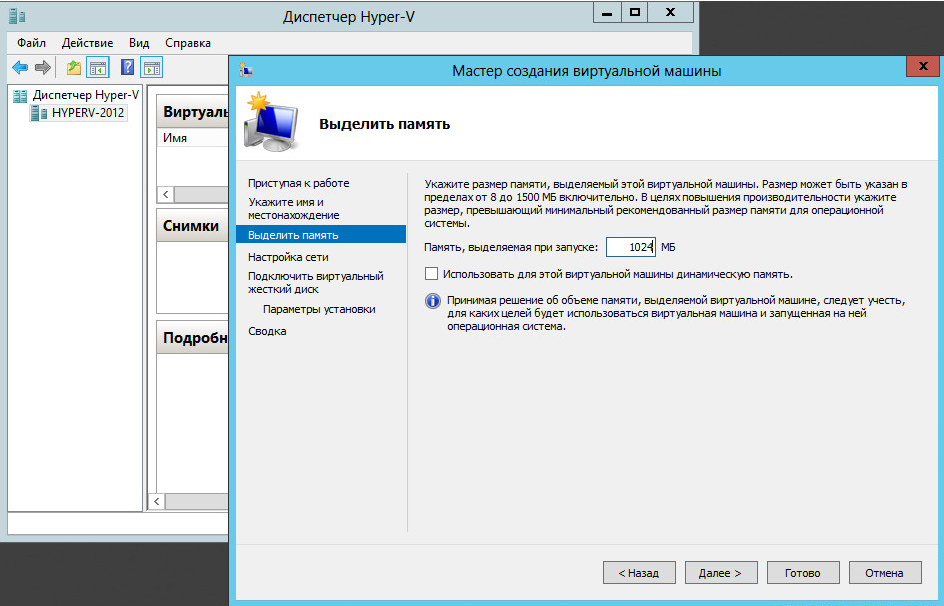
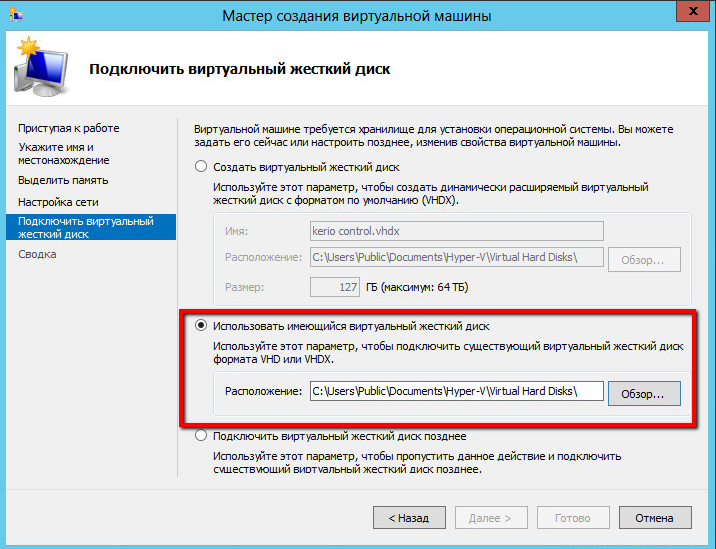
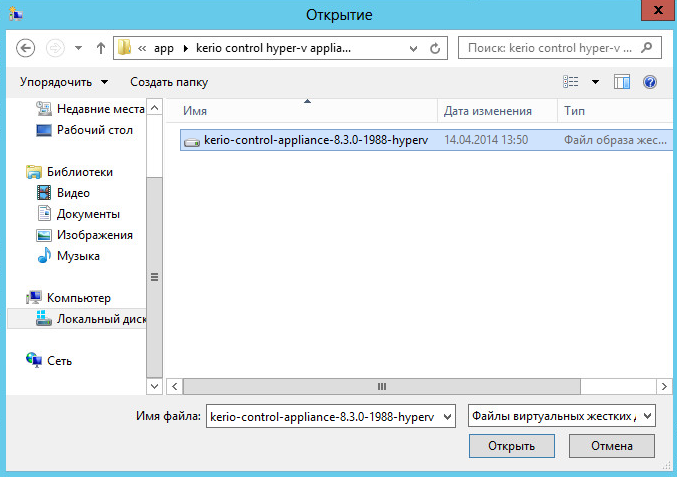
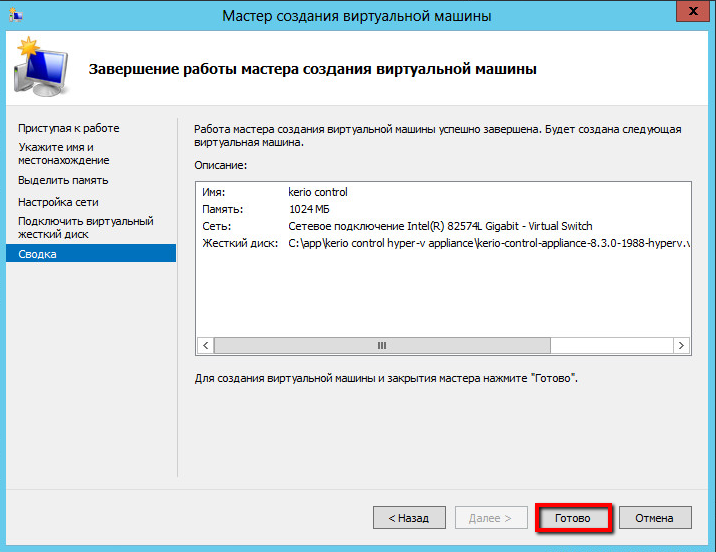
Install Virtual Appliance for Hyper-V
- Download the archived (* .zip) distribution kit, unpack it into the necessary folder.
- Create a new virtual machine, select the "Use existing virtual hard disk" option, specifying the file unpacked from the downloaded archive as the disk image
Installing a virtual module in MS Hyper-V

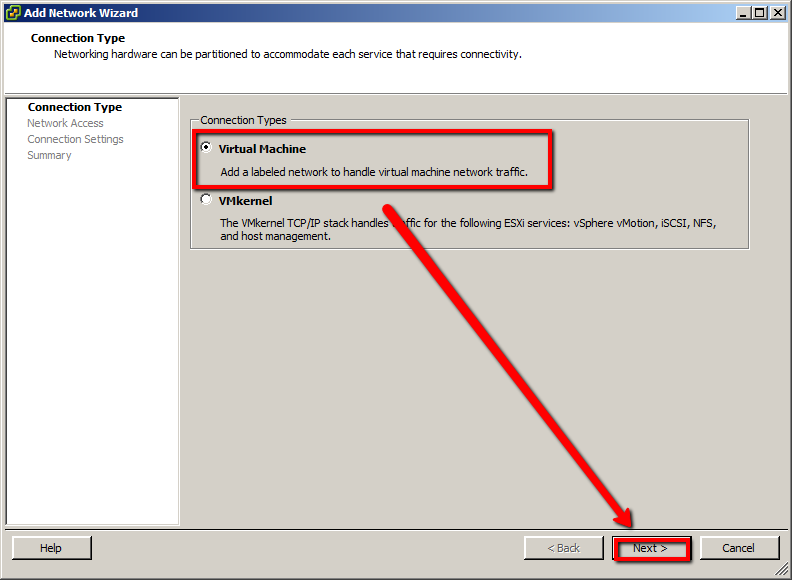
The next important point in preparing for the transition to the Appliance platform is the correct configuration of the network interfaces on the selected Appliance platform.
Configuring Network Interfaces in the Software Appliance
In the pseudo-graphical interface of the Kerio Control Software Appliance, you can configure IP addresses / multiple addresses in static or dynamic mode, create VLAN interfaces, and configure the interface in PPPoE mode.
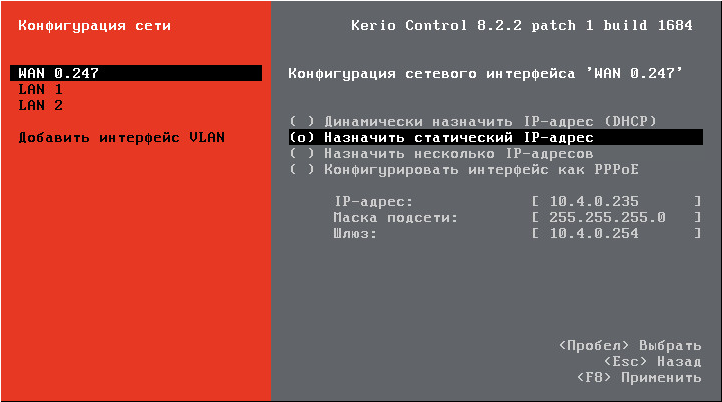
Note: The initial configuration of network interfaces in the distribution of the Kerio Control Software Appliance itself is identical for all assemblies of the Kerio Control Appliance, there are differences only when configuring virtual network interfaces in various virtualization environments where Kerio Control can be used.
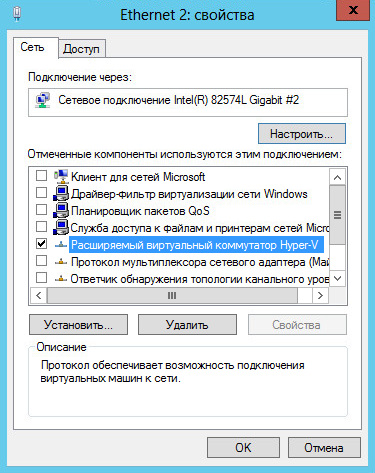
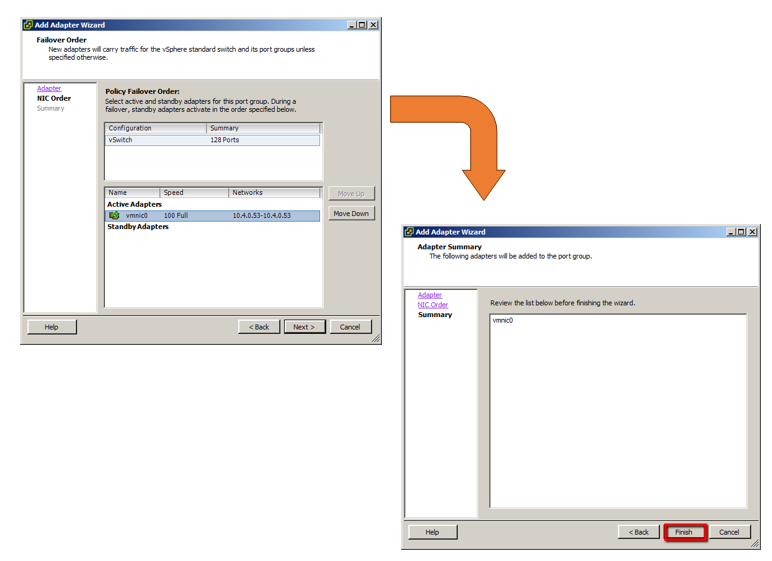
Preparing virtual network interfaces in Hyper-V
To perform the correct and minimally required configuration of the Hyper-V virtual switch, you will need to complete the following steps:
Mapping of physical and virtual network interfaces
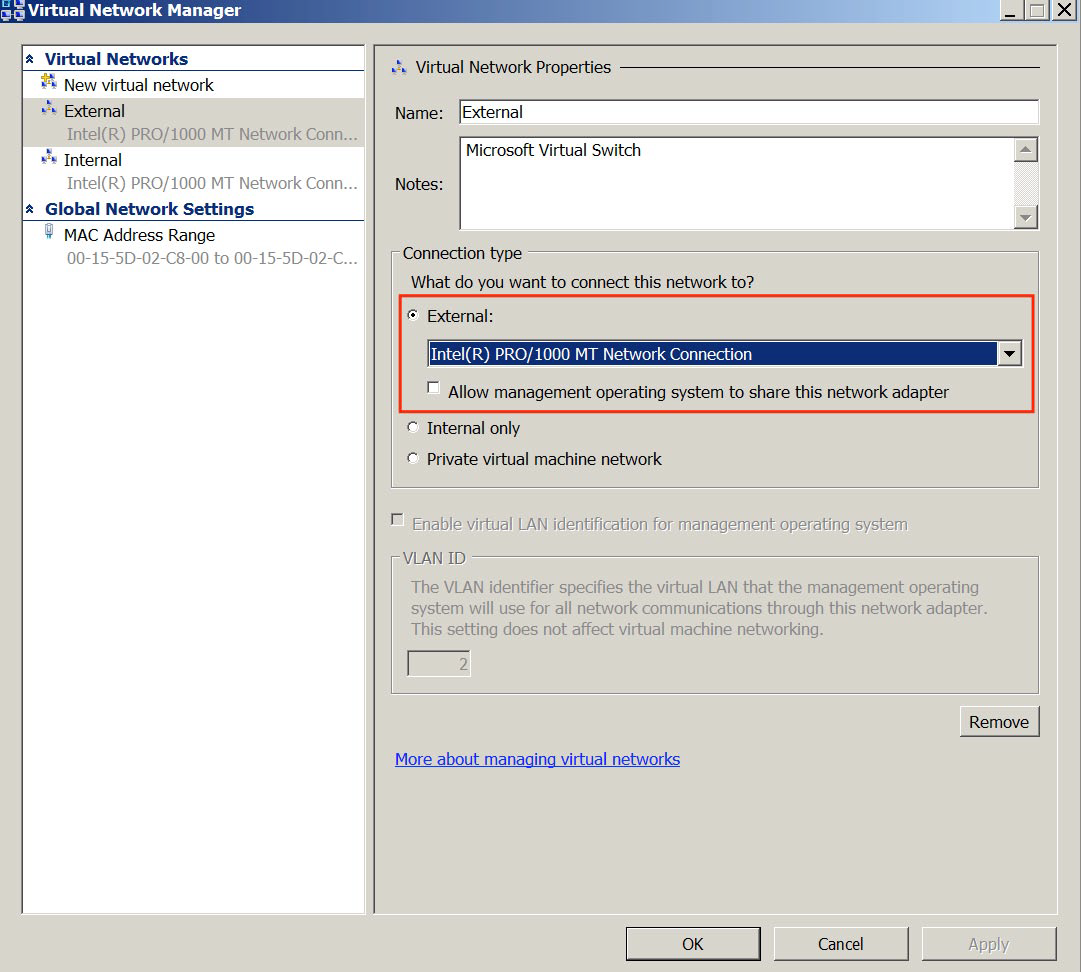
Checking the availability of the virtual bridge service on the physical network interfaces of the server
For a quick setup of the Kerio Control Hyper-V virtual Appliance network interfaces of the virtual Appliance, watch the following video clip:
Note: Complete recommendations for configuring network interfaces for the Hyper-V virtualization environment must be obtained from the official source of the manufacturer's company.
(http://technet.microsoft.com/ru-ru/)
Prepare virtual network interfaces in VMware vSphere
Approximately the same chain of actions in the case of the preparation of virtual network interfaces in vSphere.
Creating multiple virtual switches, the number depends on your needs for virtual network communications.

Creating a virtual switch in VMware vSphere
Creating a virtual switch in VMware vSphere

Creating a virtual switch in VMware vSphere
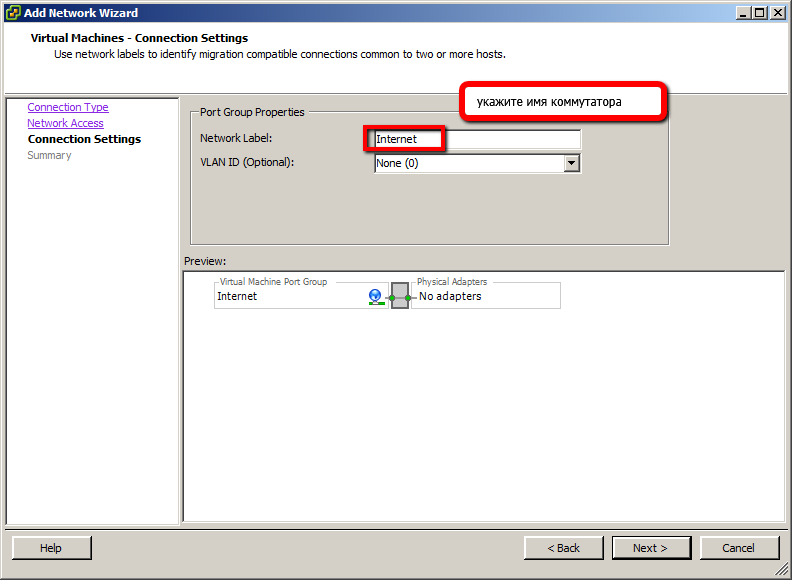
Add the appropriate physical network interfaces to the virtual switches to allow the physical LAN of the enterprise to interact with them

Mapping of created virtual switches with virtual network interfaces Kerio Control VMware Virtual Appliance


Note: Full recommendations for configuring network interfaces for VMware virtualization environments should be taken from the official source of the manufacturer’s company ( www.vmware.com/support/vsphere-hypervisor.html )
After the Appliance assembly has been deployed and the network interfaces have been configured, you can proceed to migrate the basic user configuration with your Windows version of Kerio Control.
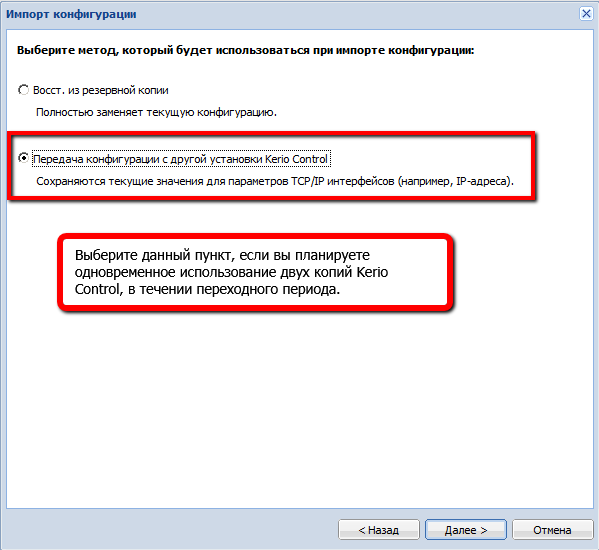
The configuration transfer process itself consists of two steps:
Save the current configuration using the Configuration Assistant
When saving the configuration, it is recommended to remember, or better write out, the MAC addresses of your current network interfaces and their correspondence to the IP addresses used. You will need this when restoring a configuration on a new installation of a Kerio Control Appliance.
The process of saving the configuration is shown in the following images:

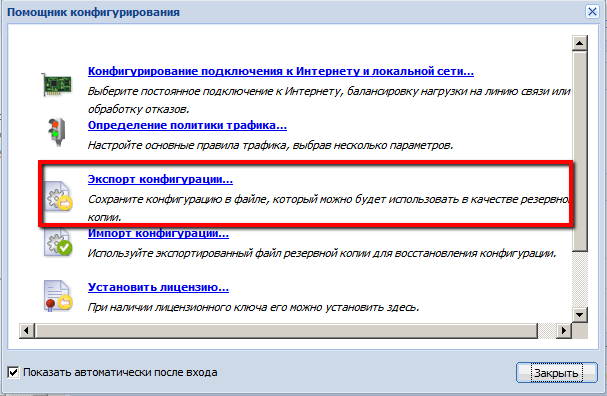
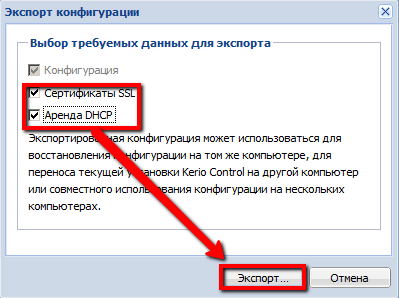

After this step, you saved the archive, which includes all the user configuration files of the current version of Kerio Control.
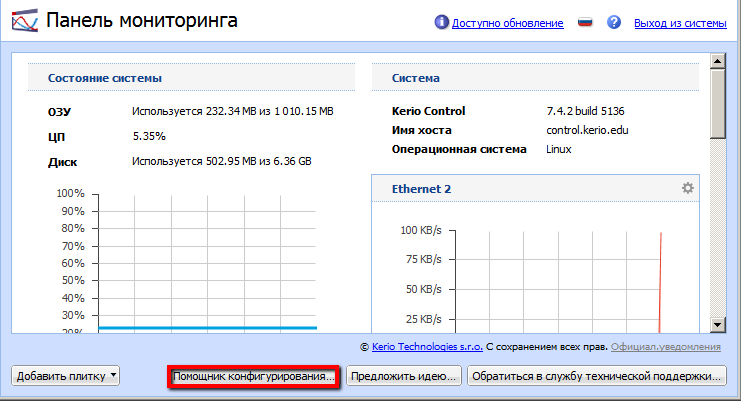
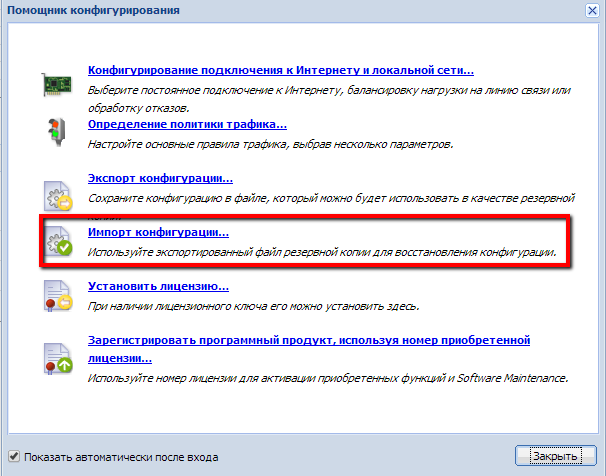
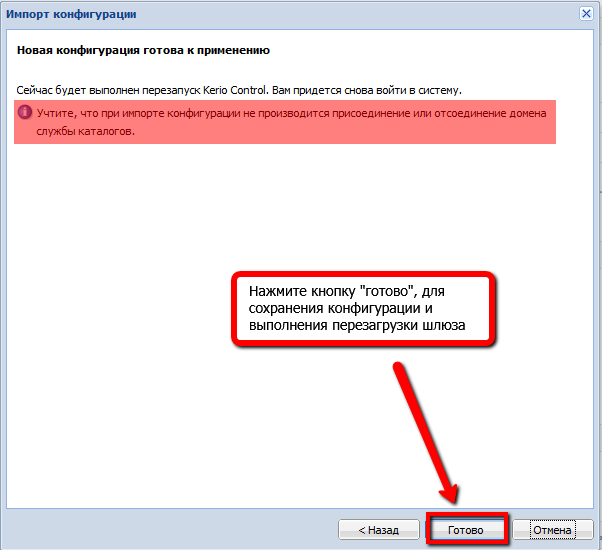
The next step is to restore the previously saved configuration on the Appliance. When restoring the configuration, the configuration assistant will suggest matching the configuration of the old network interfaces with the new ones used on the Kerio Control Appliance server.
Note: This is exactly the moment when you need information about the MAC and IP addresses from the old server that you wrote out or remembered while saving the configuration to the old one.
The process of restoring the configuration is shown in the images below:
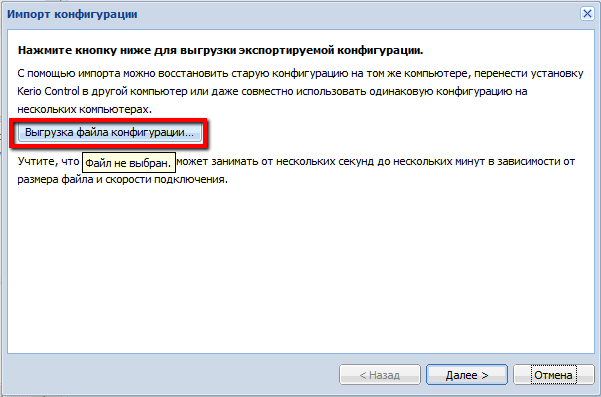

To save the configuration, the Kerio Control Appliance server will automatically reboot, after which it can be used.
However, the migration process is still too early to be considered complete, since we need to transfer application protocol data and user statistics database from your old server.
And here the most interesting begins! What you read below is not described in any official, or in informal documentation, i.e. there will be several acceptable live hacks, the use of which will help you in carrying out such an important process, transition to the appliance Kerio Control platform.
And as usual, before we go with you to the immediate description, the usual "disclaimer":
IMPORTANT: The procedure described below is not a documented possibility, therefore, in order to avoid undesirable consequences, before you start performing the data transfer, create a full backup of them by copying the data to a secure repository.
And so transgress! To begin, save the current database of application protocols. To do this, save the protocol files located in the specified path.
%programfiles%\kerio\winroute firewall\logs\*For better security of this data, it is recommended to back them up to an accessible secure storage before performing the transfer.
Then, save the current user statistics database. All this information is concentrated in the database file firebird, located in the folder
%programfiles%\kerio\winroute firewall\star\data\From there, we just need the
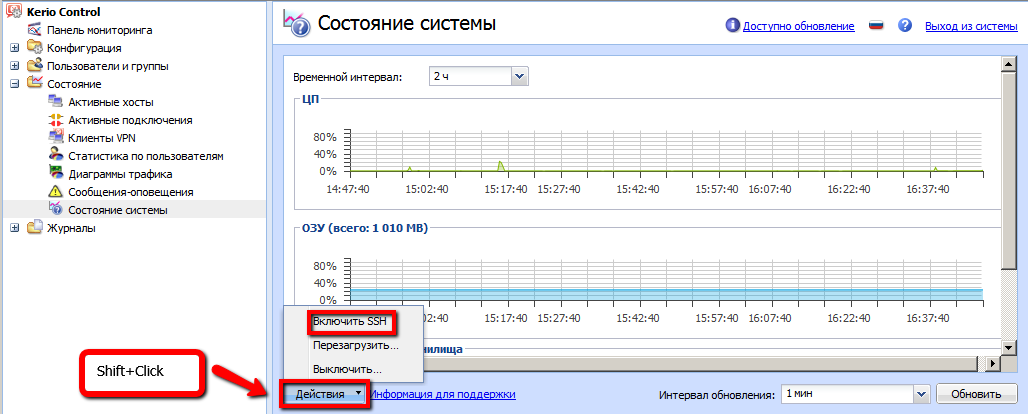
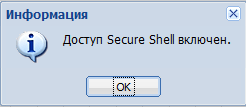
star.fdb file. For better security of this data, it is recommended to perform a backup to an accessible secure storage before performing the transfer.After we have discovered and saved all the necessary information, we need to transfer it to a new server running Kerio Control Appliance. For this, the first thing you need to do to upload the previously saved data to the Kerio Control Appliance is to enable the SSH server for perform SFTP access. To do this, in the web-based administration interface of Kerio Control, go to the menu Status -> System Status , press and hold the “Shift” key and click on the “ Actions ” button. In the list that appears, select " Enable SSH ", confirm your actions by agreeing to the question in the window that appears.

After that, you need to make sure that in the Kerio Control traffic rules you have allowed access to the Kerio Control Appliance host via the SSH protocol from the location you need.

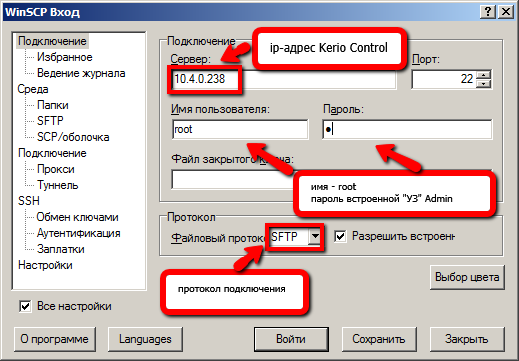
After you have enabled SSH and allowed the appropriate access, you need to connect to the Kerio Control Appliance server in order to upload the necessary protocol data and user statistics database to it. To do this, we will use the WinSCP application, which allows you to make connections using SFTP.
To connect to the Kerio Control Appliance server, you must specify a username and an access password; enter “root” as the user name (without quotes); as the password, enter the password of the “Admin” account built into Kerio Control.
SFTP settings to connect to the Kerio Control server
After establishing the connection, you must place your data in certain folders of the server. The log files must be copied to the / var / winroute / logs folder, and the user statistics file must be copied to the / var / winroute / star / data folder, while the old files must either be deleted or renamed.

Note: It is better to rename old files to save a backup of current data. In the case of application log files, you only need to rename old files with the * .log extension.
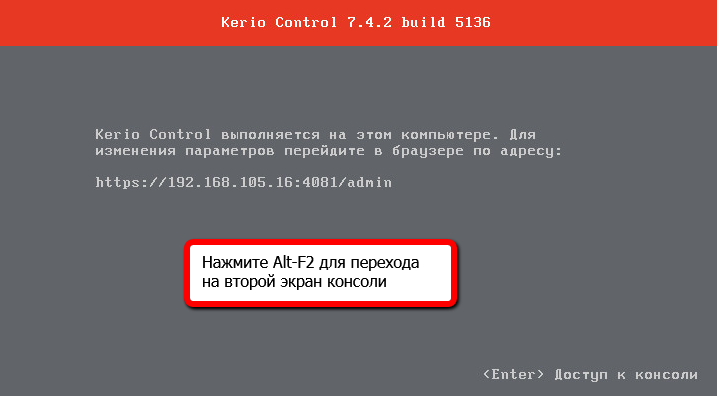
After copying is complete, you need to restart the Kerio Control service. To do this, you need to get direct access to the Kerio Control Appliance server. In the case of a Software Appliance, access is provided through the monitor and keyboard of the server itself, on which the Kerio Control Software Appliance is installed. In the case of the Kerio Control virtual module, access is provided via the console of the corresponding virtualization environment. Otherwise, the actions will be the same.
To go from a pseudographic console to the command line interface, press the “Alt-F2” key combination. In the invitation to enter a username, enter the name “root” (without quotes), click “enter”, in the password field enter the password of the Admin account built into Kerio Control.
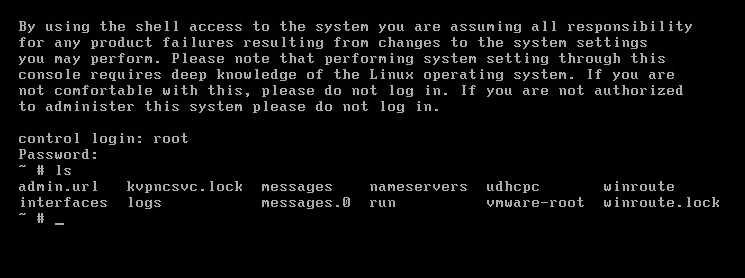
Note: it is necessary to take into account that the introduction of a password in the OS of the Linux family is not displayed even by the asterisk icons, and if you make a mistake, you will not be able to correct it - you will have to enter the password again.
At the command prompt, enter the following:
/etc/boxinit.d/60winroute restartThis command will restart the Kerio Control daemon (service), after which Kerio Control will “hook” the previously copied application protocols and user statistics.

After the start of the Kerio Control daemon, you need to check the integrity of the transferred data, for this you can use the user statistics web interface and / or the Kerio Control web administration interface.
If everything is in order with all the data, then the transition to the new Kerio Control Appliance platform can be considered completed and it remains only to complete the regular update procedure for Kerio Control to the current version. If with some part of the data "not everything is in order", then there are two options:
1) make sure that the data taken from the source Kerio Control server (KWF) was initially in order;)
2) if everything is OK with the source data, then it is necessary to repeat the procedure of transferring the part of the data with which there were problems.
3) if the solutions of paragraphs. 1 and 2 did not help, then leave a comment here, try to figure it out together :)
Now that all important data is in place, you can “pull” the version of the Kerio Control Appliance to the latest. The standard update process can take place in two ways, in automatic and manual modes.
Automatic update mode version.
Kerio Control can automatically check for new versions on the Kerio update site.
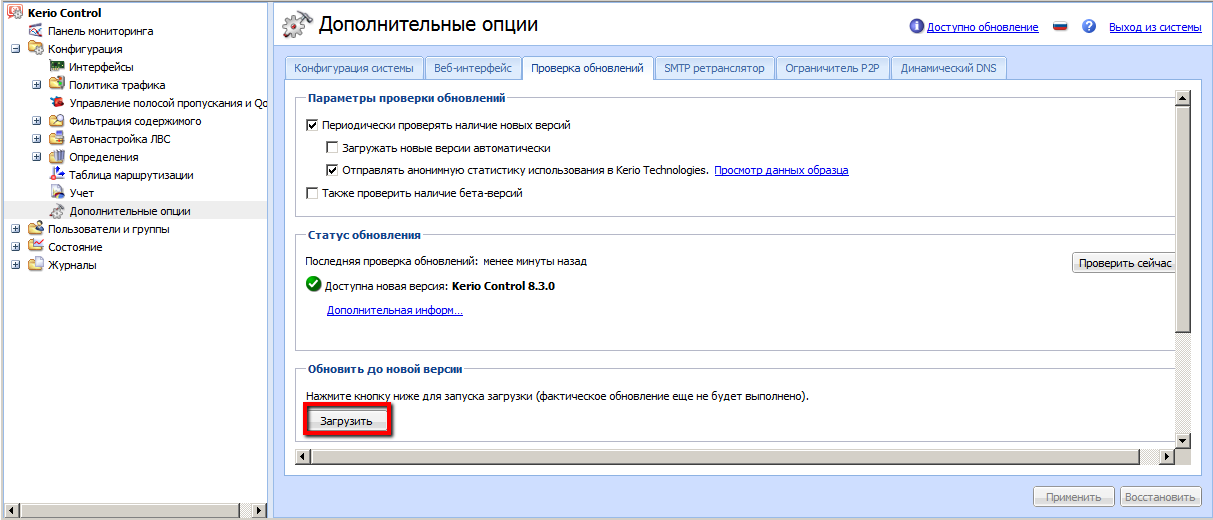
- In the web-based administration interface go to the “ Additional options ” menu item, to the “ Check for updates ” tab
- Enable the option “ Periodically check for new versions ”. Kerio Control will check for new versions every 24 hours. As soon as the availability of a new version is established, a link to download the update will be displayed on the “ Check for Updates ” tab. In order to check for updates immediately, click on the “ Check Now ” button.
- If you want to download updated versions immediately after their detection, enable the option “ Download new versions automatically ”. As soon as the new version is downloaded, you will receive a notification in the web-based administration interface.
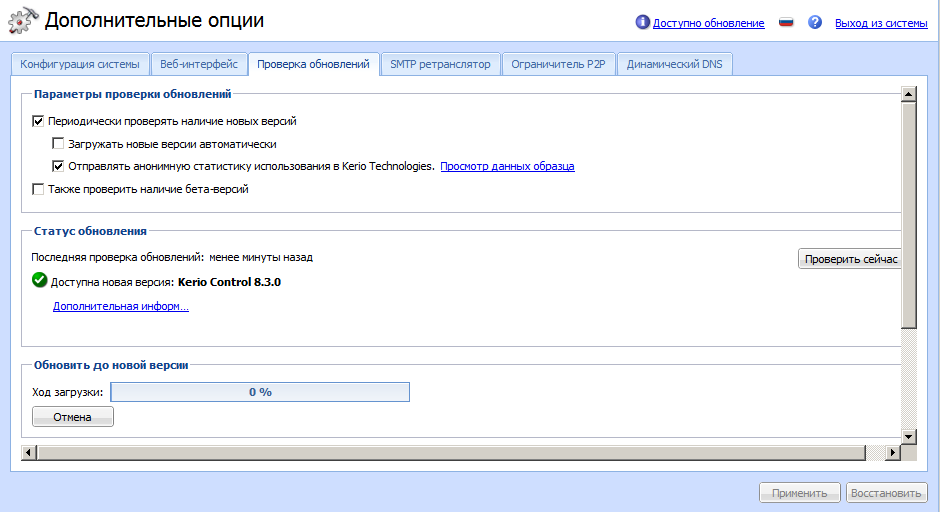
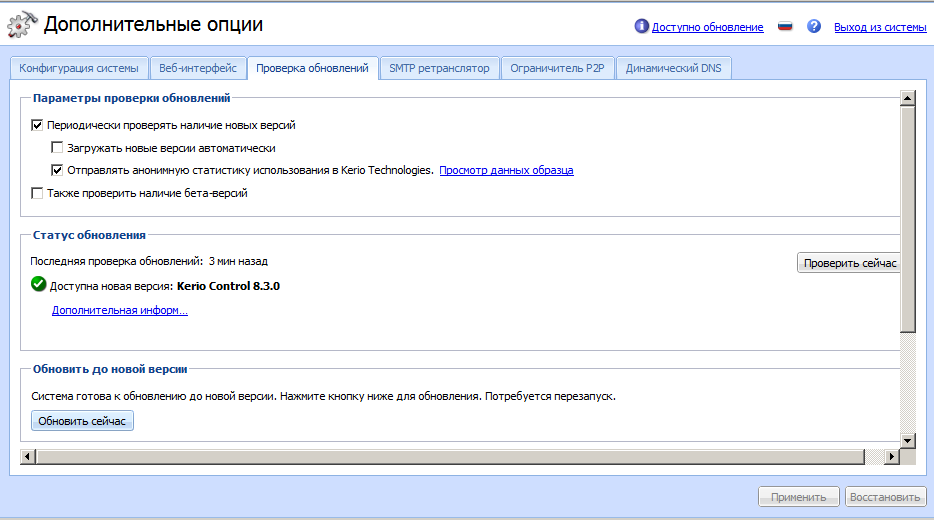
- After downloading the update, click " Update Now "
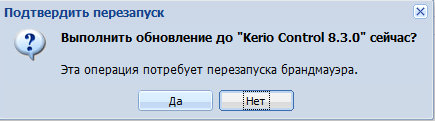
- Confirm your intention to update and perform a subsequent automatic restart of Kerio Control
- Wait until the installation of the new version is complete and the Kerio Control reboot.
- Upgrade complete.


Manual update mode version.
This update mode can be useful in the following circumstances:
- Rollback to the previous version of Kerio Control
- Update to an intermediate or non-regular version (for example, closed Beta release).
- Update the gateway with the maximum restrictions for ITU on access to Internet resources.
To perform the update in manual mode, you need to download a special image (Upgrade Image) from the Kerio Control download page (http://www.kerio.ru/support/kerio-control).
After downloading, follow these steps:
- In the web-based administration interface go to the “ Additional options ” menu item, to the “ Check for updates ” tab
- Click on the " Select " button
- Specify the location of the update image file (kerio-control-upgrade.img)
- Click on the button “ Download version update file ”
- After downloading, click on the button “ Start update version ”
- Wait for the update and reboot Kerio Control
- Upgrade complete.


Voila, you have a full-fledged Internet gateway based on the Kerio Control Appliance! Congratulations on completing the transition to the UTM Kerio Control!
Source: https://habr.com/ru/post/224883/
All Articles