Getting started with browserify

Introduction
Solutions written in javascript are becoming more difficult from year to year. This is undoubtedly due to the growth of such a beautiful beast as the web. Many of us now work with JavaScript modules — independent functional components that come together and work as a unit. Also, this approach allows us to realize the interchangeability of components without completing the code. Many of us used the AMD pattern and its implementation in RequireJS for this.
In the last year, Browserify entered the arena and exceeded all expectations. As soon as the community began to calm down, I decided to write a review Browserify - what is it like and how can I use it in your workflow.
What is Browserify?
Browserify allows you to use the style of node.js modules to work in the browser. We define the dependencies and then Browserify collects them into one small and clean JavaScript file. You include your javascript files using
require("./_.js"); expression. You can also use public modules from npm. For Browserify, it’s easy to create source maps (pre-compression source file maps), so even despite the concatenation, you can debug individual parts of the package exactly the same way you used to do it with separate files.')
Why import node modules?
Importing modules is like a blessing: instead of wool sites looking for links to downloads of a particular JavaScript library, you simply connect them using
require() (after checking that they are installed via npm) and that's it! You can also use such popular JavaScript libraries as jQuery , Underscore , Backbone, and even Angular (the unofficial port). They are all available for download and work through npm. If you are working on a site that already uses a node, you simply simplify your development, because now you can use the common architecture of all your JS scripts. I really like this approach!What you need
To get started with Browserify, you need to have the following:
node.js
npm - default comes with node.js
Browserify - I will explain how to install it
Well, and, accordingly, a set of JS files with which you want to work.
Beginning of work
To get started, you need to have node and npm installed . If you're really stuck, try these Node.js installation instructions through the package manager . You do not have to perform any additional gestures to start using Browserify. We use node solely because npm runs on top of it. Once you have received npm, you can install Browserify using the following command:
npm install -g browserify Let me explain a little bit what we are doing here: we use npm to install Browserify in the global environment on your machine (the
-g flag tells npm to install the module globally). If you end up with a problem similar to the following: Error: EACCES, mkdir '/usr/local/lib/node_modules/browserify' Then, most likely, you ran into the lack of access to the desired folder. You can run the command using sudo, but I would still recommend that you first familiarize yourself with this post.
Create your first Browserify file
Let's start by creating a file that we will process using Browserify. For example, let's take the super popular Underscore module. We will use it to search for superman. I called my JS file
main.js and put it in the js folder.Let's start by backing up the
_ variable under Underscore using the Browserify ' require() method: var _ = require('underscore'); Now, we will use the
each() and find() functions from the Underscore library we have connected. We will search in two arrays of names and at each iteration we will output the value of the superman search condition expression to the console using console.log . Lex Luther can only dream about it. Our final version of the code will look something like this: var _ = require('underscore'), names = ['Bruce Wayne', 'Wally West', 'John Jones', 'Kyle Rayner', 'Arthur Curry', 'Clark Kent'], otherNames = ['Barry Allen', 'Hal Jordan', 'Kara Kent', 'Diana Prince', 'Ray Palmer', 'Oliver Queen']; _.each([names, otherNames], function(nameGroup) { findSuperman(nameGroup); }); function findSuperman(values) { _.find(values, function(name) { if (name === 'Clark Kent') { console.log('It\'s Superman!'); } else { console.log('... No superman!'); } }); } We would like to be sure that Browserify can find the npm module when it tries to add it to the project. Well, in order to do this, you need to open a terminal, go to the directory where your JavaScript project is located, and run the Underscore installation command in this directory:
npm install underscore For those who are not familiar with the mechanism of operation of node and npm, I will explain that this code will create the
node_modules directory in the project folder. In this directory will be your Underscore module. The team will get the latest version of Underscore from the npm repository ( https://registry.npmjs.org/underscore ). With this module in our node_modules directory, Browserify can easily find and use it.Run Browserify for the first time
When we launch Browserify, it will want to build a new javascript file with all the modules attached to it. In our case, it will assemble the javascript module with the underscore inside. We will only need to choose a name for our new falya. For example, I decided to call it
findem.js . I run the command from the project root folder: browserify js/main.js -o js/findem.js -d This command reads your main.js and writes its contents to
findem.js (of course, including the package dependencies. Note. ), Which was specified using the option- -o . I also included the -d option in the request, so our team also generates a source map for our file. Thanks to this, we can debug underscore and main.js as two separate files.Using the output Browserify file
Connecting the output Browserify file is exactly the same as any other JS file:
<script src="js/findem.js"></script> Implanting your own javascript files
It’s not at all great if our application consists of only
node_modules folders. To connect your own javascript code, you can use the same approach with the require() function. This line of code imports the JS file named your_module.js into the variable greatestModuleEver : greatestModuleEver = require('./your_module.js'); To import your JavaScript in this way, we need to format our JavaScript code as a module. To do this, define
module.exports . One way to do this is shown below. module.exports = function(vars) { // } Note!
If you use a number of ready-made third-party libraries that are not in npm and you want to find a simple solution, how to add them to Browserify, then you should take a look at the npm module Browserify-shim . He will do all the work for you. We will not use it in this article, but this information may be useful for some developers.
Our example with the module
To make it clearer to show how this works, we will take out our arrays from the previous superhero example and arrange them in a separate JS module, which will return us an array of names. The module will look like this:
module.exports = function() { return ['Barry Allen', 'Hal Jordan', 'Kara Kent', 'Diana Prince', 'Ray Palmer', 'Oliver Queen', 'Bruce Wayne', 'Wally West', 'John Jones', 'Kyle Rayner', 'Arthur Curry', 'Clark Kent']; } Well, now we import this module into our variable
names = require("./names.js"); : var _ = require('underscore'), names = require('./names.js'); findSuperman(names()); function findSuperman(values) { _.find(values, function(name) { if (name === 'Clark Kent') { console.log('It\'s Superman!'); } else { console.log('... No superman!'); } }); } Our
names variable refers to the exported function from the module. Therefore, we use the names variable as a function to pass the array we need to the findSuperman() function.Run this
browserify command again to compile the code, and then open it in your browser. It should work, as expected, by iterating each value of the array and logging whether the person from the list of names is a superman or not: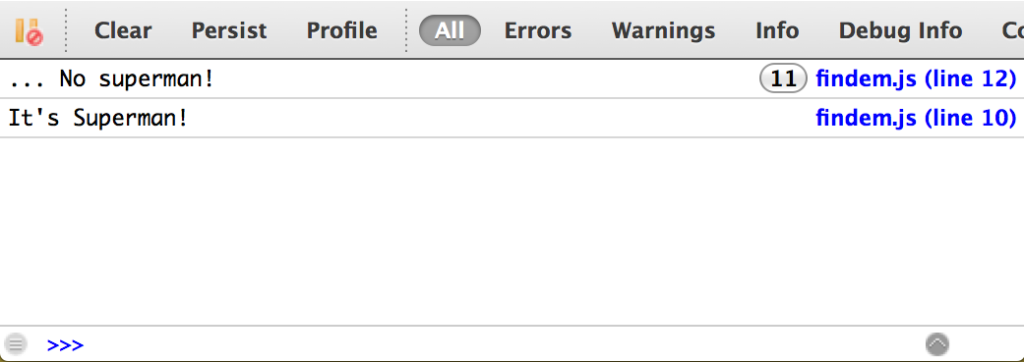
Passing in Variables and Sharing Modules Across Our App
Let's complicate our simple superman search application a bit - we
findSuperman() function into a separate module. Thus, we can theoretically find a superman from different parts of our application, and we can always replace our superman search module with a more efficient one if it is needed in the future.We can also pass variables to our modules and use them in our return function (
module.exports ), and to illustrate this, we will create a file findsuperman.js , which will take an array of names: module.exports = function (values) { var foundSuperman = false; _.find(values, function(name) { if (name === 'Clark Kent') { console.log('It\'s Superman!'); foundSuperman = true; } else { console.log('... No superman!'); } }); return foundSuperman; } I added a return value for our
findSuperman() function. If she finds a superman, returns true ; otherwise, false . And then let them decide the code that calls this module. But somehow, we missed one thing: our code uses Underscore, but we did not declare it. After adding Underscore, our code took the form: var _ = require('underscore'); module.exports = function (values) { ... } When we use Browserify, it scans all our JS files for importing modules, builds a dependency tree, and this allows it to connect the module only once, i.e. in our example, we connect Underscore in the main file, and also connect it to
findsuperman.js , but when Browserify puts it all together, it will add it only once. Cool, is not it?Our current JavaScript application is currently using our new module with a new return value of
true/false . In the case of our example, we simply use document.write to say if we could find superman in the list of names, or not: var _ = require('underscore'), names = require('./names.js'), findSuperman = require('./findsuperman.js'); if (findSuperman(names())) { document.write('We found Superman'); } else { document.write('No Superman...'); } We don’t even need to connect Underscore to our main file anymore, so we can safely delete this line, it will still be connected at the end of the
findsuperman.js file.Manage npm dependencies Browserify via package.json
Suppose you have a friend who would also like to use your code. It would be rather silly to expect from him that he would find out from somewhere that in order for your module to work, he would first need to connect underscore. To solve this problem, we can create a file called
package.json in the root directory of our project. This file gives your project a name (make sure there are no spaces), a description, it sets the author and version, and, most importantly, npm dependencies. Those who have already encountered the development of a node - we use the same mechanism: { "name": "FindSuperman", "version": "0.0.1", "author": "Patrick Catanzariti", "description": "Code designed to find the elusive red blue blur", "dependencies": { "underscore": "1.6.x" }, "devDependencies": { "browserify": "latest" } } The dependency list is currently limited to our
"underscore": "1.6.x" , where the first part of the dependency is the name and the second is the version. "lastest" or "*" will allow you to get the latest version that is in npm. Also, you can specify the version number as 1.6 (fixed number) or 1.6. (for versions from 1.6.0 to 1.7 , not inclusive).We can also connect browserify as a dependency, but since this is not a dependency required to run a project — any user will be able to find the
findsuperman.js file without the need to run a Browserify. But we will connect it as one of the devDependencies - modules needed by developers to support the application.Now that we have a
package.json file, we don’t have to force our friend to run npm install underscore . It can just run npm install and all the necessary dependencies will be installed in the node_modules directory.Automate the Browserify process
To run the
browserify command every time is insanely tedious, not to mention that it is wildly uncomfortable Fortunately, there are several ways to automate browsing.npm
npm itself can run console scripts as if you were typing them yourself. To do this, simply create a
scripts section in package.json . This is done as follows: "scripts": { "build-js": "browserify js/main.js > js/findem.js" } To start all this now, you just need to write in the command line:
npm run build-js But this is also not very convenient. We still need to run this command every time. And it is very annoying. It is best to use the npm module watchify . Watchify is simple, easy and will save you a lot of time. It will track changes in your JS scripts and automatically restart Browserify.
Now we will add it to
package.json to devDependencies , and we will not forget to write an additional line in the scripts section (it will directly launch our watchify module, if rebuilding of packages is not required). "devDependencies": { "browserify": "latest", "watchify": "latest" }, "scripts": { "build-js": "browserify js/main.js > js/findem.js", "watch-js": "watchify js/main.js -o js/findem.js" } To run it, just type the command:
npm run watch-js It will work like magic. This command has almost no console output, which can mislead you, but rest assured that the command works correctly. If you still really want to get more information about the process, you can add the
-v flag to your watchify command: "watch-js": "watchify js/main.js -o js/findem.js -v" This module will notify you every time changes in your file are saved:
121104 bytes written to js/findem.js (0.26 seconds) 121119 bytes written to js/findem.js (0.03 seconds) We generate Source Maps in npm
To generate source maps using npm, add
-d after your browserify (or watchify ) watchify : "scripts": { "build-js": "browserify js/main.js > js/findem.js -d", "watch-js": "watchify js/main.js -o js/findem.js -d" } In order to have both (one for debug, another for production) of a file, you need to write something like this:
"watch-js": "watchify js/main.js -o js/findem.js -dv" Grunt
Many people (including myself) are already familiar with Grunt , and, fortunately, continue to use it. Fortunately, because Browserify works great with this build system!
We will need to change our
package.json by adding a directive to connect Grunt there. We will no longer use the scripts section, this will shift to Grunt's shoulders: { "name": "FindSuperman", "version": "0.0.1", "author": "Patrick Catanzariti", "description": "Code designed to find the elusive red blue blur", "dependencies": { "underscore": "1.6.x" }, "devDependencies": { "browserify": "latest", "grunt": "~0.4.0", "grunt-browserify": "latest", "grunt-contrib-watch": "latest" } } We have added the following. dependencies in our project:
grunt - to make sure that we have Grunt installed for our project.
grunt-browserify is a module that allows you to use browserify inside your project.
grunt-contrib-watch is a module that will track changes to your files and call Browserify every time you save changes to any of the observed files.
Then we will create a file that we will call
Gruntfile.js and put it at the root of the project. Inside this Gruntfile.js we should write the following: module.exports = function(grunt) { grunt.loadNpmTasks('grunt-contrib-watch'); grunt.loadNpmTasks('grunt-browserify'); grunt.registerTask('default', ['browserify', 'watch']); grunt.initConfig({ pkg: grunt.file.readJSON('package.json'), browserify: { main: { src: 'js/main.js', dest: 'js/findem.js' } }, watch: { files: 'js/*', tasks: ['default'] } }); } We started our Gruntfile with loading the necessary npm modules that we plugged into
package.json : grunt.loadNpmTasks('grunt-contrib-watch'); grunt.loadNpmTasks('grunt-browserify'); We register one (and only) task group that will be launched by default (
browserify and watch ): grunt.registerTask('default', ['browserify', 'watch']); Next, we configure Grunt using
initConfig : grunt.initConfig({ After that, we need to show where our
package.json : pkg: grunt.file.readJSON('package.json'), In the Browserify settings we will write the file that we want to use as the source and where to put the browserified version of the file:
browserify: { main: { src: 'js/main.js', dest: 'js/findem.js' } } Now we will create a
watch task for detecting changes in the oodode> directory: watch: { files: 'js/*', tasks: ['default'] } Because of our new development dependencies (
devDependencies ), we need to first run npm install . You will have to run this command only once, in the future you will enjoy the benefits of Grunt.Generating Source Maps in Grunt
With version 2.0.1 of the
grunt-browserify package, the source maps generation process has changed somewhat, since The Internet was full of wrong decisions. Now, to make Grunt and Browserify properly create a source map, simply add the debug: true flag to the bundleOptions : browserify: { main: { options: { bundleOptions: { debug: true } }, src: 'js/main.js', dest: 'js/findem.js' } } This tough-looking solution will allow us in the future to transfer options to Browserify in a simple and elegant way.
Gulp
Gulp <3 Browserify. Articles about working with Browserify through Gulp is a very popular topic in IT communities, and not surprisingly: Browserify and Gulp are, in fact, an advanced web development stack. I do not want to say that Browserify fans need to use Gulp, not at all, it remains to the reader’s personal preferences. As mentioned above, you can easily use npm or Grunt, but personally I give my preference for small projects to the
npm build .In order to repeat everything that we described above for Gulp, you must first install it (globally):
npm install -g gulp We will change our
package.json to connect a couple of new devDependencies that we need: "devDependencies": { "browserify": "latest", "watchify": "latest", "gulp": "3.7.0", "vinyl-source-stream": "latest" } We added the following:
watchify - We used and described his work even when working with
npmgulp - We connect, in fact, Gulp
vinyl-source-stream - Virtual file system for reading / writing files
Browserify has an API for working with streams, so we can use it directly from Gulp.
Browserify has an API for working with streams directly from Gulp. Most manuals recommend using the
gulp-browserify plugin, but Browserify itself prefers to work with it through its streaming API. We use vinyl-source-stream to get the Browserify output and save it to a file using Gulp.Then we create the
gulpfile.js file in the root of our project. All Gulp's functionality will be here: var browserify = require('browserify'), watchify = require('watchify'), gulp = require('gulp'), source = require('vinyl-source-stream'), sourceFile = './js/main.js', destFolder = './js/', destFile = 'findem.js'; gulp.task('browserify', function() { return browserify(sourceFile) .bundle() .pipe(source(destFile)) .pipe(gulp.dest(destFolder)); }); gulp.task('watch', function() { var bundler = watchify(sourceFile); bundler.on('update', rebundle); function rebundle() { return bundler.bundle() .pipe(source(destFile)) .pipe(gulp.dest(destFolder)); } return rebundle(); }); gulp.task('default', ['browserify', 'watch']); We start by importing our npm modules into the project. It seems that everything is clearer and clearer - we go further. Now we have to create three variables for our build:
sourceFile - the location and name of the source Browserify file (in our case js/main.js )destFolder - the location of the final filedestFile is the name we want to give our final fileI will explain the following code in more detail:
How Browserify works with Gulp
The first task in our
gulpfile.js is “browserify”: gulp.task('browserify', function() { Here we transfer our source file
main.js to the npm Browserify package: return browserify(sourceFile) Then we use the streaming Browserify API to return the stream with our JS content:
.bundle() Here we transfer information from the stream to a file called
findem.js and save it in the js directory. .pipe(source(destFile)) .pipe(gulp.dest(destFolder)); Simply put, we threw our imported file through several stages, which turned it into the final file for our project. Hooray!
Combine Watchify and Gulp
As we have already understood, using Browserify directly delivers a lot of pain (hehe, approx. Lane ) and it is much easier to launch it automatically when one of the package files changes. To implement such a scheme, we will once again use the npm module
watchify .We start by setting up a task called an observer:
gulp.task('watch', function() { We assign the observer module to the
bundler variable (since we will use it twice): var bundler = watchify(sourceFile); Then we will add an event handler that will call the
rebundle function each time the update event is raised. , , , rebundle() : bundler.on('update', rebundle); rebundle() ? , Browserify: function rebundle() { return bundler.bundle() .pipe(source(destFile)) .pipe(gulp.dest(destFolder)); }; return rebundle(); }); - ,
browserify watchify , , . , gulpfile.js .gulpfile.js , ( , grunt). gulp.task('default', ['browserify', 'watch']); , Gulp . « », :
gulp browserify -, .Browserify :
gulp browserify -:
gulp watch Source Maps Gulp Browserify
, source map JavaScript,
{ debug: true } bundle() .browserify - : gulp.task('browserify', function() { return browserify(sourceFile) .bundle({debug:true}) .pipe(source(destFile)) .pipe(gulp.dest(destFolder)); }); rebundle() watch - : function rebundle() { return bundler.bundle({debug:true}) .pipe(source(destFile)) .pipe(gulp.dest(destFolder)); } Conclusion
Browserify, , , . , JavaScript , Node . Node , npm . Browserify, , !
Browserify . , :
- The Browserify Handbook – Browserify. , !
- Gulp + Browserify: The Everything Post by Dan Tello – ,
- And just like that Grunt and RequireJS are out, it's all about Gulp and Browserify now – Browserify Gulp, .
- An introduction to Gulp.js – , Gulp .
Source: https://habr.com/ru/post/224825/
All Articles