Debug email with MailCatcher
 You use email in your app, right? This is, in general, a rhetorical question, of course you use. She is over 30 years old, and it is still the most popular means of communication on the planet. Here are some statistics from Pingdom :
- 2.2 Billion - Number of Email Users Worldwide
- 144 billion - Volume of emails sent daily worldwide
- 4.3 billion - Number of mail clients worldwide
Awesome!
Why do you need this article?
For one simple reason that we all somehow come across. It is necessary to test the functionality as close as possible to the actual application, and any mistake can lead to the fact that our customers will receive test letters, and this will be sad.
I'm sure you know what I'm talking about. Thinking that you transferred the application to debug mode, you run a test that sends emails from your application. You think that no one but you will see these letters.
')
Tests pass, you praise yourself and continue to work. But after some time you get a call from your customer. He complains that his customers got weird. He is upset and wants to get an answer.
It was so? Do not want to happen again? There is a solution - MailCatcher . If you have not heard of him in brief:
... A super-simple SMTP server that intercepts any sent message and displays it in the web interface. Run mailcatcher, in the settings of your application, specifysmtp://127.0.0.1:1025instead of the default SMTP server, and then view the mail that was sent to127.0.0.1:1080
Sounds good, right? Regardless of whether you are tired, overworked, new to the team or some other problem - MailCatcher ensures that email remains within your network, or even your virtual machine.
Now I want to show you how to set up, run and use MailCatcher.
Prepared Virtual Machine
To save some of your time, I created a Vagrant box with an already configured MailCatcher. Make sure you have Vagrant and VirtualBox installed and clone your repository using the following command:
git clone git@github.com:sitepoint-examples/mailcatcher-article.git Then, going to the received directory, execute the command:
vagrant up This will start the virtual machine initialization process. Its settings are quite minimalist, MailCatcher, Sendmail and Nginx are included in the package.
Note Lane: if you use puphpet ( what it is ) to build virtual machines, I note that the installation of MailCatcher is available as an option in it, well, and a bunch of other buns, I recommend.
Manual MailCatcher installation
If you wish to install MailCatcher yourself, here is the sequence of commands:
sudo apt-get install -y vim curl python-software-properties lynx nginx sudo apt-get install -y php5-fpm php5-memcache memcached php-apc sudo apt-get install -y build-essential libsqlite3-dev ruby1.9.3 sudo gem install mailcatcher sudo mailcatcher --http-ip 0.0.0.0 Perhaps you will not need the 3rd team, but I use the rather minimalistic image of Ubuntu Precise 64, and there are no necessary packages. If you use a different distribution, the packages and their versions may differ from the above.
Note. With a standard start, MailCatcher will only listen to ip 127.0.0.1 and port 1025, in this case we would not see it from the outside. I changed the configuration so that it listened on all ip-addresses and added public ip 192.168.56.111.
MailCatcher web interface
Now by going on
192.168.56.111:1080 192.168.56.111:1080 you can watch the web interface, it will look like this: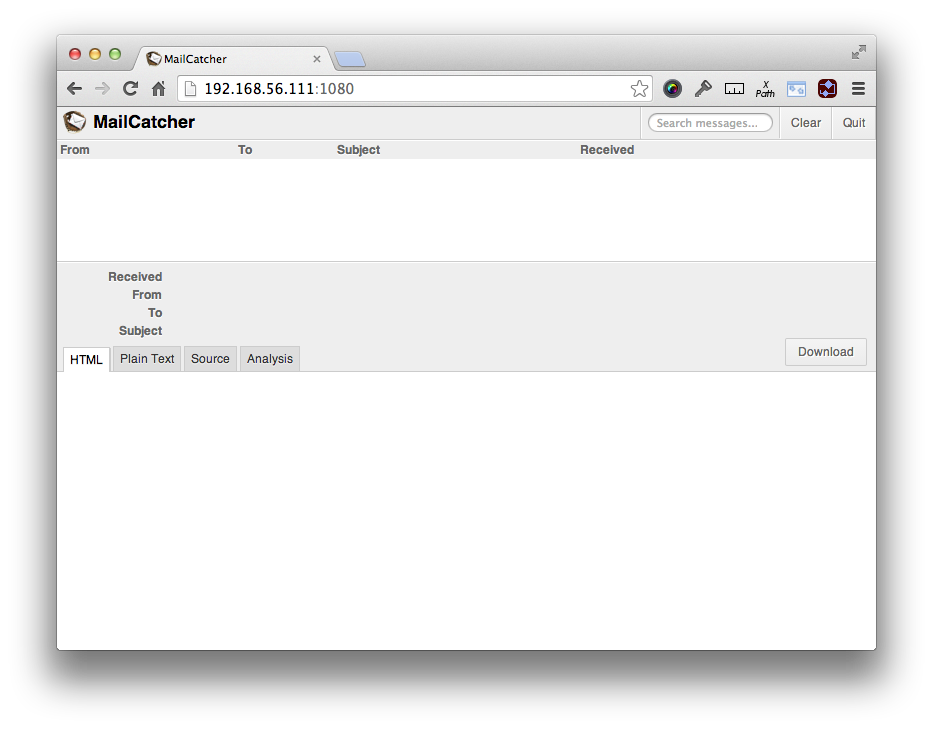
The interface is rather concise, in the upper part there is a list of emails received by MailCatcher. When there are letters in the list, information about them will be displayed at the bottom, which we will see a little later.
Usage example
For this article, I created a simple php script, index.php, it is present in the repository, we have it available at
192.168.56.111 192.168.56.111 . To send letters, use the SwiftMailer library. Take a look at the code below: <?php require_once('mail-loader.php'); ?> <html> <head> <title>Simple MailCatcher PHP Example</title> </head> <body> <h1>Simple MailCatcher PHP Example</h1> <p>This application sends a number of emails which will be caught by MailCatcher. To check them, view them in <a href="http://192.168.56.111:1080/" target="_blank">the local MailCatcher installation</a></p> </body> </html> He, in turn, connects
mail-loader.php : <?php require('vendor/autoload.php'); $email = 'matthew@example.com'; $subject = 'testing'; $message = 'test message'; $transport = Swift_SmtpTransport::newInstance( "localhost", 1025 ); $message = Swift_Message::newInstance(); $message->setTo(array( "matthew@maltblue.com" => "Matthew Setter", )); $message->setSubject( "This email is sent using Swift Mailer" ); $message->setBody("You're our best client ever."); $message->setFrom("matthew@localhost", "Your bank"); $mailer = Swift_Mailer::newInstance($transport); $mailer->send($message, $failedRecipients); print_r($failedRecipients); If you are not familiar with the SwiftMailer article Aurelio on SitePoint will be a good start in her study. By the way, this is his code I used for this example. Thank you, Aurelio.
From the above script, in principle, only one line of code is important for us:
$transport = Swift_SmtpTransport::newInstance( "localhost", 1025 ); This is where a connection to the MailCatcher smtp server is created, nothing fancy. Let's reload the page 3 times to send 3 emails. Here they are, in the image below:
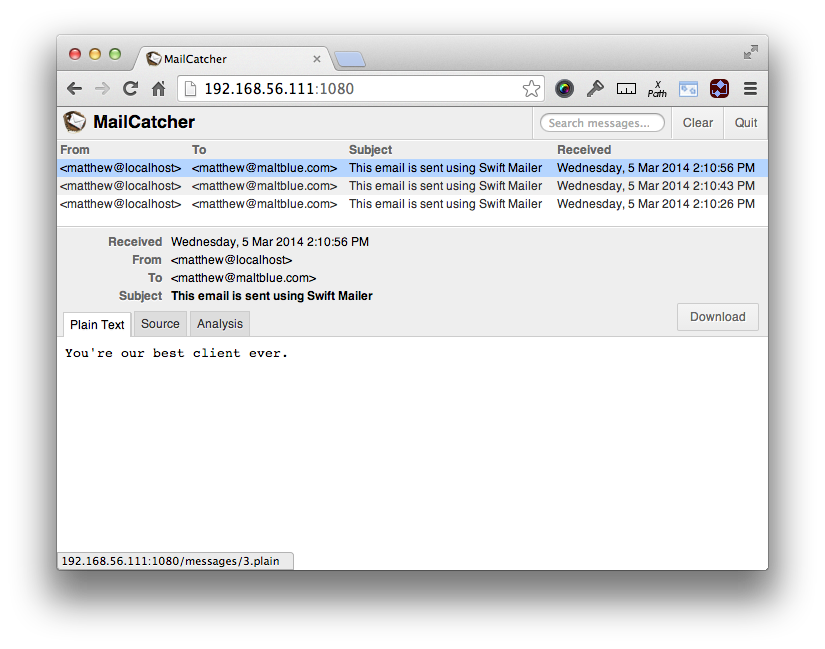
Selecting the first entry, we see information about the letter as well as its body. If we go to the
Source tab, as in the image below, we will see the letter headers: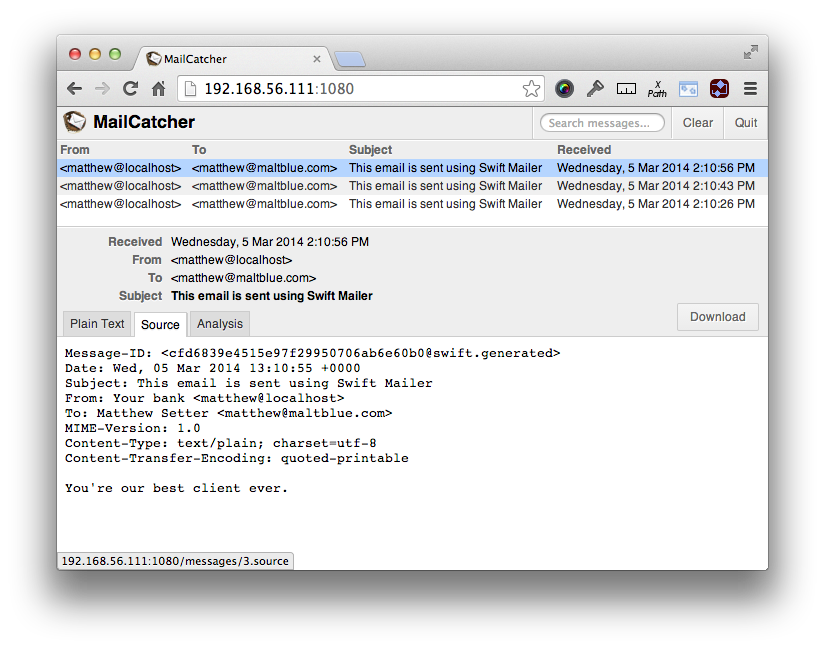
The 3rd tab allows us to use Fractal to analyze the content of the letter. I will miss it because this is a bit beyond today's article.
Everything is ready for work
Now, by installing MailCatcher, we can send emails, set recipients, subject, add attachments, etc. We can write tests that verify the entire process of the application, knowing that real users will not receive letters that are not intended for them. This is good news.
Conclusion
My example is rather trivial, and I am sure that your code base is more complex and sophisticated, but regardless of this, with almost no changes in your code, you can enjoy the benefits of working with MailCatcher and be calm.
Maybe you are already using MailCatcher? What can you say about the results of its integration, were there any questions that took you by surprise. I would be glad if you share your thoughts.
This and other translations from the Sitepoint site, as well as other articles on web development .
Source: https://habr.com/ru/post/224467/
All Articles