Living Books (a small tutorial on book production, with its own tricks)
There are not many articles on this topic, but they are there. The truth is in my opinion, since almost all of them are based on real typographical methods, for small-scale and even more single-piece production, the described technologies are not always convenient, especially when there is nothing more than desire at hand.
Therefore, I share my know-how for one-time work.
In this case, we consider the production of a well-known booklet, right at home, straight out of paper and with a minimum of tooling.
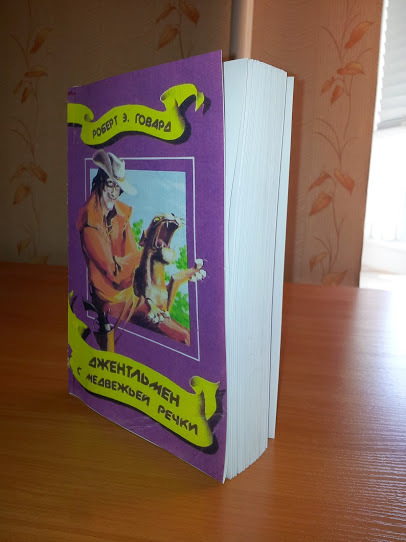
230 pages A5, softcover, 4.5 hours.
I like making books with my own hands. There is in this kind of opposition to excessively advancing electronic goods, which here and there optimize everything, and not only the processes that are really superfluous or dangerous to humans, but also completely natural, and without which a person becomes more and more like a vegetable.
Here is an electronic queue, for example, which is now being sent everywhere, where it is necessary and not necessary. In the clinic or bank. What for?..
Whether it’s a business before ... First, you train your brain and eyesight, for whom you occupied, how many people already stood behind it, but moved to another department, office, on the affairs, where did he go, after all, he was here ?! And you did not stand here at all!
So you can talk (live notice), and rejoice and be upset. Soul, in general, you live.
And now - I took the ticket, and you are sitting stupidly, silently staring at the scoreboard, and nothing and no one in this line interests you anymore. Only scoreboard. And you alone govern it. And the tablu do not care if you are alive, or already a vegetable.
')
So with the books as well. In the paper folio there is still some kind of romance, some kind of mystery and nobility, if you wish.
And in the e-books this is not. Only the notorious convenience, for hands, for the brain, for a pocket or bag, for the current to strain less ... They do not need to be watched so as not to get wet, do not blow dust, do not put under glass - boring in general ... And scary, not today- Tomorrow, Google-Glass will be implanted already in the hospital and Johnny Mnemonic will not be a character from the film, but your specific offspring.
I do books rarely. And I do mostly rare ones, those that have never been published in the Union before, or those that have been published only once and are no longer planned for re-publication.
So last time, based on private translations from the Tolkien Club, I produced a 650-page edition of The Unfinished Tales of Middle-Earth - the work of Christopher Tolkien on his father’s drafts, in hardcover and color illustrations by Alan Lee and John Howe ), arranged thematically in the text.
The club a few years ago had its own small circulation, but without illustrations, t.ch. I imho much more lovely))
The work took more than one day and required the manufacture of some intricate tooling for a hard cover of such thickness (vice, etc.).
In general, everything you need to know for a beginning home book-maker can be found here (thanks to comrade Jim aka Jim). Actually, earlier I somehow followed this particular technology. But, as you see, the technology is not trivial, it requires scrupulous accuracy, time and some inventory. Especially for hard covers. So over time, trying to optimize something here and there, our own workings appeared, with reference to work at home.
And the last time a long-standing promise to make a hendmade book coincided with the approaching DR from a colleague. There is not much time left and, without shelving, we proceed to production.
For making 230str. A5 in a soft, pleasant to the touch cover, we need:
And, in fact, everything.
With glue there is subtlety. It should be PVA, but it is exactly office and preferably imported. Such PVA does not turn yellow when cured, but becomes matte-translucent, which is just perfect for a book-worker - there are no traces on the paper. Plus, it becomes durable, but rather elastic, in contrast to furniture PVA - Moment, so that the cover does not crack and does not crumble over time.

Well, a table, a flat wooden stool, a laser printer (at work), a color inkjet printer (at home) and a few hours of family peace, I think you can provide for yourself. Try barter, if there are claims from other parties))
We impose text banal in Word. But!
We choose the size of A4 paper, and in the settings of the page (printing) we immediately set the printing method “Brochure” and - the first know-how!
We make double-sided printing on the long side.
Why do you need it? Then, that we will have a book with sheets of A5 format. This is a good, convenient format, convenient to hold, you can even put in a handbag with a certain skill. No need to cut A4 paper or look for rare and expensive A5 paper bundles.
Another advantage of this approach is that every two sheets of paper will be tied together by a fold of the paper itself, and not just a taped root. Oh oh Believe me, this is a big plus to the durability of our folio)) Especially if we consider that we will not directly sew the sheets together, but only glue the butt of the spine, although we will still need threads.
After these settings in the Word, we see in front of us a sheet of A5, and we impose it. Do not forget to add headers and footers with the name of the author, the title of the work, title and chapter number and page number. This is a good tone.
Next, print the finished file. Plain text - on a laser printer and on plain paper. Illustrations on a color printer and on photo paper (we then just put them between the pages in the right place), this gives solidity to the publication and is just a pleasure to watch.
For a 230 page book, I spent 30 minutes. on folding all 58 sheets. Yes, just take a sheet and fold it on a flat surface, on a table, in half.
And a little advice:
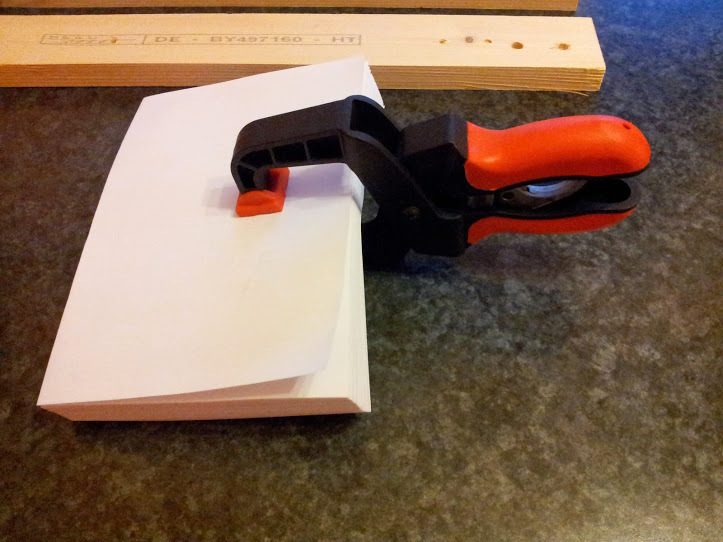
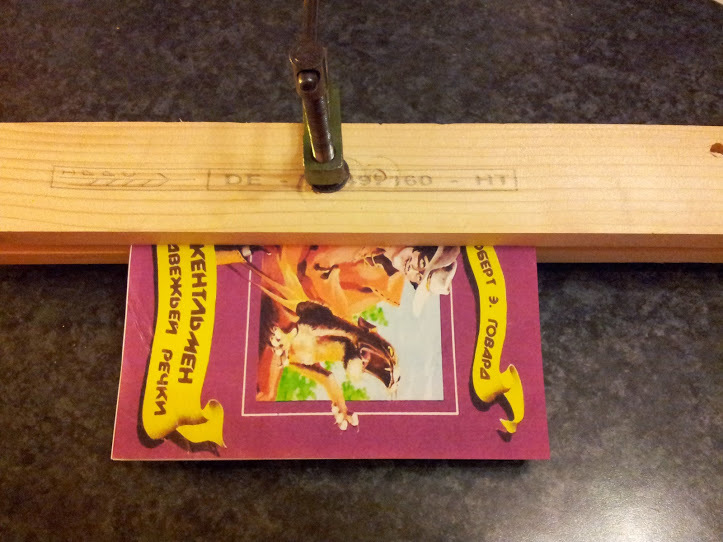
Further the block of pages needs to be finally collected, leveled and fixed with a ratchet clamp, in the middle of the block.
Here I would recommend not to philosophize slyly, but to use the third know-how.
After aligning the pages in the block, you need to fix it with a ratchet clamp in the middle.
So, the block of pages is ready. It's time to glue the spine.
Firstly, we clamp our block between two flat plates, leaving 5 mm spine behind, and tighten it with an ordinary clamp.

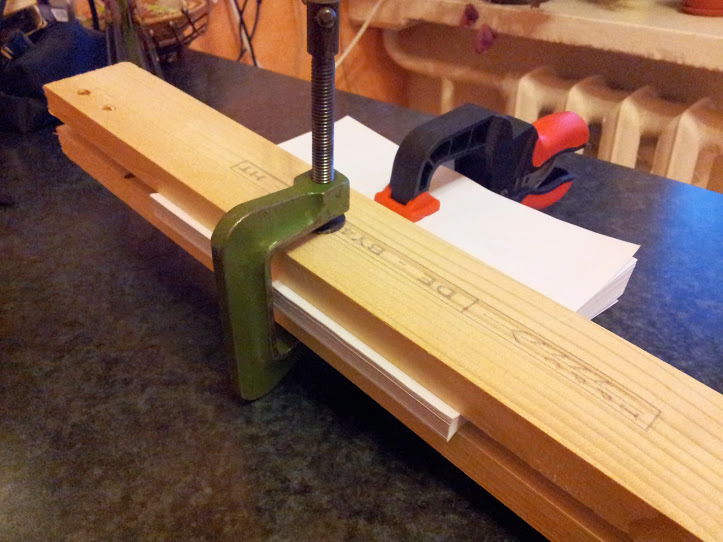
Ratchet do not touch, let it hang for reliability.
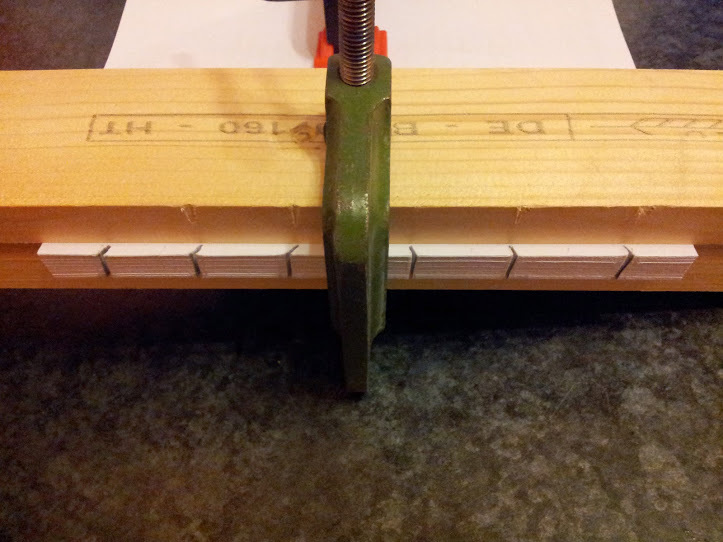
Next, take a hacksaw and make several cuts along the spine, where we later insert pieces of rope for durability, for pseudo-stitching, so to speak.
And here perhaps the basic know-how!

Now we take the PVA glue and apply it oily on the butt with a kerf. Brush carefully smear the glue so that it gets into all the cracks between the pages of the spine and especially in the cuts.
Give the glue to dry for about 30 minutes.
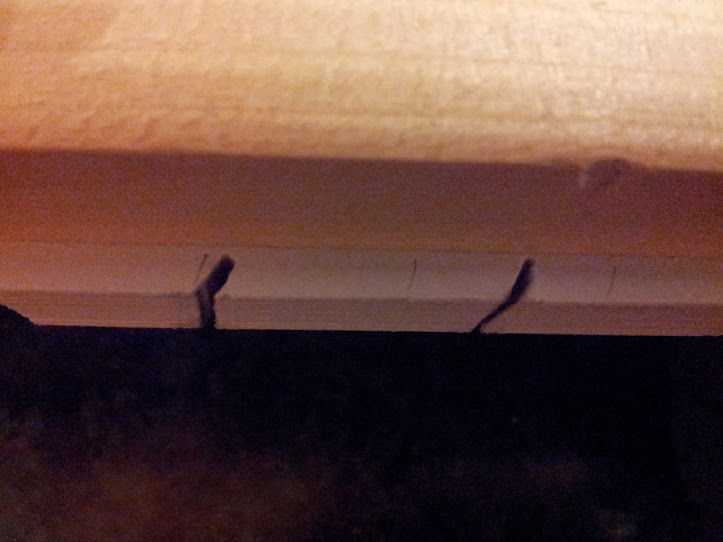
During this time, we cut the threads by 10-15cm according to the number of cuts. It is better to use a natural thread with which PVA is friends, but you can also use kapron. Practice shows that the kapron also sits firmly.
Now once again we drip into each PVA saw blade, fold the thread in half, twist it a little and in several passes so that the thread can soak up along the required length, we insert it into each cut. Once again, drip into the kerf over the PVA thread and smear it with a brush.

In this form, leave the block to dry for a couple of hours.
While the block dries, you can do the printing and preparation of the binding. As we decided earlier, the binding will be soft.
Well, take a special textured paper. BUT? Not? And there is such)) Dense, textured, pleasant to the touch for the soul and body.
Here is such , for example. In general, Lomond has a lot of goodies for booksellers and in general, for fine art, I recommend.
But this paper is also A4, and together with the binding we need a little longer. How to be? It's okay, we glue the cover of two parts. And we will make a break line on the back of the book where the cover is glued to the last page of the block, departing about 1 cm from the edge. Those. we have to type and print two covers. You can also in the Word. One main, where there will be a completely front part, a spine and a rear part that fits. And the other only with the full back cover.
The width of the front (and back) part of the cover of your page is (297/2) + 1.5mm (per fold) = 150mm.
The width of the spine = thickness of the block + 1mm (in stock, because the spine will swell from the glue).

Main cover

Rear part
Now we need to turn to the dried up block of pages. Take a sharp construction knife and gently cut the threads flush. If you have noticed, the spine of the block is slightly swollen with glue and sold. To fix it, you need to push it completely between the plates and squeeze it again with a clamp for 5-10 minutes.
After that, the unit can be completely freed from the clamps and gently bend the main cover along it. To “roll” the folds, you can use a ruler, as described above, only without a rib edge - the cover should have a “soft” fold on the spine, otherwise the paper or ink will crack and peel off at the sharp fold during the operation of the book.
Now an important point. It is necessary to cut off most of the back cover from the main one, and cut off a small part of the back cover from the extra one. Well, with this, I think everyone will cope. For convenience, place the back covers on each other, align them with the block, and draw a couple of scratches with a simple pencil on the end of both sheets of the cover, above and below, in the right place. It is better if this place is in the middle of gluing the back cover to the last page of the block, about 1 cm away from the edge of the spine. Then, using these risks and a ruler, carefully cut the sheets with the same sharp construction knife. Do not forget to put a thicker piece of cardboard under the cover, or you know, a dining, polished table…
Do not use scissors for cutting sheets. The cut line will be uneven. And the blade of the construction knife regularly update (break off another piece) every 20-25 cuts.
Binding sticking in the following order.
First, abundantly grease the first page and the spine of the block with a brush with white glue. On the first page we apply a strip 2 cm wide from the edge of the spine.
Then glue the main cover, pre-cut and bent on the spine. I remind you that we first bent everything that needs to be bent, and then cut off part of the back cover.
Now we coat the last sheet of the block, also with a strip of 2 cm from the edge of the spine. We press a small piece of the back cover (that remained with the main one). We take a separate large part of the back cover and combine it with the image on a small piece while the glue has not yet stiffened.
Here I ask you not to forget about the nuance, it is in any book production manual, so I dropped it at the beginning. The first and last sheets of the block must be necessarily empty on both sides. This is the rule for both soft and hard covers. The cover is glued to these sheets. The maximum that can be printed on them is some kind of information about typography and about the print run, and sometimes an abstract to the book is printed in small print. But it is better to leave them empty (such pictures are technical sheets).
Now, when we have all combined, we put our, already book, again between the two plates and clamp them with a clamp, but not as much as when sizing the spine. And leave for 2-3 hours.


Another know-how, about which the author himself forgot, and remembered only afterwards.
Otherwise, you risk damaging the cover when you take out a finished book from a vice, which the author did. However, there is an original and even beautiful way out of this situation.
After this procedure, the cover gets a vintage look)) Ie the book is not new, glossy and glossy, but quite adult and well-worn. In other words - we have aged the book. And it turned out beautiful, it made the book alive.
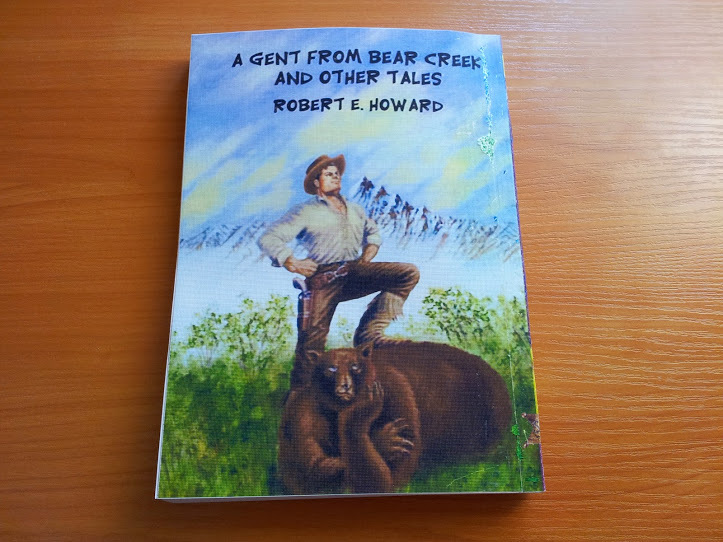
I was a little lucky with this book, because the only image found for the front cover, suitable for printing, turned out to be a scan of a real, battered book, i.e. also with bends, jams, etc. As a result, this is the best way to complement our vintage look.
And here is the long-awaited result!

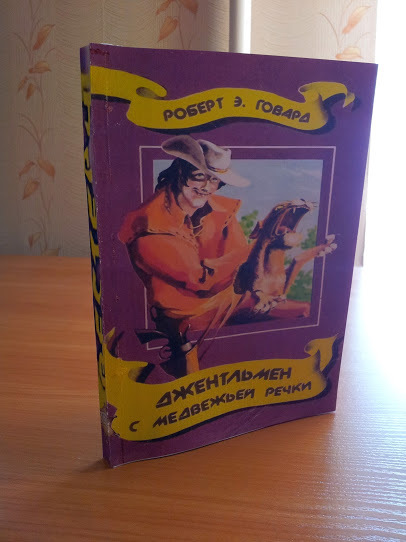
PS The gift was a success and the owner fell in love.
Language after markers during the day, try not to stick out, especially at work. At home - you can.
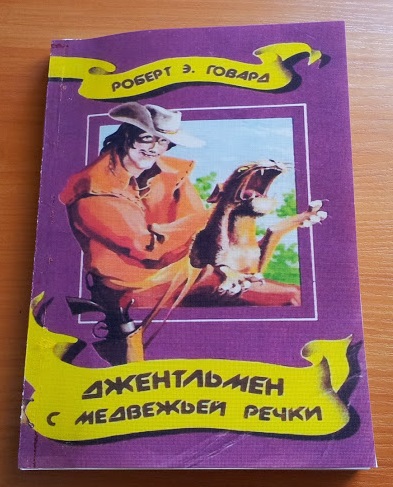
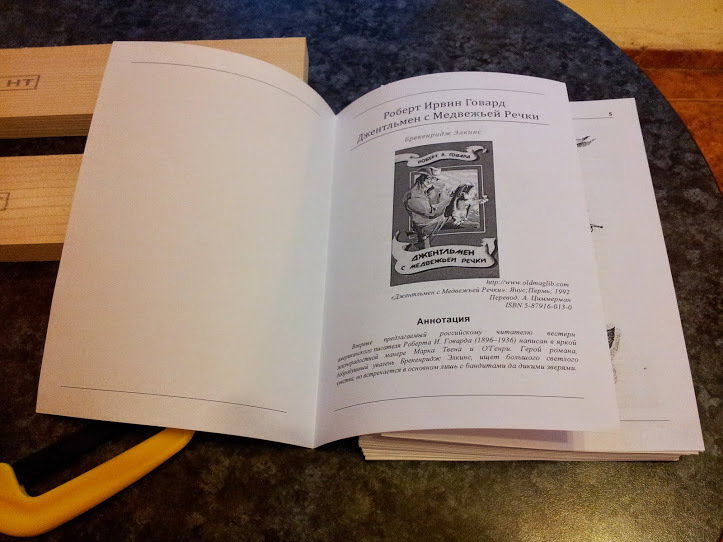
Robert I. Howard is the author of the first novels about Conan. Yes Yes! Conan the Barbarian and Conan the Destroyer are his works. And Red Sonya too)
Therefore, I share my know-how for one-time work.
In this case, we consider the production of a well-known booklet, right at home, straight out of paper and with a minimum of tooling.
230 pages A5, softcover, 4.5 hours.
I like making books with my own hands. There is in this kind of opposition to excessively advancing electronic goods, which here and there optimize everything, and not only the processes that are really superfluous or dangerous to humans, but also completely natural, and without which a person becomes more and more like a vegetable.
Here is an electronic queue, for example, which is now being sent everywhere, where it is necessary and not necessary. In the clinic or bank. What for?..
Whether it’s a business before ... First, you train your brain and eyesight, for whom you occupied, how many people already stood behind it, but moved to another department, office, on the affairs, where did he go, after all, he was here ?! And you did not stand here at all!
So you can talk (live notice), and rejoice and be upset. Soul, in general, you live.
And now - I took the ticket, and you are sitting stupidly, silently staring at the scoreboard, and nothing and no one in this line interests you anymore. Only scoreboard. And you alone govern it. And the tablu do not care if you are alive, or already a vegetable.
')
So with the books as well. In the paper folio there is still some kind of romance, some kind of mystery and nobility, if you wish.
And in the e-books this is not. Only the notorious convenience, for hands, for the brain, for a pocket or bag, for the current to strain less ... They do not need to be watched so as not to get wet, do not blow dust, do not put under glass - boring in general ... And scary, not today- Tomorrow, Google-Glass will be implanted already in the hospital and Johnny Mnemonic will not be a character from the film, but your specific offspring.
I do books rarely. And I do mostly rare ones, those that have never been published in the Union before, or those that have been published only once and are no longer planned for re-publication.
So last time, based on private translations from the Tolkien Club, I produced a 650-page edition of The Unfinished Tales of Middle-Earth - the work of Christopher Tolkien on his father’s drafts, in hardcover and color illustrations by Alan Lee and John Howe ), arranged thematically in the text.
The club a few years ago had its own small circulation, but without illustrations, t.ch. I imho much more lovely))
The work took more than one day and required the manufacture of some intricate tooling for a hard cover of such thickness (vice, etc.).
In general, everything you need to know for a beginning home book-maker can be found here (thanks to comrade Jim aka Jim). Actually, earlier I somehow followed this particular technology. But, as you see, the technology is not trivial, it requires scrupulous accuracy, time and some inventory. Especially for hard covers. So over time, trying to optimize something here and there, our own workings appeared, with reference to work at home.
And the last time a long-standing promise to make a hendmade book coincided with the approaching DR from a colleague. There is not much time left and, without shelving, we proceed to production.
1. Preparation
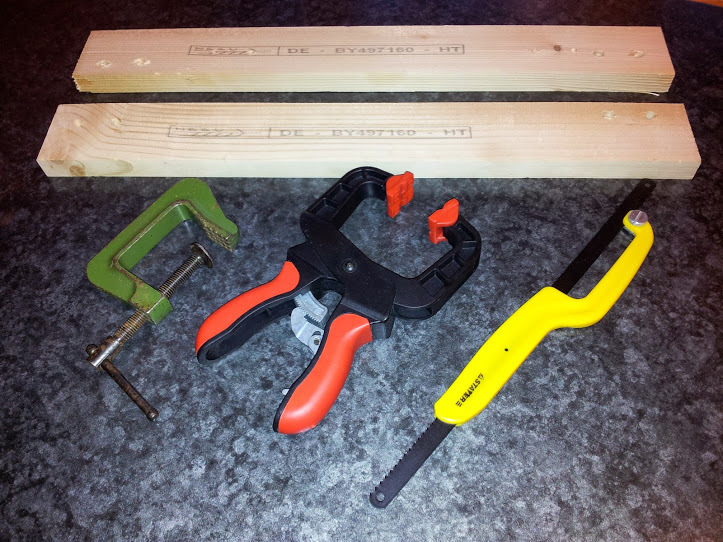
For making 230str. A5 in a soft, pleasant to the touch cover, we need:
- a pair of flat even plates;
- ordinary clamp;
- ratchet clamp (well, very useful and convenient weight);
- hacksaw (for metal);
- brush, small, flat, for painting, with artificial bristles (can be taken from a child by digging in his desk);
- clerical glue (office);
- A4 plain paper;
- A4 paper textured for inkjet printing (yes, there is one);
- laser and color inkjet printers.
And, in fact, everything.
With glue there is subtlety. It should be PVA, but it is exactly office and preferably imported. Such PVA does not turn yellow when cured, but becomes matte-translucent, which is just perfect for a book-worker - there are no traces on the paper. Plus, it becomes durable, but rather elastic, in contrast to furniture PVA - Moment, so that the cover does not crack and does not crumble over time.
Well, a table, a flat wooden stool, a laser printer (at work), a color inkjet printer (at home) and a few hours of family peace, I think you can provide for yourself. Try barter, if there are claims from other parties))
2. Typeset the text
We impose text banal in Word. But!
We choose the size of A4 paper, and in the settings of the page (printing) we immediately set the printing method “Brochure” and - the first know-how!
Know-how №1
We select the number of pages in the brochure not 32, as it should be in a classical printing house, but 4. That is. On A4 paper, 4 pages of A5 will be printed on both sides, so that we then simply fold each such sheet in half and then with each other.We make double-sided printing on the long side.
Why do you need it? Then, that we will have a book with sheets of A5 format. This is a good, convenient format, convenient to hold, you can even put in a handbag with a certain skill. No need to cut A4 paper or look for rare and expensive A5 paper bundles.
Another advantage of this approach is that every two sheets of paper will be tied together by a fold of the paper itself, and not just a taped root. Oh oh Believe me, this is a big plus to the durability of our folio)) Especially if we consider that we will not directly sew the sheets together, but only glue the butt of the spine, although we will still need threads.
After these settings in the Word, we see in front of us a sheet of A5, and we impose it. Do not forget to add headers and footers with the name of the author, the title of the work, title and chapter number and page number. This is a good tone.
Next, print the finished file. Plain text - on a laser printer and on plain paper. Illustrations on a color printer and on photo paper (we then just put them between the pages in the right place), this gives solidity to the publication and is just a pleasure to watch.
3. Preparing a block of pages
For a 230 page book, I spent 30 minutes. on folding all 58 sheets. Yes, just take a sheet and fold it on a flat surface, on a table, in half.
And a little advice:
Know-how number 2
Put in front of yourself some flat support, rail or even just a piece of cardboard. Then when you fold, you press the upper part of the sheet against the stop and smooth both edges of the bent sheet on it. When the edges are combined, take a plastic ruler and spend a couple of times first, fold the ruler flat and then a couple of times with the edge of the ruler (but not very sharp, so as not to damage the paper itself on the fold). Then the fold will be just perfect and very thin, and the edges will remain where you fixed them with your hand.Further the block of pages needs to be finally collected, leveled and fixed with a ratchet clamp, in the middle of the block.
Here I would recommend not to philosophize slyly, but to use the third know-how.
Know-how number 3
If one side (and partly the other, if the page sizes are the same) you can align by simply placing the block with an edge on a flat surface - on the table, then the second (side) surface can be leveled by pressing the block in this position against the wall, having previously placed another one vertically flat even plate (wallpaper is not always flat flat).After aligning the pages in the block, you need to fix it with a ratchet clamp in the middle.
So, the block of pages is ready. It's time to glue the spine.
4. Glue the spine
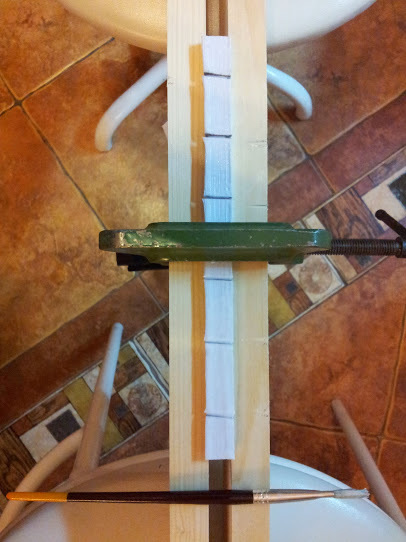
Firstly, we clamp our block between two flat plates, leaving 5 mm spine behind, and tighten it with an ordinary clamp.
Ratchet do not touch, let it hang for reliability.
Next, take a hacksaw and make several cuts along the spine, where we later insert pieces of rope for durability, for pseudo-stitching, so to speak.
And here perhaps the basic know-how!
Know-how №4, basic
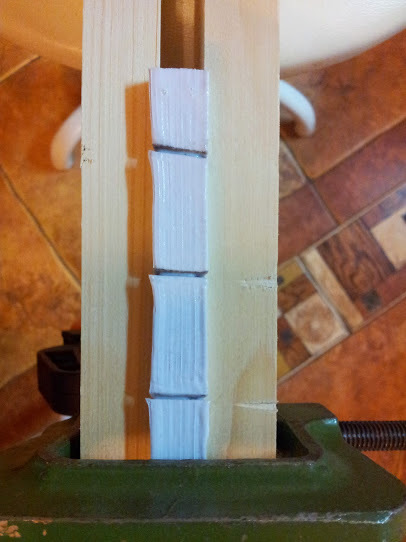
As you have not once observed in life, paperbacks, where the pages are not stitched but just glued on the butt of the spine, tend to crumble with time and with intensive use - the pages tritely fall out of the book, especially with a strong spread. So in order to avoid this and generally reduce the probability of falling to a physical zero, in contrast to the popular typographical technology, where cuts are made perpendicular to the end, we will make cuts at an angle. And on the one hand under the "right" corner, and on the other under the "left". In this case, after installing the thread in the cut (or, for a steampunk edition - a wooden peg), the page will not be able to fall out of the block even if the glue cracks completely and disappears - the page will simply stick, because the cuts are made from different sides from different angles))Now we take the PVA glue and apply it oily on the butt with a kerf. Brush carefully smear the glue so that it gets into all the cracks between the pages of the spine and especially in the cuts.
Give the glue to dry for about 30 minutes.
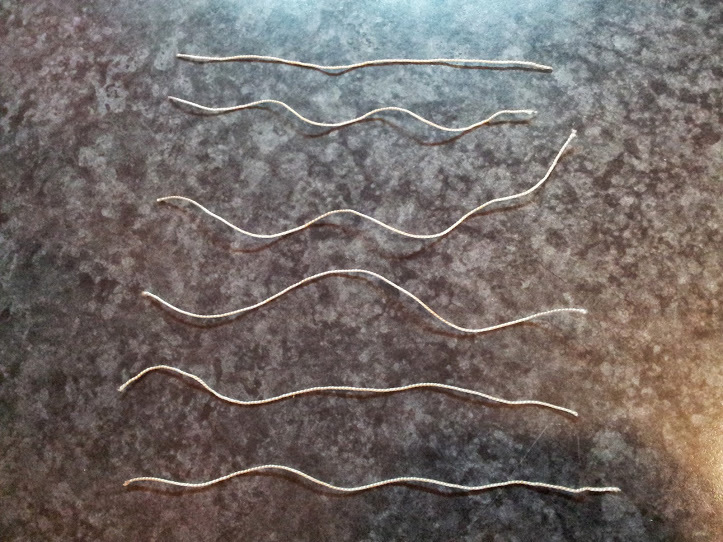
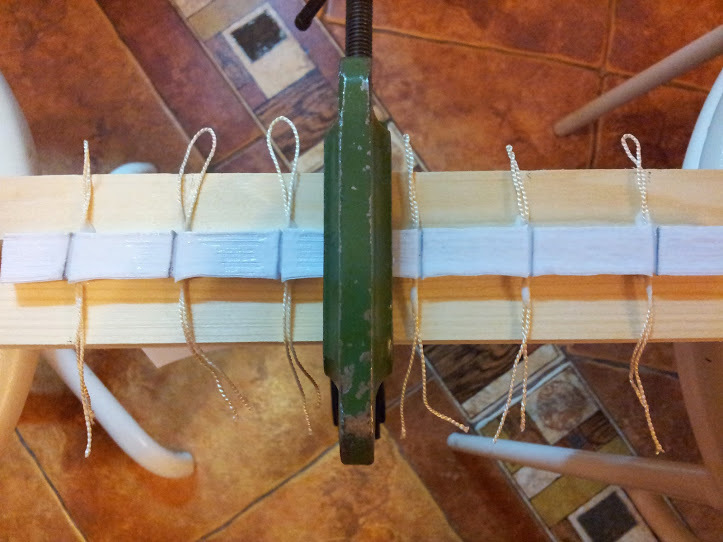
During this time, we cut the threads by 10-15cm according to the number of cuts. It is better to use a natural thread with which PVA is friends, but you can also use kapron. Practice shows that the kapron also sits firmly.
Now once again we drip into each PVA saw blade, fold the thread in half, twist it a little and in several passes so that the thread can soak up along the required length, we insert it into each cut. Once again, drip into the kerf over the PVA thread and smear it with a brush.
In this form, leave the block to dry for a couple of hours.
5. Preparing the binding
While the block dries, you can do the printing and preparation of the binding. As we decided earlier, the binding will be soft.
Well, take a special textured paper. BUT? Not? And there is such)) Dense, textured, pleasant to the touch for the soul and body.
Here is such , for example. In general, Lomond has a lot of goodies for booksellers and in general, for fine art, I recommend.
But this paper is also A4, and together with the binding we need a little longer. How to be? It's okay, we glue the cover of two parts. And we will make a break line on the back of the book where the cover is glued to the last page of the block, departing about 1 cm from the edge. Those. we have to type and print two covers. You can also in the Word. One main, where there will be a completely front part, a spine and a rear part that fits. And the other only with the full back cover.
The width of the front (and back) part of the cover of your page is (297/2) + 1.5mm (per fold) = 150mm.
The width of the spine = thickness of the block + 1mm (in stock, because the spine will swell from the glue).
Main cover
Rear part
Now we need to turn to the dried up block of pages. Take a sharp construction knife and gently cut the threads flush. If you have noticed, the spine of the block is slightly swollen with glue and sold. To fix it, you need to push it completely between the plates and squeeze it again with a clamp for 5-10 minutes.
After that, the unit can be completely freed from the clamps and gently bend the main cover along it. To “roll” the folds, you can use a ruler, as described above, only without a rib edge - the cover should have a “soft” fold on the spine, otherwise the paper or ink will crack and peel off at the sharp fold during the operation of the book.
Now an important point. It is necessary to cut off most of the back cover from the main one, and cut off a small part of the back cover from the extra one. Well, with this, I think everyone will cope. For convenience, place the back covers on each other, align them with the block, and draw a couple of scratches with a simple pencil on the end of both sheets of the cover, above and below, in the right place. It is better if this place is in the middle of gluing the back cover to the last page of the block, about 1 cm away from the edge of the spine. Then, using these risks and a ruler, carefully cut the sheets with the same sharp construction knife. Do not forget to put a thicker piece of cardboard under the cover, or you know, a dining, polished table…
Do not use scissors for cutting sheets. The cut line will be uneven. And the blade of the construction knife regularly update (break off another piece) every 20-25 cuts.
6. Glue the binding
Binding sticking in the following order.
First, abundantly grease the first page and the spine of the block with a brush with white glue. On the first page we apply a strip 2 cm wide from the edge of the spine.
Then glue the main cover, pre-cut and bent on the spine. I remind you that we first bent everything that needs to be bent, and then cut off part of the back cover.
Now we coat the last sheet of the block, also with a strip of 2 cm from the edge of the spine. We press a small piece of the back cover (that remained with the main one). We take a separate large part of the back cover and combine it with the image on a small piece while the glue has not yet stiffened.
Here I ask you not to forget about the nuance, it is in any book production manual, so I dropped it at the beginning. The first and last sheets of the block must be necessarily empty on both sides. This is the rule for both soft and hard covers. The cover is glued to these sheets. The maximum that can be printed on them is some kind of information about typography and about the print run, and sometimes an abstract to the book is printed in small print. But it is better to leave them empty (such pictures are technical sheets).
Now, when we have all combined, we put our, already book, again between the two plates and clamp them with a clamp, but not as much as when sizing the spine. And leave for 2-3 hours.
Another know-how, about which the author himself forgot, and remembered only afterwards.
Know-how №5
To prevent the paper soaked with glue (cover or block) from sticking to the vise-plates, wrap the plates with polyethylene and fix it with tape or a construction stapler at the edges. Polyethylene is well suited from packages for freezing food, it is more dense and does not stretch.Otherwise, you risk damaging the cover when you take out a finished book from a vice, which the author did. However, there is an original and even beautiful way out of this situation.
Know-how №6
Again we turn to the child’s desk and find in the bins a package with old felt-tip pens. Carefully select the markers on the color of the damaged cover, moisten with tongue if necessary, and paint over the damaged areas of the cover.After this procedure, the cover gets a vintage look)) Ie the book is not new, glossy and glossy, but quite adult and well-worn. In other words - we have aged the book. And it turned out beautiful, it made the book alive.
I was a little lucky with this book, because the only image found for the front cover, suitable for printing, turned out to be a scan of a real, battered book, i.e. also with bends, jams, etc. As a result, this is the best way to complement our vintage look.
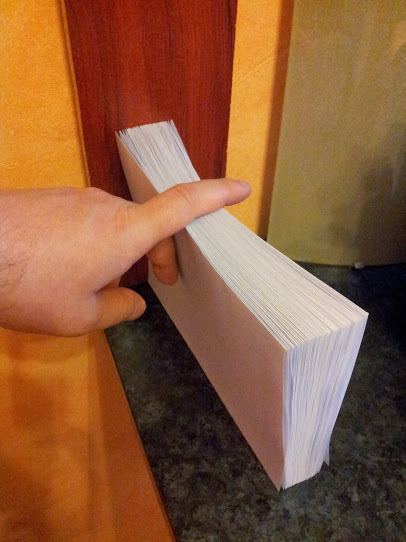
And here is the long-awaited result!
PS The gift was a success and the owner fell in love.
Language after markers during the day, try not to stick out, especially at work. At home - you can.
Robert I. Howard is the author of the first novels about Conan. Yes Yes! Conan the Barbarian and Conan the Destroyer are his works. And Red Sonya too)
Source: https://habr.com/ru/post/223911/
All Articles