Test automation. The beginning of the way
Good afternoon, Habr!
The topic of today's article will be the automation of functional testing of web applications. More precisely, not automation itself, as a type of testing, but a quick start in this, of course, fascinating business.
Many testers involved in conducting functional and regression testing, sooner or later come to the idea of automating the process, because it is quite possible to say that the execution of the same regression cases eventually becomes terribly annoying.
The article is intended for people who only approach this idea anddon’t know what to think of, where to start their journey in automation.
If you remember yourself at the beginning of this path, you get the following basic data (I bet that I'm not alone):
The manual is a separate topic.
You can't just say: “I want to automate!” And eventually get approval and time to complete the task. The management needs a result, so it’s very reasonable for them not to allocate time “it’s not known for what.”
From here follow 2 situations:
')
Situation 1.
Further development, tests and errors, new knowledge begins, the tester is motivated to the limit. But the time comes, 90% of the likelihood there were difficulties in the development (we are newbies, yes), because of which the deadlines went, there were new ideas that were not taken into account in the TK, but oh, how to realize it. In the end, it’s likely that the system will not be delivered on time, the management will be upset (and it’s not important that we have achieved much, that we have learned a lot of new things, that we have become more competent), there is no result.
I will make a reservation. Probably, dear reader went along this path and everything turned out, but I am sure that there is a minority of such people.
Situation 2.
In my opinion, path 2 is preferable here (probably it seems to me, because I myself was following this path), because it guarantees the absence of a negative result, because if you suddenly fail, no one will know about it.
By posting this article, I have several goals:
I hope that the article will benefit the novice automator.
I also hope for criticism, because The attached project is currently being developed and needs to be supplemented.
What is used:
Application installation and project setup
To work will require:
To download a project from the repository, you need to open git bash in the folder (where you want to contain it) and execute the command:
You can familiarize yourself with the work of Git, for example, in this article.
Next, open the
The next step is to create a project that will store all your tests, pages and everything else.
What should be done:
Example of creating a page (WebPages)
All created pages are inherited from the
Example of page class:
Rule:
All elements that are present on the page should be initialized when they are accessed.
Examples of working with pages:
Test case creation example (Test)
As noted above, all test cases should be in the
All test cases must be public and inherited from the
Before the name of the class with the test case, the attribute
Before each step of the test case, the
More information about the attributes of the tests can be found here .
An example of a class with a test case:
Record format:
Why not just use Assert?
All Assertions are trapped by a special class in which actions are performed on error logging, logging, etc.
Examples of working with the database
To work with the database, the
Examples:
Select:
Unselect:
Execution of stored procedure:
Collection of test results and sample report:
As mentioned above, to start the notification and receive a report by mail, after running the last test, run the code
The logic of NUnit is such that it runs the tests in alphabetical order, respectively, so that the desired test is run last, it must be named accordingly.
Alert settings are specified in the App.config file.
An example of a report (it is still damp, little information):
Autotest Report
Summary :
Pass Rate = 0%.
After completing all the points of this mini-instruction, the young tester - the automator will be able to quickly create his project and get the minimum necessary to start this journey.
Summarizing.
It is worth noting that the proposed system has not yet been completely completed, there are still many ideas to be implemented (I really hope for suggestions for improvement from a dear reader).
If there is interest, in the following articles I will describe in detail the work of the framework, setting up and running tests.
As for the launch of tests, I will only say that I use the free teamcity in my work, which, in my opinion, is very convenient and easy to learn.
I hope that reading this post has been helpful for someone.
Thanks for attention.
The topic of today's article will be the automation of functional testing of web applications. More precisely, not automation itself, as a type of testing, but a quick start in this, of course, fascinating business.
Many testers involved in conducting functional and regression testing, sooner or later come to the idea of automating the process, because it is quite possible to say that the execution of the same regression cases eventually becomes terribly annoying.
The article is intended for people who only approach this idea and
If you remember yourself at the beginning of this path, you get the following basic data (I bet that I'm not alone):
- There is a desire to automate, there is a project that can be automated;
- More than 50 open tabs in the browser with information about automation, selenium, building frameworks, etc .;
- Several Visual Studio projects started, which have already been abandoned as a result of the impasse and the realization of the wrong approach;
- The lack of time officially allocated by the automation manual, since no experience, no one knows what happens (and whether it will work).
The manual is a separate topic.
You can't just say: “I want to automate!” And eventually get approval and time to complete the task. The management needs a result, so it’s very reasonable for them not to allocate time “it’s not known for what.”
From here follow 2 situations:
')
Situation 1.
- Step 1. Tester voiced the idea of automation, perhaps even prepared a TK and made an assessment of labor costs and payback.
- Step 2. The management said: “Ok, buddy, proceed. By the end of the term you need to provide a report on the work done. "
Further development, tests and errors, new knowledge begins, the tester is motivated to the limit. But the time comes, 90% of the likelihood there were difficulties in the development (we are newbies, yes), because of which the deadlines went, there were new ideas that were not taken into account in the TK, but oh, how to realize it. In the end, it’s likely that the system will not be delivered on time, the management will be upset (and it’s not important that we have achieved much, that we have learned a lot of new things, that we have become more competent), there is no result.
I will make a reservation. Probably, dear reader went along this path and everything turned out, but I am sure that there is a minority of such people.
Situation 2.
- Step 1. In his spare time, the tester began to study the topic, read articles, automate a little.
- Step 2. Some time passes and the tester already has a more or less working automation project, several dozen auto tests. The project is not completed yet, yes, but it's time to inform the management about your initiative and your success; this will raise your price and give you additional motivation.
- Step 3. The tester informs the management, shows the worker, even if the project is not completed, as a result receives approval and time to complete what has begun.
In my opinion, path 2 is preferable here (probably it seems to me, because I myself was following this path), because it guarantees the absence of a negative result, because if you suddenly fail, no one will know about it.
By posting this article, I have several goals:
- To benefit the novice tester - automator, help quickly create the first auto-test and continue to automate;
- Get criticism on the project, because it is still doped and filled;
- Find people who will use the system, get feedback from them about what functionality they would like to see from what is not.
I hope that the article will benefit the novice automator.
I also hope for criticism, because The attached project is currently being developed and needs to be supplemented.
What is used:
- Language and development environment: C # in MS Visual Studio 2012 (project class library).
- Browser management: Selenium Webdriver.
- Testing Framework: NUnit.
- To work with the database (we need to take test data from somewhere, right?) At this stage, the standard
OracleClientandSqlClient;
Application installation and project setup
To work will require:
- Git ;
- Visual studio 2010/2012;
- Nunit 2.6.1;
- Resharper (for ease of running tests and debugging);
- Selenium IDE - plugin for firefox (for easy recognition locators of elements on the pages).
To download a project from the repository, you need to open git bash in the folder (where you want to contain it) and execute the command:
git clone git://github.com/4gott3n/AT.git masterYou can familiarize yourself with the work of Git, for example, in this article.
Next, open the
AT.sln file in Visual Studio and see in front of you the Solution containing the AT project (the framework itself), as well as an example of a test project in which you can see the implementation of pages, tests, etc. (he is a convenient example for creating your project).The next step is to create a project that will store all your tests, pages and everything else.
What should be done:
- To add to the Solution a new project (Class library) this name needs to be added later in the App.config;
- Connect links;
In the end, it should be like in the picture: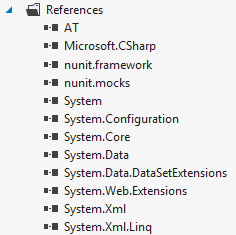
- Create the configuration file App.config;
This file will contain all the basic parameters of the project.More details. App.config<add key="project_name" value="SampleTestProject"/> <!-- --> <!-- --> <add key="smtp_server" value=" smtp " /> <add key="smtp_port" value="" /> <add key="smtp_login" value="" /> <add key="smtp_password" value="" /> <add key="mail_from" value=" email" /> <add key="mail_to" value=" " /> <!-- end notif config --> <!-- --> <add key="ImplicitlyWait" value=" ( )" /> <add key="WaitForAjax" value=" ajax ( )" /> <add key="browser" value=" (firefox, chrome iexplore)" /> <add key="browser_check_url" value="http://ya.ru" /> <!-- --> <!-- browser config end --> <!-- (webpages) --> <add key="Yandex" value="http://yandex.ru/" /> <!-- WebPages ( WebPages Yandex) --> <add key="dash_prefix" value="___" /> <!-- namespace ( ) --> <add key="extension_prefix" value="__" /> <-- ( ), index-1.html index___1__html --> <add key="folder_index_prefix" value="_fld" /> <!-- , , , https://yandex.ru/test/, Yandex test, _fld --> <!-- pages config end--> <!-- --> <add key="database_name_prefix" value="db_" /> <!-- , --> <add key="database_selected_rows_limit" value="50" /> <!-- (- ) --> <add key="db_test" value="172.18.XX.XX;1521;SID;LOGIN;PASSWORD;oracle" /> <!-- --> <!-- : host;port;sid;login;password;type (type oracle, mssql--> <!-- data base config end --> <add key="test_step_prefix" value="step_" /> <!-- -, step_01 --> <add key="test_case_prefix" value="test_" /> <!-- -, test_000001 --> <add key="datetime_string_format" value="yyyy-MMM-dd -> hh:mm:ss" /> <!-- --> <add key="log_file_name" value="system.log" /> <--! --> - Create a folder for pages (WebPages).
This folder will contain files with page classes.More details. WebPages.A few rules:- The pages folder should be called WebPages;
- It should be at the root of the project;
- Inside it should contain the root folders of your test systems (for example, if you are testing Yandex, then the WebPages folder should contain the yandex folder);
- Pages in folders must be in the same hierarchy as they are in the system under test;
Example:
Page: test.ru/step1/service/index.html
Folder hierarchy: WebPages -> Test -> step1 -> service -> index.html.cs
Important: folder and class names are case sensitive. - The names of the page class files must match the actual page names.
Page class names:
Example:
Page: index-1.html
Class: index___1__html
Here:- The hyphen in the page title is replaced by three slashes (you can change the dash_prefix parameter in App.config);
- The file point is replaced with two slashes (you can change the extension_prefix parameter in App.config;
Class names, when there is no file name, but there is only a folder:
Example:
Page: test.ru/step1/service
Class: _fld (you can change the folder_index_prefix parameter in App.config) - Create Pages.cs class
public static class Pages { }
The class will contain objects of page classes (WebPages);More details. Pages.csThis class contains objects of classes of pages through which access to elements, etc. is performed.
A few rules:- In this class, the subclass hierarchy must match the hierarchy in the WebPages folder;
- The class and all objects inside it must be public static.
Class example:public static class Pages { public static class Test { public static index__html Index = new index__html(); public static class step1 { public static class service { public static _fld Main = new _ fld(); } public static add__php Add = new add__php(); } } }
With this record, the pages will be available in tests like this:Pages.Test.Index.Open(); Pages.Test.step1.service.Main.Open(); - Create a folder for tests (Tests)
There are no special rules, it is enough to create the Tests folder in the root of the project, create test folders inside it for the tested systems as you please.More details. TestsThe picture shows how it was done on my project: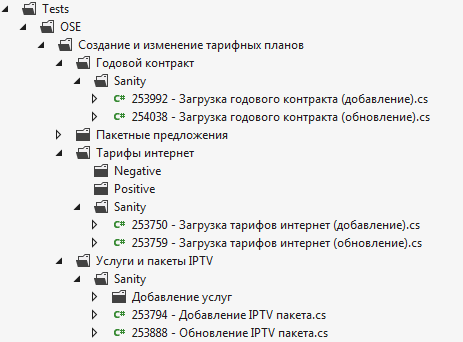
It would be very appropriate to create two “service” tests that will always be run first and last. In the first test, you can perform various actions to set up the environment; in the latter, for example, you can perform a stand cleaning and launch a notification.
Nunit runs tests inside the category in alphabetical order (after the full class name)
To start the notification, you must run the code:AT.Service.Notifier.SendNotif();
It is also useful to create the class Environment.cspublic static class Environment { }
Personally, I use it to store various global variables and constants.
Example of creating a page (WebPages)
All created pages are inherited from the
PageBase base class, which contains the necessary methods that are the same for all pages: “open”, “open with parameter”, “get Url”.Example of page class:
public class index__php : PageBase { public void OpenVpdnTab() { new WebElement().ByXPath("//a[contains(@href, '#internet')]").Click(); } public string VpdnAction { get { return new WebElementSelect().ByXPath("//select[@name='action']").GetSelectedValue(); } set { new WebElementSelect().ByXPath("//select[@name='action']").SelectByValue(value); } } public string VpdnLid { set { new WebElement().ByXPath("//input[@name='lid']").SendKeys(value); } } public string VpdnTechlist { set { new WebElement().ByXPath("//input[@name='file']").SendKeys(value); } } public string VpdnStartDate { set { new WebElement().ByXPath("//input[@name='start_date']").SendKeys(value); } } public void VpdnSubmit() { new WebElement().ByXPath("//input[@value='']").Click(); } } Rule:
All elements that are present on the page should be initialized when they are accessed.
Examples of working with pages:
Pages.Test.Index.Open(); - openPages.Test.Index.Open(“?id=1”); - open with parametervar url = Pages.Test.Index.Url; - getting the page addressPages.Test.Index.VpdnSubmit(); - start the function specified in the page class aboveTest case creation example (Test)
As noted above, all test cases should be in the
Tests folder.All test cases must be public and inherited from the
TestBase base class.Before the name of the class with the test case, the attribute
[TestFixture] should be specified.Before each step of the test case, the
[Test] attribute must be specified.More information about the attributes of the tests can be found here .
An example of a class with a test case:
namespace TestProject.Tests.OSE { [TestFixture] [Category("OSE"), Category("OSE_Internet")] /* , nunit */ public class test_253750 : TestBase { [Test] public void step_01() { Pages.OSE.Inaclogin.Open(); Pages.OSE.Inaclogin.Login = “user”; Pages.OSE.Inaclogin.Password = “password”; Pages.OSE.Inaclogin.Submit(); Assertion(" ”, () => Assert.AreEqual(Pages.OSE.Inaclogin.IsAuthSuccess, true)); } } Assertion is a conditional check.Record format:
Assertion ( , () => Assert._accert__nunit() );Why not just use Assert?
All Assertions are trapped by a special class in which actions are performed on error logging, logging, etc.
Examples of working with the database
To work with the database, the
AT.DataBase.Executor class is AT.DataBase.Executor , containing methods:- Execution of queries on the selection (select);
- Execution of queries of type insert, update, delete (unselect);
- Execution of stored procedures.
Examples:
Select:
var query = select col1, col2 from table_name"; var list = Executor.ExecuteSelect(query, Environment._); Unselect:
var query = “DELETE FROM table_name"; Executor.ExecuteUnSelect(query, Environment._); Execution of stored procedure:
Executor.ProcedureParamList.Add(new ProcedureParam("varchar", "_", «»)); /* */ Executor.ProcedureParamList.Add(new ProcedureParam("varchar")); /* */ var res = Executor.ExecuteProcedure("_", Environment._); _ must match the sid value from the db initialization string in App.config <add key="db_test" value="172.18.XX.XX;1521;SID;LOGIN;PASSWORD;oracle" /> <! -- --> Collection of test results and sample report:
As mentioned above, to start the notification and receive a report by mail, after running the last test, run the code
AT.Service.Notifier.SendNotif();The logic of NUnit is such that it runs the tests in alphabetical order, respectively, so that the desired test is run last, it must be named accordingly.
Alert settings are specified in the App.config file.
An example of a report (it is still damp, little information):
Autotest Report
| 000001 | Failed | step_01: error Track. Step: The step was not performed, the error in the previous step Track. Step: The step was not performed, the error in the previous step Track. Step: The step was not performed, the error in the previous step |
Summary :
Pass Rate = 0%.
After completing all the points of this mini-instruction, the young tester - the automator will be able to quickly create his project and get the minimum necessary to start this journey.
Summarizing.
It is worth noting that the proposed system has not yet been completely completed, there are still many ideas to be implemented (I really hope for suggestions for improvement from a dear reader).
If there is interest, in the following articles I will describe in detail the work of the framework, setting up and running tests.
As for the launch of tests, I will only say that I use the free teamcity in my work, which, in my opinion, is very convenient and easy to learn.
I hope that reading this post has been helpful for someone.
Thanks for attention.
Source: https://habr.com/ru/post/223831/
All Articles