HHVM (hip-hop): Comparative testing and tuning

Today, we are sharing the results of testing a php script with and without HHVM for speed, and also immediately see how it is implemented, for example, on Fedora 20. Although we already wrote about this here , and here we even did something similar, to be sure we recall: HHVM PHP (hip -hop) is an open virtual machine designed to run programs written in PHP and HACK. Uses JIT compilation and was developed on Facebook.
')
Test: HHVM + NGINX + FASTCGI vs. PHP-FPM + NGINX
The test script is a lot of regulars, arithmetic operations and references to the database.
Ideally, for testing hhvm for speed, the script should have no access to the database, they are present in the test only because it was needed for current affairs.
Soft:
Fedora 20
HipHop VM 2.4.0 (rel)
nginx / 1.4.4
PHP 5.5.12
Soft for the test: ab.
3000 script requests in 10 threads.
Clean hhvm 13.665 seconds
Concurrency Level: 10
Time taken for tests: 13.665 seconds
Complete requests: 3000
Failed requests: 0
Total transferred: 2142000 bytes
HTML transferred: 1842000 bytes
Requests per second: 219.54 [# / sec] (mean)
Time per request: 45.549 [ms] (mean)
Time per request: 4.555 [ms] (mean, across all concurrent requests)
Transfer rate: 153.08 [Kbytes / sec] received
nginx-fastcgi-php 31.406 seconds
Concurrency Level: 10
Time taken for tests: 31.406 seconds
Complete requests: 3000
Failed requests: 0
Total transferred: 2328000 bytes
HTML transferred: 1842000 bytes
Requests per second: 95.52 [# / sec] (mean)
Time per request: 104.688 [ms] (mean)
Time per request: 10.469 [ms] (mean, across all concurrent requests)
Transfer rate: 72.39 [Kbytes / sec] received
Conclusion: hhvm is 2.29 times faster.
Measurements of code fragments inside the script:
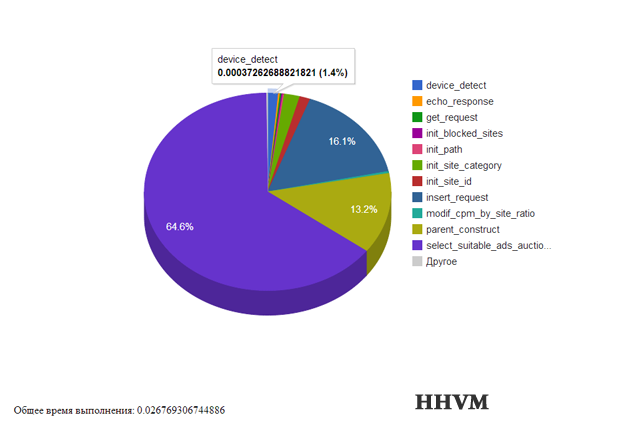

The graphs are based on an average of 1000 measurements.
As a result of measurements of code fragments, it is clear that HHVM is 2.77 times faster than NGINX-FASTCGI-PHP.
On the graph, the most accelerated section of the code (mass of regularizers) is marked in blue, it was accelerated 113 times!
Practical use
Task: We have a project that processes a lot of requests. For this project - about 10 servers. It is necessary to reduce the resource several times - either fewer servers or less data.
Solution: A virtual machine to speed up the performance of HHVM is installed on the server and through it you can run the execution of php scripts. Result: the necessary acceleration.
Such a solution is the more suitable the larger the scale: if it is a large project on the scale of Facebook (the creators of HHVM), in which tens of thousands of servers are involved, reducing them by two or three times gives a tangible result. According to the results of our testing - in some parts of the code you can overclock it 113 times - but more on that later.
Of course, everything has its pros and cons, HHVM is not an exception, so it is advisable to immediately identify them:
Pros:
• Acceleration of PHP execution (in my test on a large block of regulars there was an acceleration of 113 times, in general, the test script was accelerated by ~ 2 times due to the greater number of calls to the database).
Minuses:
• does not support php-mysqli (need to use mysql or PDO)
• server crashes were observed with PHP error about an unexpected end-of-file encounter (after restarting the server, it continued to work).
Implementation: Installing and configuring HHVM PHP (hip-hop) on Fedora 20

Of course, using HHVM to speed up PHP is pretty obvious and probably someone has already done it, even for Fedora. But in Russian sources on this topic there is much less information than we would like, so today I am sharing a small, but quite self-sufficient tutorial, from beginning to end, how to install it on Fedora and check the work.
I used Fedora 20, but the setting for other OSs is basically the same, and a link to an English-language source for them can be found at the end of the post. Conveniently, now ready-made packages are put in one team - they do not need to be assembled manually. “At dawn,” HHVM open source was difficult to install, but now, fortunately, it is already in the past: now, if you act on the manual, you can install everything and check, in principle, in an hour. Setup and installation fit into 6 consecutive steps.
Step 1: Add repository to the system
First of all, add the repository to our system. To do this, create and open a file for editing
/etc/yum.repos.d/hhvm.repoThis can be done for example:
vi /etc/yum.repos.d/hhvm.repoWe write the following lines into it:
[hhvm] name=HHVM for Fedora $releasever - $basearch baseurl=http://dl.hhvm.com/fedora/$releasever/$basearch/ If you use the vi editor, then after opening the file, click “i”, then enter the lines, then press Esc and then press Shift + z + z.
Then install the HHVM:
rpm --import dl.hhvm.com/conf/hhvm.gpg.key
yum install hhvm
During installation, a dialog will appear about the installation of the required components (Is this ok [y / d / N] :). We answer - “yes”, with the command:
yAfter that we see a list of installed components and at the end of the line “Complete!”.
Next, go to edit the config -
/etc/hhvm/config.hdf.For example:
vi /etc/hhvm/config.hdfHere is an example of a working config (most likely in it you will only need to change the root path):
Log { Level = Error UseLogFile = true File = /var/log/hhvm-error.log Access { * { File = /var/log/hhvm-access.log Format = %h %l %u %t \"%r\" %>s %b } } } MySQL { TypedResults = false } Server { Port = 4849 # hhvm SourceRoot = /home/www/site/public_html # php Type = fastcgi #ThreadCount = 50 } Eval { # set to true to enable JIT compiler # If hhvm crashes you can turn this off to see if the problem # is in the JIT. Jit = true } Replace the default config with the one suggested above and rule the root path.
Step 2: Launch HHVM
Now we can run HHVM. Here we have two options - running in server mode or daemon mode.
Running in server mode - there will be output directly to the console of errors and other things:
hhvm -m server -c /etc/hhvm/config.hfdRunning a
hhvm -m daemon -c /etc/hhvm/config.hfd - background job: hhvm -m daemon -c /etc/hhvm/config.hfdIf you comment out the hhvm config -
Type = fastcgi (#Type = fastcgi) , then you can check its operation right now. After editing the config, you need to restart hhvm.To restart hhvm in daemon mode, enter:
netstat -lnpWe see a list of programs and their pid, find hhvm, copy its pid, enter the command.
kill pid In this command, replace the pid with the process number found in the list. Re-enter netstat -lnp to ensure the death of the process. Next, run hhvm in any of the mods.To restart hhvm in server mode, simply press Ctrl + c and then run hhvm in any of the mods.
Step 3: Add a PHP Script
After these manipulations, we put any php script in the root directory specified in the hhvm config.
We address it as follows:
___:4849/_php_.phpIf the processed php script is not visible then we look at the error log in the console (in the case of hhvm -m server), or in the error log file with the command
tail /var/log/hhvm-error.log (in the case of hhvm -m daemon).Further, if you tested hhvm and commented out
Type = fastcgi in the config, then uncomment it and reload hhvm. If you did not do it, then leave everything as it is and move on.Step 4: Configure NGINX
Configure nginx to fastcgi in hhvm. To do this, we modify the nginx config, it is here /etc/nginx/nginx.conf. The following entry should appear there:
location ~ \.php$ { # (/home/www/site/public_html). root /home/www/site/public_html; fastcgi_pass 127.0.0.1:4849; # hhvm fastcgi_index index.php; fastcgi_param SCRIPT_FILENAME /home/www/site/public_html$fastcgi_script_name; include fastcgi_params; } The rest of the nginx settings are to taste (the main thing is that he listened to port 80 - server {listen 80;}). After that we reboot nginx with the command:
nginx -s reloadNow we have a bunch of nginx - in front of port 80, hhvm - behind port 4849.
Step 5: Test HHVM + NGINX + FASTCGI
We are requesting the address: change_in_ your_domain_name / ph_script_name.php
Must see the processed php script.
Do not forget that nginx and hhvm should be included.
If the script is not visible, go look at the error log. In the case of hhvm -m server, right in the console, in the case of hhvm -m daemon in the error log file like this:
tail /var/log/hhvm-error.logHere is just in case the nginx config file for the hhvm bundle:
user apache; worker_processes 10; events { worker_connections 1000; } worker_rlimit_nofile 50000; http { include mime.types; default_type application/octet-stream; log_format my_combined '$remote_addr - $remote_user [$time_local] ' '"$request" $status $body_bytes_sent ' '"$http_referer" "$http_user_agent" ' '$upstream_response_time "$host"' sendfile on; keepalive_timeout 10; limit_zone lconn $binary_remote_addr 10m; server { client_max_body_size 1000k; fastcgi_read_timeout 1m; listen 8080; listen 80; server_name site.ru; # access_log /var/log/nginx/site.ru-access_log my_combined; # error_log /var/log/nginx/site.ru-error_log; # limit_conn lconn 100; root /home/www/site/public_html; # index index.php index.html index.htm; error_page 500 502 503 504 /50x.html; location = /50x.html { root html; } location ~ \.php$ { root /home/www/site/public_html; # fastcgi_pass 127.0.0.1:4849; fastcgi_index index.php; # fastcgi_param SCRIPT_FILENAME /home/www/site/public_html$fastcgi_script_name; include fastcgi_params; } } } Step 6: Adding HHVM to autoload
If you use hhvm all the time, you will need to add it to autoload.
Open the file - /etc/init.d/hhvm for editing, for example:
vi /etc/init.d/hhvmWe replace all of its contents with the following:
#! /bin/sh # # hhvm Daemon for HHVM # # chkconfig: 2345 20 20 # # description: HHVM is an open-source virtual machine designed for executing programs written in Hack and PHP test -x /usr/bin/hhvm || exit 0 case "$1" in start) /usr/bin/hhvm --config /etc/hhvm/config.hdf --mode daemon ;; stop) start-stop-daemon --stop --quiet --oknodo --pidfile /var/run/hhvm/pid ;; reload|force-reload|restart|try-restart) $0 stop $0 start ;; status) echo "No status" ;; *) echo "Usage: /etc/init.d/hhvm {start|stop|restart|status}" exit 1 esac exit 0 We save.
Then we enter the command:
chkconfig hhvm onDone! The hhvm daemon will start at system startup.
Of course, everyone has his own way - how specifically to integrate it, everyone decides for himself. Nevertheless, everything here works exactly the same way for the minimum amount of time - I think it is quite possible to use it in live conditions, when you need to save quite a lot on the number of servers, especially if you can do it on the basis of an open source solution.
Here about this already wrote earlier:
Overview
Installing HHVM on Nginx
Test: comparing HHVM with native interpreter
Here you can take HHVM in the public domain:
Github
Community
Here you can read about the technology:
Wikipedia in English
Wikipedia in Russian
Source: https://habr.com/ru/post/223815/
All Articles