We test iOS applications without Apple Developer Program Membership
I was interested in trying to write an application for iOS, purely for educational purposes, but Apple did not really want to pay Apple 99USD for “curiosity”. Do not despair, for people like us there are ways to both launch the application and debug it on the target device.

After smoking docks and all sorts of experiments, I did it. Fortunately, once I saved the tutorial from one page, but from where, I’d hardly find it, so this can be considered a translation. Well, plus added on my own.
So, the software versions that I used:
So, what is required for "curiosity"? Just:
')
Here, in general, everything is simple. At the moment, the firmware can be cracked 7.0.6. Everything else can be learned from the site evasi0n .
If there is no hacked device, then we close this tutorial and pay Apple 99USD.
Quite a well-known fact that in order to install self-signed applications (essence cracked) you need to install the so-called AppSync in Cydia. I installed AppSync from our smolk Russian repository - http://smolk.myrepospace.com . As far as I watched this repository, Smolk himself writes / tys AppSync and puts it one of the first, therefore I recommend using his works.
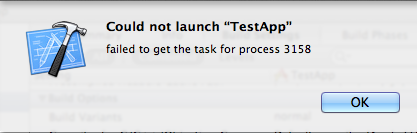
If nothing happens, then Xcode will produce something like the following:

Everything, our device will now always be recognized as used for development when connected.
I hope this guide will help novice iOS programmers simply and unpretentiously try their hand at writing programs for Apple devices.
After smoking docks and all sorts of experiments, I did it. Fortunately, once I saved the tutorial from one page, but from where, I’d hardly find it, so this can be considered a translation. Well, plus added on my own.
So, the software versions that I used:
- OS X Mavericks 10.9.2
- Xcode 5.1.1
- iOS 6.1.2 iPhone 4
- iOS 7.0. iPad mini
So, what is required for "curiosity"? Just:
- Check in our iOS device
- Prepare iOS for installing self-signed applications
- Connect iOS to Xcode and set up a device for development
- Create your certificate
- Configure Xcode to use a self-signed certificate
- Configure Xcode for debugging on target device
')
Jailim ios
Here, in general, everything is simple. At the moment, the firmware can be cracked 7.0.6. Everything else can be learned from the site evasi0n .
If there is no hacked device, then we close this tutorial and pay Apple 99USD.
We are preparing our iOS device to install self-signed applications.
Quite a well-known fact that in order to install self-signed applications (essence cracked) you need to install the so-called AppSync in Cydia. I installed AppSync from our smolk Russian repository - http://smolk.myrepospace.com . As far as I watched this repository, Smolk himself writes / tys AppSync and puts it one of the first, therefore I recommend using his works.
If nothing happens, then Xcode will produce something like the following:
We connect and configure our iOS device to Xcode
- Launch Xcode
- We cling iOS device to USB
- Open Organizer (Window \ Organizer)
- Choose a connected device
- Click "Use for development"
- Most likely, Xcode will try to connect to the Apple server and check for the existence of a developer account, if so - click Cancel
Everything, our device will now always be recognized as used for development when connected.
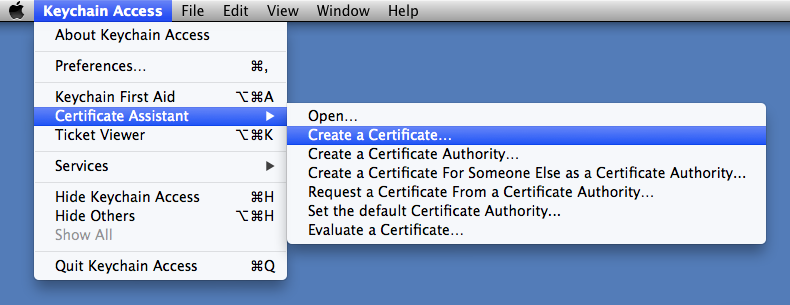
Create a developer certificate
- Launch the application "Keychain Access"
- Menu "Certification Assistant> Create a Certificate"
- On the first page, fill in the data and click «Continue».
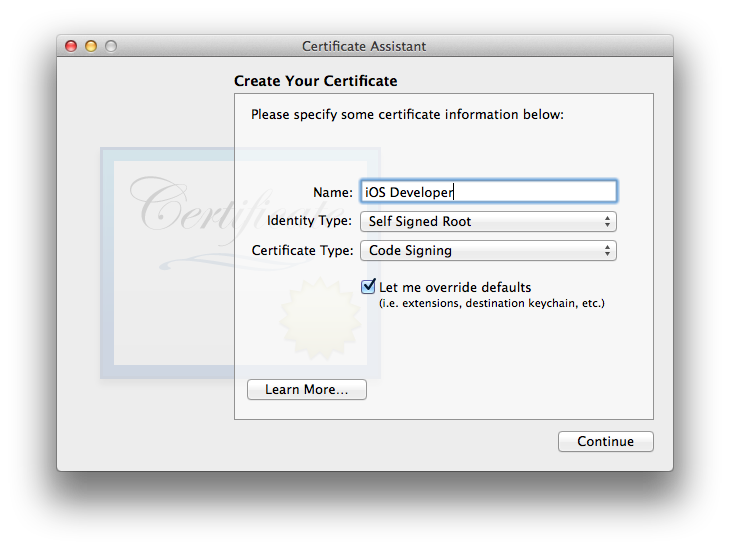
- Name: iOS Developer
- Identify Type: Self Signed Root
- Certification Type: Code Signing
- Tick "Let me override defaults"
- Click "Continue" to create a certificate.
- Change “Validity Period” for example to 3650 - this is 10 years of validity, click “Continue”.
- We leave the “Email address” field empty and click “Continue”.
- Leave the default values in the "Key Size" and "Algorithm" fields, click "Continue".
- Click "Continue" on all of the following pages until a window appears with the "Create" button.
- Click “Create” and “Done” respectively.
Configure Xcode to use a self-signed certificate.
- Close Xcode if it is open.
- Open Terminal
cd /Applications/Xcode.app/Contents/Developer/Platforms/iPhoneOS.platform # create copy of Info.plist sudo cp -p Info.plist Info.plist.orig # convert to editable xml format sudo plutil -convert xml1 ./Info.plist # replace each occurrence of XCiPhoneOSCodeSignContext with XCCodeSignContext in Info.plist sudo sed -i .bkup 's/XCiPhoneOSCodeSignContext/XCCodeSignContext/g' ./Info.plist - Open Xcode
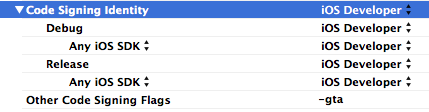
- Open or create a project and go to the project settings in the tab "Build settings". Select the generated certificate in the “Code Signing Identity” field:

- Around the "Run" button, select our connected iOS device.
- Click "Run" and Xcode translates the source code into an executable file and loads it into the device.
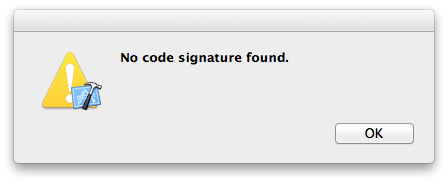
- Next, Xcode shows us the following error:
It should be so, because we have not yet configured the debugger, but the application itself can already be launched on the device.
Configure Xcode to debug the application on the target device.
Compile ldid
- If it is not worth GIT, install from here
- Next in the terminal:
cd ~/Documents git clone git://git.saurik.com/ldid.git cd ldid git clone git://git.saurik.com/minimal.git ./make.sh sudo mkdir /usr/local/bin sudo cp ldid /usr/local/bin - Create a /usb/local/bin/ldid3.py file with the contents:
#!/usr/bin/env python from sys import argv from subprocess import check_call from os.path import basename, dirname, splitext, join from tempfile import NamedTemporaryFile app = argv[-1] ldid_path = join(dirname(__file__), 'ldid') obj_path = join(app, splitext(basename(app))[0]) if '-gta' not in argv: check_call([ldid_path, '-S', obj_path]) else: with NamedTemporaryFile('w+b', 0) as f: f.write(""" <!DOCTYPE plist PUBLIC "-//Apple//DTD PLIST 1.0//EN" "http://www.apple.com/DTDs/PropertyList-1.0.dtd"> <plist version="1.0"> <dict> <key>get-task-allow</key> <true/> </dict> </plist> """) f.flush() check_call([ldid_path, '-S' + f.name, obj_path]) - Make ldid and ldid3.py executable:
sudo chmod +x /usr/local/bin/ldid sudo chmod +x /usr/local/bin/ldid3.py
Customize Xcode
- Close Xcode if it is open.
- We update the iPhoneCodeSign.xcspec configuration file, for this in the terminal:
cd /Applications/Xcode.app/Contents/Developer/Platforms/iPhoneOS.platform/Developer/Library/Xcode/Specifications # create a backup copy of iPhoneCodeSign.xcspec sudo cp -p iPhoneCodeSign.xcspec iPhoneCodeSign.xcspec.orig # convert to editable xml format sudo plutil -convert xml1 iPhoneCodeSign.xcspec # replace codesign with /usr/local/bin/ldid3.py sudo sed -i .bkup 's/codesign/\/usr\/local\/bin\/ldid3.py/g' iPhoneCodeSign.xcspec - Open Xcode
- Now, to enable debugging, we need to add the "-gta" key to the command line of the codesign utility, with the previous step we replaced it with our ldid3.py
- We build the application and run it on the target iOS device.
I hope this guide will help novice iOS programmers simply and unpretentiously try their hand at writing programs for Apple devices.
Source: https://habr.com/ru/post/223675/
All Articles