Mega-Tutorial Flask, Part 6: Profile page and avatar
This is the sixth article in the series where I will document my experience of writing a web application in Python using the Flask microform.
The purpose of this guide is to develop a fairly functional microblog application, which I decided to call microblog, in the absence of originality.
')
In the last article, we created an authorization system, now users can log in to the site using OpenID.
Today we will work with the user profile. First, we will create a profile page on which information about the user will be displayed, and his posts, as well as we will learn to show the avatar. And then we will create a personal data editing form.
In fact, creating a profile page does not require any new concepts. We will simply create a new view and an HTML template for it.
The function in the view. ( app.views.py file):
Decorator app.route will be slightly different from those that we used.
The method has a parameter named nickname . You also need to add a parameter to the view function with the same name. When a client requests a URL / user / miguel , the function in the view should be called with the parameter nickname = 'miguel' .
The implementation of the function should pass without surprises. First we will try to load the user from the database using the nickname which we took as an argument. If this does not work, we will redirect to the main page with an error message, just as we did in the previous chapter.
As soon as we have a user, we call the render_template , along with the test message. I draw your attention to the fact that on the user's page you only need to display messages from this user, so you need to fill in the author field correctly.
Our initial template looks quite simple ( app / templates / user.html file ):
We are done with the profile page, but there is no link to it anywhere. To make it easy for the user to get to his profile, we will add a link to it in the top navigation bar (file app / templates / base.html ):
Please note that we have added the required parameter nickname to the url_for function.
Let's see what we did. By clicking on You Profile we have to go to the user’s page. Since we don’t have any links to other users ’pages, you’ll have to enter the URL manually to look at the profile of another user. For example, type
Now our profile pages are dull enough. Let's add an avatar to make them more interesting.
Now we will write a method that will return the avatar, and put it into the class ( app / models.py )
The avatar method will return the path to the avatar compressed to the specified size.
Gravatar will help to do this very easily. You just need to create an MD5 hash from an email, and then add it to the specially formed URL , which was higher. After the hash, add other parameters to the URL . d = mm indicates that the default image should be returned when the user does not have a Gravatar account. The mm parameter returns an image with a gray silhouette of a person. The parameter s = N indicates to what size the avatar should be scaled.
Documentation for Gravatar .
Now the User class knows how to return an image, we can add it to the profile page (file app / templates / user.html):
It is noteworthy that the User class is responsible for returning avatars, and if at one point we decided that Gravatar is not what we want, we simply rewrite the avatar method, so that it will return another way (even those that we specify on our own server) All our templates will be presented with new avatars automatically.
We added an avatar to the top of the profile page, but at the bottom of the page we have posts, next to which it would be nice to show a small avatar. For the profile page, we, of course, will show the same avatar for all posts, but then, when we transfer this functionality to the main page, we will have each post decorated with the author’s avatar, and it will be really good.
To display avatars for the post, we will make small changes to the template (file app / templates / user.html ):
Now our profile will look like this:
We designed a profile page to show posts written by the user. Our main page also shows messages, but any user. Now we have two types of templates that will show messages written by users. We could just copy / paste the part of the template that is responsible for displaying the message, but this is not the best idea, because when you need to make changes to the design of the message, we need to remember all the templates that can display messages.
Instead, we will create a sub-template that will generate a message, then simply connect the sub-template so where it is needed (file /app/templates/post.html):
To begin, we create a message sub-template that is no different from a regular template. We take the HTML code to display the message from our template.
Then we will call the subtemplate from our template using Jinja2 with the include command (file app / templates / user.html ):
As soon as we make a working main page, we will refer to the same subpattern until we are ready for this, therefore we will leave for the next chapter.
Now that we have a good profile page, we don’t have enough information to display. Users like to add some information about themselves to their pages, so we will give them this opportunity, and also will display on the profile page. We will also keep track of when the user has logged on the last time to find the site and will also show on the profile page.
To make our plans, we must change the database. We need to add two new fields for our User class (file app / models.py):
Every time we change the database, we create a new migration. Remember how in the part about the database we went through the flour to configure the migration database system. Now we are reaping the benefits of this effort. To add new fields to our database, simply execute the script:
And we get the answer:
And our two new fields are added to the database. Do not forget that if you are on Windows, the path to run the script is different.
If we do not have a migration system, you need to edit the database manually, or worse, delete it and recreate it.
Now let's change the profile template, taking into account these fields (file app / templates / user.html ):
As you can see, we use Jijna2 to show these fields, because we will show them only when they have data.
Now two new fields are empty for all users, so nothing will be displayed.
The Last_seen field is easy to maintain. Remember how in the previous chapter we created the before_request handler. A good place to add a user login time (file app / views.py ):
If you enter your profile page, you will see when the last time you visited the site and each time updating the page, the time will be updated, because each time the browser makes a request breforerequest, the handler will update the time in the database.
Please note that we write the time in the standard UTC time zone. We discussed this in the previous chapter, that we write all the timestamps in UTC so that they match each other. There is a side effect, the time on the profile page is the same displayed in UTC . We will fix this in one of the following chapters, which will be dedicated to timestamps.
Now you need to allocate a place to display the "about me" field, and it would be more appropriate to place it in the profile editing page.
To add a profile editing form is surprisingly easy. Let's start by creating a web form ( app / forms.py file )
And the template ( app / templates / edit.html file ):
And finally, write the handler function ( app / views.py file ):
Also add a link to it from the user profile page, so that you can easily get to editing (file app / templates / user.html ):
We use conditional operators to make sure that the links to the edits of the profile did not appear when you read someone else's profile.
Here is the new screenshot of the user’s page with a small description about itself.

We did a great job with the user profile, right?
But we have one unpleasant mistake and we have to fix it.
Can you find her?
Hint. We made a mistake in the previous chapter when we did the authorization. And today we wrote a new piece of code that has the same error.
Try to find it, and if you find it, do not hesitate and write in the comments. I will explain the error and how to correct it in the next chapter.
As always, here is a link to download the application with today's changes.
I did not include the database in the archive. If you have a previous chapter database, just put it in the right place and run db_upgrade.py . Well, if you do not have a previous database, follow the new one with db_create.py .
Thanks for reading my tutorial.
Hope to see you in the next issue.
PS The author of the original article Miguel Grinberg
The purpose of this guide is to develop a fairly functional microblog application, which I decided to call microblog, in the absence of originality.
Table of contents:
Part 1: Hello, World!
Part 2: Templates
Part 3: Forms
Part 4: Database
Part 5: User Login
Part 6: Profile Page and Avatars (this article)
Part 7: Unit Testing
Part 8: Subscribers, Contacts and Friends
Part 9: Pagination
Part 10: Full Text Search
Part 11: Email Support
Part 12: Reconstruction
Part 13: Date and Time
Part 14: I18n and L10n
Part 15: Ajax
Part 16: Debugging, Testing, and Profiling
Part 17: Deploying to Linux (and even to Raspberry Pi!)
Part 18: Deploying to Heroku Cloud
')
Brief repetition
In the last article, we created an authorization system, now users can log in to the site using OpenID.
Today we will work with the user profile. First, we will create a profile page on which information about the user will be displayed, and his posts, as well as we will learn to show the avatar. And then we will create a personal data editing form.
Profile page.
In fact, creating a profile page does not require any new concepts. We will simply create a new view and an HTML template for it.
The function in the view. ( app.views.py file):
@app.route('/user/<nickname>') @login_required def user(nickname): user = User.query.filter_by(nickname = nickname).first() if user == None: flash('User ' + nickname + ' not found.') return redirect(url_for('index')) posts = [ { 'author': user, 'body': 'Test post #1' }, { 'author': user, 'body': 'Test post #2' } ] return render_template('user.html', user = user, posts = posts) Decorator app.route will be slightly different from those that we used.
The method has a parameter named nickname . You also need to add a parameter to the view function with the same name. When a client requests a URL / user / miguel , the function in the view should be called with the parameter nickname = 'miguel' .
The implementation of the function should pass without surprises. First we will try to load the user from the database using the nickname which we took as an argument. If this does not work, we will redirect to the main page with an error message, just as we did in the previous chapter.
As soon as we have a user, we call the render_template , along with the test message. I draw your attention to the fact that on the user's page you only need to display messages from this user, so you need to fill in the author field correctly.
Our initial template looks quite simple ( app / templates / user.html file ):
<!-- extend base layout --> {% extends "base.html" %} {% block content %} <h1>User: {{user.nickname}}!</h1> <hr> {% for post in posts %} <p> {{post.author.nickname}} says: <b>{{post.body}}</b> </p> {% endfor %} {% endblock %} We are done with the profile page, but there is no link to it anywhere. To make it easy for the user to get to his profile, we will add a link to it in the top navigation bar (file app / templates / base.html ):
<div>Microblog: <a href="{{ url_for('index') }}">Home</a> {% if g.user.is_authenticated() %} | <a href="{{ url_for('user', nickname = g.user.nickname) }}">Your Profile</a> | <a href="{{ url_for('logout') }}">Logout</a> {% endif %} </div> Please note that we have added the required parameter nickname to the url_for function.
Let's see what we did. By clicking on You Profile we have to go to the user’s page. Since we don’t have any links to other users ’pages, you’ll have to enter the URL manually to look at the profile of another user. For example, type
http://localhost:5000/user/miguel to view the Miguel user profile.Avatars.
Now our profile pages are dull enough. Let's add an avatar to make them more interesting.
Now we will write a method that will return the avatar, and put it into the class ( app / models.py )
from hashlib import md5 # ... class User(db.Model): # ... def avatar(self, size): return 'http://www.gravatar.com/avatar/' + md5(self.email).hexdigest() + '?d=mm&s=' + str(size) The avatar method will return the path to the avatar compressed to the specified size.
Gravatar will help to do this very easily. You just need to create an MD5 hash from an email, and then add it to the specially formed URL , which was higher. After the hash, add other parameters to the URL . d = mm indicates that the default image should be returned when the user does not have a Gravatar account. The mm parameter returns an image with a gray silhouette of a person. The parameter s = N indicates to what size the avatar should be scaled.
Documentation for Gravatar .
Now the User class knows how to return an image, we can add it to the profile page (file app / templates / user.html):
<!-- extend base layout --> {% extends "base.html" %} {% block content %} <table> <tr valign="top"> <td><img src="{{user.avatar(128)}}"></td> <td><h1>User: {{user.nickname}}</h1></td> </tr> </table> <hr> {% for post in posts %} <p> {{post.author.nickname}} says: <b>{{post.body}}</b> </p> {% endfor %} {% endblock %} It is noteworthy that the User class is responsible for returning avatars, and if at one point we decided that Gravatar is not what we want, we simply rewrite the avatar method, so that it will return another way (even those that we specify on our own server) All our templates will be presented with new avatars automatically.
We added an avatar to the top of the profile page, but at the bottom of the page we have posts, next to which it would be nice to show a small avatar. For the profile page, we, of course, will show the same avatar for all posts, but then, when we transfer this functionality to the main page, we will have each post decorated with the author’s avatar, and it will be really good.
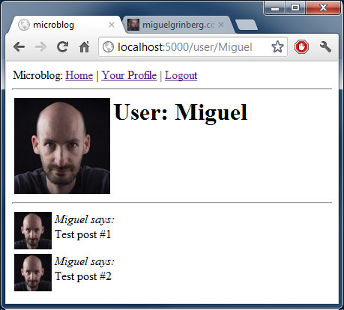
To display avatars for the post, we will make small changes to the template (file app / templates / user.html ):
<!-- extend base layout --> {% extends "base.html" %} {% block content %} <table> <tr valign="top"> <td><img src="{{user.avatar(128)}}"></td> <td><h1>User: {{user.nickname}}</h1></td> </tr> </table> <hr> {% for post in posts %} <table> <tr valign="top"> <td><img src="{{post.author.avatar(50)}}"></td><td><i>{{post.author.nickname}} says:</i><br>{{post.body}}</td> </tr> </table> {% endfor %} {% endblock %} Now our profile will look like this:
Sub-template reuse (sub-template)
We designed a profile page to show posts written by the user. Our main page also shows messages, but any user. Now we have two types of templates that will show messages written by users. We could just copy / paste the part of the template that is responsible for displaying the message, but this is not the best idea, because when you need to make changes to the design of the message, we need to remember all the templates that can display messages.
Instead, we will create a sub-template that will generate a message, then simply connect the sub-template so where it is needed (file /app/templates/post.html):
<table> <tr valign="top"> <td><img src="{{post.author.avatar(50)}}"></td><td><i>{{post.author.nickname}} says:</i><br>{{post.body}}</td> </tr> </table> To begin, we create a message sub-template that is no different from a regular template. We take the HTML code to display the message from our template.
Then we will call the subtemplate from our template using Jinja2 with the include command (file app / templates / user.html ):
<!-- extend base layout --> {% extends "base.html" %} {% block content %} <table> <tr valign="top"> <td><img src="{{user.avatar(128)}}"></td> <td><h1>User: {{user.nickname}}</h1></td> </tr> </table> <hr> {% for post in posts %} {% include 'post.html' %} {% endfor %} {% endblock %} As soon as we make a working main page, we will refer to the same subpattern until we are ready for this, therefore we will leave for the next chapter.
More interesting profiles
Now that we have a good profile page, we don’t have enough information to display. Users like to add some information about themselves to their pages, so we will give them this opportunity, and also will display on the profile page. We will also keep track of when the user has logged on the last time to find the site and will also show on the profile page.
To make our plans, we must change the database. We need to add two new fields for our User class (file app / models.py):
class User(db.Model): id = db.Column(db.Integer, primary_key = True) nickname = db.Column(db.String(64), unique = True) email = db.Column(db.String(120), index = True, unique = True) role = db.Column(db.SmallInteger, default = ROLE_USER) posts = db.relationship('Post', backref = 'author', lazy = 'dynamic') about_me = db.Column(db.String(140)) last_seen = db.Column(db.DateTime) Every time we change the database, we create a new migration. Remember how in the part about the database we went through the flour to configure the migration database system. Now we are reaping the benefits of this effort. To add new fields to our database, simply execute the script:
./db_migrate.py
And we get the answer:
New migration saved as db_repository / versions / 003_migration.py
Current database version: 3
And our two new fields are added to the database. Do not forget that if you are on Windows, the path to run the script is different.
If we do not have a migration system, you need to edit the database manually, or worse, delete it and recreate it.
Now let's change the profile template, taking into account these fields (file app / templates / user.html ):
<!-- extend base layout --> {% extends "base.html" %} {% block content %} <table> <tr valign="top"> <td><img src="{{user.avatar(128)}}"></td> <td> <h1>User: {{user.nickname}}</h1> {% if user.about_me %}<p>{{user.about_me}}</p>{% endif %} {% if user.last_seen %}<p><i>Last seen on: {{user.last_seen}}</i></p>{% endif %} </td> </tr> </table> <hr> {% for post in posts %} {% include 'post.html' %} {% endfor %} {% endblock %} As you can see, we use Jijna2 to show these fields, because we will show them only when they have data.
Now two new fields are empty for all users, so nothing will be displayed.
The Last_seen field is easy to maintain. Remember how in the previous chapter we created the before_request handler. A good place to add a user login time (file app / views.py ):
from datetime import datetime # ... @app.before_request def before_request(): g.user = current_user if g.user.is_authenticated(): g.user.last_seen = datetime.utcnow() db.session.add(g.user) db.session.commit() If you enter your profile page, you will see when the last time you visited the site and each time updating the page, the time will be updated, because each time the browser makes a request breforerequest, the handler will update the time in the database.
Please note that we write the time in the standard UTC time zone. We discussed this in the previous chapter, that we write all the timestamps in UTC so that they match each other. There is a side effect, the time on the profile page is the same displayed in UTC . We will fix this in one of the following chapters, which will be dedicated to timestamps.
Now you need to allocate a place to display the "about me" field, and it would be more appropriate to place it in the profile editing page.
Editing profile.
To add a profile editing form is surprisingly easy. Let's start by creating a web form ( app / forms.py file )
from flask.ext.wtf import Form from wtforms import TextField, BooleanField, TextAreaField from wtforms.validators import Required, Length class EditForm(Form): nickname = TextField('nickname', validators = [Required()]) about_me = TextAreaField('about_me', validators = [Length(min = 0, max = 140)]) And the template ( app / templates / edit.html file ):
<!-- extend base layout --> {% extends "base.html" %} {% block content %} <h1>Edit Your Profile</h1> <form action="" method="post" name="edit"> {{form.hidden_tag()}} <table> <tr> <td>Your nickname:</td> <td>{{form.nickname(size = 24)}}</td> </tr> <tr> <td>About yourself:</td> <td>{{form.about_me(cols = 32, rows = 4)}}</td> </tr> <tr> <td></td> <td><input type="submit" value="Save Changes"></td> </tr> </table> </form> {% endblock %} And finally, write the handler function ( app / views.py file ):
from forms import LoginForm, EditForm @app.route('/edit', methods = ['GET', 'POST']) @login_required def edit(): form = EditForm() if form.validate_on_submit(): g.user.nickname = form.nickname.data g.user.about_me = form.about_me.data db.session.add(g.user) db.session.commit() flash('Your changes have been saved.') return redirect(url_for('edit')) else: form.nickname.data = g.user.nickname form.about_me.data = g.user.about_me return render_template('edit.html', form = form) Also add a link to it from the user profile page, so that you can easily get to editing (file app / templates / user.html ):
<!-- extend base layout --> {% extends "base.html" %} {% block content %} <table> <tr valign="top"> <td><img src="{{user.avatar(128)}}"></td> <td> <h1>User: {{user.nickname}}</h1> {% if user.about_me %}<p>{{user.about_me}}</p>{% endif %} {% if user.last_seen %}<p><i>Last seen on: {{user.last_seen}}</i></p>{% endif %} {% if user.id == g.user.id %}<p><a href="{{url_for('edit')}}">Edit</a></p>{% endif %} </td> </tr> </table> <hr> {% for post in posts %} {% include 'post.html' %} {% endfor %} {% endblock %} We use conditional operators to make sure that the links to the edits of the profile did not appear when you read someone else's profile.
Here is the new screenshot of the user’s page with a small description about itself.
Conclusion ... and homework!
We did a great job with the user profile, right?
But we have one unpleasant mistake and we have to fix it.
Can you find her?
Hint. We made a mistake in the previous chapter when we did the authorization. And today we wrote a new piece of code that has the same error.
Try to find it, and if you find it, do not hesitate and write in the comments. I will explain the error and how to correct it in the next chapter.
As always, here is a link to download the application with today's changes.
I did not include the database in the archive. If you have a previous chapter database, just put it in the right place and run db_upgrade.py . Well, if you do not have a previous database, follow the new one with db_create.py .
Thanks for reading my tutorial.
Hope to see you in the next issue.
PS The author of the original article Miguel Grinberg
Source: https://habr.com/ru/post/223375/
All Articles