Visual Website Optimizer - split testing of the landing page on the main domain and the third level domain
Split testing is a common method of determining the most optimal, as a rule, in terms of conversion, of a site page variant. The essence of the method is to send traffic to two different pages, and then compare them by the required parameters.
The task for testing was defined as follows:
It is planned to launch an advertising campaign in Yandex Direct: it is necessary to identify a version of the landing page that will bring a greater number of applications (on which the conversion rate is higher). The initial version of the page is the main page of the site, an alternative version is located on the third level domain. To manage the tags on the site is used Google Tag Manager.
To solve this task, the Visual Website Optimizer tool was chosen, since it has a convenient split test setup mechanism, as well as a small amount of attracted traffic and the possibility of conducting a free test on a trial tariff plan:
')

What settings need to be made to conduct a similar experiment:
• set the source and alternative addresses of pages;
• indicate the segment of traffic involved in the experiment;
• set up a goal.
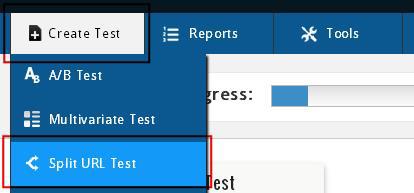
To create a test in Visual Website Optimizer, select the “Create test” item in the control panel, then specify the “Split URL test” test type to solve the designated task:
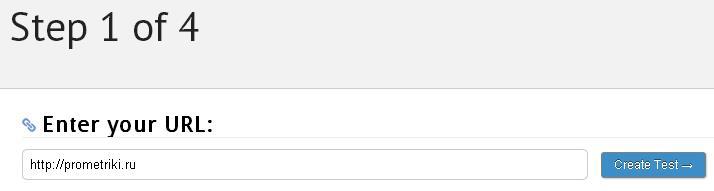
After that, the test creation wizard will start. In the first step, you must specify the full URL of the source page, and then click the “Create test” button:
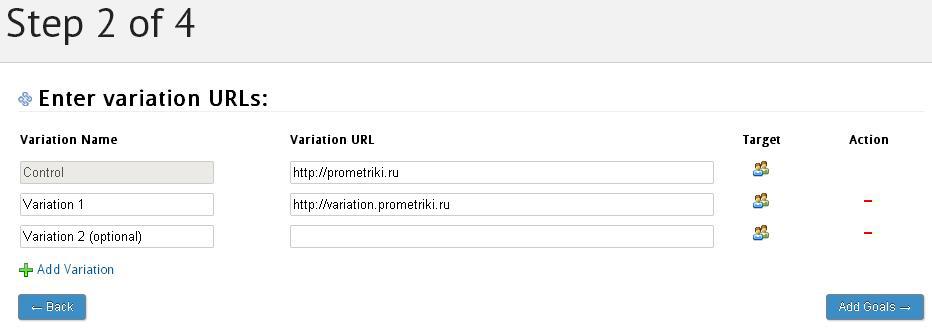
In the second step, you will be asked to specify an alternative version of the page or (if there are several) all of them. You need to fill in the “Variation name” fields, which will then designate the name of the variant, and “Variation URL”, which indicates the full URL of the alternative page. Adding a line to specify additional page options is done by pressing the "+ Add variation" button. The options configuration is completed by clicking the “Add Goals →” button:
The third step is to set a goal or a necessary action, according to which the effectiveness of the page variant will be evaluated. In the task, the expected action of the visitor is to fill in the application form and successfully send it to the site administrator.
Both on the original version of the page, and on the alternative form (after successful processing) displays a page in the browser:
or
Parameters after the question mark for each form are unique.
Visual Website Optimizer provides the ability to configure several types of goals:
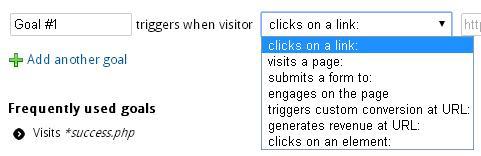
Since we know the URL of the page that is displayed when the form is successfully submitted, it was decided to use the “visits a page” type.
Considering that the address of the page indicated as a goal has a common identical fragment “orderok”, the goal was set up as follows:

Where the sign "*" indicates the entry / presence of any character.
After saving the target settings (in the fourth step), it is proposed to specify a number of additional experiment settings. Since, in the task, participation in the experiment should be taken only by visitors who came to the site from the Yandex Direct campaigns, we point this out by setting up an audience segment.
Perform the necessary settings in the “Target test to a Segment” block by pressing the “Change” button to its right. The “Add visitor condition” button that appears displays the form for specifying the required parameters.

After saving all the experiment settings, a page will open, on which a code fragment will be shown. This code must be placed on the pages participating in the test, as well as on the “order.php” page.
As mentioned earlier, Google Tag Manager is used to manage tags on the site, the code for testing will also be placed with it. This is done as follows:
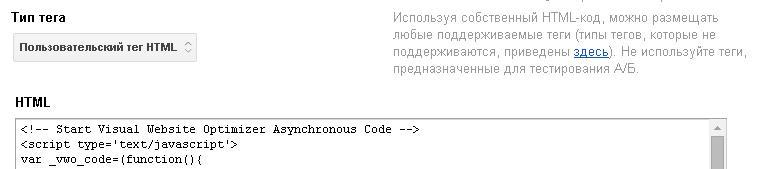
In the Google Tag Manager container installed on the site, you need to add a “Custom HTML” type tag, into which you should copy the tracking code from the Visual Website Optimizer:
After that, the tag activation rules are configured. Considering that Yandex Direct uses links marked with utm_ tags, this will be easy to implement. This is the first rule to display the experiment code on the source page and on the alternative. The second rule serves to display the experiment code on the “orderok.php” page:

Having completed the creation and configuration of the tag, we publish a new version of the container on the site.
Now you need to return to the Visual Website Optimizer control panel and run the test. This is done by pressing the red button "Start Test Now" located at the bottom of the page, completing the process of creating the tag:

After some time you can see the test results. There are two options for viewing information: a summary of information and a detailed report.
General information on the test are as follows:

The report provides information on each option: the number of visits, the conversion rate, the percentage change relative to the control option.
If there is a need for detailed information on the test, select the “Detailed report” tab at the top of the page:

The given example demonstrates only one particular case of split testing using the Visual Website Optimizer. It provides much more opportunities for testing, and for some test options no additional knowledge and skills are required of you. All settings are made in a convenient, intuitive interface.
The task for testing was defined as follows:
It is planned to launch an advertising campaign in Yandex Direct: it is necessary to identify a version of the landing page that will bring a greater number of applications (on which the conversion rate is higher). The initial version of the page is the main page of the site, an alternative version is located on the third level domain. To manage the tags on the site is used Google Tag Manager.
To solve this task, the Visual Website Optimizer tool was chosen, since it has a convenient split test setup mechanism, as well as a small amount of attracted traffic and the possibility of conducting a free test on a trial tariff plan:
')
What settings need to be made to conduct a similar experiment:
• set the source and alternative addresses of pages;
• indicate the segment of traffic involved in the experiment;
• set up a goal.
To create a test in Visual Website Optimizer, select the “Create test” item in the control panel, then specify the “Split URL test” test type to solve the designated task:
After that, the test creation wizard will start. In the first step, you must specify the full URL of the source page, and then click the “Create test” button:
In the second step, you will be asked to specify an alternative version of the page or (if there are several) all of them. You need to fill in the “Variation name” fields, which will then designate the name of the variant, and “Variation URL”, which indicates the full URL of the alternative page. Adding a line to specify additional page options is done by pressing the "+ Add variation" button. The options configuration is completed by clicking the “Add Goals →” button:
The third step is to set a goal or a necessary action, according to which the effectiveness of the page variant will be evaluated. In the task, the expected action of the visitor is to fill in the application form and successfully send it to the site administrator.
Both on the original version of the page, and on the alternative form (after successful processing) displays a page in the browser:
http://prometriki.ru/orderok.php?a=b&c=d&e=f or
http://variation.prometriki.ru/folder/orderok.php?a=b&c=d&e=f Parameters after the question mark for each form are unique.
Visual Website Optimizer provides the ability to configure several types of goals:
Since we know the URL of the page that is displayed when the form is successfully submitted, it was decided to use the “visits a page” type.
Considering that the address of the page indicated as a goal has a common identical fragment “orderok”, the goal was set up as follows:
Where the sign "*" indicates the entry / presence of any character.
After saving the target settings (in the fourth step), it is proposed to specify a number of additional experiment settings. Since, in the task, participation in the experiment should be taken only by visitors who came to the site from the Yandex Direct campaigns, we point this out by setting up an audience segment.
Perform the necessary settings in the “Target test to a Segment” block by pressing the “Change” button to its right. The “Add visitor condition” button that appears displays the form for specifying the required parameters.
After saving all the experiment settings, a page will open, on which a code fragment will be shown. This code must be placed on the pages participating in the test, as well as on the “order.php” page.
As mentioned earlier, Google Tag Manager is used to manage tags on the site, the code for testing will also be placed with it. This is done as follows:
In the Google Tag Manager container installed on the site, you need to add a “Custom HTML” type tag, into which you should copy the tracking code from the Visual Website Optimizer:
After that, the tag activation rules are configured. Considering that Yandex Direct uses links marked with utm_ tags, this will be easy to implement. This is the first rule to display the experiment code on the source page and on the alternative. The second rule serves to display the experiment code on the “orderok.php” page:
Having completed the creation and configuration of the tag, we publish a new version of the container on the site.
Now you need to return to the Visual Website Optimizer control panel and run the test. This is done by pressing the red button "Start Test Now" located at the bottom of the page, completing the process of creating the tag:
After some time you can see the test results. There are two options for viewing information: a summary of information and a detailed report.
General information on the test are as follows:
The report provides information on each option: the number of visits, the conversion rate, the percentage change relative to the control option.
If there is a need for detailed information on the test, select the “Detailed report” tab at the top of the page:
The given example demonstrates only one particular case of split testing using the Visual Website Optimizer. It provides much more opportunities for testing, and for some test options no additional knowledge and skills are required of you. All settings are made in a convenient, intuitive interface.
Source: https://habr.com/ru/post/223335/
All Articles