Rare graphic station SGI Indy. 20 years later. Part two. IRIX installation
In the first post I unearthed SGI Indy at the mezzanine and put its hardware stuffing in order. Now it's time to do some software.
I am already writing this article post factum, and therefore I can already say that installing the IRIX turns out to be much simpler than even Linux, but there are some nuances that are very difficult to deal with because of the lack of obviousness of actions and the scarcity of feedback during the installation process.
In addition, I want to warn you that I didn’t take a picture of the actual installation process in realtime (it’s quite difficult to remove the screen in complete darkness with a DSLR), so I reproduced the pictures below separately using a terminal of the already running system and Photoshop magic.
So, the image of the distribution downloaded from the torrent is easily ripped onto a CD-R. IRIX installation disks are marked in SGI Disklabel, not ISO. The sash (StandAlone SHell) loader is placed in the Volume Header, and a separate data section. Therefore, to see the contents of the disc on Mac OS X immediately after the recording did not work.
We insert the disk into an external SCSI drive, select the boot from CD-ROM from the menu. The disk reading begins, after which the computer freezes. I could not understand the reason for this behavior. Perhaps the fact is that the original installation disks are somehow labeled, or the matter is in a buggy drive. However, manually launching the shell from the disk from the console using the
')

Before installing the system, you need to reformat the disk with Debian. To do this, use the program fx (analog fdisk). Download it from the installation CD:

Seeing the auto item, I happily chose it, as a result of which I came to quit smoking for about a day. Because the breakdown in automatic mode, as it turned out, implies low-level disk formatting and the search for bad sectors, a series of read-write checks and many more operations that I did not catch. In general, the fierce crunch of the disk stopped in about a day. I turned on the monitor and saw a message that the disk is ready and an invitation to reboot to apply the changes.
Run sash from the CD-ROM again. When the disk is broken, format it with the command mkfs / dev / dsk / dks0d1s0. By default, the partition is formatted in UFS. Perhaps there was an option to choose a file-based XFS system, which just appeared in IRIX 5.3, but I did not use it.
Formatting is just that nuance, because of which I reloaded the machine 5 times, swapping the SCSI ID of the broom with a drive and shamanized with the parameters in the PROM. In the absence of a file system on the partition, the installer just cursed
Now it's time to start the actual installation of the IRIX. Load
Here I also hoped for automatics and completed the list first. A list of ready-to-install packages appeared on the screen. Since the default selection completely suited me (everything is noted, except Dev Tools), I immediately dialed go and the installation began. After half an hour without any additional questions on the post-configuration familiar to Linux, the system rebooted from the hard disk immediately to xdm with a set of default users, among which was root without a password.

(The screenshot was taken after I added myself to the user list)
In the next part of the article, I log in to IRIX and promise a lot of screenshots. Watch the tape.
In the process of installing the system, I used the instructions from software.majix.org/irix/install-index.shtml .
I am already writing this article post factum, and therefore I can already say that installing the IRIX turns out to be much simpler than even Linux, but there are some nuances that are very difficult to deal with because of the lack of obviousness of actions and the scarcity of feedback during the installation process.
In addition, I want to warn you that I didn’t take a picture of the actual installation process in realtime (it’s quite difficult to remove the screen in complete darkness with a DSLR), so I reproduced the pictures below separately using a terminal of the already running system and Photoshop magic.
So, the image of the distribution downloaded from the torrent is easily ripped onto a CD-R. IRIX installation disks are marked in SGI Disklabel, not ISO. The sash (StandAlone SHell) loader is placed in the Volume Header, and a separate data section. Therefore, to see the contents of the disc on Mac OS X immediately after the recording did not work.
We insert the disk into an external SCSI drive, select the boot from CD-ROM from the menu. The disk reading begins, after which the computer freezes. I could not understand the reason for this behavior. Perhaps the fact is that the original installation disks are somehow labeled, or the matter is in a buggy drive. However, manually launching the shell from the disk from the console using the
boot -f dksc(0,2,8)sashARCS possible without any problems.')
Before installing the system, you need to reformat the disk with Debian. To do this, use the program fx (analog fdisk). Download it from the installation CD:
boot -f dksc(0,2,7)stand/fx.ARCS --x . Please note that the disk partition changes as I wrote above. The loader is separate from the rest of the files. We get something like this:Seeing the auto item, I happily chose it, as a result of which I came to quit smoking for about a day. Because the breakdown in automatic mode, as it turned out, implies low-level disk formatting and the search for bad sectors, a series of read-write checks and many more operations that I did not catch. In general, the fierce crunch of the disk stopped in about a day. I turned on the monitor and saw a message that the disk is ready and an invitation to reboot to apply the changes.
Run sash from the CD-ROM again. When the disk is broken, format it with the command mkfs / dev / dsk / dks0d1s0. By default, the partition is formatted in UFS. Perhaps there was an option to choose a file-based XFS system, which just appeared in IRIX 5.3, but I did not use it.
Formatting is just that nuance, because of which I reloaded the machine 5 times, swapping the SCSI ID of the broom with a drive and shamanized with the parameters in the PROM. In the absence of a file system on the partition, the installer just cursed
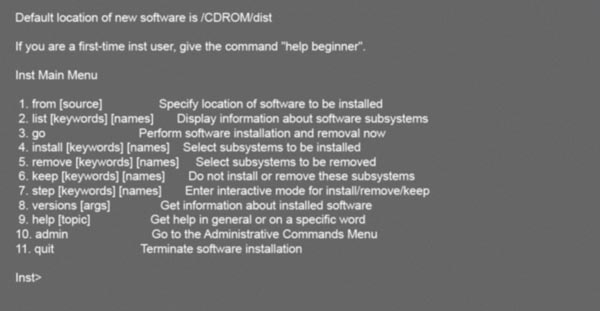
Inst: Can't mount root filesystem /dev/dsk/dks0d1s0 and then offered to reboot. A solution was found in IRC on the #IRIX channel.Now it's time to start the actual installation of the IRIX. Load
sash again and run inst . The installer is unpacked for a very long time on a newly formatted disk. At the end, the main inst: menu appears inst:Here I also hoped for automatics and completed the list first. A list of ready-to-install packages appeared on the screen. Since the default selection completely suited me (everything is noted, except Dev Tools), I immediately dialed go and the installation began. After half an hour without any additional questions on the post-configuration familiar to Linux, the system rebooted from the hard disk immediately to xdm with a set of default users, among which was root without a password.
(The screenshot was taken after I added myself to the user list)
In the next part of the article, I log in to IRIX and promise a lot of screenshots. Watch the tape.
In the process of installing the system, I used the instructions from software.majix.org/irix/install-index.shtml .
Source: https://habr.com/ru/post/223231/
All Articles