Creating reports about testing Android applications using Spoon and Emma
Testing is one of the most important steps when developing an application. And Android applications are no exception. When writing code, you usually need to look at it and think about how to test it later. Imagine a situation where you need to test your project, which is completely written. Most often, it is not so simple. Most likely, your code simply was not implemented in such a way that it was easy to test. This means that you have to make changes in it in order to make it testable ... without destroying any functionality (actually, this is called refactoring in our time). But, performing such changes, can we quickly and confidently say that you did not break anything in the running code if there were no comprehensive tests in it? Hardly. I believe that tests, namely UNIT tests, should be written by the developer himself, since he and he only knows everything about how and what he writes.
As for Android, like all the others, Google has provided not bad tools for testing, but with their help, not all can be done. For testing, you use the jUnit framework, which has its pros and cons, of course.
')
jUnit - used for unit testing, which allows you to check for correctness of individual modules of the program source code. The advantage of this approach is to isolate a single module from others. At the same time, the purpose of this method allows the programmer to make sure that the module itself is able to work correctly. jUnit is a class library. But the one who wrote the tests with this framework probably made sure that he was uncomfortable at all when testing the GUI. A sign of good tone is a code covered in tests and a report that shows the percentage of code covered by tests. Recently, in projects I have to write, among other things, load tests to GUI tests, and I would like to tell you about the features that I meet and how to create these reports. But first, about the main frameworks:

An approximate picture of the use of basic frameworks. In fact, each choice is made for itself. Someone chooses Robotium because of the reluctance to climb into the source code, someone Espresso, because of its intuitive interface.
Spoon
Spoon is a framework that can take screenshots from the screen of a device or emulator during the execution of tests and as a result creates a report from them. In addition to the screenshots, he attaches the test runner's logging to the report, and if the test fails, he displays the full stack-trace, which is very convenient. To get a report, do the following:
- swing Spoon-clien t and Spoon-runner ;
- copy the Spoon-client into the project libs folder with tests;
- create a folder in the same project (for example, spoon);
- Copy Spoon-runner to the created folder;
- create a bat file with this script:
call java -jar spoon-runner-1.1.1-jar-with-dependencies.jar -- apk Path\to\your\project \bin\project.apk -- test-apk Path\to\your\test-project \bin\tests.apk In subparameters, you can specify a filter for tests, for example, only tests with the “Medium” annotation can be run by adding size medium to the script.
Now the script will look like this:
call java -jar spoon-runner-1.1.1-jar-with-dependencies.jar -- apk Path\to\your\project \bin\project.apk -- test-apk Path\to\your\test-project \bin\tests.apk -- size medium A complete list of subparameters can be viewed on its official page on Github . Everything, now when writing tests just where you need to insert:
Spoon.screenshot(activity, "state_changed"), where the second argument is the string that will be highlighted above the screenshot. Yes, another feature is that inside it it uses regexes, and when using spaces in signatures it throws an exception. We start the emulator or connect the phone, open our batch file and if everything is done correctly, you will see the report in the same folder:
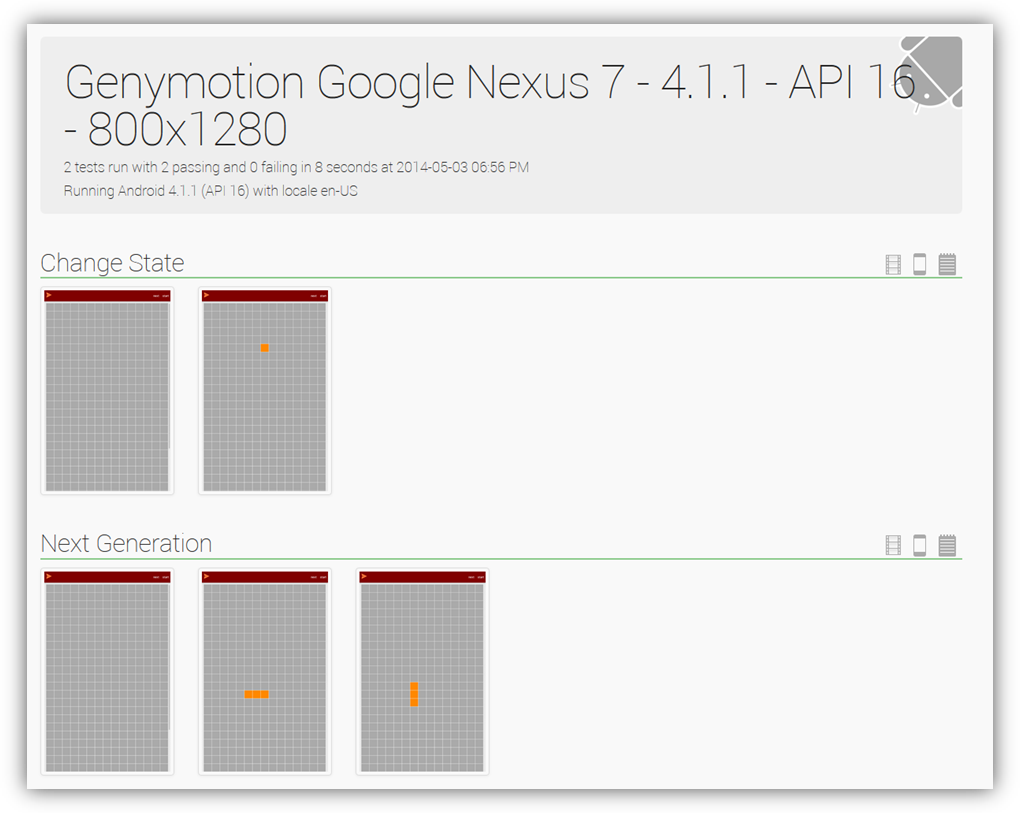
The official sample report from the developer is here .
Report from my project can be found here .
Not bad, isn't it? Another advantage of the “spoon” is that it runs tests at the same time on all connected devices, that is, it will collect the results from all devices in one report. The only and probably significant drawback is that it does not take screenshots of the dialogues and to see what was on it during the test is not possible. And he still will not create a report on code coverage with tests! So let's fix this.
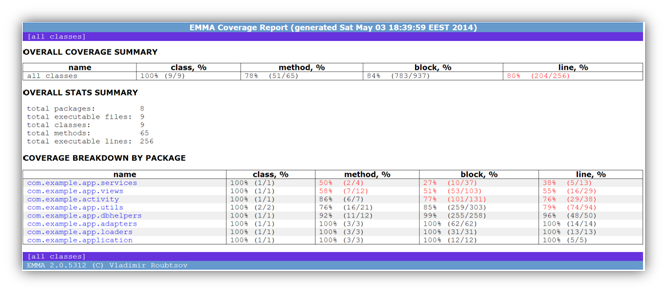
Emma
Agree, the report looks at least decent
An example of code covered with tests:
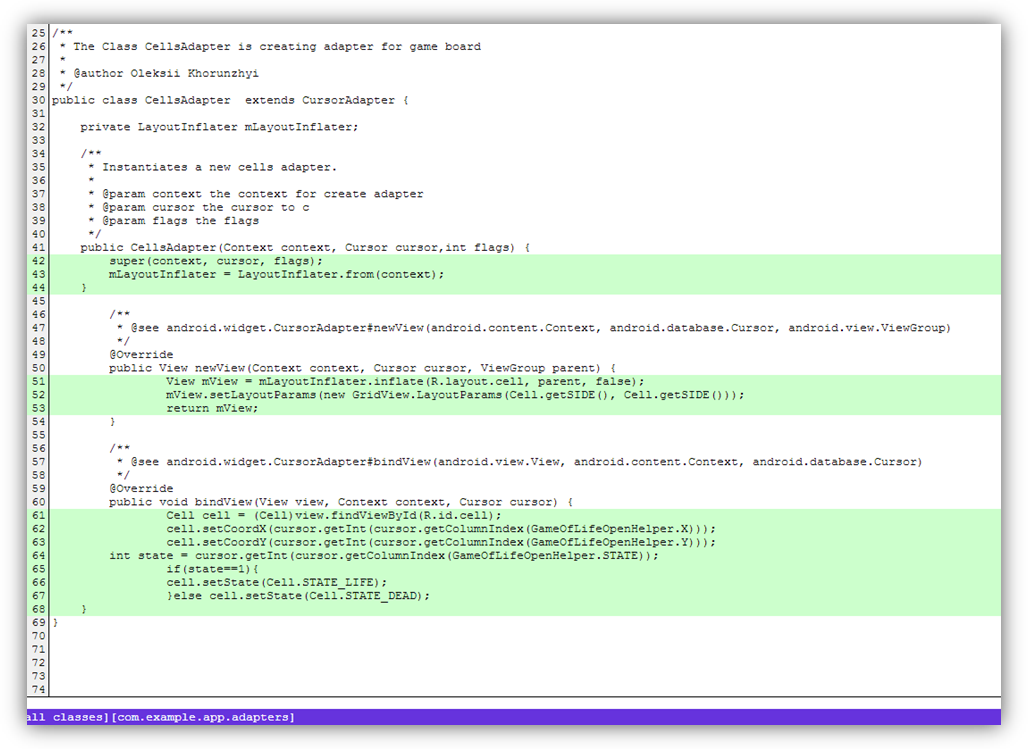
and respectively partially covered:
Full report in all formats .
EMMA is an open source toolkit for measuring and reporting code coverage with tests in Java. This tool is built into the Android SDK and the developers provide the ability to generate a report "from the box." Key features:
- support for class inspection offline (before loading) and on the fly;
- supported coating types: package, class, method, line and main unit. It is also possible to detect when one line of source code is only partially covered;
- types of output reports: text, HTML, XML;
Build a project using Ant
Apache Ant is a tool for transforming development structures into application deployment. It is declarative and all command line instructions used to deploy the application are represented by simple XML elements. More details can be read here .
To describe the procedure for assembling a project you need: a working project — MyProject and a project with tests for it — MyProjectTests. About the rules that must be followed when creating tests can be found here .
First of all, when building a project using Ant, you need to build projects that are used in the application as libraries. If not, then you can skip this step. For example, the project uses such libraries as “google_play_service_lib” to do the following:
- in the command line, go to the folder installed by sdk \ tools (for example, D: \ android \ adt-bundle \ sdk \ tools) and execute:
android update lib-project -p MyLibProject where MyLibProject is the path to the library used in the project. As a result, build.xml should appear in the project root and a message will appear in the console:
Updated local.properties Updated file D:\Workspace\MyProject\build.xml Updated file D:\Workspace\MyProjectTests\proguard-project.txt After assembling all the libraries you need to assemble the working draft itself. To do this, in the same folder you need to run:
android update project -p MyProject where MyProject is the path to the working branch of the project. Naturally, AndroidManifest.xml should be in this folder. The script will generate build.xml again and build the working project. You can enter a project name through sub-parameters in order to use it later:
android update project -p MyProject -n NameForProject How does the project build with tests? Everything is similar and convenient. Script for building a project with tests:
android update test-project -m ..\MyProject -p \MyProjectTests where MyProject is the path to the working project, and MyProjectTests is the path to the project with tests.
All is ready! By the way, at this step developers may have problems due to the use of libraries! For example, in a project, different jar libraries can be built on the basis of libraries that are used in your other libraries. Ant does not understand what to do with them and eventually there is an error during the build. That is, if in the project inside one they use one and the same lib, then this may already lead to an error.
To start the calculation of the amount of code coverage by tests in the script in the sub-parameters you need to register emma. Before starting, you need to run the emulator or connect the device. The following script is executed on the command line on the top branch of the project with tests:
ant clean emma debug install test During the execution of tests, Emma generates the coverage.em file in the bin folder of the main project (metadata), after passing all the tests, sets the required permissions, creates the coverage.ec file in the installed project folder, copies these two files to the bin project test folder and based on them generates a report in the same folder.
Sources of my project with examples of reports can be viewed on Github .
Summarize
Look at the tests, even if they are written very well. Can you look at them to answer how much they cover your code? Do you have a green bar that shows the result of your tests as a visual report as a whole? I think no. The use of reporting as a result of work performance shows the level of competence of a specialist, and when it comes to test automation, even more so. Writing scripts can of course take you some time, but believe it is worth it!
Source: https://habr.com/ru/post/222977/
All Articles