Learning Derby 0.6, example # 3
This lesson, the continuation of a series of lessons on derbyjs, is a reactive full-stack framework. Read previous lessons required ( first , second ).
This lesson will consist of two parts: the first is an overview of the server part of the derby application, and the second is the use of the
derby-auth module (wrappers over passportjs ) for registration / authorization in a derby application using social networks as well.Part 1 - server code derby applications
Training
In the previous examples, in order to facilitate the perception of information, we used
derby-starter as the server part. This module hid from us the details of the server settings. Let me remind you that on the server, a derby application is built on top of the standard expressjs application, in particular, the database is set up there, the express middlware we need is connected. For our example today, it is necessary to deal more deeply with the server part - we will not use derby-starter .If someone is not familiar with
expressjs or doesn’t know nodejs badly, nodejs advise Ilya Kantor’s excellent course .')
Basic application
As a base for our example today, you need to copy my
derby-boilerplate . In fact, this is a minimal application, similar to what we had in the first example, but the server part is no longer in derby-starter , but in the project itself (the last 4th express is also used here, and redis is not used at redis - now it is possible without it). Copy the command: git clone https://github.com/derbyparty/derby-boilerplate.git Let's explore the structure of the project - it is already quite militant in contrast to what was in the previous examples:
src/ app/ server/ styles/ views/ index.js In the
app folder will be our derby app. Schematically, the “analogue” of the derby-starter will be located in the server folder (I really took the derby-starter , copied it there and slightly combed it), we will analyze its contents in more detail.In
styles and views folders - styles and templates, respectively. The index.js file is similar to what it was in the previous examples - a few lines that run the whole thing.Server part of a derby application
First of all, I once again draw your attention to the fact that the derby runs on top of the
expressjs application, so if you do not know what it is, what express-middleware , how they work, how express sessions work, routing - here you need to stop and eliminate deficiencies in knowledge.Let's see what is in the server folder:
error/ index.js server.js In
error daddy, I brought an error handler, I will not here. I can only say that it is expressjs-middlware , which is triggered when there is no handler for the dialed url , or errors occurred during the operation of the application. If you want to sort it out yourself.The main purpose of the
index.js file is to pick up express (which is configured in the server.js file) and raise the server on the specified port in the settings:Source code (practically unchanged from derby-starter)
var derby = require('derby'); exports.run = function (app, options, cb) { options = options || {}; var port = options.port || process.env.PORT || 3000; derby.run(createServer); function createServer() { if (typeof app === 'string') app = require(app); var expressApp = require('./server.js').setup(app, options); var server = require('http').createServer(expressApp); server.listen(port, function (err) { console.log('%d listening. Go to: http://localhost:%d/', process.pid, port); cb && cb(err); }); } } Next is the most interesting, setting expressjs, with added
derby . Parsing this moment is the key to understanding how the derby works.I use the 4th express, it has several differences from the 3rd. The main thing is that the standard middlware is now missing from the
express distribution and must be installed separately.That’s how it would look like this file without a derby:
The server.js code, if we were doing a regular expressjs application:
var express = require('express'); // 4- middleware // var session = require('express-session'); // var MongoStore = require('connect-mongo')(session); // - , // var midError = require('./error'); var MongoClient = require('mongodb').MongoClient; exports.setup = function setup(app, options) { var mongoUrl = process.env.MONGO_URL || process.env.MONGOHQ_URL || 'mongodb://localhost:27017/derby-app'; // MongoClient.connect(mongoUrl); var expressApp = express() if (options && options.static) { expressApp.use(require('serve-static')(options.static)); } expressApp.use(require('cookie-parser')()); expressApp.use(session({ secret: process.env.SESSION_SECRET || 'YOUR SECRET HERE', store: new MongoStore({url: mongoUrl}) })); // - // - 404 expressApp.all('*', function(req, res, next) { next('404: ' + req.url); }); // expressApp.use(midError()); return expressApp; } In a nutshell, I remind you how it works. First, the modules are connected, then the most important is the connection of express
middleware (via expressApp.use ). In essence, these middlware are simple functions that will be in the same order as registered, called for each request that arrives at the server. Each of these middleware can either respond to the request by completing the processing chain (the control will not be transferred to the remaining middlware), or perform some intermediate actions with the request (for example, parsing cookies , determine the session, cookies etc.) and transfer control down the chain. The order of connecting middlware very important - it is in this sequence that the functions will be called for each request.And this is what a derby version looks like - commented server.js code with a derby
// 4- var express = require('express'); // 4- middleware // var session = require('express-session'); // var MongoStore = require('connect-mongo')(session); // - , // var midError = require('./error'); var derby = require('derby'); // BrowserChannel - socket.io - , // , // liveDbMongo - - var racerBrowserChannel = require('racer-browserchannel'); var liveDbMongo = require('livedb-mongo'); // browserify derby.use(require('racer-bundle')); exports.setup = function setup(app, options) { var mongoUrl = process.env.MONGO_URL || process.env.MONGOHQ_URL || 'mongodb://localhost:27017/derby-app'; // ( redis) var store = derby.createStore({ db: liveDbMongo(mongoUrl + '?auto_reconnect', {safe: true}) }); var expressApp = express() // "" // (.. /derby/...) expressApp.use(app.scripts(store)); if (options && options.static) { expressApp.use(require('serve-static')(options.static)); } // browserchannel, // middleware, // (browserchannel longpooling - .. // /channel) expressApp.use(racerBrowserChannel(store)); // req getModel, // express- // . createUserId expressApp.use(store.modelMiddleware()); expressApp.use(require('cookie-parser')()); expressApp.use(session({ secret: process.env.SESSION_SECRET || 'YOUR SECRET HERE', store: new MongoStore({url: mongoUrl}) })); expressApp.use(createUserId); // -, // , // expressApp.use(app.router()); // - // // - 404 expressApp.all('*', function(req, res, next) { next('404: ' + req.url); }); // expressApp.use(midError()); return expressApp; } // id- , // id - function createUserId(req, res, next) { var model = req.getModel(); var userId = req.session.userId; if (!userId) userId = req.session.userId = model.id(); model.set('_session.userId', userId); next(); } Take some time to figure it all out. In essence, the main thing here is that
browserify is used - it is needed in order to give the client a so-called “bundle” to the client - a data block containing all javascript derby application files, as well as templates (css scripts will not be contained here) . It is necessary to understand that with the usual request of any page of the site by the client - a bundle is not immediately sent to the browser, it would be too costly. A rendered page with styles and with some initial data has already been presented. This is logical because speed is very important here. Then this page itself loads the “bundle” - a request is made to the address "/ derby /: bandle-name".I have already said that several “derby applications” can correspond to one server part of a derby - in fact, each of them will have its own bundle. This is logical. So, for example, we can separate the client part of the site from the admin panel - in order not to transmit extra data to everyone. If so, you will need to register:
expressApp.use(clientApp.scripts(store)); expressApp.use(adminApp.scripts(store)); The same applies to the processing of routes. If we don't have 2 derby apps, we’ll get instead:
expressApp.use(app.router()); connection of two application routers:
expressApp.use(clientApp.router()); expressApp.use(adminApp.router()); Well, and you should also understand that, apart from handlers of “derby applications” routes, we can easily add our
expressjs handlers, organizing any RESTFull API we need, as they say, with blackjack and young ladies. This all works due to the fact that the client router of derby applications, not finding the right handler in their application, simply sends a request to the server for processing.The next important point is to connect the
browserchannel - this is Google's analog socket.io . In essence, this is a transport, thanks to which our application will synchronize data with the server in real time. Under the hood is the fact that at some point the client browser browsernel script is added to the bundle, as well as processing requests from this module (it is based on longpooling - therefore, processing is required, in this case at the /channel address)Yes, I would like to note that in my example of the basic derby setting,
redis is not used. The derby update has recently been released, and now, redis not mandatory (it is still needed if we do horizontal scaling — that is, to increase performance, run several derby servers at once).So, at the moment you need to understand that this structure allows you to add anything to your application very flexibly. Whether it’s some
expressjs-middlware , derby plugins, individual derby applications, express handlers - whatever. All this will be easy to live together.So, well, the last point to which you need to pay attention, especially in light of the question of authorization - the session. As you may have noticed, sessions in the derby are used quite by themselves
express new ones. That is, everything happens according to the classical scheme: a cookie is used for identification (which will be stored in the client’s browser), the sessions themselves are stored in mongodb in the sessions collection.If you look at the
createUserId function: function createUserId(req, res, next) { var model = req.getModel(); var userId = req.session.userId; if (!userId) userId = req.session.userId = model.id(); model.set('_session.userId', userId); next(); } It can be seen that userId is extracted from the session in it, but if it is absent, the id is generated randomly (
model.id() ) and written to the model along the path _session.userId (this data will be serialized and transmitted to the client) and into the session itself .Imagine several query options:
- The user has visited the site for the first time and requested the main page - a new cookie will be formed on the server, a new session (with a new random
userId) - the main page will be displayed in the browser and if we look at the model on the client, then on the way '_session.userId' - We will see our newly formed ID. Now wandering through the pages of our application (there will be no requests to the server) - the client always has his Id, and if he makes any requests to the server, we will always be able to recognize him by the session. - The user has not registered and logged in a week. Cook has survived - the same
userId- everything is fine. - The user logged in from another browser - the same as in paragraph 1
Suppose how we would develop the registration / authorization (from the point of view of the server). Suppose in the browser the client entered the registration data - then they should go to the server, where we would create an entry in the users collection, even no longer need to invent an id, it already exists.
When authorization is more difficult, a client going to the site will receive a random id, then go to the login page - enter the login / password, transfer it all to the server, then the server will understand who it is and should change the userId in the session and in
_session.userId .What would we store there in this collection. Most likely: username, email, passwordHash, may be some kind of statistical data. If our site would be authorization (registration) through the social. networks, the social network keys would be stored here. Still, of course, custom settings - they would also be nice to store here.
Naturally, we would like that no one could see a part of this collection on the client. Now there is no problem. Recently, so-called projections appeared in the derby (the ability to subscribe to a collection, not to subscribe to the entire document, but only to certain of its fields), but a couple of weeks ago it was impossible, and the
derby-auth module, which we will consider, is still can not. It uses the division of user data into 2 parts: the first is the auths collection (here only private data), the second users are open public data. So derby-authPart 2 - authorization in derby-application (module derby-auth)
A little bit about derby-auth
At the moment there are 2 packages - authorization for the derby. This is
derby-auth and derby-passport . Both of them are wrappers over passportjs , (one of them, in my opinion, fork the other). Actual versions of both that and that are intended for use with the fifth version of the derby (remember the 6th is still in alpha), have not yet been updated for the 6th, but this does not prevent us from using derby-auth in all our projects on 6-ke (not available only html form templates, but we have them all the same custom).My choice in favor of
derby-auth just because I worked with him.Another limitation that I have already mentioned is that the user data in both of these projects is divided into two parts. Public data should be stored in the
users collection, and closed in auths . Recently, an opportunity has appeared in the derby to make “projections” —that is, to subscribe only to certain collection fields — I think when these modules are updated to the 6th version of the derby, the restriction will go away.update
A few days after writing this article, Vladimir Makhaev (@vmakhaev) developed an awesome derby-login authorization module based on derby-auth. It is under 0.6, supports projections, it has ready-made components for registering, logging in, changing the password - in short, only use it.
By the way, do not forget to thank Vladimir, at least with an asterisk on the githaba . Very useful thing he did.
A bit about passportjs
PassportJS is the middleware for authorization under node.js This is an abstracting module that allows your application to use both regular login and password authorization and authorization through almost any service that supports Oauth, Oauth 2, etc. authorization Authorization methods are called strategies here. For example, login / password authorization is called LocalStrategy (“local authorization strategy”), while GitHub authorization is GithubStrategy . Each strategy is put into a separate module, so connecting the whole thing to a node.js application will look something like this: var passport = require('passport'); var LocalStrategy = require('passport-local').Strategy; var GithubStrategy = require('passport-github').Strategy; Here it should be noted features of the use of authorization strategies through social networks. If someone else does not know, then before our application can use such authorization, you need to register it (application) in the social. network and get two parameters, usually this
appId (or clientId is a unique id-schnick of our application in this social network) and Secret (a secret key that nobody can say, it will be used to enable our application to confirm that we are us). When registering, you will also need to enter the so-called redirectURL - that is, the url-address, where social. the network will redirect the client browser after authorization. In my example it will be: localhost : 3000 / auth / github / callback - but more on that later.In the example application, I will use authorization through
github , registration of the application there is very simple (for other providers it is not more difficult). First of all, you need to have a regular user account, an application is easily created in its settings.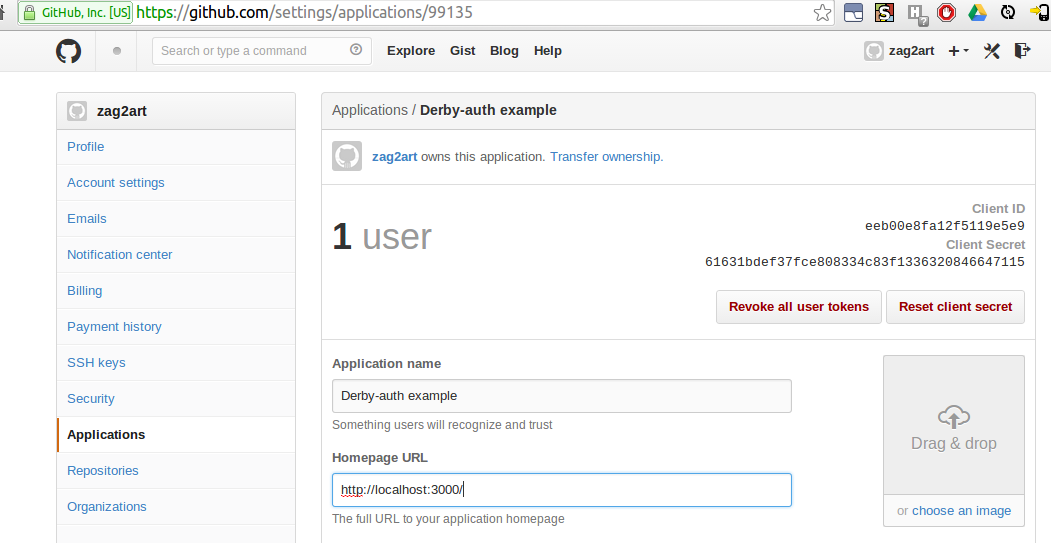
Don't tell my secret to anyone.
We connect derby-auth to our application
So, first of all, we
derby-auth directly from the git-repository, for some reason, they have the master version under the previous derby :npm install git: //github.com/cray0000/derby-auth#0.5 -S
Derby-auth automatically puts passport and passport-local , it remains to install passport-github : npm install passport-github -S Now go to the settings. We will do everything in accordance with the instructions - https://github.com/lefnire/derby-auth/tree/0.5 . Most of the connection actions are performed on the server, that is, we need src / server / server.js.
Step 1
We connect derby-auth itself, and set up strategies (of course in a normal application, the settings should be taken from the config file or environment variables)
// derby-auth var auth = require('derby-auth'); var strategies = { github: { strategy: require("passport-github").Strategy, conf: { clientID: 'eeb00e8fa12f5119e5e9', clientSecret: '61631bdef37fce808334c83f1336320846647115' } } } It is clear that if there were more strategies, they would all be listed here:
Step 2
Set options:
var options = { passport: { failureRedirect: '/login', successRedirect: '/' }, site: { domain: 'http://localhost:3000', name: 'Derby-auth example', email: 'admin@mysite.com' }, smtp: { service: 'Gmail', user: 'zag2art@gmail.com', pass: 'blahblahblah' } } In principle, everything is clear from the names:
failureRedirect , successRedirect - url-address where the client will be redirected in case of not successful / successful authorization, respectively. Site information is needed to be sent to a strategy (for example, social networks can use it if the corresponding fields were not filled in when registering the application). The mail settings are needed in order for the “forgotten password” feature to work - reset it and send me a new one for soap.Step 3
Initializing the repository
auth.store(store, false, strategies); At this step,
derby-auth adds data access control, the user will not be able to get other people's records from the auths collection — he will only see his account. The second parameter is currently not used.Step 4
Let us make sure that middleware for storing sessions is connected to the express and
body-parser(we do not have it yet - we will install npm i body-parser -Sand connect it): expressApp.use(require('cookie-parser')()); expressApp.use(session({ secret: process.env.SESSION_SECRET || 'YOUR SECRET HERE', store: new MongoStore({url: mongoUrl}) })); expressApp.use(require('body-parser')()) // method-override , // , PUT // expressApp.use(require('method-override')()) Well and the last - we connect
derby-auth middeware- the heap of all about it is connected here further: expressApp.use(auth.middleware(strategies, options)); Let's see what is happening here. If this is middleware, it is logical to assume that some controllers are registered here that
expressjsprocess requests to specific url. So it is - here is a summary of the controllers:| Route | Method | Options | Purpose |
|---|---|---|---|
| / login | post | username password | Login to the system by login and password |
| / register | post | username, email, password | Serves for user registration by login and password |
| / auth /: provider | get | absent | Passing here we will be redirected to the authorization page of the corresponding social. network. Example path: / auth / github |
| / auth /: provider / callback | get | absent | . — derby-auth failureRedirect successRedirect url. : /auth/github/callback — url , . network. |
| /logout | get | «» '/' | |
| /password-reset | post | email ( AJAX) | |
| /password-change | post | uid, oldPassword, newPassword | ( AJAX) |
There is one more (optional) step in the manual - connecting components (html and authorization / registration form styles, etc.), but these components are written under Derby 0.5 and have not yet been updated. In my example, I follow the simplest implementation of forms to demonstrate the basic principles of work. But first you need to discuss another point.
What we will see in the model on the client
Derby-auth It sends certain data to the client, which allows you to find out whether the user has logged in, his id, as well as supporting information describing problems with logging and registration:| Let be | Description |
|---|---|
| _session.loggedIn | Boolean variable - authorized / not authorized user |
| _session.userId | User ID |
| _session.flash.error | Array of strings - auxiliary error messages (various authorization / registration errors) |
| auth. {userId} .local | Local Registration Information |
| auth. {userId}. {provider} | Registration data through the corresponding social. network |
All this is available in the templates and will be used by us to determine the status of authorization.
Sample application
In general, of course, if the visual components of the
derby-authwould fit the 6th version of the derby, the application would be written in two accounts, without them more difficult. To simplify development, we connect bootstrap, for this we enter in src / app / index.js app.use(require('d-bootstrap')); having done
npm i d-bootstrap -S The third bootstrap is installed.
In the application, I will make 2 pages: the first, under the address "/" with the authorization status, so that we can see if the user has logged into his account, as well as the credentials, the second, at the address / login, directly with the authorization registration logs, so that to experiment. Also, before rendering each of these two pages, I will pull up user credentials from the collection
auths.I think the derby application file
src/app/index.jsdoes not require special comments, the only thing that we did not discuss is the controller "*", but this is the standard thing for the express: var derby = require('derby'); var app = module.exports = derby.createApp('auth', __filename); global.app = app; app.use(require('d-bootstrap')); app.loadViews (__dirname+'/../../views'); app.loadStyles(__dirname+'/../../styles'); app.get('*', function(page, model, params, next){ var user = 'auths.' + model.get('_session.userId'); model.subscribe(user, function(){ model.ref('_page.user', user); next(); }); }); app.get('/', function (page, model){ page.render('home'); }); app.get('/login', function (page, model){ page.render('login'); }); Let’s do this according to the templates - we will do it
layoutwith the menu in the file index.html, home.htmland login.htmlwe will put in the files , respectively, a page with information about the user’s status (entered / not entered, whether the github account is linked), and a page with authorization / registration.So, index.html
<import: src="./home"> <import: src="./login"> <Title:> Derby-auth example <Body:> <div class="navbar navbar-inverse" role="navigation"> <div class="container"> <div class="navbar-header"> <a class="navbar-brand" href="/">Derby-auth Example</a> </div> <div class="collapse navbar-collapse"> <ul class="nav navbar-nav"> <view name="nav-link" href="/"></view> <view name="nav-link" href="/login"></view> </ul> </div> </div> </div> {{if _session.flash.error}} <div class="container"> {{each _session.flash.error as #error}} <div class="alert alert-warning">{{#error}}</div> {{/}} </div> {{/}} <view name="{{$render.ns}}"></view> <nav-link: element="nav-link"> <li class="{{if $render.url === @href}}active{{/}}"> <a href="{{@href}}">{{@content}}</a> </li> This menu and in general most of the markup here are purely auxiliary and are not specifically related to authorization as such (well, except for the alert). The only thing that can cause questions here is:
<view name="{{$render.ns}}"></view> Instead of this line, the derby will insert the content either
home.html, or login.html, depending on what we have registered in the controller: page.render('home')or The page.render('login')page with auxiliary information
home.html: <index:> <div class="container"> <h1>:</h1> {{if _session.loggedIn}} <p> </p> <h2> :</h2> {{if _page.user.local}} <p> : <b>{{_page.user.local.username}}</b></p> {{else}} <p> </p> {{/}} <h2>GitHub:</h2> {{if _page.user.github}} <p> : <b>{{_page.user.github.username}}</b></p> {{else}} <p> </p> {{/}} <a class="btn btn-danger" href="/logout"></a> {{else}} <p> </p> <a href="/login">/</a> {{/}} </div> Pay attention to the “Exit” button - the controller is used here.
GET /logout derby-authWe will not bother too much and take the login form along with the styles straight from the bootstrap site, there is an excellent example of “sign in” http://getbootstrap.com/examples/signin/
Styles are stupidly copied from the bootstrap example - file slyles / index.styl
.form-signin { max-width: 330px; padding: 15px; margin: 0 auto; } .form-signin .form-signin-heading, .form-signin .checkbox { margin-bottom: 10px; } .form-signin .checkbox { font-weight: normal; } .form-signin .form-control { position: relative; height: auto; -webkit-box-sizing: border-box; -moz-box-sizing: border-box; box-sizing: border-box; padding: 10px; font-size: 16px; } .form-signin .form-control:focus { z-index: 2; } .form-signin input[type="email"] { margin-bottom: -1px; border-bottom-right-radius: 0; border-bottom-left-radius: 0; } .form-signin input[type="password"] { margin-bottom: 10px; border-top-left-radius: 0; border-top-right-radius: 0; } The login.html file with authorization and registration:
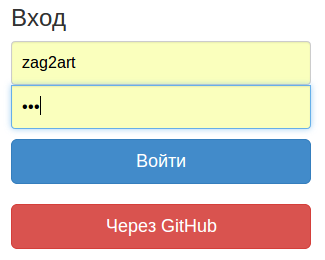
<index:> <view name="signin"></view> <hr/> <view name="signup"></view> <signin:> <div class="container"> <form class="form-signin" role="form" action='/login' method='post'> <h3 class="form-signin-heading"></h3> <input name="username" type="text" class="form-control" placeholder="" required="" autofocus=""> <input name="password" type="password" class="form-control" placeholder="" required=""> <button class="btn btn-lg btn-primary btn-block" type="submit"></button> <br/> <a class="btn btn-lg btn-danger btn-block" href="/auth/github"> GitHub</a> </form> </div> <signup:> <div class="container"> <form class="form-signin" role="form" action='/register' method='post'> <h3 class="form-signin-heading"></h3> <input name="username" type="text" class="form-control" placeholder="" required="" autofocus=""> <input name="email" type="email" class="form-control" placeholder="" required=""> <input name="password" type="password" class="form-control" placeholder="" required=""> <button class="btn btn-lg btn-primary btn-block" type="submit"></button> </form> </div> If you start everything, it will look something like this:

I changed the Bootstap form a bit, based on our derby-auth controllers. What we pay attention to in the registration form: this is the post form leading to the action / login - derby-auth will process, the username and password field names are all from our table. Logging in via GitHub - get request to / auth / github - also from there.
Registration form. The same thing - post to / register, fields: username, email, password.
We start the application: npm start - we look at the status - “the user is not logged in”, we register, we see - “the user is in the system”. We can get - / logout. Until we come out, we have the opportunity to link a github account to the current account, for this you need to click “log in via github”, we will be redirected to the github, log in there, confirm everything and go back to the site.
Derby-auth also allows, without registering through a local strategy, to register on the site through social accounts. networks.I prefer the technique used in the Habré, when only a registered user can link social accounts to his account. nets, but for this derby-auth need a little tweak.
Play around with what you got. View available data using the developer console (enter app.model.get () in the console).
I apologize that we didn’t implement the remaining chips in the example
derby-auth(resetting and changing the password) - this lesson came out pretty big because of the need to explain the server part of the derby.We also implemented simplified forms, the point here is that in a full-fledged application, these blocks will be put into separate components, and we have not studied them yet.
The final version on github
I ask those who at least tried something myself, unsubscribe in the comments and tell you what happened. You can not write comments on the brave - write on the soap . Interestingly, it’s not for nothing that I write.
PS
If you do not want to skip the following articles on derbyjs, subscribe to updates in my profile: zag2art . I do it myself - on the Habré there is no possibility to add a specific (very interesting) hub to the tracker in order not to miss anything.
Pps
By the way, the derby 0.6 alpha 7 is already out - the final release is getting closer and closer.
If you like derbyjs, don’t take the trouble to put an asterisk on github
Source: https://habr.com/ru/post/222399/
All Articles