Arduino Pro Mini Firmware via Nano
Not so long ago, I was faced with the need to use the Arduino Pro Mini in my project and immediately the question arose of how to fill it with a sketch. Of course, various UART adapters are sold with the help of which this issue is removed quickly, but at that moment such an adapter was not at hand.
After reading on the site http://arduino.cc and having inspected the information on various forums, I learned about the possibility to flash the Pro Mini with the help of other Arduino boards.
So, consider what the Arduino as ISP method is and what is needed for this using the example of Arduino Nano.
In order to use the board in the native Arduino IDE, there is an example of a sketch for transferring the board to the programmer, this example is already self-sufficient for the Pro Mini firmware, you can find it in the File menu.
')

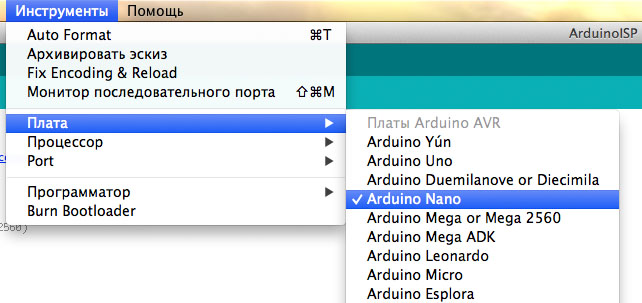
Next in the "Tools" menu, we expose our board "programmer" and the type of its microcontroller.
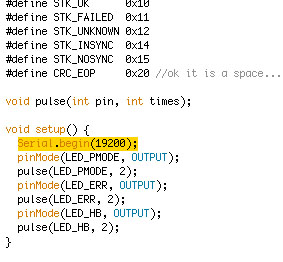
Then we flash the Nano with the ArduinoISP sketch, drawing attention to the port speed in the setup function, this speed will be used directly when flashing the Pro Mini in the standard sketch, its value is 19200 .
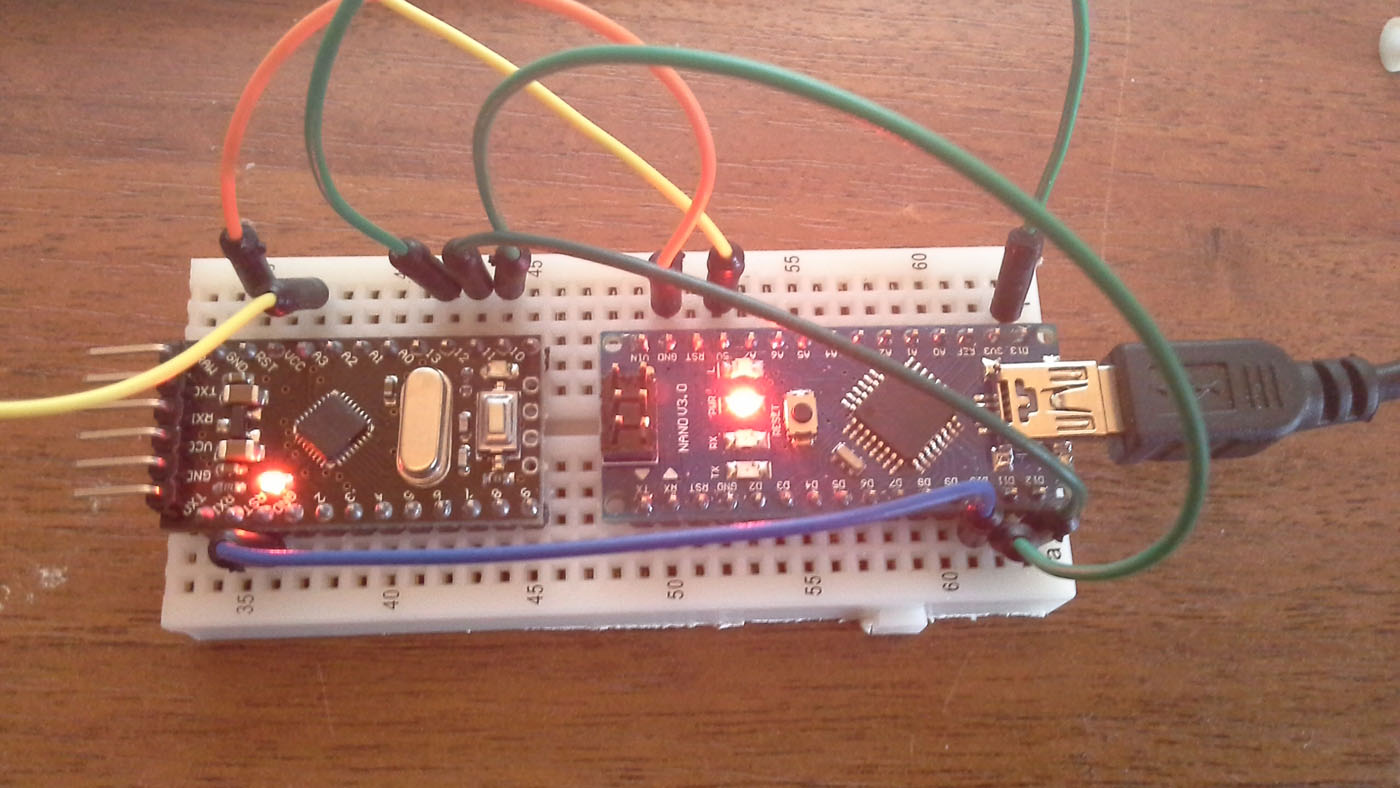
After the Nano is prepared, we can assemble the breadboard, for the Pro Mini firmware according to the scheme specified here http://arduino.cc/en/Tutorial/ArduinoISP .
That is, as follows:
Nano -> Pro Mini
I did something like this:
After everything is assembled and tested, you can connect the Nano to the computer by blinking 7 times both boards are ready to work.
Next, for the firmware, we need to make sure that when setting the firmware and the programmer we use the same port speeds, taking speed from the sketch as standard. For a board type, you need to find the boards.txt file . Its path relative to the installed IDE program is: Arduino / hardware / arduino / boards.txt . In it we need to find the parameters section for the Pro Mini board, it looks like this:
I have a 5 volt flash on mini with an ATmega328 microcontroller, if you have a different board version, then you need to find the section corresponding to your board.
Here you need to make sure that the speed set is correct:
Then go to the file programmers.txt, its path Arduino / hardware / arduino / programmers.txt and make sure that the parameters are correct :
Once you have made sure that all the parameters are correct, you can run the IDE, if it is running then restart. This is necessary for the new parameters to take effect.
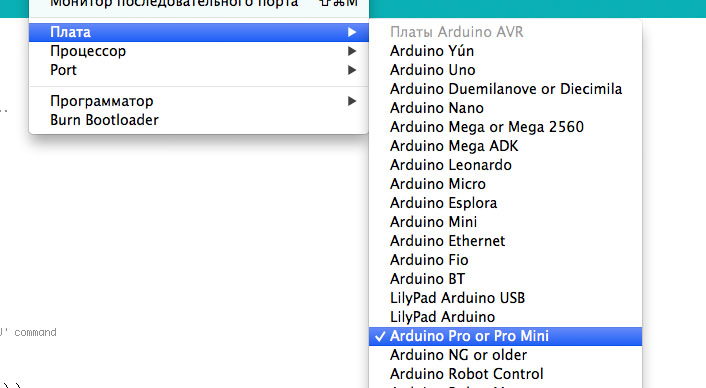
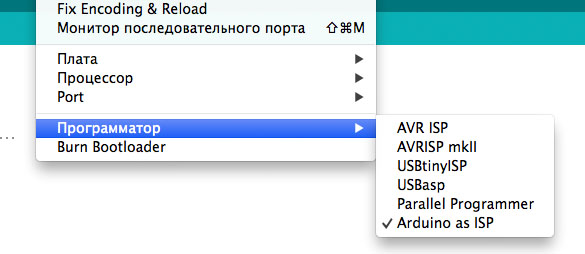
After launching the IDE, we need to put in the Tools menu our firmware and the type of the Arduino as ISP programmer:
Now we have everything ready for the firmware. Select the desired sketch, for the sample, you can choose any of the examples. And now I will pay special attention to how to flash, the usual button for firmware will not work for us since it is intended for firmware by a standard programmer, i.e. in Arduino Nano and when it is pressed, we simply flash the Nano, which we absolutely do not need.
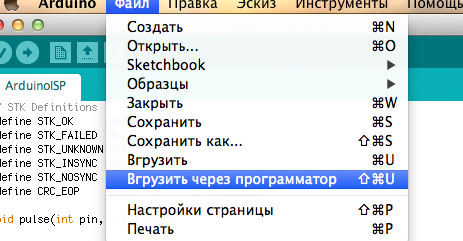
The surest way to flash the Pro Mini is in the “File” menu and it's called “Download using a programmer”, I have an IDE version 1.5.6-r2 there this item is called “Load via programmer”, it seems that the translation is difficult in this release. in version 1.0.5-r2 everything is in order.
From the first time it may not be possible to flash, and in the future it will be possible to get an error of the following type:

However, do not worry, if everything is assembled correctly and firmly securely, just press "Reset" on the Pro Mini, wait a couple of seconds and the board will pass successfully.
Thank you for your attention on this for now.
After reading on the site http://arduino.cc and having inspected the information on various forums, I learned about the possibility to flash the Pro Mini with the help of other Arduino boards.
So, consider what the Arduino as ISP method is and what is needed for this using the example of Arduino Nano.
In order to use the board in the native Arduino IDE, there is an example of a sketch for transferring the board to the programmer, this example is already self-sufficient for the Pro Mini firmware, you can find it in the File menu.
')
Next in the "Tools" menu, we expose our board "programmer" and the type of its microcontroller.
Then we flash the Nano with the ArduinoISP sketch, drawing attention to the port speed in the setup function, this speed will be used directly when flashing the Pro Mini in the standard sketch, its value is 19200 .
After the Nano is prepared, we can assemble the breadboard, for the Pro Mini firmware according to the scheme specified here http://arduino.cc/en/Tutorial/ArduinoISP .
That is, as follows:
Nano -> Pro Mini
- + 5v -> Vcc
- GND -> GND
- D10 -> RST
- D11 -> D11
- D12 -> D12
- D13 -> D13
I did something like this:
After everything is assembled and tested, you can connect the Nano to the computer by blinking 7 times both boards are ready to work.
Next, for the firmware, we need to make sure that when setting the firmware and the programmer we use the same port speeds, taking speed from the sketch as standard. For a board type, you need to find the boards.txt file . Its path relative to the installed IDE program is: Arduino / hardware / arduino / boards.txt . In it we need to find the parameters section for the Pro Mini board, it looks like this:
pro5v328.name=Arduino Pro or Pro Mini (5V, 16 MHz) w/ ATmega328I have a 5 volt flash on mini with an ATmega328 microcontroller, if you have a different board version, then you need to find the section corresponding to your board.
Here you need to make sure that the speed set is correct:
pro5v328.upload.speed=19200Then go to the file programmers.txt, its path Arduino / hardware / arduino / programmers.txt and make sure that the parameters are correct :
arduinoisp.name=Arduino as ISP
arduinoisp.communication=serial
arduinoisp.protocol=stk500v1
arduinoisp.speed=19200
Once you have made sure that all the parameters are correct, you can run the IDE, if it is running then restart. This is necessary for the new parameters to take effect.
After launching the IDE, we need to put in the Tools menu our firmware and the type of the Arduino as ISP programmer:
Now we have everything ready for the firmware. Select the desired sketch, for the sample, you can choose any of the examples. And now I will pay special attention to how to flash, the usual button for firmware will not work for us since it is intended for firmware by a standard programmer, i.e. in Arduino Nano and when it is pressed, we simply flash the Nano, which we absolutely do not need.
The surest way to flash the Pro Mini is in the “File” menu and it's called “Download using a programmer”, I have an IDE version 1.5.6-r2 there this item is called “Load via programmer”, it seems that the translation is difficult in this release. in version 1.0.5-r2 everything is in order.
From the first time it may not be possible to flash, and in the future it will be possible to get an error of the following type:
However, do not worry, if everything is assembled correctly and firmly securely, just press "Reset" on the Pro Mini, wait a couple of seconds and the board will pass successfully.
Thank you for your attention on this for now.
Source: https://habr.com/ru/post/222201/
All Articles