Squeeze the maximum out of DDMS
DDMS (Dalvik Debug Monitor Server) is an incredibly useful tool for debugging applications that comes bundled with the Android SDK, which for some reason is not specifically mentioned in Habré, however, as in the google examples, it is presented in a very modest form. I would like to reveal his opportunities and show what he is capable of. In short:
These things will be discussed in this article. And for reference, less interesting, which is rather trivial and what will NOT be covered in this article:
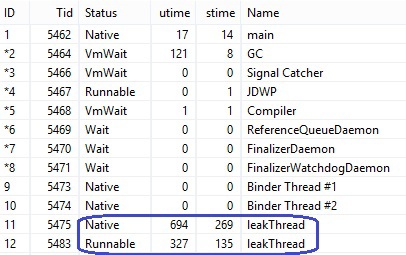
DDMS contains a tool that allows us to analyze information on each process and its threads. It is enough to select the necessary process of our application and click "update threads".

On the right, you can see the “Threads” tab and the working threads of the selected process. The following information is available for each stream:
Thus, we can understand which thread consumes the most CPU time. Here it is necessary to say a few words about some streams.
GC - as everyone thinks guessed, this is a garbage collector stream. Until Android 3, it is not available for viewing in streams.
JDWP (Java Debug Wire Protocol) - protocol of interaction between a debager and a virtual machine.
This is actually its flow. Do not worry about its appearance, it is created only when debugging the application.
You can also monitor your current streams and detect a memory leak if one of your streams is listed in two copies (of course, if not so intended). Suppose you turned the screen, but you forgot to correctly handle the closing of the stream, and then created a copy of it. In the list you will see both such streams. I started the normal stream in onCreate () and turned the screen without stopping the past, and got such a picture.
Perhaps, on the tab with the streams everything. But this information is closely related to the continuation of the article.
')
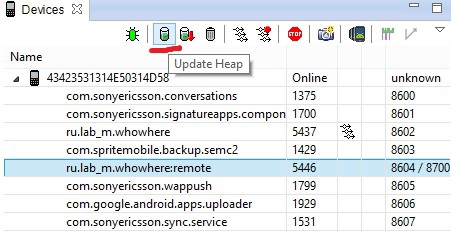
We have a tool for debugging a heap. To do this, also select the required process and select the “update heap”.
Now we have access to information about the distribution of dynamic memory in our process. Start the garbage collection (Cause GC) and see what remains.
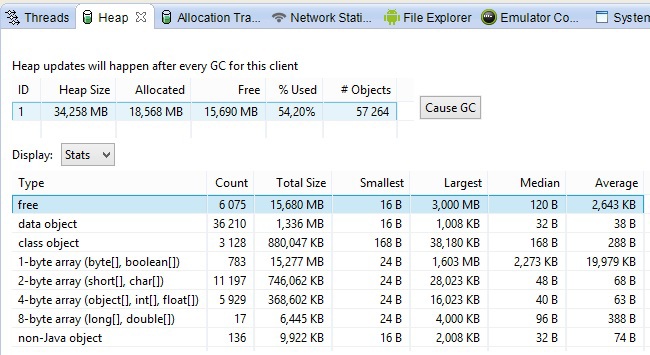
It's all pretty simple:
At the bottom of the screenshot, shows the distribution of objects by size and type.
Heap Size can be increased as needed by the virtual machine itself. Sometimes a few minutes of tracking him are enough to understand that you have a memory leak.
I will give an example. In one of the projects I use the listener Broadcast messages. I commented unregisterReceiver in onPause
BroadcastReceiver itself is registered via LocalBroadcastManager
It allows you to throw messages only in one process. This will hold the Activity, which will definitely affect the heap. Since I work in my project with a map service, this will lead to the retention of the map and all the tiles that have been zipped, so the result will be quickly noticeable.
At the top of the figure, the first start of the application is shown. Then I turned the screen 11 times, after which the heap increased quite a lot. The application stopped responding 12 times. An increasing heap is a double-edged sword. On the one hand, it’s good that it can increase so slightly (depending on free memory), on the other hand, the application can stay there for a long time and will slowly work, annoying the user. Of course, the analysis of the heap will not show where you have a leak, but will make it clear that it is still there, and this is not bad.
Allocation tracker can give us much more information. It allows you to track which objects were created for a selected process in a selected period of time, where you can see which objects were created more often, their size, the thread that created them and the call stack.
Select “Start track”, after which we perform actions with the application that we want to analyze, then click “Get Allocations”. A list of objects that were created during this period of time will appear below.
In this screenshot, the objects are sorted by the order of their initialization or by the time of creation, I do not know how to put it better. You can sort your objects in any convenient way by simply clicking on the column name. Available information:
We can select any object and see its entire call stack. Thus, you can get information about where objects are created, how often, their size and take appropriate measures, because many people know that the creation of an object is an expensive operation and should be avoided.
I finally got to my favorite code analysis tool, “Method Profiling”. This tool allows you to analyze the time that was spent methods on their work. Thereby, we can understand the bottlenecks in our code and optimize them.
I will show a simple example. In one of our projects, we had to deal with the NMEA protocol. This is a maritime protocol that provides so-called “raw” GPS data. I parsed this data. This is one of the lines I need.
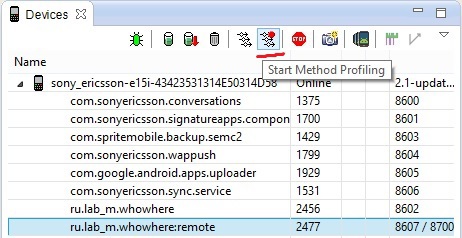
Split by comma and everything is fine. Or not? Select the required process and run Method Profiling.
After 1-2 minutes (you yourself choose the time that you consider necessary), stop Method Profiling, after which we get a trace of our methods, as shown in the figure below.
The upper part shows the time schedule of work flows. Here you can find the id of the stream, its name and a graphic representation of the time of its work. Much more interesting is the lower part of the treys. At the left, from top to bottom, methods are shown which consume the maximum number of processor time;
In this table, noticeably, my method spends 23.5% of the total time. By clicking on it, I got this picture

Obviously, the split method, which spends 72% of the time of the total time of the method in which it was called, is to blame. The usual transition to substring allowed us to optimize this method by 2 times.
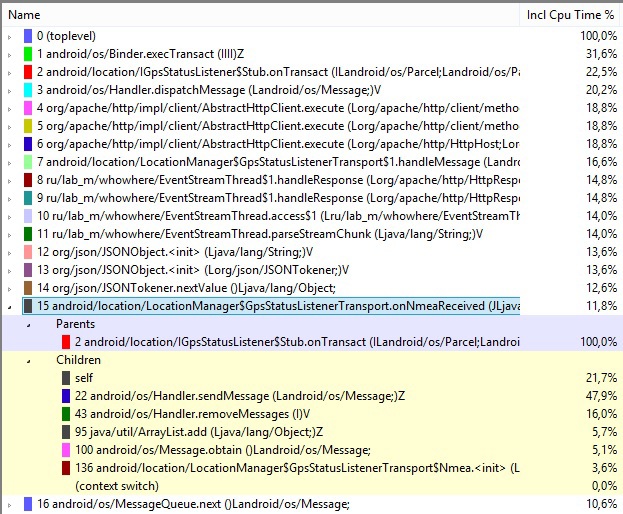
Our method went down by the workload to the 15th position, and the others went upstairs, where you can also look at the information, what time is spent on, look at the call stack and figure out how to optimize it. Also here is the implicit optimization. Since split produces an array with strings, now the load on the GC has become less, hence the number of calls of the collector will, by definition, be less, which will have a favorable effect on both the speed and responsiveness of the application. GC can also be found in this trace, if it was launched by the system during the code analysis.
You can sort the methods, as well as with the allocation tracker, just click on the column name.
It is possible to analyze only certain sections of code in the application. For this, Android provides us with two methods:
After the stopMethodTracing is completed, the trace will be available in /sdcard/trace_name.trace. This can be very useful if we want to optimize certain parts of the code, or, for example, improve the speed of the start of the application.
Perhaps this is all for now. Behind the scene was a heap dump analysis ( Dump HPROF File ). If you are interested, I will try to write an article in the same spirit about such a wonderful tool as MAT , which allows you to analyze the heap dump for leaks and other things. He just shows all instances of my activity, which were held in a heap when you rotate the screen.
I also avoided the tool Hierarchy Viewer, which already has an article on Habré. I hope this article is helpful and helps you optimize your applications.
Happy debugging!
- examine information about running threads;
- analyze heap on the amount of free and used memory;
- analyze which objects are created more often, their size and another (Allocation tracker);
- find problem areas of the code that work for a long time and require optimization (Method profiling). This I advise everyone to know.
These things will be discussed in this article. And for reference, less interesting, which is rather trivial and what will NOT be covered in this article:
- work with the emulator or device file system;
- find information about errors (hello logcat );
- emulate calls / sms / location;
- use the network statistics tool.
Threads
DDMS contains a tool that allows us to analyze information on each process and its threads. It is enough to select the necessary process of our application and click "update threads".
On the right, you can see the “Threads” tab and the working threads of the selected process. The following information is available for each stream:
- Id - unique identifier of the stream assigned by the virtual machine. If there is an asterisk next to it, then it is a daemon thread;
- Tid - stream id in Linux. The main process thread will contain the process id;
- Status - current status of the stream;
- Utime is the total time the thread spent executing custom code. The units of measurement are jiffies , the duration of which is determined by the system and is usually 10ms;
- Stime - the time spent on the execution of the system code. The units of measurement are also jiffies;
- Name - the name of the stream. Do not forget to give meaningful names when creating a stream.
Thus, we can understand which thread consumes the most CPU time. Here it is necessary to say a few words about some streams.
GC - as everyone thinks guessed, this is a garbage collector stream. Until Android 3, it is not available for viewing in streams.
JDWP (Java Debug Wire Protocol) - protocol of interaction between a debager and a virtual machine.
This is actually its flow. Do not worry about its appearance, it is created only when debugging the application.
You can also monitor your current streams and detect a memory leak if one of your streams is listed in two copies (of course, if not so intended). Suppose you turned the screen, but you forgot to correctly handle the closing of the stream, and then created a copy of it. In the list you will see both such streams. I started the normal stream in onCreate () and turned the screen without stopping the past, and got such a picture.
Perhaps, on the tab with the streams everything. But this information is closely related to the continuation of the article.
')
Heap
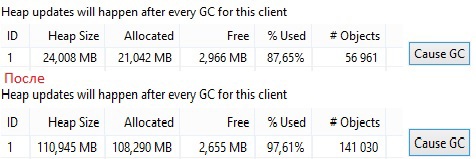
We have a tool for debugging a heap. To do this, also select the required process and select the “update heap”.
Now we have access to information about the distribution of dynamic memory in our process. Start the garbage collection (Cause GC) and see what remains.
It's all pretty simple:
- Heap size is the total heap size that Android allocated for this process;
- Allocated - used memory;
- Free - free memory;
- Used - used as a percentage of memory;
- Objects - the total number of objects that make up the allocated size.
At the bottom of the screenshot, shows the distribution of objects by size and type.
Heap Size can be increased as needed by the virtual machine itself. Sometimes a few minutes of tracking him are enough to understand that you have a memory leak.
I will give an example. In one of the projects I use the listener Broadcast messages. I commented unregisterReceiver in onPause
// LocalBroadcastManager.getInstance(this).unregisterReceiver(receiver); BroadcastReceiver itself is registered via LocalBroadcastManager
LocalBroadcastManager.getInstance(this).registerReceiver(receiver, intentFilter); It allows you to throw messages only in one process. This will hold the Activity, which will definitely affect the heap. Since I work in my project with a map service, this will lead to the retention of the map and all the tiles that have been zipped, so the result will be quickly noticeable.
At the top of the figure, the first start of the application is shown. Then I turned the screen 11 times, after which the heap increased quite a lot. The application stopped responding 12 times. An increasing heap is a double-edged sword. On the one hand, it’s good that it can increase so slightly (depending on free memory), on the other hand, the application can stay there for a long time and will slowly work, annoying the user. Of course, the analysis of the heap will not show where you have a leak, but will make it clear that it is still there, and this is not bad.
Allocation tracker
Allocation tracker can give us much more information. It allows you to track which objects were created for a selected process in a selected period of time, where you can see which objects were created more often, their size, the thread that created them and the call stack.
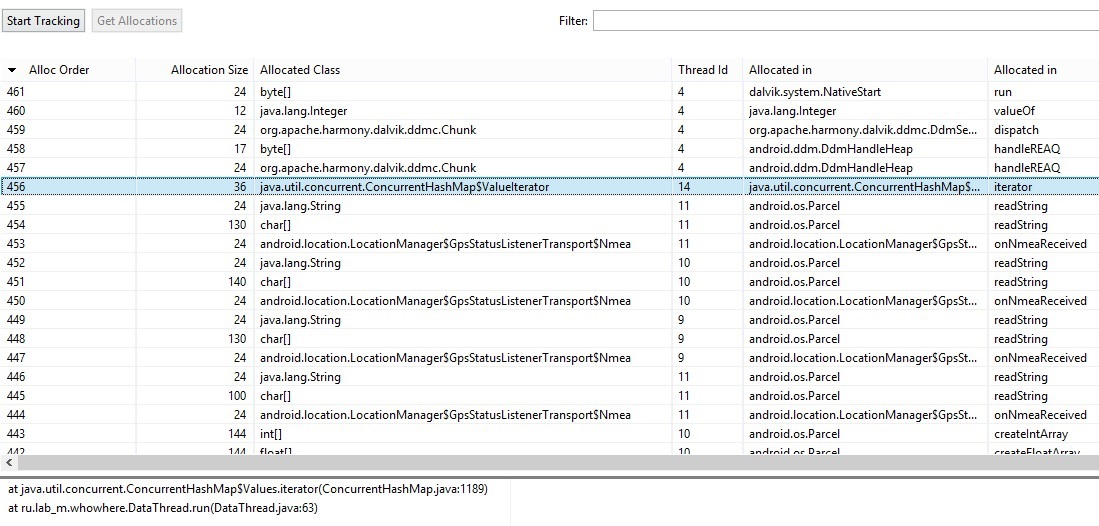
Select “Start track”, after which we perform actions with the application that we want to analyze, then click “Get Allocations”. A list of objects that were created during this period of time will appear below.
In this screenshot, the objects are sorted by the order of their initialization or by the time of creation, I do not know how to put it better. You can sort your objects in any convenient way by simply clicking on the column name. Available information:
- Alloc order - the number of the created object;
- Allocation Size - the size of the object;
- Allocated Class - object type;
- Thread Id - the thread id assigned by the virtual machine (not to be confused with Tid);
- Allocated Id - the class and method in which the object was created.
We can select any object and see its entire call stack. Thus, you can get information about where objects are created, how often, their size and take appropriate measures, because many people know that the creation of an object is an expensive operation and should be avoided.
Method profiling
I finally got to my favorite code analysis tool, “Method Profiling”. This tool allows you to analyze the time that was spent methods on their work. Thereby, we can understand the bottlenecks in our code and optimize them.
I will show a simple example. In one of our projects, we had to deal with the NMEA protocol. This is a maritime protocol that provides so-called “raw” GPS data. I parsed this data. This is one of the lines I need.
$ GPGGA, 123519,4807.038, N, 01131.000, E, 1.08.0.9.545.4, M, 46.9, M ,, * 47
Split by comma and everything is fine. Or not? Select the required process and run Method Profiling.
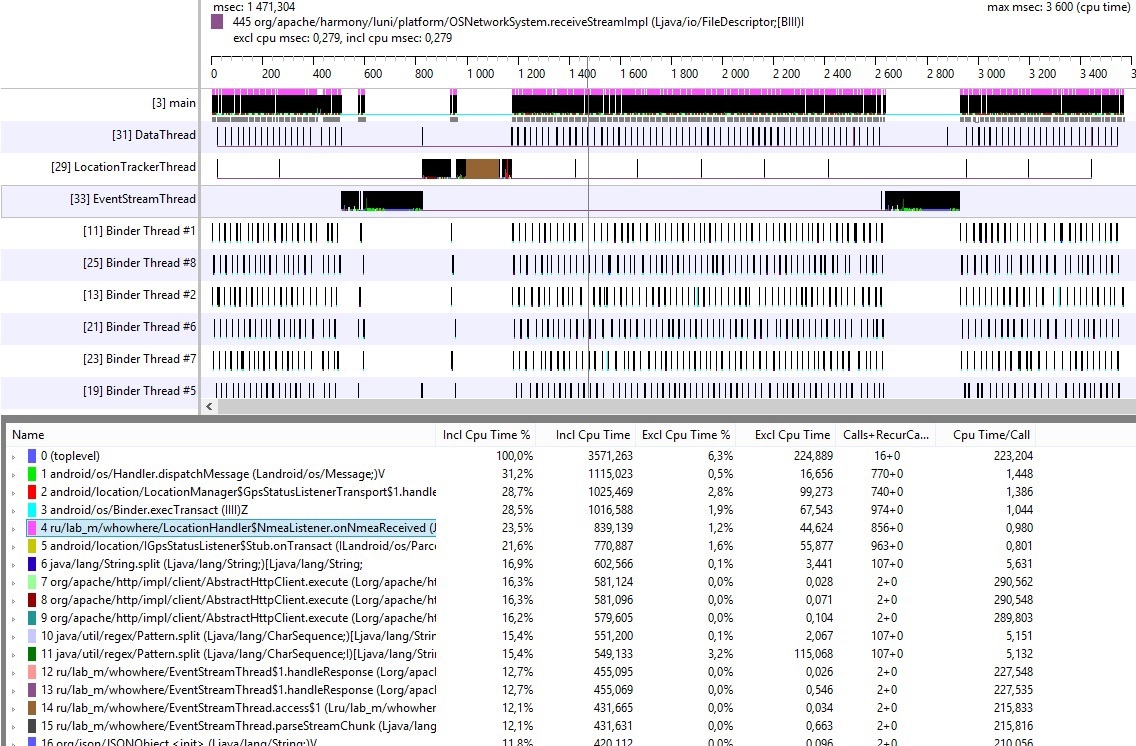
After 1-2 minutes (you yourself choose the time that you consider necessary), stop Method Profiling, after which we get a trace of our methods, as shown in the figure below.
The upper part shows the time schedule of work flows. Here you can find the id of the stream, its name and a graphic representation of the time of its work. Much more interesting is the lower part of the treys. At the left, from top to bottom, methods are shown which consume the maximum number of processor time;
- Incl Cpu Time% - time spent on executing own code in a method, plus the time spent on executing other methods in this method (%);
- Excl Cpu Time% - time spent on the execution of own code in the method (%);
- Incl Cpu Time and Excl Cpu Time are the same, only units of millisecond;
- Calls + Recur Calls / Total - the number of calls and their recurrences;
- Time / Call - total elapsed time (ms).
In this table, noticeably, my method spends 23.5% of the total time. By clicking on it, I got this picture
Obviously, the split method, which spends 72% of the time of the total time of the method in which it was called, is to blame. The usual transition to substring allowed us to optimize this method by 2 times.
Our method went down by the workload to the 15th position, and the others went upstairs, where you can also look at the information, what time is spent on, look at the call stack and figure out how to optimize it. Also here is the implicit optimization. Since split produces an array with strings, now the load on the GC has become less, hence the number of calls of the collector will, by definition, be less, which will have a favorable effect on both the speed and responsiveness of the application. GC can also be found in this trace, if it was launched by the system during the code analysis.
You can sort the methods, as well as with the allocation tracker, just click on the column name.
It is possible to analyze only certain sections of code in the application. For this, Android provides us with two methods:
android.os.Debug.startMethodTracing(“trace_name”); android.os.Debug.stopMethodTracing(); After the stopMethodTracing is completed, the trace will be available in /sdcard/trace_name.trace. This can be very useful if we want to optimize certain parts of the code, or, for example, improve the speed of the start of the application.
Perhaps this is all for now. Behind the scene was a heap dump analysis ( Dump HPROF File ). If you are interested, I will try to write an article in the same spirit about such a wonderful tool as MAT , which allows you to analyze the heap dump for leaks and other things. He just shows all instances of my activity, which were held in a heap when you rotate the screen.
I also avoided the tool Hierarchy Viewer, which already has an article on Habré. I hope this article is helpful and helps you optimize your applications.
Happy debugging!
Source: https://habr.com/ru/post/222199/
All Articles