Unity3d Lessons from Unity 3D Student (B25-B28)
Hello. This is the final series of basic Unity 3D tutorials from Unity3DStudent . Next are two more mid-level lessons. Upd: the plans have changed, these lessons will not be, since the second lesson (in animation) is already quite outdated, and I see no reason to post the translation of just one lesson. Let it remain for independent study =)
Links to previous lessons:
The tutorial describes how to create a simple button using the GUI Texture and mouse events.
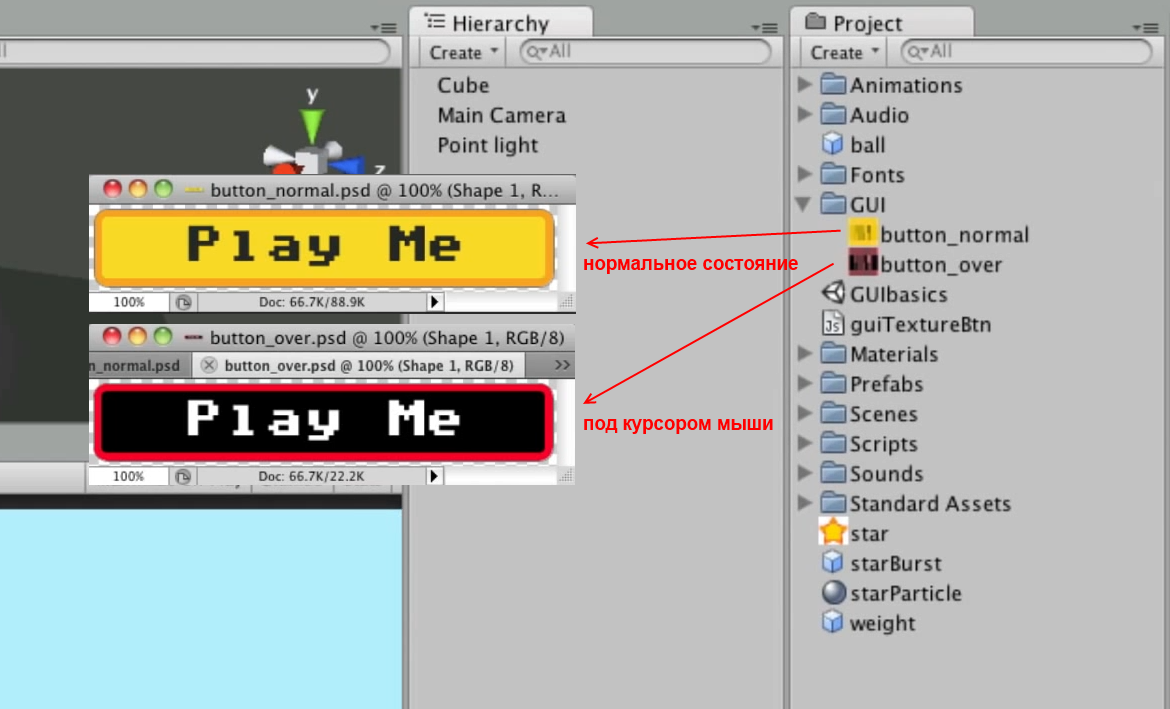
If you want to create a simple user interface, you can use a GUI Texture object. Consider this object on the example of creating a button. First we need two textures: for the button in the normal state and for the button in the state when the mouse cursor is hovering over it. Prepare the appropriate files and add them to the project.
')
Now click on the button_normal file, and then create a GUI Texture from the GameObject menu - Create Other - GUI Texture . A new object will appear on the scene, onto which the corresponding texture of the normal state of the button will immediately be superimposed.
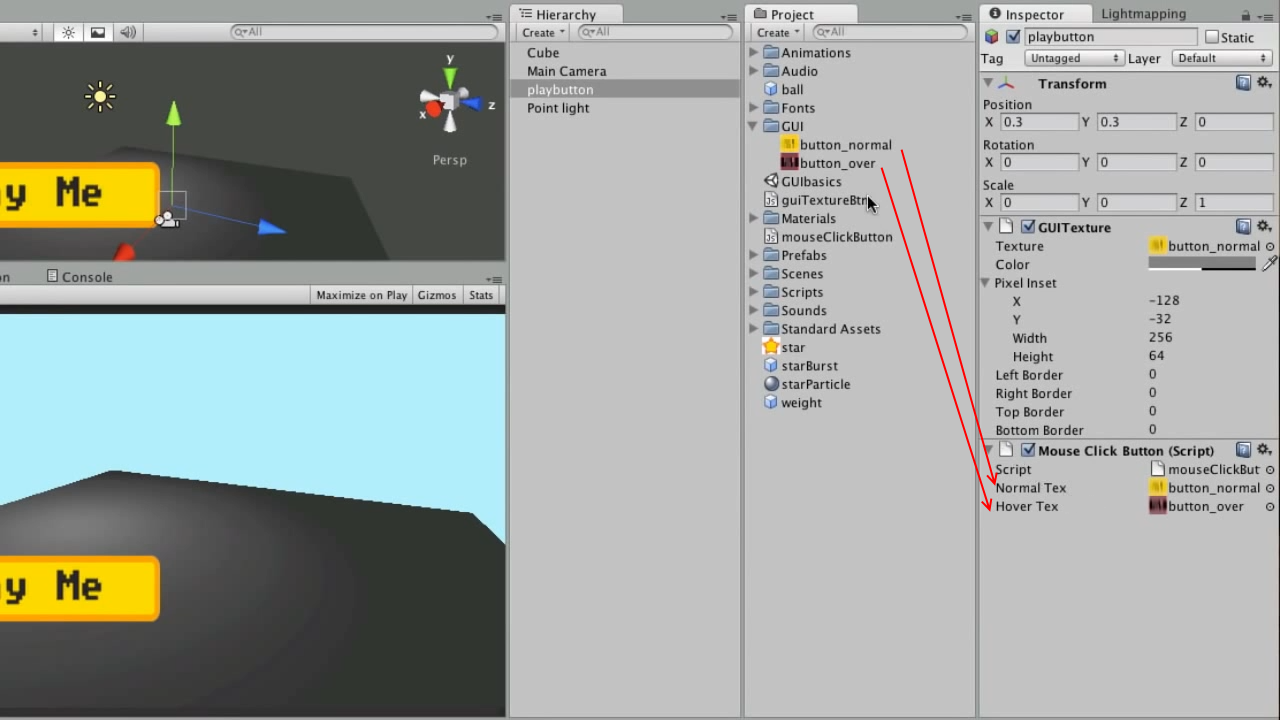
The created object consists of two components: Transform and GUITexture . Notice that changing the parameters of the Transform component works slightly differently compared to other objects in the scene. In the Position and Scale parameters, only changes along the X and Y axes are processed, changes along the Z axis are ignored. Changes to the Rotation parameter are ignored completely. In addition, in the Position parameter, the values are indicated not in world, but in screen coordinates, where 0.0 is the lower left corner of the screen, and 1.1 is the upper right corner of the screen. The default values are 0.5.0.5, i.e. center of the screen. In the GUITexture component, you can set the texture, color, additional offset from the edges of the screen and the border. Since we selected a specific texture before creating the object, Unity itself set these values. If desired, they can be changed.
So, we have a button in the center of the screen that is not doing anything yet. Let's revive it with the following script:
JavaScript code:
C # code:
We created the normalTex and hoverTex variables for storing, respectively, the normal state of the button texture and the button texture under the mouse cursor. Then we process three methods: OnMouseEnter (hovering the mouse over an object), OnMouseExit (getting the mouse cursor out of the object) and OnMouseDown (clicking the object). These methods are called after the corresponding mouse events, if the object to which the script is attached is inherited from the GUIElement or Collider class. In the entry / exit methods of the mouse cursor, we set the corresponding texture to the object, in the click method we simply write a message to the console.
Attach the script to our button, put the texture files in the appropriate fields:
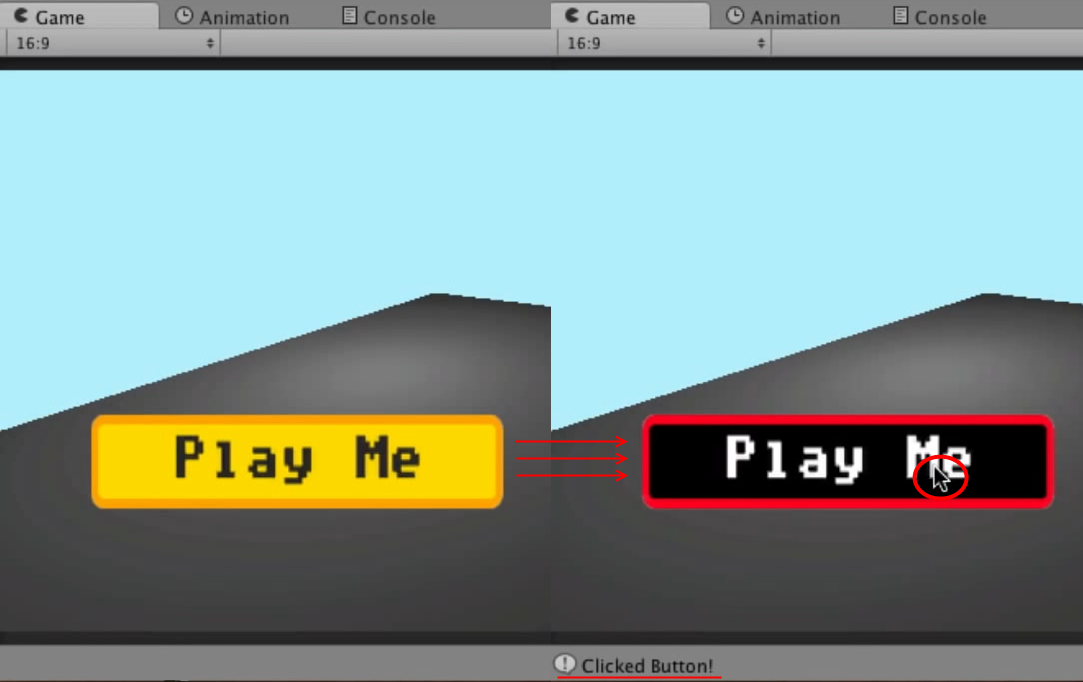
Launch the scene and test the button. The button changes the texture when you hover the mouse, when clicked, displays the message “clicked” in the console and changes the texture back when the cursor is displayed.
Link to the original lesson
Reference to the GUI Texture component documentation
Link to OnMouseEnter Method Documentation
Link to OnMouseExit Method Documentation
Link to OnMouseDown Method Documentation
The lesson shows how to limit the values in a certain range using the Mathf.Clamp method.
When developing game mechanics, it is sometimes necessary to limit a certain value within a given interval of values. For example, you are writing some kind of simple space shooter and you want the player-controlled ship not to fly out of the screen. This will help us Clamp method class Mathf .
Consider using this method on the stage where we have a camera, a light source and a simple Cube cube .

We realize the possibility of moving the cube along the X axis, and it will only be possible to move between X = -10 to X = 10. To do this, we write the following script and add it to the cube:
JavaScript code:
C # code:
We move the cube using the value of the virtual X axis and the Transform.Translate method, and then we restrict the cube position on the X axis by calling the Mathf.Clamp method. The method takes three parameters: the limit value, the minimum range limit, and the maximum range limit.
Launch the scene, press on the keyboard A / D or left-right arrows. The cube moves, and it cannot move beyond the range of the X = -10..10 range (you can add to the end of the Update method the output of the X-axis position to the console — Debug.Log (transform.position.x); - comment of the translator) .
Link to the original lesson
Reference to the documentation of the Mathf.Clamp method
The lesson discusses using the Time.timeScale property to pause / resume a game.
When developing a game, you will probably want to give players the opportunity to pause it and then resume it. To do this, you just need to work a little with the static timeScale property of the Time class.
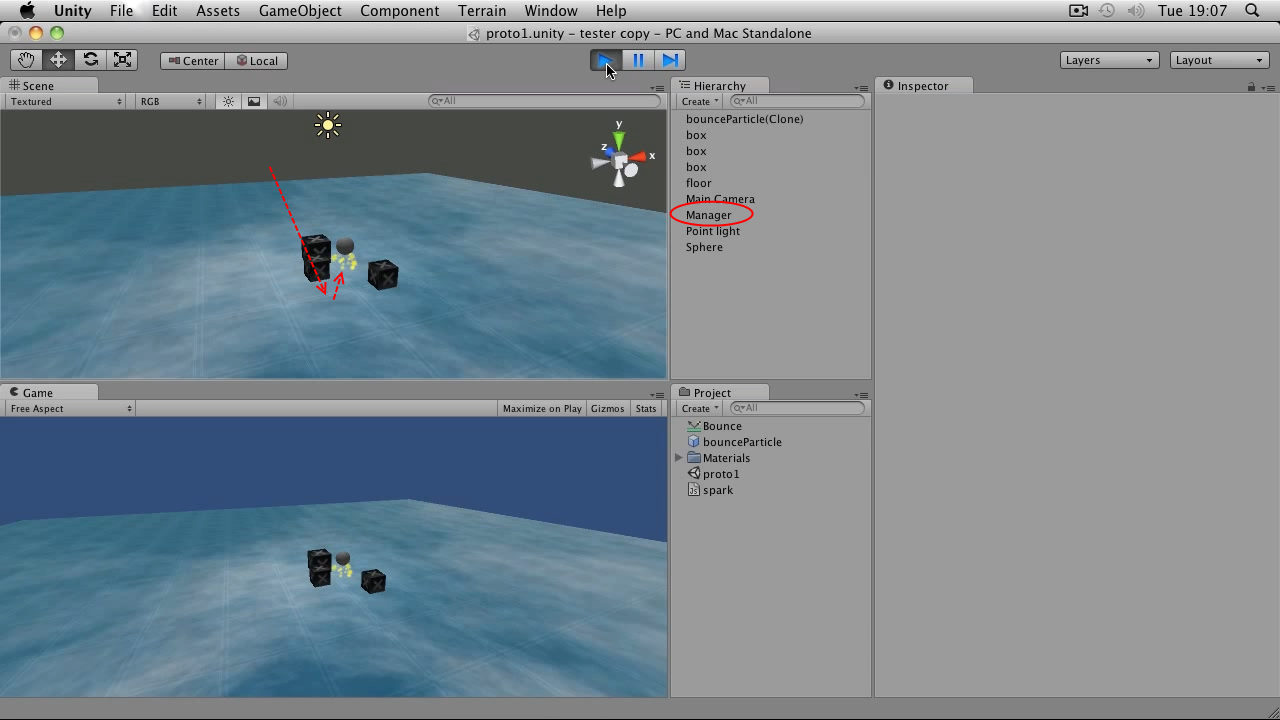
For example, we have a scene where a small ball is jumping on the floor, and we want to suspend / resume its movement. First we need an object on which we will “hang” the pause implementation script. To do this, you can create an empty game object ( GameObject menu - Create Empty ), place it in any convenient place and name it, for example, Manager .
Now create a new script and write the following in it:
JavaScript code:
C # code:
In the script, we set the paused variable to control whether the pause is on or not. We enable on / off pauses in the Update method by pressing the “Jump” button - with the standard input settings this is the space bar. Next we check if the pause is off? If so, we set the Time.timeScale property to 0 , which will stop the flow of time in the game; and denote that the pause is on - paused = true . Otherwise, set the Time.timeScale value to 1 and turn off the pause. The Time.timeScale property can also set values between 0 and 1 and more than 1, which will, respectively, slow down and speed up the passage of time, if you need it.
Add the script to the Manager object, run the scene. At any time, press the space bar - the ball stops. A second press returns the paused movement of the ball.
Link to the original lesson
Reference to the documentation of the Time.timeScale property
The tutorial describes how to use the SendMessage method of the GameObject class to invoke the script method of another game object.
There are different ways to connect from the script of one game object with the script of another game object. Earlier we considered the GetComponent method, with which you can get the components of an object, including its scripts. An alternative to this may be using the SendMessage method.
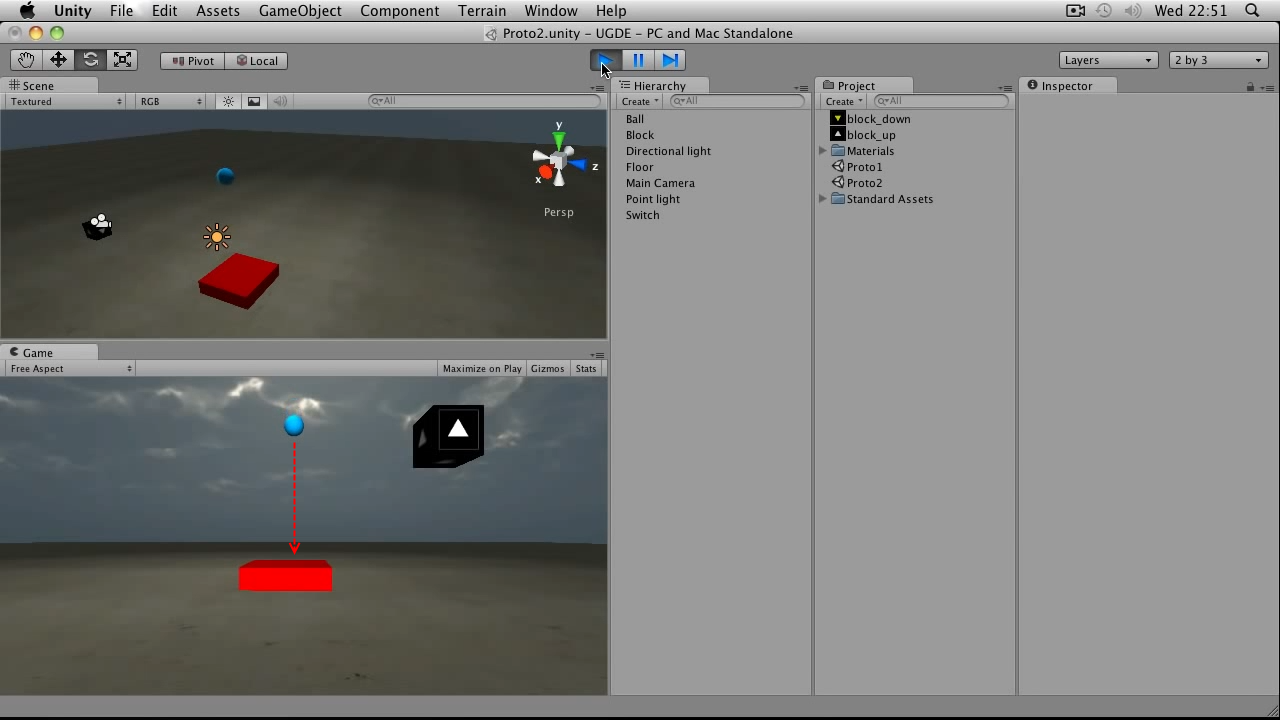
Consider a scene where there is a blue Ball Ball falling onto a red Switch box. Next to them hangs in the air black block. Let's make it so that when the ball falls on the drawer, the unit changes the texture and also falls down.
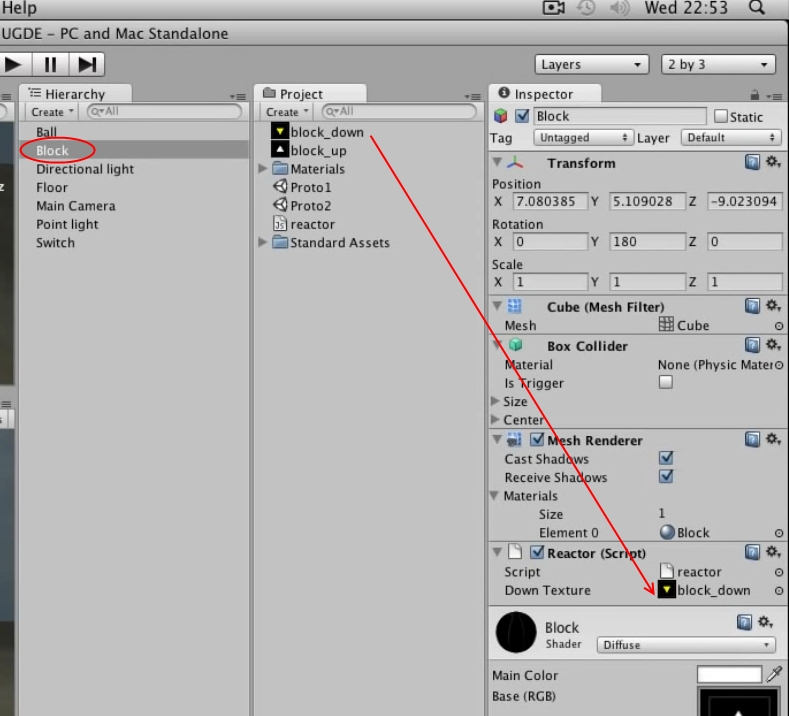
First we need to write a script for the block. Create a new script, name it Reactor and write the following:
JavaScript code:
C # code:
We declared a downTexture variable to store the texture and implemented the React method, in which we change the texture of the object, make a small delay of 1 second, and add the Rigidbody component of the solid, so that the object becomes gravitational. Add this script to the Block object right away and drag any suitable image to the Down Texture script field. In the lesson, this is an image of a downward yellow arrow on a black background.
Do not rush to run the scene yet, nothing will change on it yet. Next we need to make a script for the ball Ball . Let's call it Switcher and write inside:
JavaScript code:
C # code:
We implemented the OnCollisionEnter method, which will be called when the collider collides with another object. We are interested in colliding with the Switch box, so we first make the appropriate check. If so, we search for the Block object using the GameObject.Find method, specifying the name of the block. For the object found, the SendMessage method is called, to which the name of the method we want to call ( React ) is passed, after which, accordingly, this method is executed.
Add the script to the ball, run the scene. Now when the ball falls on the box, the block changes the texture and after a second it also drops down.

Note from the translator: One of the drawbacks of using SendMessage is a possible performance degradation compared to calling methods directly. Here on this page , devoted to the issues of performance, says about the difference in 100 times in favor of a direct call. Therefore, this method should be used with caution (like GetComponent , Find methods, etc.), and if its use really becomes the culprit for a performance drop, use faster solutions.
Link to the original lesson
Reference to the documentation of the GameObject.SendMessage method
Links to previous lessons:
Basic Lesson 25 - Object GUI Texture and Mouse Events
The tutorial describes how to create a simple button using the GUI Texture and mouse events.
If you want to create a simple user interface, you can use a GUI Texture object. Consider this object on the example of creating a button. First we need two textures: for the button in the normal state and for the button in the state when the mouse cursor is hovering over it. Prepare the appropriate files and add them to the project.
')
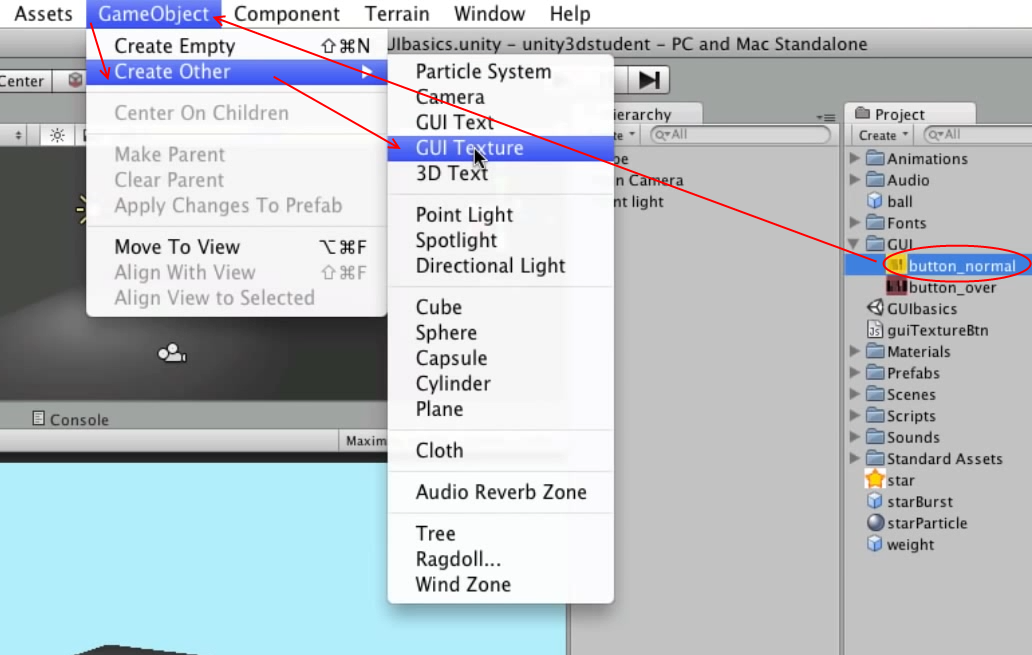
Now click on the button_normal file, and then create a GUI Texture from the GameObject menu - Create Other - GUI Texture . A new object will appear on the scene, onto which the corresponding texture of the normal state of the button will immediately be superimposed.
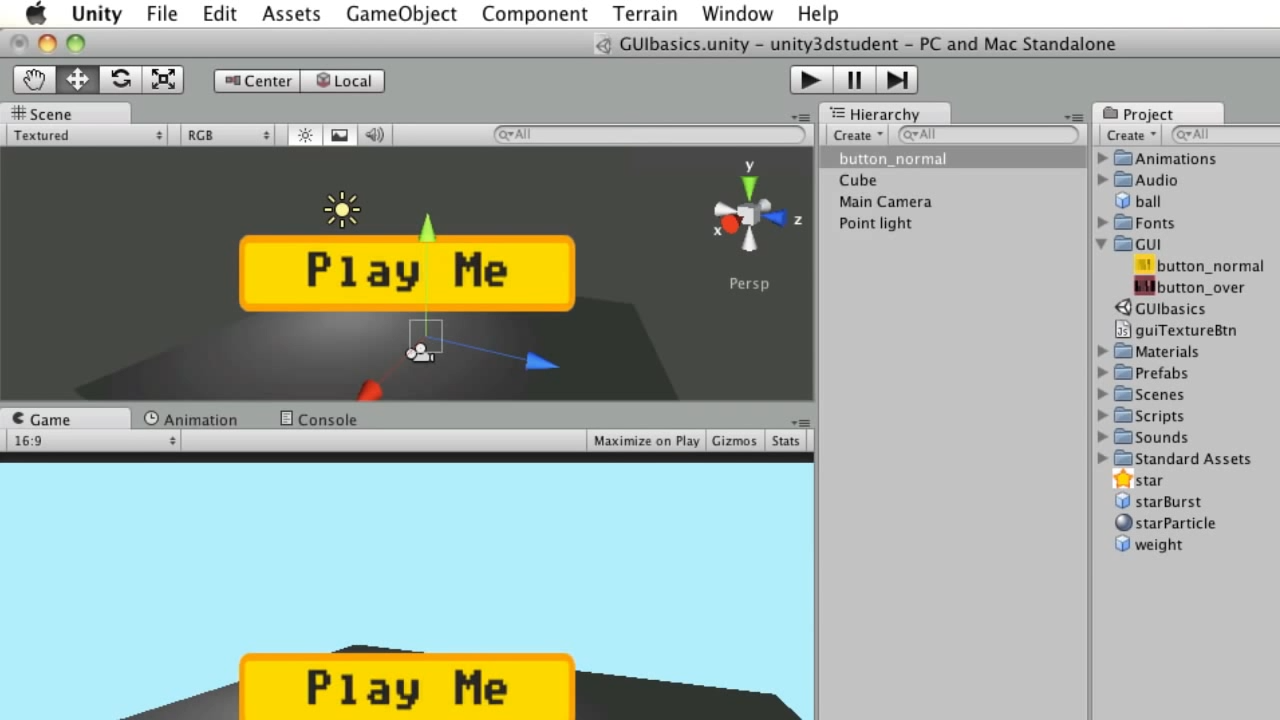
The created object consists of two components: Transform and GUITexture . Notice that changing the parameters of the Transform component works slightly differently compared to other objects in the scene. In the Position and Scale parameters, only changes along the X and Y axes are processed, changes along the Z axis are ignored. Changes to the Rotation parameter are ignored completely. In addition, in the Position parameter, the values are indicated not in world, but in screen coordinates, where 0.0 is the lower left corner of the screen, and 1.1 is the upper right corner of the screen. The default values are 0.5.0.5, i.e. center of the screen. In the GUITexture component, you can set the texture, color, additional offset from the edges of the screen and the border. Since we selected a specific texture before creating the object, Unity itself set these values. If desired, they can be changed.
So, we have a button in the center of the screen that is not doing anything yet. Let's revive it with the following script:
JavaScript code:
var normalTex : Texture2D; var hoverTex : Texture2D; function OnMouseEnter () { guiTexture.texture = hoverTex; } function OnMouseExit(){ guiTexture.texture = normalTex; } function OnMouseDown(){ Debug.Log("clicked"); } C # code:
public Texture2D normalTex; public Texture2D hoverTex; private void OnMouseEnter() { guiTexture.texture = hoverTex; } private void OnMouseExit() { guiTexture.texture = normalTex; } private void OnMouseDown() { Debug.Log("clicked"); } We created the normalTex and hoverTex variables for storing, respectively, the normal state of the button texture and the button texture under the mouse cursor. Then we process three methods: OnMouseEnter (hovering the mouse over an object), OnMouseExit (getting the mouse cursor out of the object) and OnMouseDown (clicking the object). These methods are called after the corresponding mouse events, if the object to which the script is attached is inherited from the GUIElement or Collider class. In the entry / exit methods of the mouse cursor, we set the corresponding texture to the object, in the click method we simply write a message to the console.
Attach the script to our button, put the texture files in the appropriate fields:
Launch the scene and test the button. The button changes the texture when you hover the mouse, when clicked, displays the message “clicked” in the console and changes the texture back when the cursor is displayed.
Link to the original lesson
Additional materials:
Reference to the GUI Texture component documentation
Link to OnMouseEnter Method Documentation
Link to OnMouseExit Method Documentation
Link to OnMouseDown Method Documentation
Basic Lesson 26 - Using the Mathf.Clamp Method to Restrict Values
The lesson shows how to limit the values in a certain range using the Mathf.Clamp method.
When developing game mechanics, it is sometimes necessary to limit a certain value within a given interval of values. For example, you are writing some kind of simple space shooter and you want the player-controlled ship not to fly out of the screen. This will help us Clamp method class Mathf .
Consider using this method on the stage where we have a camera, a light source and a simple Cube cube .
We realize the possibility of moving the cube along the X axis, and it will only be possible to move between X = -10 to X = 10. To do this, we write the following script and add it to the cube:
JavaScript code:
function Update () { var xMove : float = Input.GetAxis("Horizontal") * Time.deltaTime * 20; transform.Translate(Vector3(xMove,0,0)); transform.position.x = Mathf.Clamp(transform.position.x, -10, 10); } C # code:
void Update() { float xMove = Input.GetAxis("Horizontal") * Time.deltaTime * 20; transform.Translate(new Vector3(xMove,0,0)); transform.position = new Vector3(Mathf.Clamp(transform.position.x, -10, 10), transform.position.y, transform.position.z); } We move the cube using the value of the virtual X axis and the Transform.Translate method, and then we restrict the cube position on the X axis by calling the Mathf.Clamp method. The method takes three parameters: the limit value, the minimum range limit, and the maximum range limit.
Launch the scene, press on the keyboard A / D or left-right arrows. The cube moves, and it cannot move beyond the range of the X = -10..10 range (you can add to the end of the Update method the output of the X-axis position to the console — Debug.Log (transform.position.x); - comment of the translator) .
Link to the original lesson
Additional materials:
Reference to the documentation of the Mathf.Clamp method
Basic Lesson 27 - Implementing Suspension (Pause) in a Game Using Time.timeScale
The lesson discusses using the Time.timeScale property to pause / resume a game.
When developing a game, you will probably want to give players the opportunity to pause it and then resume it. To do this, you just need to work a little with the static timeScale property of the Time class.
For example, we have a scene where a small ball is jumping on the floor, and we want to suspend / resume its movement. First we need an object on which we will “hang” the pause implementation script. To do this, you can create an empty game object ( GameObject menu - Create Empty ), place it in any convenient place and name it, for example, Manager .
Now create a new script and write the following in it:
JavaScript code:
var paused : boolean = false; function Update () { if(Input.GetButtonUp("Jump")){ if(!paused){ Time.timeScale = 0; paused=true; }else{ Time.timeScale = 1; paused=false; } } } C # code:
bool paused = false; private void Update() { if(Input.GetButtonUp("Jump")) { if(!paused) { Time.timeScale = 0; paused=true; } else { Time.timeScale = 1; paused=false; } } } In the script, we set the paused variable to control whether the pause is on or not. We enable on / off pauses in the Update method by pressing the “Jump” button - with the standard input settings this is the space bar. Next we check if the pause is off? If so, we set the Time.timeScale property to 0 , which will stop the flow of time in the game; and denote that the pause is on - paused = true . Otherwise, set the Time.timeScale value to 1 and turn off the pause. The Time.timeScale property can also set values between 0 and 1 and more than 1, which will, respectively, slow down and speed up the passage of time, if you need it.
Add the script to the Manager object, run the scene. At any time, press the space bar - the ball stops. A second press returns the paused movement of the ball.
Link to the original lesson
Additional materials:
Reference to the documentation of the Time.timeScale property
Basic Lesson 28 - Using the SendMessage Method to Call External Methods
The tutorial describes how to use the SendMessage method of the GameObject class to invoke the script method of another game object.
There are different ways to connect from the script of one game object with the script of another game object. Earlier we considered the GetComponent method, with which you can get the components of an object, including its scripts. An alternative to this may be using the SendMessage method.
Consider a scene where there is a blue Ball Ball falling onto a red Switch box. Next to them hangs in the air black block. Let's make it so that when the ball falls on the drawer, the unit changes the texture and also falls down.
First we need to write a script for the block. Create a new script, name it Reactor and write the following:
JavaScript code:
var downTexture : Texture2D; function React () { renderer.material.mainTexture = downTexture; yield WaitForSeconds(1); gameObject.AddComponent(Rigidbody); } C # code:
public Texture2D downTexture; private IEnumerator React() { renderer.material.mainTexture = downTexture; yield return new WaitForSeconds(1); gameObject.AddComponent(typeof(Rigidbody)); } We declared a downTexture variable to store the texture and implemented the React method, in which we change the texture of the object, make a small delay of 1 second, and add the Rigidbody component of the solid, so that the object becomes gravitational. Add this script to the Block object right away and drag any suitable image to the Down Texture script field. In the lesson, this is an image of a downward yellow arrow on a black background.
Do not rush to run the scene yet, nothing will change on it yet. Next we need to make a script for the ball Ball . Let's call it Switcher and write inside:
JavaScript code:
function OnCollisionEnter(col : Collision) { if(col.gameObject.name == "Switch"){ gameObject.Find("Block").SendMessage("React"); } } C # code:
private void OnCollisionEnter(Collision col) { if (col.gameObject.name == "Switch") GameObject.Find("Block").SendMessage("React"); } We implemented the OnCollisionEnter method, which will be called when the collider collides with another object. We are interested in colliding with the Switch box, so we first make the appropriate check. If so, we search for the Block object using the GameObject.Find method, specifying the name of the block. For the object found, the SendMessage method is called, to which the name of the method we want to call ( React ) is passed, after which, accordingly, this method is executed.
Add the script to the ball, run the scene. Now when the ball falls on the box, the block changes the texture and after a second it also drops down.
Note from the translator: One of the drawbacks of using SendMessage is a possible performance degradation compared to calling methods directly. Here on this page , devoted to the issues of performance, says about the difference in 100 times in favor of a direct call. Therefore, this method should be used with caution (like GetComponent , Find methods, etc.), and if its use really becomes the culprit for a performance drop, use faster solutions.
Link to the original lesson
Additional materials:
Reference to the documentation of the GameObject.SendMessage method
Source: https://habr.com/ru/post/221755/
All Articles