Learning Derby 0.6, example # 2
This post is a continuation of the series started here (it is necessary to read the previous part). Today we will create a so-called “to-do list” (Todo-list from the TodoMVC project). We take the variant made on Angular as a basis, and try to recreate the functionality on derby .
Investigate the working version
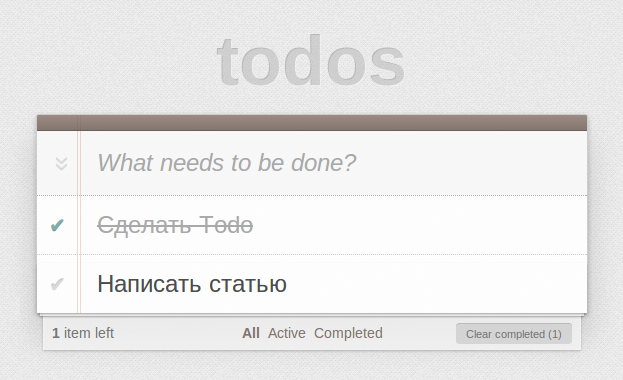
So, let's see what we have in the Angulyarov variant, and how it works (spend 5 minutes to understand the functionality):
- A new task is entered in the upper input field, the list gets when you press
enter; - any task in the list can be deleted by clicking on the “cross” to the right of the task (appears if you hover the mouse over the task);
- tasks can be marked as "completed" by clicking on the "check mark" to the left of the task (the mark can be removed);
- when you double click on the task, it goes into edit mode, edit, click enter - it is updated;
- if we have completed tasks, the “clear completed” button appears at the bottom right, if you click on it, completed tasks are deleted;
- Counting (and displaying) completed and active tasks. Bottom in the status bar;
- there are 3 links in the status line (all, active, completed, changing the url to '# /', '# / active' and '# / completed', respectively), by clicking on them we change the task filter: either all are displayed tasks, either only active (not completed), or only completed;
What we take as a basis
Based on our goals (learn better derbyjs), we will not invent styles here, they are already written and used without changes in most TodoMVC implementations. Just take the css file . A quick glance at it shows that we will need to also take a picture for the background bg.png . Also, let's take the angular-generated html as a frame (I copied it using the developer tools in the browser and cleaned it a bit from Angulyar directives).
Basic html code
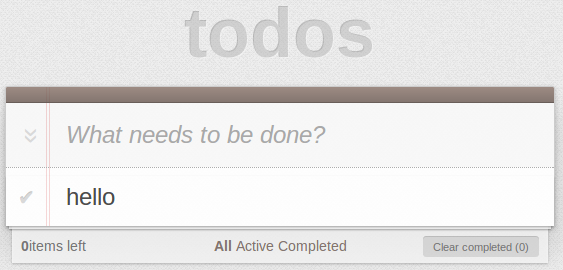
<section id="todoapp"> <header id="header"> <h1>todos</h1> <form id="todo-form"> <input id="new-todo" placeholder="What needs to be done?" autofocus> </form> </header> <section id="main"> <input id="toggle-all" type="checkbox"> <label for="toggle-all">Mark all as complete</label> <ul id="todo-list"> <li> <div class="view"> <input class="toggle" type="checkbox"> <label>hello</label> <button class="destroy"> </button> </div> <form > <input class="edit"> </form> </li> </ul> </section> <footer id="footer"> <span id="todo-count"><strong>0</strong> <span>items left</span> </span> <ul id="filters"> <li><a href="/" class="selected">All</a></li> <li><a href="/active">Active</a></li> <li><a href="/completed">Completed</a></li> </ul> <button id="clear-completed">Clear completed (0)</button> </footer> </section> As you can see, our html consists of 3 main blocks:
')
- header - here is the main input. It is needed to enter new tasks;
- main - the main block, the list of tasks is stored here;
- footer - the status bar, here is the information, switching between filters and the 'Clear completed' button
Project structure
So, let's reason. What will we have in the project? There will be a style file, there will be a return of static data (background pictures), there will be html templates, there will also be at least 2 files - two parts of the application derby (the server part, and the derby application itself). Based on all this, I have added the following file structure to the application (you can do any other):
public/ bg.png app # - views/ index.html css/ index.css index.js # - server.js # package.json Please note, the css-file is inside the app folder, not inside public. This is due to the fact that the derby works with styles in a special way. As a result, they will be inserted directly into the head of the page in the style tags - as google research showed (according to derby creators) - this is the best way to place styles.
So, as I said in the last lesson, all that is in the app folder is an isomorphic derby application. I don’t like the word “isomorphic” and I’ll omit it, I’ll just say derby application as opposed to “server side derby” The point here is that all these files together (everything in the app), in a single bundle (piece) will be given to the client browser, so I put them together.
In general (for the future), you can split the project into several derby applications, for example, the client part and admin panel. This is justified for two reasons, in order not to give extra data (templates, styles, code), and to reduce the connectedness. That is, it will be like this: the project will have one server-side and several derby-applications (in this case, two).
In the package.json file, the same two modules will appear as dependencies: derby@0.6.0- alpha5 and derby-starter.
Getting started
Create a file structure. We download the background image and styles from the links that I indicated at the beginning; we create package.json using
npm init (you can see in the previous lesson).Html will be slightly corrected, first, as in the previous example, it should be in the predefined
Body: template Body: second, we will place the header, main and footer into separate derby-templates.Summary index.html
<Body:> <section id="todoapp"> <view name="header"/> <view name="main"/> <view name="footer"/> </section> <header:> <header id="header"> <h1>todos</h1> <form id="todo-form"> <input id="new-todo" placeholder="What needs to be done?" autofocus> </form> </header> <main:> <section id="main"> <input id="toggle-all" type="checkbox"> <label for="toggle-all">Mark all as complete</label> <ul id="todo-list"> <li> <div class="view"> <input class="toggle" type="checkbox"> <label>hello</label> <button class="destroy"> </button> </div> <form > <input class="edit"> </form> </li> </ul> </section> <footer:> <footer id="footer"> <span id="todo-count"><strong>0</strong> <span>items left</span> </span> <ul id="filters"> <li><a href="/" class="selected">All</a></li> <li><a href="/active">Active</a></li> <li><a href="/completed">Completed</a></li> </ul> <button id="clear-completed">Clear completed (0)</button> </footer> As you can see, calling your own templates is done using the
view tag, where the name attribute specifies the name of the template.To begin with, we will create a minimal working code to be able to see the result in the browser and increase its functionality.
The server.js file from the previous example is slightly extended to take into account the structure of the project and to give out static files.
server.js
var server = require('derby-starter'); var appPath = __dirname + '/app'; var options = { static: __dirname + '/public' }; server.run(appPath, options); Let me remind you that because of the educational nature of the project, we use the derby-starter module as the server part. If you look inside, returning static files there is a classic use of express static middlware. See for yourself .
Minimum index.js:
var derby = require('derby'); var app = module.exports = derby.createApp('todos', __filename); // app , // ( ) global.app = app; app.loadViews (__dirname+'/views'); app.loadStyles(__dirname+'/css'); app.get('/', getTodos); function getTodos(page, model){ page.render(); } All, we start npm start (or directly node server.js), we see in the browser http: // localhost: 3000 / result:
Styles with layout picked up. A start.
Design url
In the last lesson, I said that a derby developer should begin development by splitting a project into url addresses. This is due to the ability of the derby to generate pages both on the client and on the server, which search engines are very fond of. So, studying the Angulyarovsky version, we noticed that there are 3 links in the footer that change the url and, accordingly, the filter for tasks. Here we understand that we should have 3 get-request handlers in the application. Something like:
app.get('/', getAllTodos); app.get('/active', getActiveTodos); app.get('/completed', getCompletedTodos); It would be justified if all these pages were different, but for us, the only difference between them is the filter, so we will try to duplicate the code to a minimum.
We design the data
Our tasks will be stored in the
todos collection. Each task will be represented by two fields:- text - task description
- completed - a sign that the task is completed
To this we need to add that each task will, of course, have an id field - derby will add it automatically when adding an item to the collection.
So, in accordance with the derby methodology, in the controller (the function that processes the url request), before the render call is called, we must prepare the data and register the data update subscriptions. It turns out the handler, the schematic should be something like this:
function getTodos(page, model){ model.subscribe('todos', function(){ page.render(); }); } This is about to be, but before moving on (to make one controller for all three requests, only so that the filters for tasks are different) you need to know a few things about derby models:
- "Paths" starting with an underscore (for example, "_session", "_page", etc.)
- what's the feature of "_page"
- what is the derby filters
- what is ref to certain data in the collection
In the last lesson I talked about the so-called "ways". We use them in operations with models. For example, when subscribing to data: model.subscribe ('path'), when receiving and writing data to the model:
model.get('') , model.set('', ) . Examples of ways:- 'todos' - refer to the entire todos collection
- 'users.42' - refer to the entry in the collection of users c id = 42
So here. The first segment of the path is, as you understand, the name of the collection. This name in the derby can begin either with a Latin letter, or with the characters $ or _. All collections starting with $ and _ are special, they are not synchronized with the server (they are local to the model, and only one model is created in the derby application). Collections starting with $ reserved derby for their own needs. Collections that begin with an underscore are used by developers.
Let's do a little experiment. Open the developer console in your browser and type
app.model.get() - view the output.Among the "_" - collections there is one special -
_page , it is _page every time you change the url - this makes it very convenient for storing all sorts of working data. In this lesson you will see examples.Go to the filters. If you read the model documentation, you know that in the derby, there are various mechanisms that make it easier to work with reactive data. These are, for example, reactive functions, subscriptions to various events occurring with data, data filters, data sorters.
Let's discuss the filters. How do we implement, for example, a filter showing only active tasks:
We register by a specific name a filter function (the name is mandatory for serialization into a bundle). Documentation says that you need to register them strictly in
app.on('model') app.on('model', function(model) { model.fn('completed', function(item) { return item.completed; }); }); And further in the controller, we use this filter to filter the todos collection:
function getPage(page, model){ model.subscribe('todos', function() { var filter = model.filter('todos', 'completed') filter.ref('_page.todos'); page.render(); }); } The
filter.ref('_page.todos'); line is very important here filter.ref('_page.todos'); , in it, the filtered "todos" becomes available on the _page.todos path. Putting it all together, I offer the following filter code with controllers: app.on('model', function(model) { model.fn('all', function(item) { return true; }); model.fn('completed', function(item) { return item.completed;}); model.fn('active', function(item) { return !item.completed;}); }); app.get('/', getPage('all')); app.get('/active', getPage('active')); app.get('/completed', getPage('completed')); function getPage(filter){ return function(page, model){ model.subscribe('todos', function() { model.filter('todos', filter).ref('_page.todos'); page.render(); }); } } As you probably noticed, in order to unify everything, I had to make a false “all” filter, but I think this is not a big payment for the lack of duplicates.
Okay, we digress a little. Let's animate the app.
Adding and outputting tasks
The input for data entry in the layout looks like this:
<form id="todo-form"> <input id="new-todo" placeholder="What needs to be done?" autofocus> </form> The classic pattern in the derby (as in many modern frameworks) is reactive binding. Let's associate the value entered into input with some path in
_page . Also, we will register the form's event handler, in order to handle pressing enter : <form id="todo-form" on-submit="addTodo(_page.newTodo)"> <input id="new-todo" placeholder="What needs to be done?" autofocus value="{{_page.newTodo}}"> </form> Instead,
on-submit we naturally could write on-click , on-keyup , on-focus - that is, this is the standard way of handling events in the derby. The handler is placed in app.proto (when we discuss the derby components, we will see that each component stores its handlers in itself, but for now we are doing this): app.proto.addTodo = function(newTodo){ if (!newTodo) return; this.model.add('todos', { text: newTodo, completed: false }); this.model.set('_page.newTodo', ''); }; Check whether the text is empty, add the task to the collection, clear the
input . You may have noticed that we only have one parameter in the handler, if we needed links to the event object or the html element itself for some needs, we would need to explicitly put it in html like this: on-submit="addTodo(_page.newTodo, $event, $element)" , $event and $element - special parameters, filled by the derby itself.Now output the filtered task list — edit our
ul element: <ul id="todo-list"> {{each _page.todos as #todo, #index}} <li class="{{if #todo.completed}}completed{{/}}"> <div class="view"> <input class="toggle" type="checkbox" checked="{{#todo.completed}}"> <label>{{#todo.text}}</label> <button class="destroy"> </button> </div> <form> <input class="edit"> </form> </li> {{/each}} </ul> So, what did:
- cycle run over all todos (already filtered) - we create elements for them-
li - print the task description in
lable - tied
checkboxtotodo.completed - for the
litag, set the classcompletedif the task is completed.
Deleting items
It is done elementary:
<button class="destroy" on-click="delTodo(#todo.id)"> </button> app.proto.delTodo = function(todoId){ this.model.del('todos.' + todoId); }; And it could be even shorter:
<button class="destroy" on-click="model.del('todos.' + #todo.id)"> </button> Deleting all “completed” tasks is similar (the “Clear completed” button in the bottom right):
<button id="clear-completed" on-click="clearCompleted()"> Clear completed (0) </button> app.proto.clearCompleted = function(){ var todos = this.model.get('todos'); for (var id in todos) { if (todos[id].completed) this.model.del('todos.'+id); } } Editing items
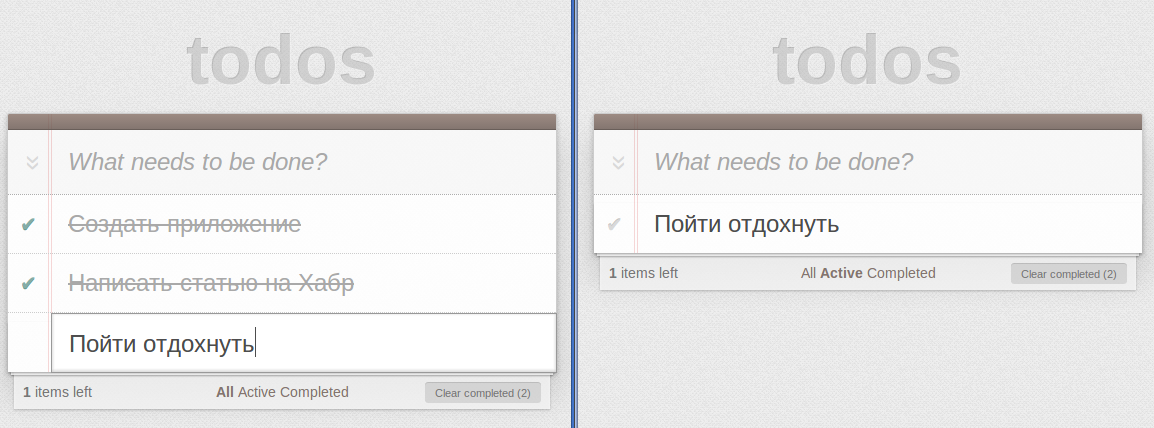
Double-click a task to switch to edit mode. Judging by the layout, when we switch to this mode, we will need to add the
editing class to the corresponding li element. Also along the way, you will need to get rid of the selection that occurs when you double-click and correctly focus on the input we need.I propose to do this as follows: information about the edited task will be stored using the path - _page.edit . There we will store the id of the edited task, and the text.
Why keep the text separate, is it already stored in the task itself?
It all depends on the goals. If we linked text to input directly from the task, the user would edit the element directly in the database. That is, his edits (each click on the button) would instantly be shown to other users in the browser. Moreover, several users could simultaneously edit the text and see all the changes, but this is not what we need. The usual scenario is to fix the final edited data in the database, or to refuse to commit ... That is, everything should be updated only when the user presses
enter .So, we realize all this:
<ul id="todo-list"> {{each _page.todos as #todo}} <li class="{{if #todo.completed}}completed{{/}} {{if _page.edit.id === #todo.id}}editing{{/}}"> <div class="view"> <input class="toggle" type="checkbox" checked="{{#todo.completed}}"> <label on-dblclick="editTodo(#todo)">{{#todo.text}}</label> <button class="destroy" on-click="delTodo(#todo.id)"> </button> </div> <form on-submit="doneEditing(_page.edit)"> <input id="{{#todo.id}}" class="edit" value="{{_page.edit.text}}" on-keyup="cancelEditing($event)"> </form> </li> {{/each}} </ul> app.proto.editTodo = function(todo){ this.model.set('_page.edit', { id: todo.id, text: todo.text }); window.getSelection().removeAllRanges(); document.getElementById(todo.id).focus() } app.proto.doneEditing = function(todo){ this.model.set('todos.'+todo.id+'.text', todo.text); this.model.set('_page.edit', { id: undefined, text: '' }); } app.proto.cancelEditing = function(e){ // 27 = ESQ-key if (e.keyCode == 27) { this.model.set('_page.edit.id', undefined); } } When double-clicking, the editTodo function is triggered , in it we fill in _path.edit , remove the extra selection, switch the focus to the input we need (here I cheated a little by giving input to
id = todo.id ).After you finish editing, press either enter or esq. Accordingly, one of the two handlers
doneEditing : doneEditing , cancelEditing . Learn the code - nothing new.The number of active and completed tasks - reactive functions
So, the last thing we do is display the number of active and completed tasks in the footer. This is a good reason to explain what the reactive functions are.
A small remark about the project architecture
It should be noted that the implementation of the application that I chose is not the only one. Considering this particular project, the use of a live-query comes to mind right away - this is another awesome derby mechanism that allows you to make a mongo-query into the database, the results of which will be reactively updated. In the queries, of course, you can use various selections, sorting, quantity restrictions (
$limit , $skip , $orderby ). You can also make queries that return the number of items in the collection (with any selections) - this is our case. We study “live” requests in one of the following posts, but now I thought it appropriate to show implementation through reactive functions, which are also often used in real-world applications.So, a reactive function is a function that works every time when some data changes. That is, we must indicate that this particular reactive function will follow the change of this specific data. This data comes to this function as parameters. Then it calculates something and returns the results. Its results are tied to a particular “path” ...
Well, this is all abstract and therefore difficult to understand. Let's take our example. We have a todos collection with active and completed tasks. It would be nice if, at any change in the collection, to us, somewhere (for example, along the path
_page.counters ), counters of active and completed tasks were available. Something like: _page.counters = { active: 2, completed: 3 } Then we could easily bring this data to the footer.
One option to get these counters is to use reactive functions. They are registered in the same way as filters:
app.on('model', function(model) { model.fn('all', function(item) { return true; }); model.fn('completed', function(item) { return item.completed;}); model.fn('active', function(item) { return !item.completed;}); model.fn('counters', function(todos){ var counters = { active: 0, completed: 0 }; for (var id in todos) { if(todos[id].completed) counters.completed++; else counters.active++; } return counters; }) }); That's how we registered the
counters function, but that's not all. It still needs to be started at the right time and tied to the paths. This is done in the controller using the model.start function: model.subscribe('todos', function () { model.filter('todos', filter).ref('_page.todos'); model.start('_page.counters', 'todos', 'counters'); page.render(); }); Everything, now counters are available in our templates. We finish the footer:
<footer:> <footer id="footer"> <span id="todo-count"><strong>{{_page.counters.active}} </strong> <span>items left</span> </span> <ul id="filters"> <li><a href="/" class="{{if $render.url==='/' }}selected{{/}}">All</a></li> <li><a href="/active" class="{{if $render.url==='/active' }}selected{{/}}">Active</a></li> <li><a href="/completed" class="{{if $render.url==='/completed'}}selected{{/}}">Completed</a></li> </ul> <button id="clear-completed" on-click="clearCompleted()" class="{{if _page.counters.completed==0}}hidden{{/}}"> Clear completed ({{_page.counters.completed}}) </button> </footer> They showed the necessary counters, simultaneously hiding the “Clear completed” button if there are no completed tasks. We also added the
selected class to the link that is active, using the information obtained during the learning process app.model.get() in the browser console. Yes, the reserved $render collection contains various useful information, in particular, the url that was being rendered. Take a look at the console again.Total
Let's play around with what happened, open several tabs, check that everything is synchronized:
The project on github , in case you want to compare the code.
PS
If you do not want to skip the following articles on derbyjs, subscribe to updates in my profile: zag2art .I do it myself - on the Habré there is no possibility to add a specific (very interesting) hub to the tracker in order not to miss anything.
If you like derbyjs, don’t take the trouble to put an asterisk on github
Source: https://habr.com/ru/post/221703/
All Articles