Retro gaming center on the Raspberry Pi
Well, here come the May holidays, in which you can relax and escape from business.
Someone went to nature, fry kebabs, someone - to dig potatoes, and someone, like me, decided to stay at home and relax. But how to do it with benefit? Without resorting to loading the brain with regular manuals? And here I came across my restless Raspberry Pi. And along with a nostalgic and warm lamp mood, I had an idea: is it possible to make a gaming system from RPI? Having driven into Google, there was a simple and very affordable solution, with which I want to share with you. Who cares - I ask under the cat.
As it turned out, this topic is not new, and already flashed on Habré . Nevertheless, during its publication, progress has stepped forward, and it should be a little more detailed to tell about it.
')
The entire system is based on the RetroArch port, based on the libretro library, which allows using emulators of various prefixes (NES, SNES, Sega Genesis, PlayStation, as well as SCUMMVM, zxspectrum) through a common API. GUI - EmulationStation is responsible for the interface and usability. Today, to get a fully working system, it’s enough to use a ready-made RetroPie image.

But I am not a fan of such a hardcore as the same Pixel_Devil (which, by the way, inspired me to this experiment), so I settled on the result achieved. Now I will indulge myself in nostalgia and play with my friends :)
Someone went to nature, fry kebabs, someone - to dig potatoes, and someone, like me, decided to stay at home and relax. But how to do it with benefit? Without resorting to loading the brain with regular manuals? And here I came across my restless Raspberry Pi. And along with a nostalgic and warm lamp mood, I had an idea: is it possible to make a gaming system from RPI? Having driven into Google, there was a simple and very affordable solution, with which I want to share with you. Who cares - I ask under the cat.
As it turned out, this topic is not new, and already flashed on Habré . Nevertheless, during its publication, progress has stepped forward, and it should be a little more detailed to tell about it.
')
The entire system is based on the RetroArch port, based on the libretro library, which allows using emulators of various prefixes (NES, SNES, Sega Genesis, PlayStation, as well as SCUMMVM, zxspectrum) through a common API. GUI - EmulationStation is responsible for the interface and usability. Today, to get a fully working system, it’s enough to use a ready-made RetroPie image.
- Download RetroPie Project SD card Image
- Write to SD card using dd for Linux, Wind32DiskImager for Windows or RPi SD card builder for MacOS.
- We connect the video, audio cables, network cable, keyboard and controllers (gamepads), insert the SD card and turn it on (insert the mini-usb power plug).
Pay attention to the compatibility of the joysticks - some of them require additional power, and then you will need to use a USB hub with power. Also, it is likely that something will have to finish handles. In my case, I used Microsoft Xbox 360 branded joysticks, which started without problems.
- We are waiting for the system to load, and after it boots up, we exit to the console ( F4 )
- Go to the configuration utility:
sudo raspi-config
- Select “ Expand Filesystem ”, click OK
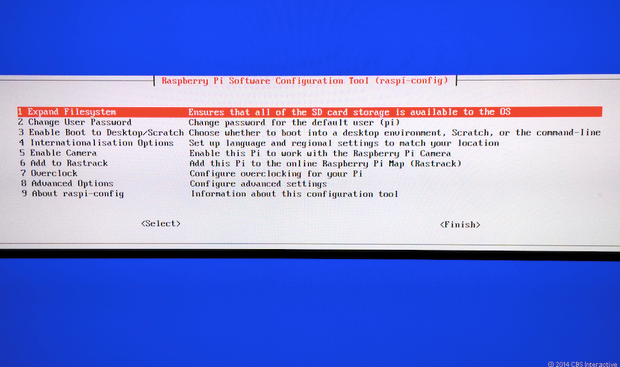
- Go to Advanced -> memory split, set for model “B” 256
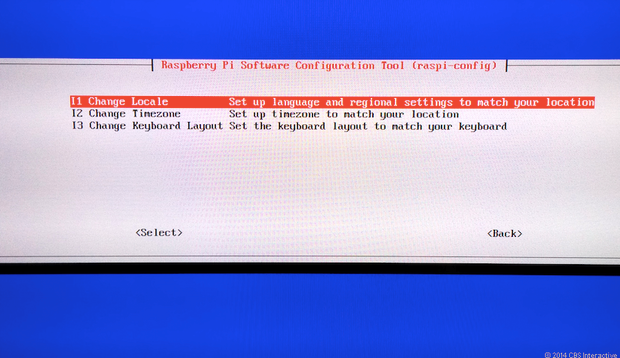
- We return, go to the Internationalization Options, there we select the locale, the keyboard layout and the time zone (in my case it is a pair of US and RU in UTF8 ).
- After setting click " Finish ", reboot.
- After loading the system again go to the console ( F4 ) to configure the joysticks.
- Install drivers:
sudo apt-get install xboxdrv
- Rule settings:
sudo nano /etc/rc.local
- Add at the end (before fi ) the line:
xboxdrv --trigger-as-button --id 0 --led 2 --deadzone 4000 --silent & sleep 1
If we have more than one joystick, then we increase id and led by one (for the second, 1 and 3, respectively). If the joystick is wireless, then instead of id will be wid .
Do not forget to save (we will be asked about saving on exit: ctrl + x , answer Y ). - Overload the system:
sudo reboot

- After downloading, we agree to configure the joysticks by clicking on what the system asks for. After the setup is complete, again go to the console ( F4 ).
- Moving on:
cd RetroPie / emulators / RetroArch / installdir / bin
- Adjust the joysticks:
./retroarch-joyconfig -o p1.cfg -p 1 -j 0
We are convinced that under j 0 we really have an xbox joystick, otherwise we interrupt ( ctrl + c ) and increment the digit by one. If this is our joystick, then press those buttons that the configurator asks. For the second and subsequent joysticks, we increase the numbers in the call by 1 until everything is entered. - We copy our settings to the system:
In the event that somewhere when you configure joysticks, delete configs:sudo cat p * .cfg >> ~ / RetroPie / configs / all / retroarch.cfg
rm /home/pi/.emulationstation/es_input.cfg
rm ~ / RetroPie / configs / all / retroarch.cfg
- In order not to break the SD card when rebooting due to the emulator hanging, and to do it from the joystick, do the following:
sudo nano ~ / RetroPie / configs / all / retroarch.cfg
Add lines:input_enable_hotkey_btn = "X"
Where X and Y are the corresponding buttons (these are usually the buttons in the center of the gamepad).
input_exit_emulator_btn = "Y" - Now, to copy the ROMs on the Raspberry is better to use the transfer through the grid.
Look for ifconfig 's IP address of our RPI. Connect via the net from the computer (for example, via winscp for Windows) using the username pi and the password raspberry. We copy the files on the Raspberry into the appropriate folders / home / pi / RetroPie / roms . - To make everything work and look beautiful, we deliver and launch:
cd RetroPie / supplementary
Select: SETUP -> Run 'ES-scraper -> (Re-) scape of the ROMs directorygit clone https://github.com/elpendor/ES-scraper
cd
cd RetroPie-Setup
sudo ./retropie_setup.sh
As a result, this action will scan our ROMs and download pictures and a description of the games.
However, this will add new ROMs every time. - Reboot the Raspberry Pi (you can also turn off the keyboard and, if necessary, the grid) (sudo reboot / sudo shutdown –h now) and after loading our RPI will be fully operational.
What else can be done?
- Get the original joysticks and connect them via GPIO
- Add hardware buttons, and make a gaming machine on raspberry
- Make the console portable .
But I am not a fan of such a hardcore as the same Pixel_Devil (which, by the way, inspired me to this experiment), so I settled on the result achieved. Now I will indulge myself in nostalgia and play with my friends :)
Source: https://habr.com/ru/post/221581/
All Articles