Unity3d Lessons from Unity 3D Student (B21-B24)
Hello.
Links to previous lessons:
The lesson will show how to get the distance between two points in a three-dimensional scene using the Vector3.Distance method. In addition, in addition to the original tutorial, I will talk about the Vector3.sqrMagnitude property, with which you can get a more optimized code for calculating the distance.
When developing a game, it is often necessary to know the distance between objects. One of the easiest ways to do this is to use the Distance method of the Vector3 class.
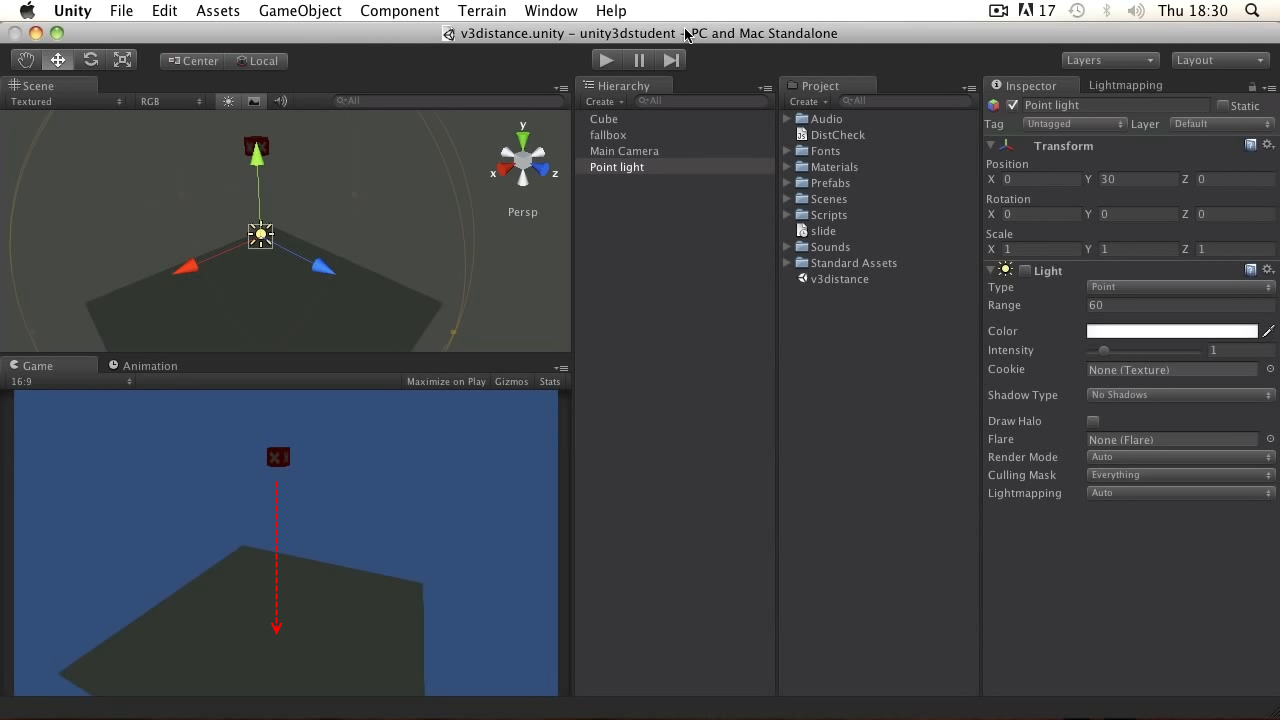
Consider the following scene: a fallbox cube falling down onto a larger Cube cube ; Point light Point between them; and of course the camera.
')
If we want the light source to light up only when it is within a certain distance from the falling cube, then we need to create the following script:
JavaScript code:
C # code:
In the script, we first declare the box variable, in which we will store the reference to the Transform component of our falling box. Then in Update we call the Vector3.Distance method, passing as arguments the coordinates of the objects between which we want to calculate the distance. The resulting distance is entered into the dist variable and compare it with the required value ( 10 in our example). If the distance does not exceed the specified value - turn on the light component, otherwise - turn off. Using the Debug.Log method , we output the value of the current distance to the console.
Add a script to the Light object of the Point Light object; drag the fallbox into the Box script field and start the scene. The cube falls down, the light does not burn. When the distance between the light and the cube is <= 10, the light turns on.

Note from translator №1: the distance can also be calculated by calculating the difference between the coordinates of objects, resulting in an object of type Vector3 , and then refer to its magnitude property:
C # code:
Note from translator # 2: using the Vector3.Distance method or the Vector3.magnitude property has one drawback. The fact is that when calculating the distance, we first obtain the square of the distance value, from which, respectively, the root must be extracted. Removing the root is quite a costly operation and if you frequently call for a large number of objects, it can lead to a drop in performance. In this case, the Vector3.sqrMagnitude property can be used as an optimization. It returns the square of the distance, which is calculated faster than the simple distance due to the absence of the operation of extracting the root. The resulting square of the distance will need to be compared with the square of the given value, that is, for the example from the lesson, it will look like this:
C # code shortened, optimized, with a constant instead of the "magic" number:
Link to the original lesson
Reference to the documentation for the Vector3.Distance method
Reference to the documentation for the Vector3.sqrMagnitude property
The tutorial describes how to pause (delay) in a game using the WaitForSeconds method and the yield instruction.
If you want to realize a pause between certain game events (for example, the creation of game objects at certain intervals), then you need to use the Korutins (coroutines). Korutina is a specially designed method that works in the main game thread and is usually called after the Update method. Korutina, depending on the specified conditions, can interrupt his execution at a certain point of his code, and then continue to work again (for more information about korutinah, there is on Habré - a comment of the translator) .
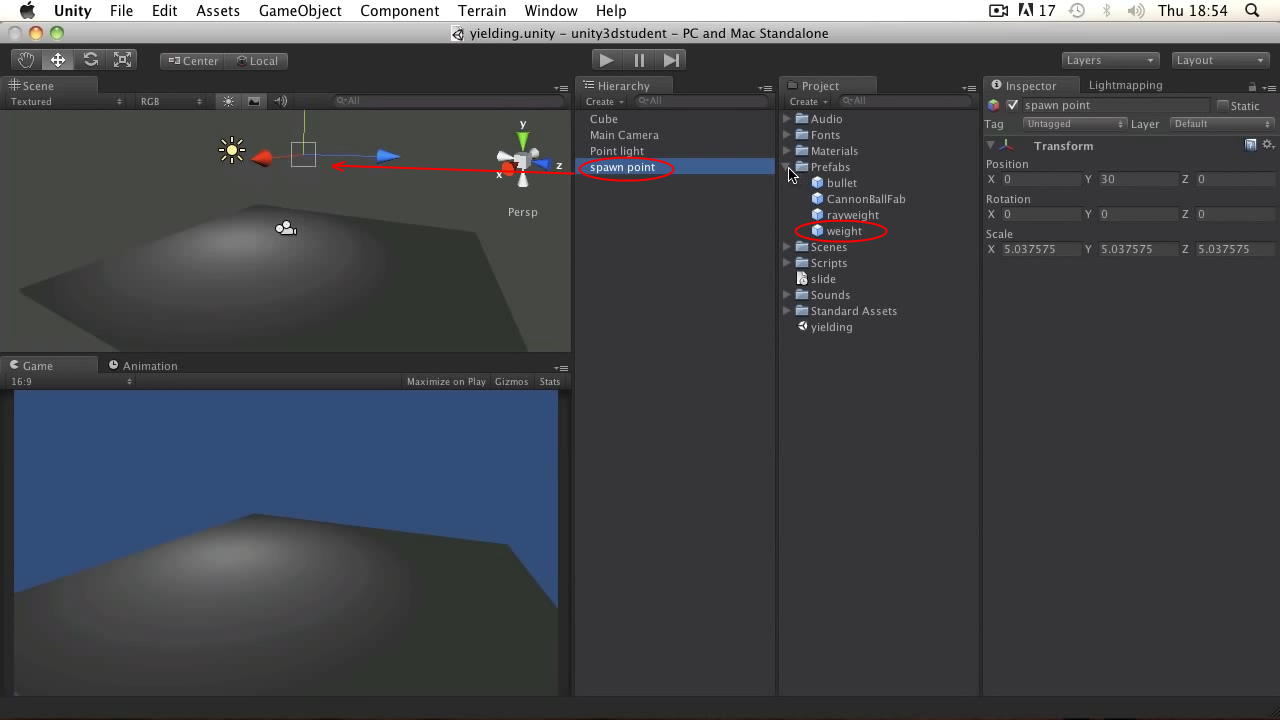
Look at the scene below. It has a cube playing the role of the earth, a source of light, a camera and an empty object called spawn point , hanging above the ground. In addition, in the Project folder there is a weight prefab - a cube with the rigidbody component. Our goal is to periodically create cubes from the prefab at the spawn point , after which they will fall to the ground.
Creating an object is easy - you need to use the familiar Instantiate method. However, if we just write such a script and add it to the spawn point object ...
JavaScript code:
... then we get about the following picture:

Just a couple of seconds of execution, we created too many objects. This is not surprising, because we placed the creation of an object in the Update method, which is called every frame of the game, that is, several dozen times per second. Any attempts to somehow insert a delay into the Update method so that objects are created less frequently will not lead to anything good - this will reduce the game's FPS. Instead, Korutina will help us.
Let's implement the object creation script as follows:
JavaScript code:
C # code:
So, in the variable box we store the reference to the prefab of the object being spawned. The readynow boolean variable is used to determine whether to run the corutin method MakeBox , which creates an object. Inside MakeBox we first deny its call (readynow = false), then create an object with the Instantiate method, and then use the yield / WaitForSeconds bundle (note the differences in the code for JS and in the code for C # - translator's comment) . This bundle allows you to suspend the execution of the corortina, in this case, for 2 seconds, and then go back and continue the execution, where we now allow the challenge of the corortina (readynow = true). The Update method does not stand idle for these 2 seconds, but continues to be executed, only it does not restart a new coruntine until the previous one is completed.
I remind you that the script must be added to the spawn point object, drag the prefab of the cube into the Box script field and start the scene. Now cubes are created every 2 seconds.

Link to the original lesson
Link to the WaitForSeconds class documentation
The lesson will show you how to create a simple explosion using a particle system.
Note from the translator: the original lesson uses the old version of Unity, in which work with particle systems is very different from the current version (4.3.X). Since it makes no sense to talk about old components, I will describe the work with the current version, as a result of which there will be discrepancies with the original. If, nevertheless, someone needs to look at the old particle system, refer to the original lesson at the link at the end of the translation.
If you want to create smoke, fire, dust or other distribution of certain particles, you can use a system of particles. This time on our stage there is a falling cube that disappears when it touches the ground. Our goal is to make the disappearance accompanied by an explosion effect.

Let's create a new particle system: menu GameObject -> Create Other -> Particle System . A new object will be added with Transform and Particle System components. The Particle System lists a lot of settings, changing which can achieve different effects. For the explosion effect, we will set the following settings:
In the component header:
Duration = 0.10 - the duration of particle generation. Since the explosion will be short-lived, we can set the smallest value
Looping - uncheck - flag looping particle generation. For a single explosion, it must be removed
Start Lifetime = 0.4 - the lifetime of the particles. Particles will exist for a specified time, after which they will disappear.
Start Speed = 25 - the initial velocity of the particles
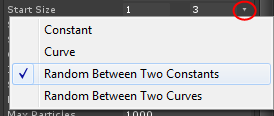
Start Size = from 1 to 3 - the initial particle size. Here we will introduce a variety and set not a constant value, but a random value between two constant values. To do this, click the small triangle to the right of the parameter value and select the item “Random between two constants” in the menu, then enter the values 1 and 3.
On the "Emission" tab:
Rate = 0 - the number of particles generated per second or per unit of distance traveled by the particle system. Oddly enough, we set this value to 0, since we need to simultaneously generate particles, and for this, the next parameter is better suited.
Bursts - allows you to set a mass emission of particles, which is well suited for an explosion. To do this, press the button with a plus sign and in the appeared line set the values Time = 0, Particles = 20. Due to this, immediately after the appearance of the object of the particle system on the scene, 20 particles will be emitted simultaneously.
On the “Shape” tab:
Shape = Sphere - sets the shape that determines the direction of particle propagation. Since we want to spread the particles of the explosion in all directions - use the sphere.
On the "Renderer" tab:
Material - you need to set the material to display the particles. As long as the default material is set, particles are displayed as gray balls. To make something more interesting, you need to create your own material:

A new material will appear in the Inspector window. Give it any name, then set the Shader field to Particles / Alpha Blended and add a texture for the explosion (drawing an asterisk):

Now this material needs to be added to the Material field of the Renderer tab of our particle system (by dragging the material with the mouse or selecting it from the menu).
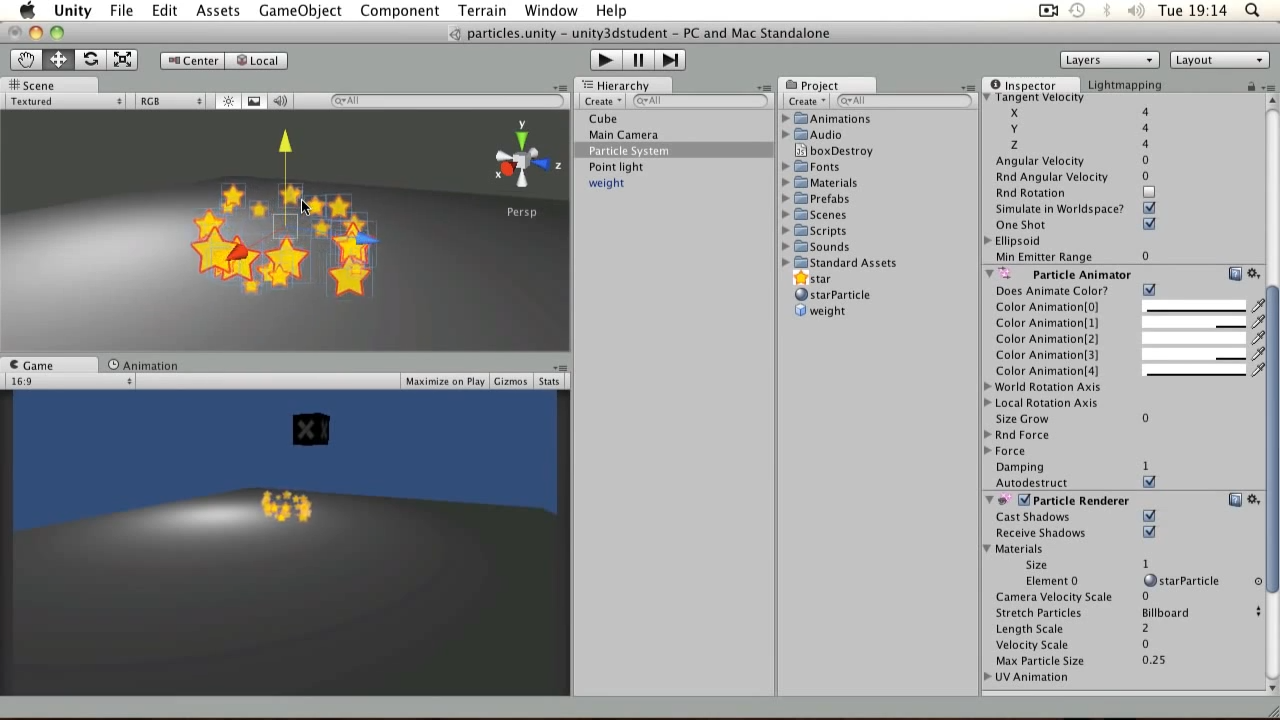
Just in case, I will duplicate the settings with a screenshot (unused tabs are cut):

Test our explosion. Click on the created particle system in the Hierarchy window. If everything was done correctly, a bunch of stars crumbled in different directions.
Now you need to write a small script and add it to our explosion. This script will be responsible for the destruction of the particle system from the scene, after all its particles cease to exist:
JavaScript code:
C # code:
In the script, we store the component of the particle system in the variable ps . In the Update method, we check the presence of the component on the scene. If it is, we check if it is “alive”. This is done by calling the IsAlive method - it returns false if the particle system no longer generates particles and all previously generated particles have disappeared. If so, remove the particle system object.
Everything is ready to make a prefab out of the explosion. In the Project window , click the Create - Prefab button, call the starBursts prefab , drag an explosion onto it from the Hierarchy window and remove the explosion from the scene.
Now we just need to write a script and add it to the falling cube:
JavaScript code:
C # code:
When a cube collider touches any other collider, we create an Instantiate explosion and remove the cube using the Destroy method. In the stars field of the script you need to place the prefab of the particle system of our explosion.
We start, we admire effective destruction of a cube.
Link to original lesson (using old particle system)
Particle System component documentation
The lesson describes the use of the “For” loop operator, with which you can repeat the necessary actions while a given condition is met.
When creating a game, there is often a task to perform several repetitive actions several times in a row. To do this, do not "copy-paste" the code, and you need to use cycles.
On our stage there is a land, a light, a camera and an empty creator object.

We want to create several other objects from the creator object with small pauses from the prefab. To do this, we write the following script:
JavaScript code:
C # code:
We have set a variable to store the created myPrefab object. In the lesson, this is a ball with a component Rigidbody , but it does not matter. The variable distanceMultiplier is needed to space apart the created objects. In the Start method, we save the position of the creator object, which will serve as the basis for the placement of the created objects. Then the for loop starts.
In the first line of the loop, the operation condition is specified. The loop will be executed as long as the condition is true. The condition consists of three parts:
With this record, the cycle will work 4 times: while the variable i is 0, 1, 2 and 3. When i becomes equal to 4, the loop will exit.
Inside the loop, we perform familiar actions. First, we create an object by setting it to a position equal to the position of the creator object, except for the x coordinate — we add to it the current index value multiplied by the distanceMultiplier constant. Then we pause for half a second so that the objects are not created simultaneously. At the end of the cycle we write a debug message to the log.
Add the script to the creator object, transfer the prefab of the sphere with the Rigidbody component to the myPrefab script field, and launch the scene. Four spheres, one after another, appeared from nowhere and fell to the ground.

Link to the original lesson
Link to MSDN about various cycles
Links to previous lessons:
Basic lesson 21 - Calculation of the distance between objects
The lesson will show how to get the distance between two points in a three-dimensional scene using the Vector3.Distance method. In addition, in addition to the original tutorial, I will talk about the Vector3.sqrMagnitude property, with which you can get a more optimized code for calculating the distance.
When developing a game, it is often necessary to know the distance between objects. One of the easiest ways to do this is to use the Distance method of the Vector3 class.
Consider the following scene: a fallbox cube falling down onto a larger Cube cube ; Point light Point between them; and of course the camera.
')
If we want the light source to light up only when it is within a certain distance from the falling cube, then we need to create the following script:
JavaScript code:
var box : Transform; function Update () { var dist : float = Vector3.Distance(box.position, transform.position); Debug.Log(dist); if(dist <= 10){ light.enabled = true; }else{ light.enabled = false; } } C # code:
public Transform box; private void Update() { float dist = Vector3.Distance(box.position, transform.position); Debug.Log(dist); if (dist <= 10) // if/else : light.enabled = dist <= 10; { light.enabled = true; } else { light.enabled = false; } } In the script, we first declare the box variable, in which we will store the reference to the Transform component of our falling box. Then in Update we call the Vector3.Distance method, passing as arguments the coordinates of the objects between which we want to calculate the distance. The resulting distance is entered into the dist variable and compare it with the required value ( 10 in our example). If the distance does not exceed the specified value - turn on the light component, otherwise - turn off. Using the Debug.Log method , we output the value of the current distance to the console.
Add a script to the Light object of the Point Light object; drag the fallbox into the Box script field and start the scene. The cube falls down, the light does not burn. When the distance between the light and the cube is <= 10, the light turns on.

Note from translator №1: the distance can also be calculated by calculating the difference between the coordinates of objects, resulting in an object of type Vector3 , and then refer to its magnitude property:
C # code:
float dist = (box.position - transform.position).magnitude; Note from translator # 2: using the Vector3.Distance method or the Vector3.magnitude property has one drawback. The fact is that when calculating the distance, we first obtain the square of the distance value, from which, respectively, the root must be extracted. Removing the root is quite a costly operation and if you frequently call for a large number of objects, it can lead to a drop in performance. In this case, the Vector3.sqrMagnitude property can be used as an optimization. It returns the square of the distance, which is calculated faster than the simple distance due to the absence of the operation of extracting the root. The resulting square of the distance will need to be compared with the square of the given value, that is, for the example from the lesson, it will look like this:
C # code shortened, optimized, with a constant instead of the "magic" number:
public Transform box; private const int cMaxDistance = 10; private void Update() { float dist = (box.position - transform.position).sqrMagnitude; light.enabled = dist <= cMaxDistance * cMaxDistance; // ! Debug.Log(dist); } Link to the original lesson
Additional materials:
Reference to the documentation for the Vector3.Distance method
Reference to the documentation for the Vector3.sqrMagnitude property
Basic lesson 22 - Creating a pause using the WaitForSeconds method
The tutorial describes how to pause (delay) in a game using the WaitForSeconds method and the yield instruction.
If you want to realize a pause between certain game events (for example, the creation of game objects at certain intervals), then you need to use the Korutins (coroutines). Korutina is a specially designed method that works in the main game thread and is usually called after the Update method. Korutina, depending on the specified conditions, can interrupt his execution at a certain point of his code, and then continue to work again (for more information about korutinah, there is on Habré - a comment of the translator) .
Look at the scene below. It has a cube playing the role of the earth, a source of light, a camera and an empty object called spawn point , hanging above the ground. In addition, in the Project folder there is a weight prefab - a cube with the rigidbody component. Our goal is to periodically create cubes from the prefab at the spawn point , after which they will fall to the ground.

Creating an object is easy - you need to use the familiar Instantiate method. However, if we just write such a script and add it to the spawn point object ...
JavaScript code:
var box : GameObject; // function Update () { Instantiate(box, transform.position, transform.rotation); // } ... then we get about the following picture:

Just a couple of seconds of execution, we created too many objects. This is not surprising, because we placed the creation of an object in the Update method, which is called every frame of the game, that is, several dozen times per second. Any attempts to somehow insert a delay into the Update method so that objects are created less frequently will not lead to anything good - this will reduce the game's FPS. Instead, Korutina will help us.
Let's implement the object creation script as follows:
JavaScript code:
var box : GameObject; var readynow : boolean = true; function Update () { if(readynow){ MakeBox(); // JS } } function MakeBox(){ readynow=false; Instantiate(box, transform.position, transform.rotation); yield WaitForSeconds(2); // 2 readynow=true; } C # code:
public GameObject box; private bool readynow = true; private void Update() { if (readynow) StartCoroutine(MakeBox()); // C# StartCoroutine } private IEnumerator MakeBox() // IEnumerator { readynow = false; Instantiate(box, transform.position, transform.rotation); yield return new WaitForSeconds(2); // , JS readynow = true; } So, in the variable box we store the reference to the prefab of the object being spawned. The readynow boolean variable is used to determine whether to run the corutin method MakeBox , which creates an object. Inside MakeBox we first deny its call (readynow = false), then create an object with the Instantiate method, and then use the yield / WaitForSeconds bundle (note the differences in the code for JS and in the code for C # - translator's comment) . This bundle allows you to suspend the execution of the corortina, in this case, for 2 seconds, and then go back and continue the execution, where we now allow the challenge of the corortina (readynow = true). The Update method does not stand idle for these 2 seconds, but continues to be executed, only it does not restart a new coruntine until the previous one is completed.
I remind you that the script must be added to the spawn point object, drag the prefab of the cube into the Box script field and start the scene. Now cubes are created every 2 seconds.

Link to the original lesson
Additional materials:
Link to the WaitForSeconds class documentation
Basic lesson 23 - Particle system
The lesson will show you how to create a simple explosion using a particle system.
Note from the translator: the original lesson uses the old version of Unity, in which work with particle systems is very different from the current version (4.3.X). Since it makes no sense to talk about old components, I will describe the work with the current version, as a result of which there will be discrepancies with the original. If, nevertheless, someone needs to look at the old particle system, refer to the original lesson at the link at the end of the translation.
If you want to create smoke, fire, dust or other distribution of certain particles, you can use a system of particles. This time on our stage there is a falling cube that disappears when it touches the ground. Our goal is to make the disappearance accompanied by an explosion effect.

Let's create a new particle system: menu GameObject -> Create Other -> Particle System . A new object will be added with Transform and Particle System components. The Particle System lists a lot of settings, changing which can achieve different effects. For the explosion effect, we will set the following settings:
In the component header:
Duration = 0.10 - the duration of particle generation. Since the explosion will be short-lived, we can set the smallest value
Looping - uncheck - flag looping particle generation. For a single explosion, it must be removed
Start Lifetime = 0.4 - the lifetime of the particles. Particles will exist for a specified time, after which they will disappear.
Start Speed = 25 - the initial velocity of the particles
Start Size = from 1 to 3 - the initial particle size. Here we will introduce a variety and set not a constant value, but a random value between two constant values. To do this, click the small triangle to the right of the parameter value and select the item “Random between two constants” in the menu, then enter the values 1 and 3.

On the "Emission" tab:
Rate = 0 - the number of particles generated per second or per unit of distance traveled by the particle system. Oddly enough, we set this value to 0, since we need to simultaneously generate particles, and for this, the next parameter is better suited.
Bursts - allows you to set a mass emission of particles, which is well suited for an explosion. To do this, press the button with a plus sign and in the appeared line set the values Time = 0, Particles = 20. Due to this, immediately after the appearance of the object of the particle system on the scene, 20 particles will be emitted simultaneously.
On the “Shape” tab:
Shape = Sphere - sets the shape that determines the direction of particle propagation. Since we want to spread the particles of the explosion in all directions - use the sphere.
On the "Renderer" tab:
Material - you need to set the material to display the particles. As long as the default material is set, particles are displayed as gray balls. To make something more interesting, you need to create your own material:

A new material will appear in the Inspector window. Give it any name, then set the Shader field to Particles / Alpha Blended and add a texture for the explosion (drawing an asterisk):

Now this material needs to be added to the Material field of the Renderer tab of our particle system (by dragging the material with the mouse or selecting it from the menu).
Just in case, I will duplicate the settings with a screenshot (unused tabs are cut):

Test our explosion. Click on the created particle system in the Hierarchy window. If everything was done correctly, a bunch of stars crumbled in different directions.

Now you need to write a small script and add it to our explosion. This script will be responsible for the destruction of the particle system from the scene, after all its particles cease to exist:
JavaScript code:
private var ps : ParticleSystem; function Start () { ps = GetComponent(ParticleSystem); } function Update () { if(ps) { if(!ps.IsAlive()) { Destroy(gameObject); } } } C # code:
private ParticleSystem ps; private void Start() { ps = (ParticleSystem)GetComponent(typeof(ParticleSystem)); } private void Update() { if (ps) if (!ps.IsAlive()) Destroy(gameObject); } In the script, we store the component of the particle system in the variable ps . In the Update method, we check the presence of the component on the scene. If it is, we check if it is “alive”. This is done by calling the IsAlive method - it returns false if the particle system no longer generates particles and all previously generated particles have disappeared. If so, remove the particle system object.
Everything is ready to make a prefab out of the explosion. In the Project window , click the Create - Prefab button, call the starBursts prefab , drag an explosion onto it from the Hierarchy window and remove the explosion from the scene.
Now we just need to write a script and add it to the falling cube:
JavaScript code:
var stars : ParticleSystem; function OnCollisionEnter (col : Collision) { Instantiate(stars, transform.position, transform.rotation); Destroy(gameObject); } C # code:
public ParticleSystem stars; private void OnCollisionEnter(Collision col) { Instantiate(stars, transform.position, transform.rotation); Destroy(gameObject); } When a cube collider touches any other collider, we create an Instantiate explosion and remove the cube using the Destroy method. In the stars field of the script you need to place the prefab of the particle system of our explosion.
We start, we admire effective destruction of a cube.
Link to original lesson (using old particle system)
Additional materials:
Particle System component documentation
Basic lesson 24 - Working with the “For” cycle
The lesson describes the use of the “For” loop operator, with which you can repeat the necessary actions while a given condition is met.
When creating a game, there is often a task to perform several repetitive actions several times in a row. To do this, do not "copy-paste" the code, and you need to use cycles.
On our stage there is a land, a light, a camera and an empty creator object.

We want to create several other objects from the creator object with small pauses from the prefab. To do this, we write the following script:
JavaScript code:
var myPrefab : Rigidbody; var distanceMultiplier : float = 2; function Start(){ var i : int = 0; var pos : Vector3 = transform.position; for(i=0; i<=3; i++){ Instantiate(myPrefab, Vector3(pos.x+i*distanceMultiplier, pos.y, pos.z), transform.rotation); yield WaitForSeconds(0.5); Debug.Log("made ball "+i); } } C # code:
public Rigidbody myPrefab; private const float distanceMultiplier = 2f; private IEnumerator Start() { Vector3 pos = transform.position; for(int i=0; i<=3; i++) { Instantiate(myPrefab, new Vector3(pos.x + i * distanceMultiplier, pos.y, pos.z), transform.rotation); yield return new WaitForSeconds(0.5f); Debug.Log("made ball "+i); } } We have set a variable to store the created myPrefab object. In the lesson, this is a ball with a component Rigidbody , but it does not matter. The variable distanceMultiplier is needed to space apart the created objects. In the Start method, we save the position of the creator object, which will serve as the basis for the placement of the created objects. Then the for loop starts.
In the first line of the loop, the operation condition is specified. The loop will be executed as long as the condition is true. The condition consists of three parts:
- i = 0 - set the variable-index initial value
- i <= 3 - set, in fact, the condition - to execute the cycle, while the index value is not more than 3
- i ++ - increase the index value by 1
With this record, the cycle will work 4 times: while the variable i is 0, 1, 2 and 3. When i becomes equal to 4, the loop will exit.
Inside the loop, we perform familiar actions. First, we create an object by setting it to a position equal to the position of the creator object, except for the x coordinate — we add to it the current index value multiplied by the distanceMultiplier constant. Then we pause for half a second so that the objects are not created simultaneously. At the end of the cycle we write a debug message to the log.
Add the script to the creator object, transfer the prefab of the sphere with the Rigidbody component to the myPrefab script field, and launch the scene. Four spheres, one after another, appeared from nowhere and fell to the ground.

Link to the original lesson
Additional materials:
Link to MSDN about various cycles
Source: https://habr.com/ru/post/221545/
All Articles