How to configure access to Microsoft Azure through a corporate account (Organizational Account) and enable multifactor authentication
Initially, only Microsoft Account (LiveID) could be used to manage and access Azure resources, but some time ago support for an Organizational Account was added. The Organizational Account is maintained by the Azure Active Directory service , and this provides enhanced data management capabilities within your organization (for which you are creating a dedicated Azure Active Directory). For example, Organizational Account, as well as Microsoft Account (LiveID), support two-factor authentication. But for an Organizational Account, the requirement to use multifactor authentication can be specified as mandatory , i.e. a user can only access the Azure Management Portal by completing all two-factor verification steps.

I often ask a question about providing access to the management system deployed in Azure. Providing access based on Microsoft Account (LiveID) is not always suitable for a real system, since It is more difficult for administrators to control both the applied security measures and the rights of users / employees. For example, an employee may resign or his account will be hacked (not all include two-factor authentication for your account), in this case, you must suspend access to the cloud system via this recorded entry so that no actions can be performed through the portal or through the API .
Organizational Account solves most issues (centralized access control, enhanced security settings, etc.). For more information on managing accounts and subscriptions in Azure, see the MSDN article Manage Accounts, Subscriptions, and Administrative Roles .
')
And then there will be a step-by-step instruction on how to set up an Organizational Account and link it to Azure and enable it for a two-factor authentication account.
1. Go to the Sign up for Azure as an organization page and select Sign up now .
2. Next, you will be prompted to sign in using Microsoft Account (LiveID) or Organizational Account. Choose Organizational Account .
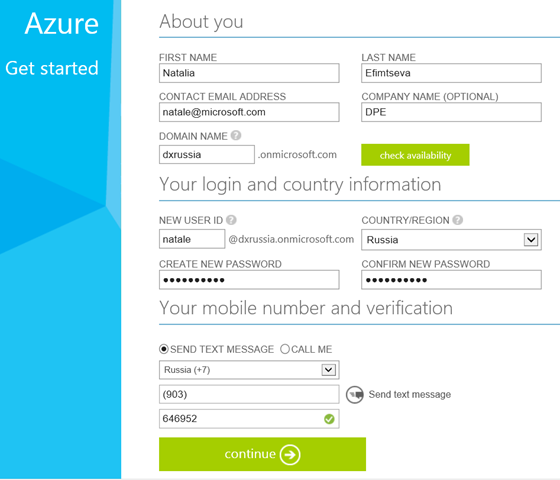
3. A page opens where you are prompted to create an Organizational Account and define an Azure Active Directory. The DOMAIN NAME field defines the name of the Azure Active Directory (the full name will be <specified value> .onmicrosoft.com ) to which the created user will be added and which you will be able to manage in the future. In this example, DOMAIN NAME is defined as dxrussia (and the full name is dxrussia.onmicrosoft.com , which is the prefix for the full user name).
You will need to specify a mobile phone number for verification, an SMS with a code will come to the specified phone number.
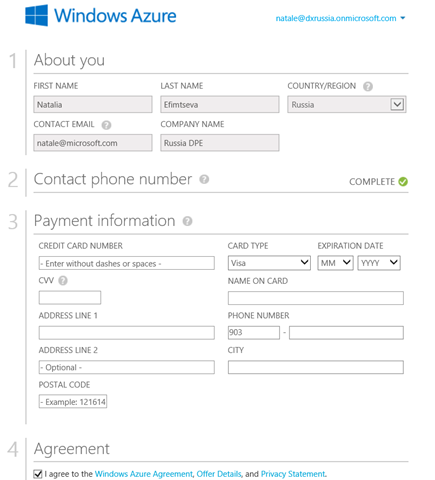
4. Further it will be offered to create an account in Azure on the user created at the previous step ( natale@dxrussia.onmicrosoft.com ).
You will need to specify for verification the data of the bank card and tick the checkbox next to I agree to the Windows Azure Agreement, Offer Details and Privacy Policy , if you agree with the terms of use of Azure.
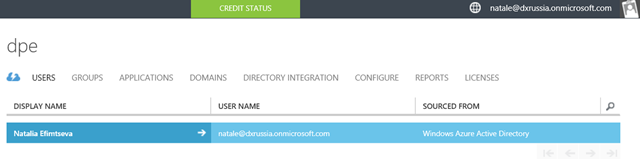
5. Actually, that's all - now created:
And now, so that nobody, no one, will get to us in Azure, let's configure multi-factor authentication for our account.
Note : enabling multifactor authentication for accounts is a paid service (see clause 10 at the end of the article).
1. To do this, go to the Azure Management Portal - https://manage.windowsazure.com .
By the way, when you sign in, please note that the address will look like manage.windowsazure.com <The name of your Azure Active Directpory> .onmicrosoft.com . In this example, it is manage.windowsazure.com/dxrussia.onmicrosoft.com#Workspaces/All/dashboard .
2. Go to the Azure Active Directory tab, in the Configure You Directory section, select Enable Multi-Factor Authentication .

3. Now go to the Users tab and click the Manage Multi-Factor Auth button at the bottom of the page. A two-factor authentication settings page will open for users of your Azure Active Directory.
Enable two-factor authentication ( Enable ) for users.

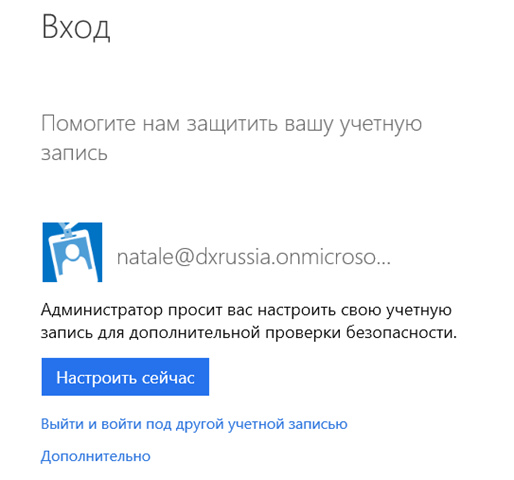
4. Now go back to the Azure Management Portal, because security settings have been changed, the system will ask you to define a convenient way to further verify your account.
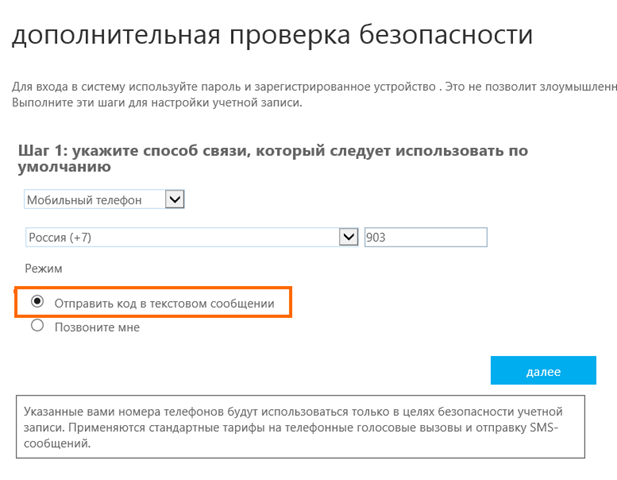
5. Actually, I suggest setting up =) By default, the “Call Me” is set, I still prefer to receive the code via SMS.
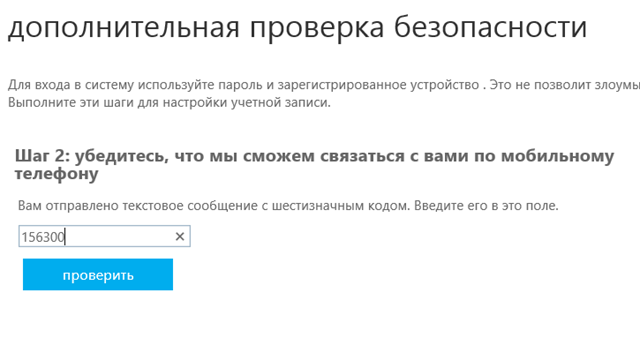
6. The next step is to check the operation of the selected confirmation method. I received an SMS with a code on my phone.
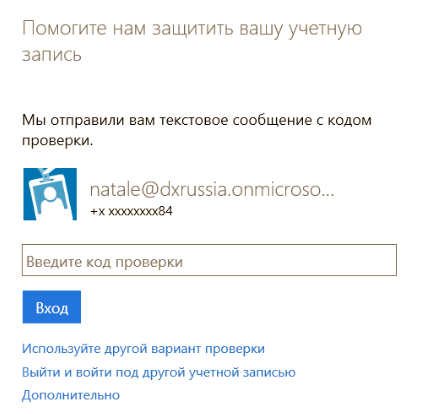
7. Now go to the portal again. Enter the login ( natale@dxrussia.onmicrosoft.com ) and password.
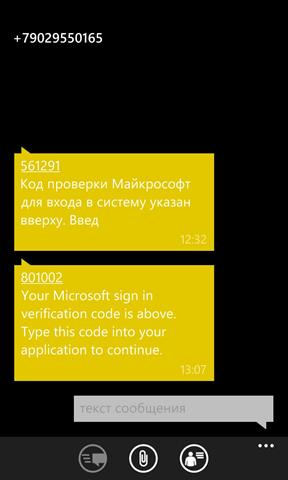
8. And now the code that came in the SMS.
9. On the portal you can now see that a new provider has appeared - Multi-Factor Auth Provider .

10. Once again I will pay attention that inclusion of multifactor authentication for accounts is a paid service. Pricing is shown here . The amount is charged \ deducted from the total account for Azure resources.
There are two payment methods:
In addition, two-factor authentication can be used when a user accesses other resources and applications, and not just to manage Azure resources.

By the way, more details about managing multifactor authentication can be found in the article of my colleague - Overview of multifactor authentication in the Microsoft Azure cloud .
I often ask a question about providing access to the management system deployed in Azure. Providing access based on Microsoft Account (LiveID) is not always suitable for a real system, since It is more difficult for administrators to control both the applied security measures and the rights of users / employees. For example, an employee may resign or his account will be hacked (not all include two-factor authentication for your account), in this case, you must suspend access to the cloud system via this recorded entry so that no actions can be performed through the portal or through the API .
Organizational Account solves most issues (centralized access control, enhanced security settings, etc.). For more information on managing accounts and subscriptions in Azure, see the MSDN article Manage Accounts, Subscriptions, and Administrative Roles .
')
And then there will be a step-by-step instruction on how to set up an Organizational Account and link it to Azure and enable it for a two-factor authentication account.
Organizational Account and bind it in Azure
1. Go to the Sign up for Azure as an organization page and select Sign up now .
2. Next, you will be prompted to sign in using Microsoft Account (LiveID) or Organizational Account. Choose Organizational Account .
3. A page opens where you are prompted to create an Organizational Account and define an Azure Active Directory. The DOMAIN NAME field defines the name of the Azure Active Directory (the full name will be <specified value> .onmicrosoft.com ) to which the created user will be added and which you will be able to manage in the future. In this example, DOMAIN NAME is defined as dxrussia (and the full name is dxrussia.onmicrosoft.com , which is the prefix for the full user name).
You will need to specify a mobile phone number for verification, an SMS with a code will come to the specified phone number.
4. Further it will be offered to create an account in Azure on the user created at the previous step ( natale@dxrussia.onmicrosoft.com ).
You will need to specify for verification the data of the bank card and tick the checkbox next to I agree to the Windows Azure Agreement, Offer Details and Privacy Policy , if you agree with the terms of use of Azure.
5. Actually, that's all - now created:
- Organization account (Organizational Account)
- Your Azure Active Directory
- Azure Account
- An Azure subscription associated with an account.
Configure two-factor authentication for Organizational Account
And now, so that nobody, no one, will get to us in Azure, let's configure multi-factor authentication for our account.
Note : enabling multifactor authentication for accounts is a paid service (see clause 10 at the end of the article).
1. To do this, go to the Azure Management Portal - https://manage.windowsazure.com .
By the way, when you sign in, please note that the address will look like manage.windowsazure.com <The name of your Azure Active Directpory> .onmicrosoft.com . In this example, it is manage.windowsazure.com/dxrussia.onmicrosoft.com#Workspaces/All/dashboard .
2. Go to the Azure Active Directory tab, in the Configure You Directory section, select Enable Multi-Factor Authentication .
3. Now go to the Users tab and click the Manage Multi-Factor Auth button at the bottom of the page. A two-factor authentication settings page will open for users of your Azure Active Directory.
Enable two-factor authentication ( Enable ) for users.
4. Now go back to the Azure Management Portal, because security settings have been changed, the system will ask you to define a convenient way to further verify your account.
5. Actually, I suggest setting up =) By default, the “Call Me” is set, I still prefer to receive the code via SMS.
6. The next step is to check the operation of the selected confirmation method. I received an SMS with a code on my phone.
7. Now go to the portal again. Enter the login ( natale@dxrussia.onmicrosoft.com ) and password.
8. And now the code that came in the SMS.
9. On the portal you can now see that a new provider has appeared - Multi-Factor Auth Provider .
10. Once again I will pay attention that inclusion of multifactor authentication for accounts is a paid service. Pricing is shown here . The amount is charged \ deducted from the total account for Azure resources.
There are two payment methods:
- Per user (unlimited user authentication per user) is $ 2 \ month per user.
- Per Authentication - $ 2 \ 10 Authentication
In addition, two-factor authentication can be used when a user accesses other resources and applications, and not just to manage Azure resources.
By the way, more details about managing multifactor authentication can be found in the article of my colleague - Overview of multifactor authentication in the Microsoft Azure cloud .
Source: https://habr.com/ru/post/221473/
All Articles