Learning Derby 0.6, example # 1

For the past few months I have been involved in several projects being developed on Derby (a reactive fullstack javascript framework). Some of them are quite successfully working in production, some start soon.
While I was studying this technology, several thoughts arose. Firstly, there is very little information about this technology: documentation is scarce, and articles that are written (I’m talking about English-speaking) are usually written by people who have spent a day or two of its study. Secondly, there is a small group of people who are well aware of this technology and use it in their projects, successfully solving all the problems that beginners stumble about.
My idea is simple - to share the knowledge gained, if it is of course interesting and relevant. I want to take a few examples from the derby-examples project and sort them out on the shelves. Either, recreating them from scratch, in passing, explain the logic of creation, from the point of view of a specialist, or, on the basis of a ready-made example, explain those moments that were not disclosed in previous examples. In short, if you like it, I think I will analyze 5-6 examples.
')
Version 0.6
We will study derby version 0.6. Version 0.6 alpha 5 is currently released. It is stable enough for us to start transferring all our projects from 0.5 to it. New projects are all created exclusively at 0.6. For example, type4fame is my friend’s hobby project, set to 0.6.
In comparison with version 0.5, everything, of course, has changed for the better. The framework code is structured and understandable, rendering has accelerated, it has become possible to use arbitrary expressions in views. The new component system allows you to structure large applications well. To divide them into parts with low connectivity. In short, I have only positive impressions.
For the sake of justice, it is worth adding here that this is still an alpha version, and the creators have a certain set of unimplemented TODOs, and errors are also encountered (and corrected).
Level of training
I will list the main things you need to know and understand in order to quickly enter the derby:
- basic knowledge of web development (html, css, javascript);
- nodejs - you need to understand commonjs-modules, npm, to know how to run a standard http-server;
- expressjs - derby applications are built on top of express applications, so it would be good to have some basic knowledge about express and server js (connecting modules, processing requests, etc.)
There is also a certain set of technologies that are used in derby and familiarity with them would help a lot (although it is not mandatory, we will gradually touch all of this)
- reactive programming
- isomorphic javascript applications
- operational transformation - a technology developed by google to resolve conflicts while editing documents in google docs
- browserify
- mongodb
Platform
We are suitable linux, mac. C windows may have problems - version 0.5 worked fine and under windows (though I had to redis version 2.6 myself), version 0.6 also does this, but there are a couple of pull-requests that have not yet been included in the main repository, so for beginners worth the wait.
Before starting development, you need to make sure that the following are installed on the computer:
- nodejs
- mongodb
- redis 2.6 (note that version 2.4 does not fit) - upd redis is no longer required
Everything is set with the default settings. Monga and radish at the time of the application must be running.
So, we start
Let us consider an example: https://github.com/zag2art/derby-example-hello . It is very simple, but there will be many explanations.
You can copy yourself a ready-made example and study it, or you can fill it from scratch yourself. I advise the second option, so it is better to be stored in memory, but choose for yourself, I will explain both options.
Copy from my repository:
# git clone https://github.com/zag2art/derby-example-hello.git # cd derby-example-hello # ( derby derby-starter) npm install # localhost:3000 npm start We create all the files ourselves (after creating the daddy and entering it):
package.json create package.json standard, using npm init (we specify server.js as the startup file), then we add two modules also via npm : # 0.6 ( npm 0.5), package.json npm install derby@~0.6 -S # derby-starter npm install derby-starter -S A few words about the
derby-starter : most likely you will never use it in your projects. Look if you want its code , here, for the most part, the standard expressjs application is initialized, to which the derby clings to the middle-ware. It also sets up a derby connection to the data (mongue and radish), and the server part of the derby is configured.In the usual case, this code will be located inside derby applications, since it will need to be supplemented, for example, to connect authorization via passport , data access restrictions via
racer-access , or if you want to process some requests by express-ohms, and Do not derby (for example, if you need a backup restful-api). But for our purposes, all this is not yet necessary, and thanks to this module our server part is reduced to one line:server.js
require('derby-starter').run(__dirname+'/index.js'); We start the server part of the derby by specifying the path to the index.js file as the parameter, in which our derbyjs application itself is located.
So, the application consists of 2 files: index.js
var app = module.exports = require('derby').createApp('hello', __filename); app.loadViews(__dirname); // app.get('/', function(page, model) { // model.subscribe('hello.message', function() { page.render(); }); }); and index.html
<Body:> <!-- html --> Holler: <input value="{{hello.message}}"> <h2>{{hello.message}}</h2> Let's first type them in, launch the application, play around with it, and then analyze the source code. So, all the files are in the same folder: package.json, server.js, index.js and index.html. The derby and derby-starter modules are installed and located in the node_modules subdirectory, mongo and redis are installed and running.
Run the application (npm start, well, or directly - node server.js):
zag2art@laptop:~/work/derby-example-hello$ npm start > derby-example-hello@0.0.0 start /home/zag2art/work/derby-example-hello > node server.js Master pid 11291 11293 listening. Go to: http://localhost:3000/ Open the browser, enter the address http: // localhost: 3000 / , and send something to the input, for example:
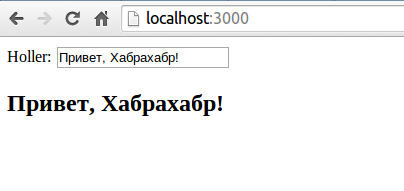
What we see, the text we entered repeated in the h2 block, below the input, the reactive bindings work here. Another experiment, try to open another tab with the same address http: // localhost: 3000 / . We see the text we entered earlier. That is, the data is synchronized between the tabs (and if our application was posted on the Internet, then between absolutely all clients). Let's try to change the data. The change will immediately be reflected in the adjacent tab, without any unnecessary blinking, that is, when updating the data, the necessary part of the page is recreated directly on the client. Next, let's look at the source code of the page in the second tab:

We conclude that the server gave us a completed page that was already formed - which is very good for indexing pages by search engines. Ie, we have both client and server rendering - a quick update for users and data access for search engines.
Now let's look at the principles laid out in derby, as well as the source code. The first thing to think about is what the requirements for the system were for the creators of derby:
- Derby, designed to create SPA (complex, rich in web application elements) applications with a strong redrawing inside the page
- For the convenience of users, the application should allow you to bookmark your current state - and therefore, with an important state change, the url should change
- The same applies to the search engine indexation. The application should be indexed, it follows that when designing an application, the creator must clearly decide for himself which application states should go into the index and schedule the corresponding url for them.
So, the creators understand the following, if the page is requested from the server, you need to generate it there and give it ready, if the user in the browser is working in the application, he should not go to the server every time you change url, receive a flicker of the screen. Also I really would not want to duplicate the page rendering code. That is, we need to be able to render the page both on the server and on the client, and not duplicate the code. And on the client and on the server we have javascript - this makes it easier. But is it even possible to do this? It turns out that we need both the client and the server to work in the same way with the code responsible for rendering pages (templating, working with html), routing (working with the url when changing addresses on the client), and it turns out that both there and there need to be uniform organize access to data. This code, which works the same on both the client and the server, is called isomorphic, you can read about it here . In the derby it is implemented.
It turns out in the derby there are 2 parts:
- The part related only to the server (various settings, connection of modules, binding to expressjs). Note that there is no rendering, no routing. In our case, this is the server.js file with the derby-starter module.
- The isomorphic application itself. Its code is executed on the server when any page is requested from the server, and further, the code is already working on the client. In our case, these files are index.js and index.html.
Let me try to tell you more about the second part. Imagine that we created a derby application that works with 3 pages:
/- website homepage/about- page with information about the creator/projects- project page
All pages have links to each other. How the search engine will work with such a site. It will make 3 requests, one for each page, and will normally index them. How will the user work with this? (note - an important point). The user will enter the site (either by reference or by entering the address in the address bar) on any of these three pages. This will be the only request to the server. Because along with the finished page, the user will receive the entire isomorphic application (the so-called bundle, which includes everything we wrote in a packaged form - js-files that contain url processing, html-files with templates, css-files). , as well as part of the derby, which allows all this to work). Thus, initially requesting, say, the / about page, the user receives a ready-made SPA application on the client. And now, if he clicks (on his about page) on the link / or / projects - there will be no more requests to the server (there should be an asterisk, which I will decode later). The page is generated directly on the client, the url in the browser changes. Well, and so on: the user can run on these three pages, without any requests to the server.
So, now let's look at the index.js code:
var app = module.exports = require('derby').createApp('hello', __filename); app.loadViews(__dirname); // app.get('/', function(page, model) { // model.subscribe('hello.message', function() { page.render(); }); }); First, it must be said that index.js is a common.js module, that is, we, for example, can easily connect here any modules that can work, both on the client and on the server. For example, like this:
var _ = require('underscore'); . The first line is connected and initialized derby. app.loadViews(__dirname); Here we show where we have the template files. In this case, we pointed to the same folder in which index.js is located, look for the wilds there and find index.html. We have a minimal educational application, so everything is in one folder, usually the templates are located separately in the views subfolder. In theory, if we had css-styles, here we would write something like:
// app.loadViews (path.join(__dirname, '../views')); app.loadStyles(path.join(__dirname, '../styles')); There could be, for example, the file index.css (well, either index.styl or index.less - the derby supports them). Naturally in this file there can be include with their subfolder structure.
Go ahead, and then the code to handle the url. Schematically, if we did the application that I described (for 3 women) - here it would be:
app.get('/', function(page, model) { ... }); app.get('/about', function(page, model) { ... }); app.get('/projects', function(page, model) { ... }); It is clear, yes? For everything that we called a separate page, there must be a handler (someone will tell the controller). Yes, the whole thing is very similar to expressjs, here you can use parameters, for example:
app.get('/users/:user', getUser); See here for more details.
What do we do inside the handler? In general, by analogy with expressjs, we need to prepare the data for rendering the page, and then call the render function with the appropriate template and data as parameters. The scheme here is the same, but there are some peculiarities. First, let's deal with the data. To work with them, the model is used (passed to the handler as a parameter). Derby is a reactive framework, so we always have two options when working with data: either we just get the data as it is and that moment and give it further to the template engine, or we get it, but at the same time we also subscribe to update them ... what does that mean. Replace a page with some list: if we just received and output the data, then everything - the page will be static, if we also subscribe to updates, the list on our page will be updated (if, for example, another user with access to this list, changed it). In the code, it looks like this:
// model.fetch('list', function(){ // // render }); // c model.subscribe('list', function(){ // , // // render }); So, the code from our example:
model.subscribe('hello.message', function() { page.render(); }); We subscribe to 'hello.message', and in the callback function (when the data is pulled) we call render. This raises a few questions: what is 'hello.message' and why render without parameters (there is neither a template name nor data)?
In the derby, the racer module is responsible for working with reactive data, in which all references to data occur using so-called “paths”. We have 'hello.message' is the path, where 'hello' is the name of the collection in mongo (in sql would be a table), 'message' is the id of the entry in the collection. That is, we are subscribed to a single entry in the hello collection. It is these data that will get into our input in the template. Learn more about working with data and paths here .
Further, we didn’t transfer anything to render for the following reasons: html for url = / is set in the main html file (index.html is the root, there could be several more connected to it via import), it will be used by default , and we did not transfer the data, because the templates have access to the “paths”.
Now the template file is index.html:
<Body:> <!-- html --> Holler: <input value="{{hello.message}}"> <h2>{{hello.message}}</h2> So, the file itself consists of several sections (we have only one - Body), in derby terminology, they are called templates. That is so: we have a template file, in which there is a Body template, as you understand, all that we put in it will be in the body of the resulting html. In this example, I will not explain to you the whole derby template system, including namespaces, inheritance, etc. (example is inappropriate), I will add only a few points. In double braces - data bindings (those are our very ways). To set the page title, for example, we could use another predefined Title template, for example, like this:
<Title:> - <Body:> <!-- html --> Holler: <input value="{{hello.message}}"> <h2>{{hello.message}}</h2> Inside, the template engine is very similar to handlebars. I will give a few examples for clarity (you shouldn’t think about them especially):
<Body:> {{if _page.login}} <h3> Hello, friend! </h3> {{/}} {{each _page.todos as #todo, #index}} <p>{{#todo.text}}</p> {{if #index % 5 === 0}} <!-- 0, 5, 10, 15 --> <b></b> {{/}} {{/}} Well, an example of binding to events:
<a href="#" on-click="{{removeTopic(topic[#index])}}">Ok</a> Here we ran a little forward, but I think this is justified. Next week, we will do a “to-do list” (TODO-list), where all this will be used and explained.
In the meantime, play around with the code, try adding something to the template, change the title (note the derby supports livereloading, that is, as soon as you change the html-file and record the change - the browser will refresh the page itself). Try connecting styles.
PS
If you want to read the standard derby documentation, keep in mind that it is written for version 0.5, some parts are irrelevant there.
What can be read there: controllers, models. What is not worth it: views, templates, components - everything has changed, you will only get confused.
Pps
In the comments, please write what you would like to hear about derby. What is most interesting? Maybe there are some questions? If there is - ask them to love, it is important to build a solid foundation.
update
The second example is http://habrahabr.ru/post/221703/
The third example is http://habrahabr.ru/post/222399/
If you like derbyjs, don’t take the trouble to put an asterisk on github
Source: https://habr.com/ru/post/221027/
All Articles