Use RestKit 0.22.x to view Marvel heroes.
Web services, in particular using the REST architecture, have already firmly entered our lives. When developing a client application for iOS, one way or another, it is often necessary to download data from the server and store / display it locally. At the same time, I want to do this easily and naturally, without resorting to the invention of my own “bicycles”.
The latest version of the well-known Objective-C RestKit framework for iOS and OSX greatly simplifies working with the RESTful API. Undoubtedly, one of its most valuable features is the ability to automatically save objects to a local database using CoreData . Let's make a journey from receiving data from the server to saving and displaying them on our iOS device. And so that we would not be bored, as an example, we will work with the API of the world famous company for the production of comics Marvel.
The article is a kind of tutorial. It is assumed that the reader is already familiar with the basic concepts of development in Objective-C, using the iOS SDK, Core Data, and such concepts as blocks.
')
First, let's register as a developer on the Marvel website.
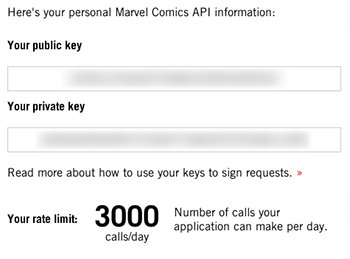
After trivial registration, go to the Account tab and copy our public and private keys.
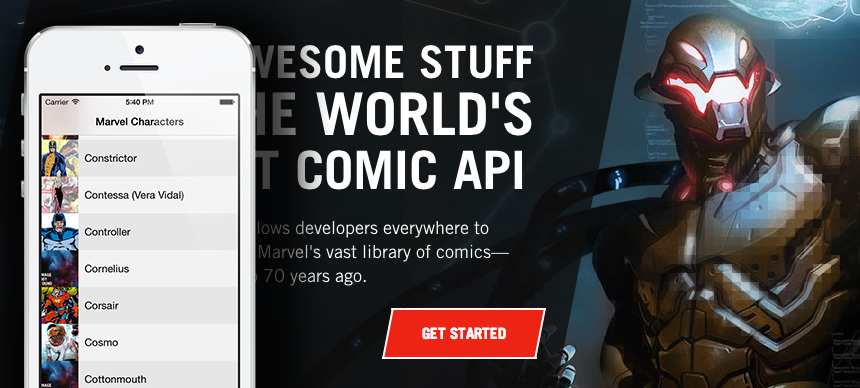
After that, go to the tab Interactive Documentation and see what data we kindly provide the creators of the API. We have the opportunity to work with a database of heroes, comics, creators, events and much more. For us, it’s enough to “touch” one thing, so the future application will simply load the list of characters, save it, and also display a description of the most popular ones.
Create a new project in Xcode. We’ll select the iPhone as the device and don’t forget to leave a tick next to the “use Core Data” field in the project creation wizard.
Now back to the portal and consider the structure of the
I specifically created two identifiers: the first, the
Notice that I also created two
In the following we will show how we will work with this.
Now, in order to work correctly with Core Data entities, it is also necessary to create an Objective-C class that will represent it. Create a
Here, in addition to the obvious correspondences, the property
Connect to our project RestKit (hereinafter - RK). How to do this is described in detail here (or here , if you are a CocoaPods lover).
The next step is to create a wrapper class
A little about the classes RK.
Do not forget to include the RK
Our wrapper class will have no properties, but will have two instance variables:
Let's take a look at what we need to set up so that everything works as it should.
To begin with
Now our requests will be sent. What about working with Core Data? Let's create a method that configures an object of type RKManagedObjectStore.
The last line is very important. It connects two of our main RK objects:
So, our further task is to create an interface for two main actions in our
The first task is implemented in the following method:
Here we are interested in several parameters of the
The second non-obvious value is the
Now it is clear that before reaching the actual list of heroes, RK will have to go through the dictionaries for several levels down to get to the desired structure. The value of
The second method of our class for working with an internal RK object is
Note that the code uses a method from a non-standard category above
Our class will still have a simple method
To begin with, we will create a basic
In the method of turning on / off the animation itself there will be the following code:
Now, when we call this method with a

Next, create a
In this view controller, we will display data from the database. To do this, we will use an instance of
As you can see, as a parameter
After we added the mapping, call the method
Consider in detail what he does:
First we get the total number of characters from the local database; this value will correspond to the number of cells in the main table. When you first start the application, it will naturally be zero. We will use the same value as the transmitted parameter offset when accessing the server. Thus, for each subsequent request, the Marvel server will return only new objects of heroes (by default, the characters return in batches of 20 pieces each).
Next, we produce the same main query using our
This method has two important parameters for us now: success: and failure :, which are blocks that describe the behavior of the successful and unsuccessful results of the query execution, respectively. So, if we successfully receive an array of characters, we generate
In the event of an error, we simply output it to the user and do not update the table.
The code uses the save to storage method:
You will also notice a reference to the
Earlier in
As you can see, in the body of the block passed as an action parameter: we put all the same method of loading new heroes
Well, run the application in the emulator and wait for the first successful response. If everything went right, and logger RK produced something like
To do this, go to the emulator folder, find our application and the Documents folder. There should be a base
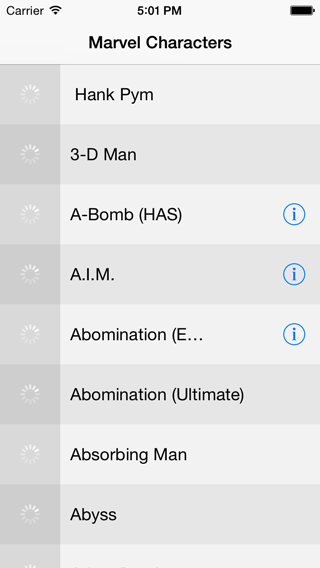
Hooray! Some heroes even have a short description. It's time to go to the display of all this "good."
I know that an impatient reader has long wanted to look at the images of their favorite characters. For this we need to customize the appearance of our table. We will not go into the technical details of creating and configuring objects of type
After creating the next cell, we retrieve the required hero from the base and display its name, we also check whether the expanded information about it is present, and put a button on the cell, by clicking on which we will display this information later. And most importantly - the image of the character. I created for this a special class
With an empty implementation of the
Let's implement the method of loading pictures of the hero. Since RK already includes the
That's all. Run our application again. Already a good result.

Now it will be hard to stop, and with your permission I use the convenient Pull-To-Refresh control to load more characters. At the same time we will check how our base now looks.

Now both pictures and information about the heroes (of course, only those that we managed to upload) will be stored locally, regardless of whether we have an Internet connection or not.
RestKit perfectly coped with the task: requests are sent, answers are received, objects are saved automatically. Not everyone can like the principle of loading and display provided in this article: it is possible that it would be wiser to immediately dump the entire database and work with it completely locally. The author believes that to familiarize with the basic features of RK, this functionality is quite enough. The source code of the entire project (along with the missing part in this article with information about a specific character) can be downloaded on GitHub . Your wishes and comments are welcome as comments on the article, as well as pull requests on GitHub.
Finally, I would like to please with another image - this time it is a screenshot of the second view controller, which opens by pressing the “info” button next to the name of the hero in the main view controller. I've been scrolling my spreadsheet for a long time to finally load it:

The latest version of the well-known Objective-C RestKit framework for iOS and OSX greatly simplifies working with the RESTful API. Undoubtedly, one of its most valuable features is the ability to automatically save objects to a local database using CoreData . Let's make a journey from receiving data from the server to saving and displaying them on our iOS device. And so that we would not be bored, as an example, we will work with the API of the world famous company for the production of comics Marvel.
The article is a kind of tutorial. It is assumed that the reader is already familiar with the basic concepts of development in Objective-C, using the iOS SDK, Core Data, and such concepts as blocks.
')
1. Get Marvel keys and formulate the task
First, let's register as a developer on the Marvel website.
After trivial registration, go to the Account tab and copy our public and private keys.
After that, go to the tab Interactive Documentation and see what data we kindly provide the creators of the API. We have the opportunity to work with a database of heroes, comics, creators, events and much more. For us, it’s enough to “touch” one thing, so the future application will simply load the list of characters, save it, and also display a description of the most popular ones.
2. Getting started
Create a new project in Xcode. We’ll select the iPhone as the device and don’t forget to leave a tick next to the “use Core Data” field in the project creation wizard.
Now back to the portal and consider the structure of the
Character object:Character object
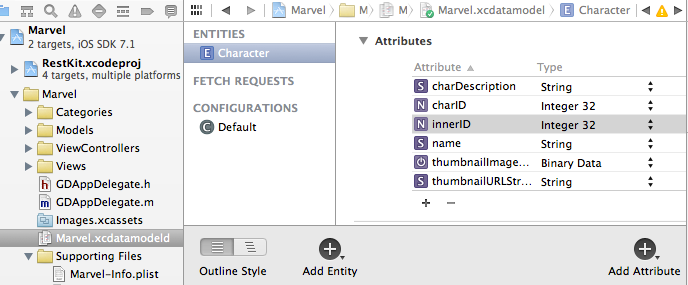
What of this we may need? Perhaps we confine ourselves to the identifier, name, picture and description. Let's move on to our * .xcdatamodeld file in XCode and create a Character { id (int, optional): The unique ID of the character resource., name (string, optional): The name of the character., description (string, optional): A short bio or description of the character., modified (Date, optional): The date the resource was most recently modified., resourceURI (string, optional): The canonical URL identifier for this resource., urls (Array[Url], optional): A set of public web site URLs for the resource., thumbnail (Image, optional): The representative image for this character., comics (ComicList, optional): A resource list containing comics which feature this character., stories (StoryList, optional): A resource list of stories in which this character appears., events (EventList, optional): A resource list of events in which this character appears., series (SeriesList, optional): A resource list of series in which this character appears. } Character entity that will logically correspond (albeit partially) to our remote object.I specifically created two identifiers: the first, the
charID , will serve to store the “native Marvel's” id for the future, the second, the innerID , will be needed for local use. The charDescription and name attributes correspond to the remote description and name parameters, respectively.Notice that I also created two
thumbnailImageData and thumbnailURLString attributes, although they do not match any parameters of the original structure. This is because in the JSON response, the thumbnail of the Image type and in reality corresponds to the dictionary. Here is an example of a thumbnail object from a real answer: "thumbnail": { "path": "http://i.annihil.us/u/prod/marvel/i/mg/8/c0/4ce5a0e31f109", "extension": "jpg" } In the following we will show how we will work with this.
Now, in order to work correctly with Core Data entities, it is also necessary to create an Objective-C class that will represent it. Create a
Character class that will inherit from NSManagedObject . Here is his announcement: @interface Character : NSManagedObject { NSDictionary *_thumbnailDictionary; } @property (nonatomic, retain) NSString *name; @property (nonatomic, retain) NSNumber *charID; @property (nonatomic, retain) NSNumber *innerID; @property (nonatomic, retain) NSString *charDescription; @property (nonatomic, retain) NSData *thumbnailImageData; @property (nonatomic, retain) NSString *thumbnailURLString; @property NSDictionary *thumbnailDictionary; // + (NSInteger)allCharsCountWithContext:(NSManagedObjectContext *)managedObjectContext; // innerID. + (Character *)charWithManagedObjectContext:(NSManagedObjectContext *)context andInnerID:(NSInteger)charInnerID; @end Here, in addition to the obvious correspondences, the property
thumbnailDictionary appeared, which I added for more convenient work with the object thumbnail, which I wrote about a little higher. I also added two auxiliary class methods to not create additional classes in the project.3. Model for working with RestKit
Connect to our project RestKit (hereinafter - RK). How to do this is described in detail here (or here , if you are a CocoaPods lover).
The next step is to create a wrapper class
GDMarvelRKObjectManager (inherited from NSObject ), which will work with RK, in particular with classes such as RKObjectManager and RKManagedObjectStore . This class can also not be created, however we will go for it to slightly unload the code in our future main view controller.A little about the classes RK.
RKManagedObjectStore encapsulates all work with Core Data, so that in the future there will be no need to work with NSManagedObjectContext or NSManagedObjectModel directly. RKObjectManager provides a centralized interface for sending requests and receiving responses using object mapping (matching). For example, the necessary values received in the JSON response will be automatically assigned to all properties of our object when the mapping is successful. Isn't that what we wanted at the beginning of the article?Do not forget to include the RK
#import <RestKit/RestKit.h> in your * .h file.Our wrapper class will have no properties, but will have two instance variables:
@implementation GDMarvelRKObjectManager { RKObjectManager *objectManager; RKManagedObjectStore *managedObjectStore; } Let's take a look at what we need to set up so that everything works as it should.
To begin with
- (id)init add the initialization of the necessary RK objects to the - (id)init method: // AFNetworking HTTPClient NSURL *baseURL = [NSURL URLWithString:@"http://gateway.marvel.com/"]; AFHTTPClient *client = [[AFHTTPClient alloc] initWithBaseURL:baseURL]; // RKObjectManager objectManager = [[RKObjectManager alloc] initWithHTTPClient:client]; Now our requests will be sent. What about working with Core Data? Let's create a method that configures an object of type RKManagedObjectStore.
- (void)configureWithManagedObjectModel:(NSManagedObjectModel *)managedObjectModel { if (!managedObjectModel) return; managedObjectStore = [[RKManagedObjectStore alloc] initWithManagedObjectModel:managedObjectModel]; NSError *error; if (!RKEnsureDirectoryExistsAtPath(RKApplicationDataDirectory(), &error)) RKLogError(@"Failed to create Application Data Directory at path '%@': %@", RKApplicationDataDirectory(), error); NSString *path = [RKApplicationDataDirectory() stringByAppendingPathComponent:@"RKMarvel.sqlite"]; if (![managedObjectStore addSQLitePersistentStoreAtPath:path fromSeedDatabaseAtPath:nil withConfiguration:nil options:nil error:&error]) RKLogError(@"Failed adding persistent store at path '%@': %@", path, error); [managedObjectStore createManagedObjectContexts]; objectManager.managedObjectStore = managedObjectStore; } The last line is very important. It connects two of our main RK objects:
objectManager and managedObjectStore .So, our further task is to create an interface for two main actions in our
GDMarvelRKObjectManager class: adding a mapping (correspondence) between the Core Data entity and a remote object, as well as receiving these objects from a remote server.The first task is implemented in the following method:
- (void)addMappingForEntityForName:(NSString *)entityName andAttributeMappingsFromDictionary:(NSDictionary *)attributeMappings andIdentificationAttributes:(NSArray *)ids andPathPattern:(NSString *)pathPattern { if (!managedObjectStore) return; RKEntityMapping *objectMapping = [RKEntityMapping mappingForEntityForName:entityName inManagedObjectStore:managedObjectStore]; // , . [objectMapping addAttributeMappingsFromDictionary:attributeMappings]; // , . , . objectMapping.identificationAttributes = ids; // , . RKResponseDescriptor *characterResponseDescriptor = [RKResponseDescriptor responseDescriptorWithMapping:objectMapping method:RKRequestMethodGET pathPattern:[NSString stringWithFormat:@"%@%@", MARVEL_API_PATH_PATTERN, pathPattern] keyPath:@"data.results" statusCodes:[NSIndexSet indexSetWithIndex:200]]; [objectManager addResponseDescriptor:characterResponseDescriptor]; } Here we are interested in several parameters of the
responseDescriptorWithMapping:... method responseDescriptorWithMapping:... First, the pathPattern parameter. It is obtained by concatenating the MARVEL_API_PATH_PATTERN macro (with the value of @"v1/public/" ) and the input parameter pathPattern , which in our example will be equal to @"characters" . If we want to get not a list of characters, but, say, a list of comics, then we will transmit the string @”comics” , which is already in the body of the method again connected with @"v1/public/" .The second non-obvious value is the
@"data.results" parameter for the keyPath parameter. Where did it come from? It's very simple: Marvel wraps all its answers in the same type of wrapper, and everything will fall into place when we look at its structure:Characters wrapper
{ "code": "int", "status": "string", "copyright": "string", "attributionText": "string", "attributionHTML": "string", "data": { "offset": "int", "limit": "int", "total": "int", "count": "int", "results": [ { "id": "int", "name": "string", "description": "string", "modified": "Date", "resourceURI": "string", "urls": [ { "type": "string", "url": "string" } ], "thumbnail": { "path": "string", "extension": "string" }, "comics": { "available": "int", "returned": "int", "collectionURI": "string", "items": [ { "resourceURI": "string", "name": "string" } ] }, "stories": { "available": "int", "returned": "int", "collectionURI": "string", "items": [ { "resourceURI": "string", "name": "string", "type": "string" } ] }, "events": { "available": "int", "returned": "int", "collectionURI": "string", "items": [ { "resourceURI": "string", "name": "string" } ] }, "series": { "available": "int", "returned": "int", "collectionURI": "string", "items": [ { "resourceURI": "string", "name": "string" } ] } } ] }, "etag": "string" } Now it is clear that before reaching the actual list of heroes, RK will have to go through the dictionaries for several levels down to get to the desired structure. The value of
@"data.results" just indicates the path that you need to "go down".The second method of our class for working with an internal RK object is
getMarvelObjectsAtPath , which essentially proxies a call to an getObjectsAtPath object of type RKObjectManager . The name of the method is “speaking” - you are waiting for it to load remote objects. Since Marvel requires that hash, timestamp and public key be sent to each request, it is convenient to encapsulate the generation of these parameters in our getMarvelObjectsAtPath . Here he is: - (void)getMarvelObjectsAtPath:(NSString *)path parameters:(NSDictionary *)params success:(void (^)(RKObjectRequestOperation *operation, RKMappingResult *mappingResult))success failure:(void (^)(RKObjectRequestOperation *operation, NSError *error))failure { // NSDateFormatter *formatter = [[NSDateFormatter alloc] init]; [formatter setDateFormat:@"yyyyMMddHHmmss"]; NSString *timeStampString = [formatter stringFromDate:[NSDate date]]; NSString *hash = [[[NSString stringWithFormat:@"%@%@%@", timeStampString, MARVEL_PRIVATE_KEY, MARVEL_PUBLIC_KEY] MD5String] lowercaseString]; NSMutableDictionary *queryParams = [NSMutableDictionary dictionaryWithDictionary:@{@"apikey" : MARVEL_PUBLIC_KEY, @"ts" : timeStampString, @"hash" : hash}]; if (params) [queryParams addEntriesFromDictionary:params]; // objectManager [objectManager getObjectsAtPath:[NSString stringWithFormat:@"%@%@", MARVEL_API_PATH_PATTERN, path] parameters:queryParams success:success failure:failure]; } Note that the code uses a method from a non-standard category above
NSString - MD5String . How to generate MD5-troku from the line, look on the Internet .Our class will still have a simple method
- (NSManagedObjectContext *)managedObjectContext , which will return the main context of the managedObjectStore . This class will also be a singleton with the + (GDMarvelRKObjectManager *)manager method + (GDMarvelRKObjectManager *)manager for accessing the instance.4. Main ViewController
To begin with, we will create a basic
GDBaseViewController controller, in which we simply embed support for the animation of waiting for a response from the server with the only new method - (void)animateActivityIndicator:(BOOL)animate . In the viewDidLoad method, viewDidLoad will create this indicator of the UIActivityIndicatorView type, assign the obtained value to the instance variable UIActivityIndicatorView *activityIndicator and add it to self.view .In the method of turning on / off the animation itself there will be the following code:
animateActivityIndicator: code
- (void)animateActivityIndicator:(BOOL)animate { activityIndicator.hidden = !animate; if (animate) { [self.view bringSubviewToFront:activityIndicator]; [activityIndicator startAnimating]; } else [activityIndicator stopAnimating]; } Now, when we call this method with a
YES value for a single parameter, our controller view will look like this:Next, create a
GDMainViewController controller GDMainViewController inherited from this class. Here is his announcement: @interface GDMainViewController : GDBaseViewController <UITableViewDataSource, UITableViewDelegate, UIAlertViewDelegate> { UITableView *table; NSInteger numberOfCharacters; AllAroundPullView *bottomPullView; BOOL noRequestsMade; } @end In this view controller, we will display data from the database. To do this, we will use an instance of
UITableView , in which a picture and the name of each of the characters are displayed in each cell. But they must also be downloaded, since the local database is initially empty. After the entire initialization process inherent in instantiating the UITableView in the method - (void)viewDidLoad , we first assign our CoreData model to RKManagedObjectStore using our wrapper class GDMarvelRKObjectManager : NSURL *modelURL = [[NSBundle mainBundle] URLForResource:@"Marvel" withExtension:@"momd"]; [[GDMarvelRKObjectManager manager] configureWithManagedObjectModel:[[NSManagedObjectModel alloc] initWithContentsOfURL:modelURL]]; // Character: [[GDMarvelRKObjectManager manager] addMappingForEntityForName:@"Character" andAttributeMappingsFromDictionary:@{ @"name" : @"name", @"id" : @"charID", @"thumbnail" : @"thumbnailDictionary", @"description" : @"charDescription" } andIdentificationAttributes:@[@"charID"] andPathPattern:MARVEL_API_CHARACTERS_PATH_PATTERN]; As you can see, as a parameter
andAttributeMappingsFromDictionary: the dictionary is transferred, consisting of the correspondences between the names of the JSON-keys of the remote object and the properties of the class we created. As the parameter andPathPattern: the string @"characters" is passed (macro MARVEL_API_CHARACTERS_PATH_PATTERN ) - the name of the remote JSON object.After we added the mapping, call the method
[self loadCharacters] .Consider in detail what he does:
- (void)loadCharacters { numberOfCharacters = [Character allCharsCountWithContext:[[GDMarvelRKObjectManager manager] managedObjectContext]]; if (noRequestsMade && numberOfCharacters > 0) { noRequestsMade = NO; return; } [self animateActivityIndicator:YES]; noRequestsMade = NO; [[GDMarvelRKObjectManager manager] getMarvelObjectsAtPath:MARVEL_API_CHARACTERS_PATH_PATTERN parameters:@{@"offset" : @(numberOfCharacters)} success:^(RKObjectRequestOperation *operation, RKMappingResult *mappingResult) { [self animateActivityIndicator:NO]; NSInteger newInnerID = numberOfCharacters; for (Character *curCharacter in mappingResult.array) { if ([curCharacter isKindOfClass:[Character class]]) { curCharacter.innerID = @(newInnerID); newInnerID++; // ( ), , [self saveToStore]; } } numberOfCharacters = newInnerID; [table reloadData]; bottomPullView.hidden = NO; [bottomPullView finishedLoading]; } failure:^(RKObjectRequestOperation *operation, NSError *error) { [bottomPullView finishedLoading]; [[[UIAlertView alloc] initWithTitle:@"Marvel API Error" message:operation.error.localizedDescription delegate:self cancelButtonTitle:@"Cancel" otherButtonTitles:@"Retry", nil] show]; }]; } First we get the total number of characters from the local database; this value will correspond to the number of cells in the main table. When you first start the application, it will naturally be zero. We will use the same value as the transmitted parameter offset when accessing the server. Thus, for each subsequent request, the Marvel server will return only new objects of heroes (by default, the characters return in batches of 20 pieces each).
Next, we produce the same main query using our
getMarvelObjectsAtPath wrapper getMarvelObjectsAtPath :This method has two important parameters for us now: success: and failure :, which are blocks that describe the behavior of the successful and unsuccessful results of the query execution, respectively. So, if we successfully receive an array of characters, we generate
innerID for each of them, save them to a local database and change the value of the total number of heroes. Then update the display of our table. The main magic here is that at this stage, the resulting objects were automatically saved in our CoreData storage — RK did it for us. (It should be noted that this applies only to those fields / properties of the object for which the mapping matches are set. Thus, in the code above, the change of the innerID parameter innerID be saved separately by calling [self saveToStore] ).In the event of an error, we simply output it to the user and do not update the table.
The code uses the save to storage method:
- (void)saveToStore { NSError *saveError; if (![[[GDMarvelRKObjectManager manager] managedObjectContext] saveToPersistentStore:&saveError]) XLog(@"%@", [saveError localizedDescription]); } You will also notice a reference to the
bottomPullView instance bottomPullView . This variable stores an object of type AllAroundPullView ( pulled from GitHub ) —a useful control that helps implement Pull-To-Resfresh behavior from all sides of your UIScrollView . We will load each successive portion of our characters, reaching the bottom edge of the table and pulling it up.Earlier in
- (void)viewDidLoad this control was initialized and used as follows: bottomPullView = [[AllAroundPullView alloc] initWithScrollView:table position:AllAroundPullViewPositionBottom action:^(AllAroundPullView *view){ [self loadCharacters]; }]; bottomPullView.hidden = YES; [table addSubview:bottomPullView]; As you can see, in the body of the block passed as an action parameter: we put all the same method of loading new heroes
loadCharacters .Well, run the application in the emulator and wait for the first successful response. If everything went right, and logger RK produced something like
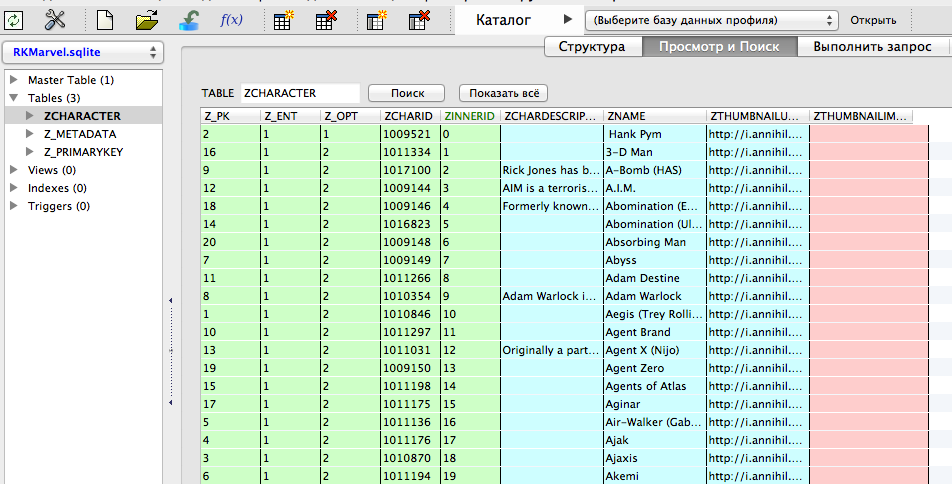
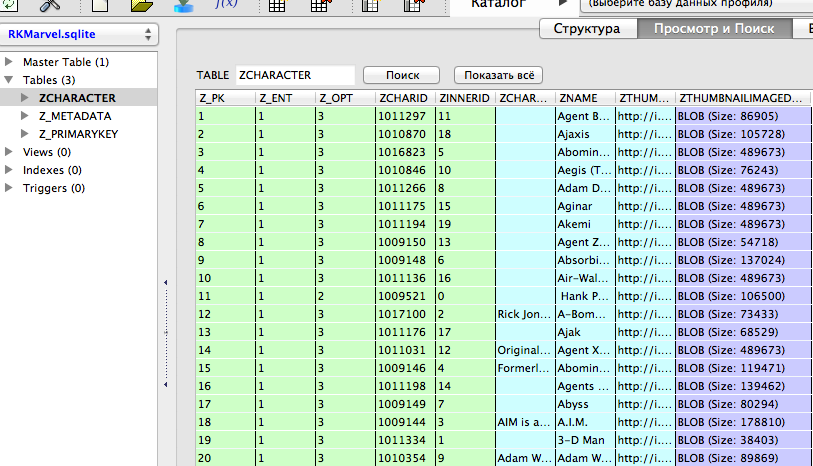
I restkit.network:RKObjectRequestOperation.m:220 GET 'http://your-url.here' (200 OK / 20 objects) , then everything is fine and you can check Whether our objects are preserved in the database.To do this, go to the emulator folder, find our application and the Documents folder. There should be a base
RKMarvel.sqlite (this is the name we specified as a parameter when calling the addSQLitePersistentStoreAtPath: method addSQLitePersistentStoreAtPath: earlier). Let's open this database in SQLite-editor and make sure that our characters are saved:Hooray! Some heroes even have a short description. It's time to go to the display of all this "good."
5. Saving pictures and display.
I know that an impatient reader has long wanted to look at the images of their favorite characters. For this we need to customize the appearance of our table. We will not go into the technical details of creating and configuring objects of type
UITableView (the author assumes that this is already known to the reader), but go straight to the table delegate method that creates the cells:tableView: cellForRowAtIndexPath: code
- (UITableViewCell *)tableView:(UITableView *)tableView cellForRowAtIndexPath:(NSIndexPath *)indexPath { NSInteger row = indexPath.row; NSString *reusableIdentifier = [NSString stringWithFormat:@"%d", row % 2]; UITableViewCell *cell = [table dequeueReusableCellWithIdentifier:reusableIdentifier]; if (!cell) { cell = [[UITableViewCell alloc] initWithStyle:UITableViewCellStyleDefault reuseIdentifier:reusableIdentifier]; cell.autoresizingMask = UIViewAutoresizingFlexibleWidth; } [[cell.contentView subviews] makeObjectsPerformSelector:@selector(removeFromSuperview)]; if (numberOfCharacters > row) { Character *curCharacter = [Character charWithManagedObjectContext: [[GDMarvelRKObjectManager manager] managedObjectContext] andInnerID:row]; if (curCharacter) { BOOL charHasDescription = ![curCharacter.charDescription isEqualToString:@""]; UILabel *label = [[UILabel alloc] initWithFrame:CGRectMake(70, 0, CGRectGetWidth(cell.contentView.frame) - 70 - (charHasDescription ? 60 : 0), 60)]; label.backgroundColor = [UIColor clearColor]; label.text = curCharacter.name; label.autoresizingMask = UIViewAutoresizingFlexibleWidth; [cell.contentView addSubview:label]; GDCellThumbnailView *thumbnail = [GDCellThumbnailView thumbnail]; if (curCharacter.thumbnailImageData) [thumbnail setImage:[UIImage imageWithData:curCharacter.thumbnailImageData]]; else [self loadThumbnail:thumbnail fromURLString:curCharacter.thumbnailURLString forCharacter:curCharacter]; [cell.contentView addSubview:thumbnail]; cell.accessoryType = charHasDescription ? UITableViewCellAccessoryDetailButton : UITableViewCellSelectionStyleNone; cell.selectionStyle = charHasDescription ? UITableViewCellSelectionStyleGray : UITableViewCellSelectionStyleNone; } } return cell; } After creating the next cell, we retrieve the required hero from the base and display its name, we also check whether the expanded information about it is present, and put a button on the cell, by clicking on which we will display this information later. And most importantly - the image of the character. I created for this a special class
GDCellThumbnailView , instances of which I put on the cell. He does not do anything special, he just has the opportunity to show us the “spinning flower” of waiting until the thumbnail is loaded.With an empty implementation of the
loadThumbnail:fromURLString:forCharacter: our main view controller will now look like this:Let's implement the method of loading pictures of the hero. Since RK already includes the
AFNetworking framework, we will use it to send an asynchronous request to the Marvel servers to download images: - (void)loadThumbnail:(GDCellThumbnailView *)view fromURLString:(NSString *)urlString forCharacter:(Character *)character { XLog(@"Loading thumbnail for %@", character.name); AFHTTPRequestOperation *operation = [[AFHTTPRequestOperation alloc] initWithRequest:[NSURLRequest requestWithURL:[NSURL URLWithString:urlString]]]; [operation setCompletionBlockWithSuccess:^(AFHTTPRequestOperation *operation, id responseObject) { character.thumbnailImageData = responseObject; [self saveToStore]; [view setImage:[UIImage imageWithData:responseObject]]; } failure:^(AFHTTPRequestOperation *operation, NSError *error) { XLog(@"%@", [error localizedDescription]); }]; [operation start]; } That's all. Run our application again. Already a good result.
Now it will be hard to stop, and with your permission I use the convenient Pull-To-Refresh control to load more characters. At the same time we will check how our base now looks.
Now both pictures and information about the heroes (of course, only those that we managed to upload) will be stored locally, regardless of whether we have an Internet connection or not.
6. Conclusion.
RestKit perfectly coped with the task: requests are sent, answers are received, objects are saved automatically. Not everyone can like the principle of loading and display provided in this article: it is possible that it would be wiser to immediately dump the entire database and work with it completely locally. The author believes that to familiarize with the basic features of RK, this functionality is quite enough. The source code of the entire project (along with the missing part in this article with information about a specific character) can be downloaded on GitHub . Your wishes and comments are welcome as comments on the article, as well as pull requests on GitHub.
Finally, I would like to please with another image - this time it is a screenshot of the second view controller, which opens by pressing the “info” button next to the name of the hero in the main view controller. I've been scrolling my spreadsheet for a long time to finally load it:
Source: https://habr.com/ru/post/220885/
All Articles