Homemade ring LED illuminator for video, photo and macro shooting
The idea of creating such a device in my head wandered for a long time, but macro, without much effort, I was able to shoot with flashes, but for a photo the ring source was not really needed, plus laziness, which doesn’t allow to do everything in advance, so work on it constantly they were postponed, and when a certain amount of money appeared, they turned into search for shopping or Ibei for sane money, but those that I needed were either worth exorbitant money, or the first and needed some work.
Everything happened unexpectedly, before the New Year, my familiar actress and singer, asked to shoot her competitive performance in one of the clubs and make a video. My simple and compact source of video light, with 160 small diodes, which was and is present in almost all video operators, clearly does not work in the club due to the powerful color backlighting, or in other words you can shoot something with a couple of meters, but from 10-15 it is possible and not to remove. It was necessary to urgently draw up technical requirements for the characteristics of the device and on the Internet to review the many illuminators possessing them.
On DX, I found a fairly compact, lightweight illuminator with a lithium battery, asked the seller to send an exact description of the instructions, because the Chinese could have anything written on the websites, in general, it turned out that the description contained other dimensions of the internal opening, and meant that with my working lens this light would not work. There was a week left before the shooting, and I had to either refuse or do something ... I chose the latter, and as it turned out it was right, it turned out to be a convenient illuminator for all occasions!
Below in the photo, what happened.
')
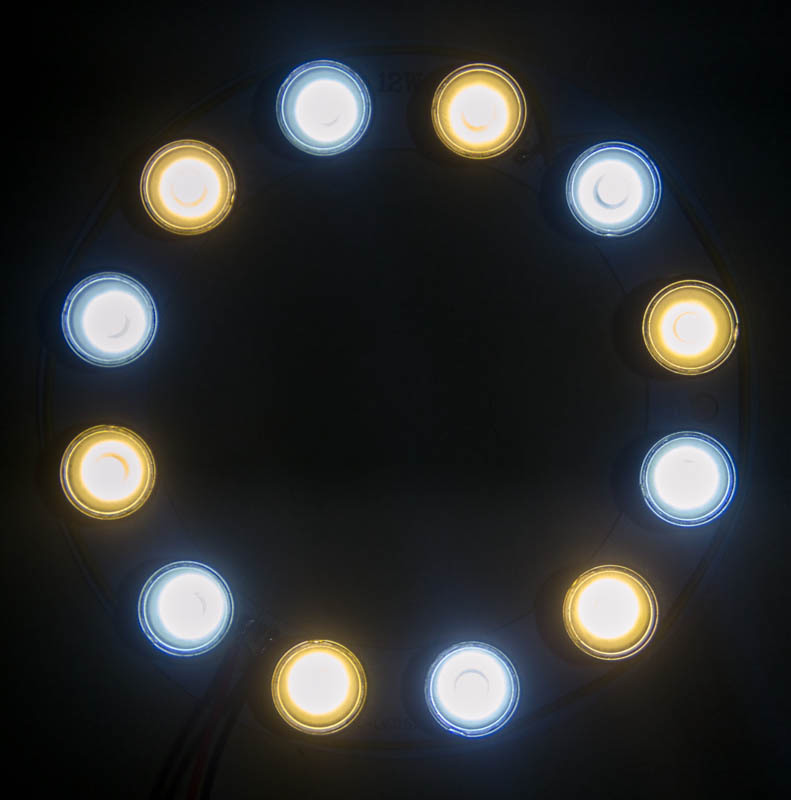
With LED technology, I have quite a lot of experience, so after digging among the existing I picked up a pair of rings for LEDs, I did not find rings for 18 diodes, and there was no time to order, those that were, went to rework the round ceiling lights from incandescent bulbs to LEDs, so I had to be content with the remaining rings for 12 diodes.

I tried to put on them 5 watts. diodes from Bridgelux, there was a lot of light, but heat was not small, heat was solved, but I did not have light controllers with PWM, I order them from a Russian seller with a hammer from China ( http://molotok.ru/ my_page.php? uid = 14496341 ), selling various lights for the house, diodes and other things, I can not say that prices are very good, certainly cheaper than in Moscow, but most importantly, a person understands that he sells and can find something rare under the order. In general, we had to abandon the 60W source and put 3W diodes, for a total of 36W, the luminous flux of about 2600Lm under the lenses is lost to 15%.
The camera sees them somehow like this, since it sets the average color temperature from the total flow.
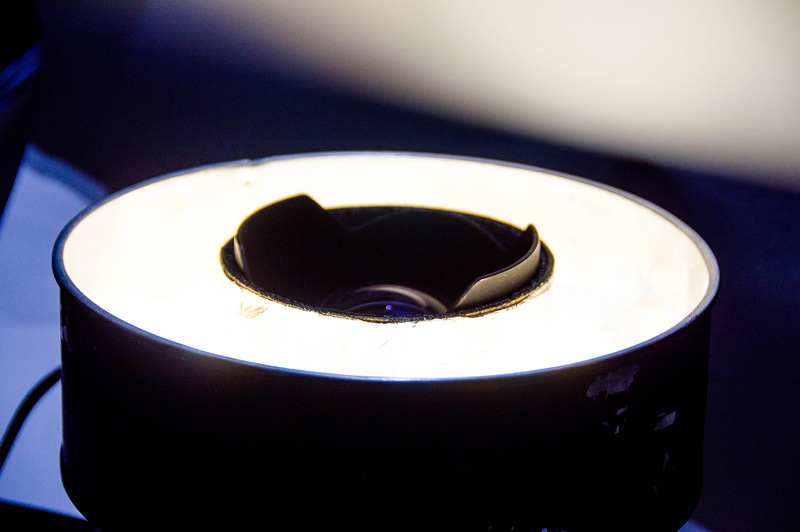
The second problem was to pick up the body in which this ring could get up and the main thing this body was to become a radiator for the whole lighting device, mounted on the lens hood and, as a result, to have a low weight and not heat the lens.
For these purposes, the aluminum baking sheet was best suited, in which a hole for the hood was cut from behind, the mount on the hood was made of technical black foam rubber and honeycomb polycarbonate rolled into a tube in diameter.
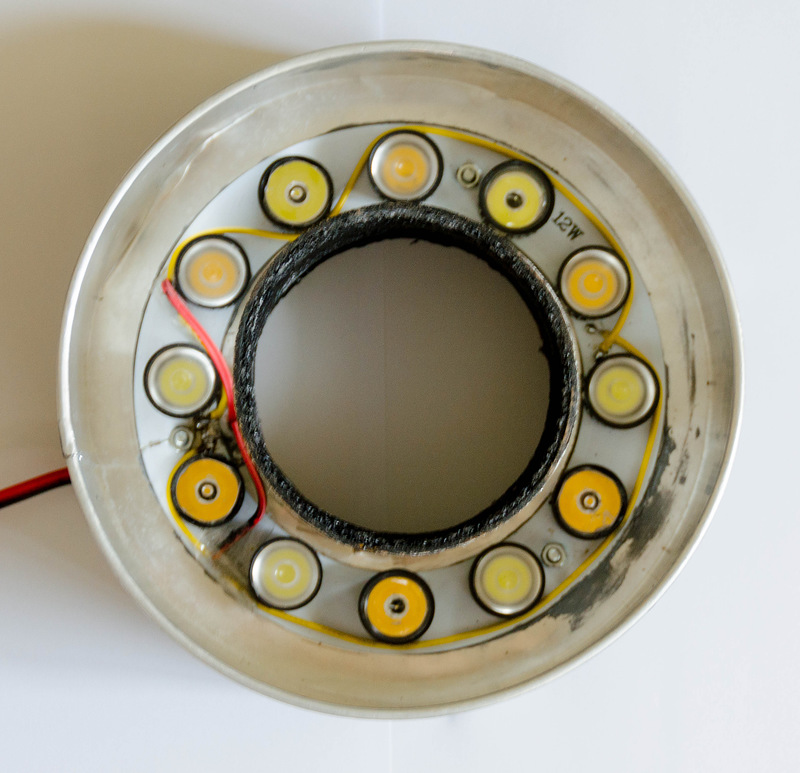
The case itself is used as a radiator, so the ring with diodes was fixed on 3 bolts, thermal paste was used for better thermal contact, some of it is visible in the photo, and since the walls are about 1 mm thick, there is another ring at the back that matches the size of on which there are diodes made of aluminum with a thickness of 3 mm, these two rings clamp the construction case between them, for greater rigidity.
From above, the outer part of the structure, wrapped in food, is wrapped in food foil for better reflection of light, and in order to protect the lens edges from glare or from light penetration from the source, the source itself is attached to the holder with 24 screws 1.8 mm in diameter and 10 mm long , the edge of the polycarbonate where they are screwed is poured with BOSH hot melt.

The issue with the power supply was resolved as follows, the usual battery from a 12V motorcycle and a capacity of 5.5Ah was chosen as the energy accumulator. Since 2 parallel lines of 6 diodes require about 24V and a current of 1.5A, we had to install a step-up DC / DC converter with a high conversion coefficient operating at 300 kHz, in general, we managed to save about 93% of the energy.

The scheme is taken from the site - http://radiokot.ru , all of its beauty, in that half of the components are in the old computer power supply units, the other on the motherboards, in the power supplies of the processors, they also by the way contain ferrites operating at 300kHz.
Later between the output and the diodes, a radio-controlled (433MHz) PWM power regulator was installed with 3 preset values of 25%, 50%, 100% and having a smooth adjustment.
To charge it, I use both the standard charger from the outlet, and the ability to connect it in parallel to the same main motorcycle.
After more than six months of operation, the video shoots perfectly, small things for online stores with virtually no shadows, which simplifies the clipping, took with him on trips to the caves, the lenses changed to 5-8 degrees.
Below are a few photos taken for the online store.


A few photos taken in the caves, a matte diffuser was taken, lenses with scattering angles of 5-15 degrees were used.

In the next photo, the illuminator is removed from the camera, and for a long time exposing the hands (light), different parts of the frame are drawn:
This is what this construction looks like on the camera. As far as I remember, it was 1/4 of the capacity.
In the photo below, light mixed with natural light passing through a hole in the arch of the cave.

Everything happened unexpectedly, before the New Year, my familiar actress and singer, asked to shoot her competitive performance in one of the clubs and make a video. My simple and compact source of video light, with 160 small diodes, which was and is present in almost all video operators, clearly does not work in the club due to the powerful color backlighting, or in other words you can shoot something with a couple of meters, but from 10-15 it is possible and not to remove. It was necessary to urgently draw up technical requirements for the characteristics of the device and on the Internet to review the many illuminators possessing them.
On DX, I found a fairly compact, lightweight illuminator with a lithium battery, asked the seller to send an exact description of the instructions, because the Chinese could have anything written on the websites, in general, it turned out that the description contained other dimensions of the internal opening, and meant that with my working lens this light would not work. There was a week left before the shooting, and I had to either refuse or do something ... I chose the latter, and as it turned out it was right, it turned out to be a convenient illuminator for all occasions!
Below in the photo, what happened.
')
Below are the technical characteristics that were critical for me when choosing:
- Light flux - not less than 1500Lm
- The angle of scattering is at least 15 - 20 degrees. This angle at a distance of 7-10 meters allows you to fully highlight the subject; the task to highlight the rest of the scene is not mine. In the future, it was possible to quickly, in about 5 minutes, change this value to any from 5 to 120, due to a change of lenses, and more than 120 does not allow the resulting body.
- The color temperature was planned to be smooth, from 2700K to 6500K, but the CRI parameter, no matter how high it was for the eye, does not matter much for the camera, it is bad — everything, and 2700K, and 4200K, and 5500K, and 6500K. He shot the same Kodak test scale for calibrating the scanner and compared it with its picture taken in the sun. The best result turned out to be a set of diodes with a different phosphor, as a result, according to the camera, the color temperature of the source turned out to be 4000K. Although, if you do not carp can be removed with one type of phosphor.
- The ability to smoothly adjust the light flux
- The temperature is not color - it should be humane, not only for the diodes, but also for the hands, if you keep the illuminator, which means less than 55-60 degrees.
- Hours without recharging for at least 1.5 hours
- The weight and size, battery and current source should be placed in the “Nord Face” belt bag and not lifted. In total, it turned out 2kg with a little, but there are plans to replace it with lithium and throw off another 1.5 kg.
With LED technology, I have quite a lot of experience, so after digging among the existing I picked up a pair of rings for LEDs, I did not find rings for 18 diodes, and there was no time to order, those that were, went to rework the round ceiling lights from incandescent bulbs to LEDs, so I had to be content with the remaining rings for 12 diodes.
I tried to put on them 5 watts. diodes from Bridgelux, there was a lot of light, but heat was not small, heat was solved, but I did not have light controllers with PWM, I order them from a Russian seller with a hammer from China ( http://molotok.ru/ my_page.php? uid = 14496341 ), selling various lights for the house, diodes and other things, I can not say that prices are very good, certainly cheaper than in Moscow, but most importantly, a person understands that he sells and can find something rare under the order. In general, we had to abandon the 60W source and put 3W diodes, for a total of 36W, the luminous flux of about 2600Lm under the lenses is lost to 15%.
The camera sees them somehow like this, since it sets the average color temperature from the total flow.
The second problem was to pick up the body in which this ring could get up and the main thing this body was to become a radiator for the whole lighting device, mounted on the lens hood and, as a result, to have a low weight and not heat the lens.
For these purposes, the aluminum baking sheet was best suited, in which a hole for the hood was cut from behind, the mount on the hood was made of technical black foam rubber and honeycomb polycarbonate rolled into a tube in diameter.
The case itself is used as a radiator, so the ring with diodes was fixed on 3 bolts, thermal paste was used for better thermal contact, some of it is visible in the photo, and since the walls are about 1 mm thick, there is another ring at the back that matches the size of on which there are diodes made of aluminum with a thickness of 3 mm, these two rings clamp the construction case between them, for greater rigidity.
From above, the outer part of the structure, wrapped in food, is wrapped in food foil for better reflection of light, and in order to protect the lens edges from glare or from light penetration from the source, the source itself is attached to the holder with 24 screws 1.8 mm in diameter and 10 mm long , the edge of the polycarbonate where they are screwed is poured with BOSH hot melt.
The issue with the power supply was resolved as follows, the usual battery from a 12V motorcycle and a capacity of 5.5Ah was chosen as the energy accumulator. Since 2 parallel lines of 6 diodes require about 24V and a current of 1.5A, we had to install a step-up DC / DC converter with a high conversion coefficient operating at 300 kHz, in general, we managed to save about 93% of the energy.
The scheme is taken from the site - http://radiokot.ru , all of its beauty, in that half of the components are in the old computer power supply units, the other on the motherboards, in the power supplies of the processors, they also by the way contain ferrites operating at 300kHz.
Later between the output and the diodes, a radio-controlled (433MHz) PWM power regulator was installed with 3 preset values of 25%, 50%, 100% and having a smooth adjustment.
To charge it, I use both the standard charger from the outlet, and the ability to connect it in parallel to the same main motorcycle.
In custody
After more than six months of operation, the video shoots perfectly, small things for online stores with virtually no shadows, which simplifies the clipping, took with him on trips to the caves, the lenses changed to 5-8 degrees.
Below are a few photos taken for the online store.
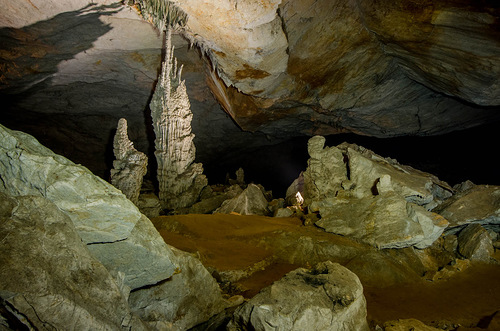
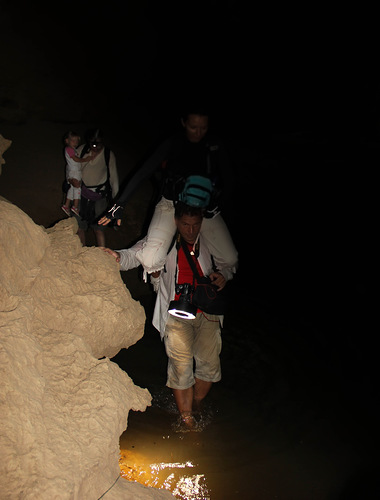
A few photos taken in the caves, a matte diffuser was taken, lenses with scattering angles of 5-15 degrees were used.
In the next photo, the illuminator is removed from the camera, and for a long time exposing the hands (light), different parts of the frame are drawn:
This is what this construction looks like on the camera. As far as I remember, it was 1/4 of the capacity.
In the photo below, light mixed with natural light passing through a hole in the arch of the cave.
Issue price
- Ring PCB on 12 high power LEDs - US $ 6.20
- 12 high power LEDs - US $ 12.00
- Lenses and holders for 12 LEDs - US $ 4.80
- Baking Casserole Pan - US $ 2.70
- Black Acrylic Paint - US $ 1.50
- Battery - (Was)
- Boost DC / DC Converter - US $ 18.50
- Radio Control Dimmer with PWM - US $ 9.20
- Total: - US $ 54.90 or in rubles - 1970 rubles.
Source: https://habr.com/ru/post/220873/
All Articles